This is another article in an ongoing series to make my new 2006 Yamaha FJR 1300 the “Ultimate Sport Tourer”.
Having been spoiled by my ’99 BMW K1200LT with such luxuries as heated grips, heated seats, six-disc CD changer and fully electronic cruise control, I decided I was going to need one or two of these amenities on the new ride.
In this review I’ll go over my solution to equip the bike with some sort of “cruise control”.
The need for a speed control device is both for convenience and comfort.
That’s because my hands, especially the right one, have been abused for over 30 years in the automotive trade and they get sore and stiff holding the throttle steady for extended periods.
In truth, I wasn’t sure how often I would actually have the opportunity to take this bike on any extended trips. Those are usually done two-up on the LT.
I did though have an up coming solo trip planned to Vermont to my brother’s.
Although my route was planned for mostly back roads, I wanted some way to rest the right hand for any portions of super-slab that might occur and I wanted it installed in time for this trip.
After some research, it looked like the choices were either a system that holds the throttle lever at a fixed position via a clamp or friction device, thus maintaining an approximate road speed, or installing an aftermarket electronic system.
Whereas the first is not a “true” cruise control, it at least provides the ability to release the throttle and relax the right hand during those times on the super-slab, yet still maintain a steady speed.
I also wanted this to be a simple but effective system without trashing up the looks or the handlebars with extra levers, switches, etc.
Unlike some others, I don’t need, or like, to have an array of accessory controls and devices perched all over my handlebars.
Nor did I want to clutter up the throttle linkage at the engine or the rest of the bike with cables, servo, actuators, vacuum reservoirs, etc.
Therefore, I chose to go with one of the friction device cruise control systems. But which one? There are several on the market, but I decided to use the system by Throttlemeister.
The Throttlemeister Cruise Control
Throttlemeister has been a well known accessory for many years for riders looking for a basic cruise control device.
The Throttlemeister is made right here in the U.S.A. by Marker Machine Inc. of Milwaukee, Wisconsin, a small machining company established in 1998 with around 9-10 employees.
I was familiar with the Throttlemeister because a used 1999 BMW R1100RT that I had purchased had one installed on it.
Once I figured out how to operate it, I found it to be an asset for the post purchase ride home to Maryland from Grand Rapids, Michigan.
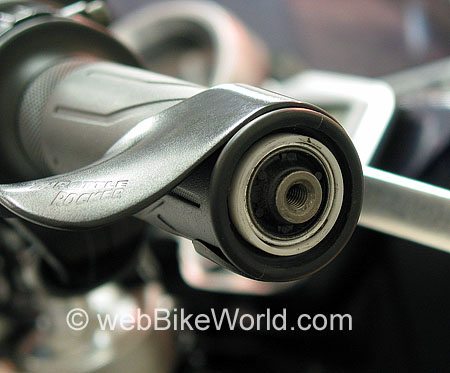
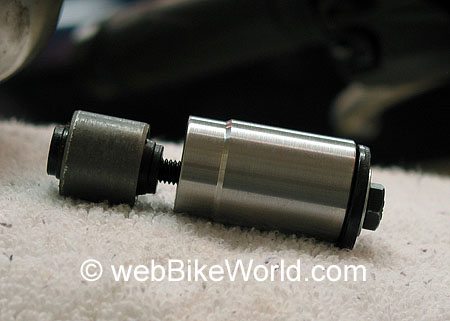
It’s a simple system consisting of a bar end weight device that rotates, and as it does, it exerts pressure on a friction collar fitted onto the throttle tube.
The friction is enough to hold the throttle in whatever position it’s currently set, yet light enough that the throttle can still be twisted by hand as needed.
With that said, it must be made clear that incorrect or inappropriate use of ANY speed control system can cause serious injury or worse. You, and only you, are responsible for its operation!
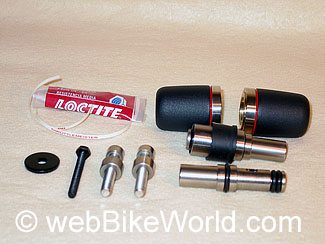
The Throttlemeister components are beautifully made out of machined billet stainless steel and Ampco Bronze, eliminating the development of rust and corrosion.
The internal parts are sealed by “O” rings that keep out dirt and water.
They are also maintenance free and require no lubrication (Cool, one less thing I have to worry about taking care of). A matching bar end weight for the left handle bar is included in every kit.
There are a couple of choices available in color, finish and weight.
In addition to the normal stainless steel finish, a polished version that shines like a mirror is also available (I guess for those riders that just love to polish chrome) and one in black with a high strength textured powder-coated finish.
Both “small” and a “heavy” weights are available, which refers to the weight of the bar ends. The small weighs in at 12 oz. and the heavy at 14 oz.
The heavy Throttlemeister helps to reduce vibrations on those bikes that suffer from strong vibrations through the handlebars — like solving two problems at once. The heavy Throttlemeister is also reported to be easier to operate due to its increased size.
Throttlemeister has kits available to fit dozens of bikes and probably one for the model you own, so be sure to consult their website for model applications.
Even though I don’t have a vibration problem on the FJR 1300, I chose to go with the heavy kit with the black textured powder coating finish.
I felt that this model would look nice and blend in well with the looks of the bike’s handlebars.
Installing the Throttlemeister Cruise Control
Installation proved to be straightforward and not all that difficult or complicated. First on the list was the removal of the old bar end weights, which is a simple matter of removing the Allen head socket bolts and sliding the ends of the bar weights off.
Next it was necessary to extract the little rubber grommets or bushings that are installed inside the handlebar ends.
This was accomplished by using the included puller in the kit which consisted of a bolt, washer and collar.
The collar was machined to just fit over the end of the handle bars, but allow the grommet to be pulled out of the bar through the inside of the collar.
By passing the bolt through the collar and then threading it into the grommet and tightening, the grommet was slowly and carefully extracted.
At first it felt like the bolt was going to strip out, but it was just the rubber in the grommet flexing before enough force was applied to break it free. After that the grommet was pulled smoothly from the bar end undamaged.
This was repeated on the opposite side. I have to admit, based on my experience as an automotive technician, it sure felt like the bolt was stripping out.
I stopped more than once on each side to remove the bolt for inspection just to make sure it wasn’t damaged.
With both grommets out the next step was to install the friction sleeve. This is a plastic tube about 3/4″ (19mm) long with an edge on one end.
By rolling back about 1” (26mm) of the handle bar grip on the throttle side, the sleeve could be slid onto the throttle tube (the plastic rotating collar the grip slips over) until the collar bottoms out on the tube.
Since I had already installed heated grips it was necessary to trim off a little of the tube on the inside end, otherwise it butted up against the heating pad and would not slide fully on.
The grip was then rolled back in place where it should sit flush on the collar.
Cleaning the inside of the handle bars with alcohol before inserting the expansion device is very important.
Failure to do so will cause the expanding device to move that could result in problems including binding of the throttle and even the bar ends falling off.
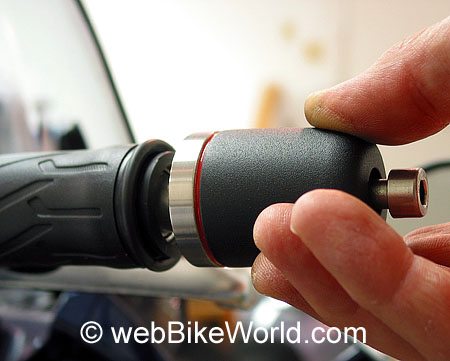
Next, the bar end, collar and expanding device are assembled, finger tight, then inserted into the handle bar opening.
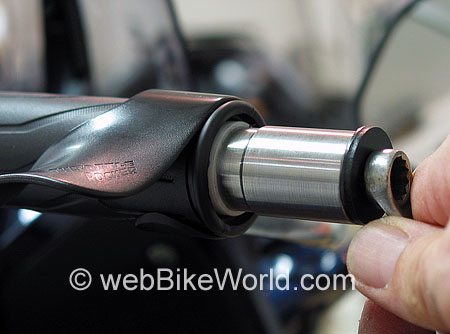
Until the end bolt is tightened you’re able to slide the assembly in and out to achieve an approximate 1/16” target starting gap between the friction sleeve and the bar end.
Getting the final adjustment takes a little trial and error. What’s important is that the throttle operate smoothly and return closed on it’s own without interference.
Then when the bar end is rotated in the same direction as when opening the throttle, the gap is eliminated, pressure is exerted against the friction sleeve holding the throttle in place.
Please note again that even though the throttle is held in place when riding the bike, it’s still possible to “override” it and twist the throttle off or on with ease.
That’s what takes the most time during the installation, tightening the bolt, checking the gap, testing the throttle operation, making any changes and then going through the whole process again.
It may sound like a lot, but it really isn’t.
The left side goes together the same way, except this time you only need to set a gap to match the throttle side.
I didn’t time it, but I’d be surprised if I spent 2 hours on the entire install and that included time to set up and take photos along the way.
Included in the kit was a little decal to place around the throttle side bar weight that lets you know at a glance whether it’s “on” or “off”.
I found the print to be so small I’d have to take my eyes off the road too long to read it and chose to leave it off. I can tell by the tension on the throttle if it’s on or not.
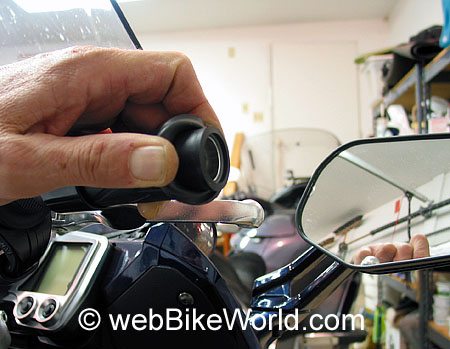
Operation of the Throttlemeister is quite simple. Once you’ve achieved a cruising speed it’s just a matter of rotating the right bar end in the same direction as you do the throttle to accelerate, until the friction sleeve is contacted and held steady.
I’ve never been able to smoothly “engage” the Throttlemeister with only the right hand, so I simply reach across with my left hand and give the right end weight a twist — I’m sure others out there have their own methods.
Once it’s been “set”, to make any speed adjustments you only need to give the throttle a light twist in either direction.
Remember, it will not make adjustments for any grade changes so if you’re going up and down hills you will have to make corrections to your speed via the throttle.
To release or “disengage” the device, simply rotate the bar end in the same direction as you would when rolling off the throttle, which can easily be done with just the right hand.
Conclusion
I like the Throttlemeister “cruise control”. It’s elegantly made, attractive, simple to use and unnoticeable installed.
It’s easy to install, no wiring is required and it won’t be in the way anytime I’m working on the bike unlike some of the electronic systems available.
There are few working parts which mean fewer parts to fail/break and nothing to catch my glove on either.
Yeah, it’s not a “true” cruise control and I have to make some adjustments to my speed when in use, but that doesn’t bother me. It’s a small inconvenience in an overall great device.
Do you have any Throttlemeister (or other motorcycle cruise control system) tips?
| wBW Product Review: Throttlemeister Cruise Control | |
|---|---|
| Manufacturer: Throttlemeister | List Price: $100.00 and up. |
| Colors: Black, polished or black milled. | Made In: U.S.A. |
| Comments: Throttlemeister fits many makes and models, including Aprilia, BMW, Buell, Cagiva, Ducati, Harley Davidson, Honda, Kawasaki, Moto Guzzi, MV Agusta, Polaris, Suzuki, Triumph, Yamaha. | |
Owner Comments and Feedback
See details on submitting comments.
From “D.H.”: “One of the first mods I did on my new ’03 Kawasaki ZR-7S before heading out on a 7-day tour was to install a “heavy” Throttlemeister.
It’s an elegant solution, if not quite as easy to operate as a thumb-lever throttle lock.
By the way, the red stripe is just tape and can be easily removed or swapped for another color. I recently found a couple of black rubber O-rings that fit tight in the groove on the inboard ends (where the stripe is).
The clutch side O-ring doesn’t do anything of course, but the O-ring on the throttle side provides better grip for rotating the unit.”