


Technology is a wonderful thing. As long as the early adopters get the bugs worked out so that the rest of us can focus on the added value, rather than fussing to work out the problems.
We can hope that some day motorcycle helmets will be heated, with visors that automatically darken or lighten in response to the levels of ambient light. They’ll have anti-fog and anti-scratch lenses that really do just that.
And how about active noise suppression, inflatable or gel-filled internal bladders that provide an exact, comfortable and safe fit, a single lever to control heating and cooling, and maybe nighttime lighting strips for visibility?
The motorcycle helmet rear-view mirror is here (we’re currently working with the Reevu helmet that has one built in and will be reporting on it soon) and as long as we’re wishing out loud, how about a heads up display?
I’m guessing that all helmets will have a heads up display sometime soon. If so, I’m sure it will be built into the helmet liner and communicate via a Bluetooth or other type of wireless connection, which will and should be built into the motorcycle itself. A wireless display of speed, RPM, gear indicator, fuel level and other engine data, and maybe even something like a road surface indicator (about to freeze, oil, water, etc.) would be nice.
And – don’t forget the GPS display. I’ll take mine with stereo sound and in color, thank you.
A leap ahead perhaps, and to get there, we first have to walk, one step at a time. That’s basically the job of the Sportvue MC1 heads up display, or “wireless personal display”, as they call it. The concept is there, and it needs some work, as we shall see, but ride with it for a few weeks and the benefits are obvious.
Description of the Sportvue MC1
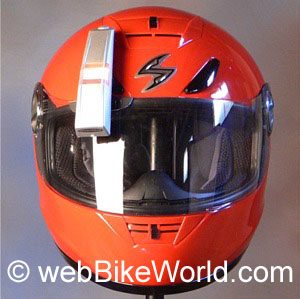
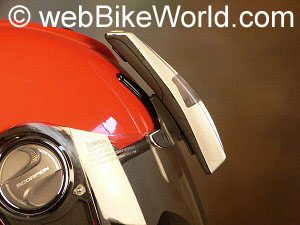
The Sportvue MC1 is an external device that attaches to the visor of a motorcycle helmet, as illustrated in the above photo. The system consists of a sending unit that’s about the size of a pack of cigarettes; a visor mounted display; and a rear wheel speed sensor. The control unit has four wires; one is attached to a switched power source, one wire is grounded, one line is plumbed into the motorcycle’s RPM sensor wire and the fourth wire is attached to the speed sensor.
A magnet is attached to the motorcycle’s rear brake rotor or other suitable location, and the speed sensor wire is located so that it will read the magnet as it passes by the sensor. This is very similar to the bicycle speedometer and odometer systems that have been available for some time, and which some motorcyclists have found to be both useful and more accurate than the instruments supplied by the manufacturer.
The Sportvue helmet heads up display unit is located just out of the line of site, above either the right or left eye, depending upon the rider. The display shows speed and gear selection, and a bar graph across the top of the display indicates RPM.
The live display is hard to photograph for various technical reasons, and also because the LED that displays the data is covered by a section of magnifying glass which distorts the image. In actual use, the orange colored numbers and RPM graphic is clear, with some background “noise”.
The most useful aspect of the Sportvue MC1 is being able to see the motorcycle’s speed. I’m assuming it is more accurate than my motorcycle’s speedometer (which I have always suspected as being optimistic). The Sportvue MC1 reads about 2 MPH slower than the speedometer up to about 45 MPH, where the Sportvue reads about 3 MPH slower than is indicated.
Mounting the Sportvue MC1 HUD
We received one of the first Sportvue production units about a month ago, and we had a few issues that we assume were first-batch teething problems.
Our original unit was not labeled as a pre-production unit; we waited like everyone else until the product became available, and we placed an order as soon as Sportvue released the production models to market.
The original unit contained no instructions and some parts were missing. The visor mounting unit was incomplete and the double-sided tape that is supposed to be attached wasn’t.
Sportvue has a copy of the installation guide available as a .pdf file on their website. The instructions in the .pdf
version are relatively clear, but could use much better photos and/or diagrams, and ours was missing a diagram illustrating the parts, which would have been helpful.
The replacement version does include a printed instruction manual. It does not include a diagram showing all the parts included in the system, which we think would be helpful.
For example, there are two white nylon brackets in our box which are not referenced in the instruction manual. We’re not sure what these parts are for.
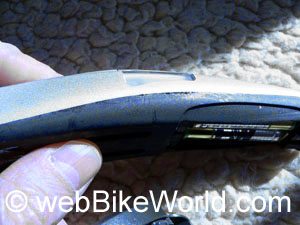
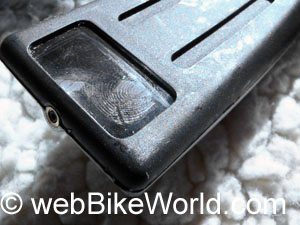
The replacement unit did not have the quality problems with extra glue or fingerprints. See the photo left, below.
A mounting bracket is provided that is designed to fit between the
display unit and the plastic visor mounting clip. We weren’t sure how this was fitted to the original unit.
Apparently the instructions indicate that the mounting bracket is either supposed to be part of the heads up display unit or it’s designed to snap into the back of the unit.
We’ve since learned that this bracket was supposed to have been attached to the display unit. It is attached on our replacement.
This bracket allows the display to slide up or down if necessary to bring the readout into the rider’s field of vision. The bracket then slips in to the mounting clip to hold the display unit in place on the visor.
We ended up gluing it to the original display unit to get it to work correctly, but it is not necessary to do this on the replacement.
The original Sportvue heads up display unit that we received had traces of excess glue in multiple places. The body of the display unit is made from plastic. It weighs 70 grams (2.5 oz.).
The door that covers the batteries is, in our opinion, rather flimsy. There is a metal tab that slides up into the body to cover the batteries, but the spring on ours is very weak and it’s easy to remove the cover without sliding the tab. The replacement unit is identical in this regard.
The replacement unit has tighter seams and no excess glue. See the photo left and below for a comparison.
The original unit and the replacement do not have an O-ring or other indication of waterproofing under the battery cover.
There is no indication that we found on the Sportvue website or in the instructions that the device is waterproof, so we’re not sure how will it might hold up under adverse conditions.
Also, the cable ties that came in the box with the original unit broke as soon
as we tried to bend them. They are apparently too brittle and we ended up using some of our own supply. We needed about three times as many cable ties as were supplied in the box anyway.
The replacement unit comes with 4 smaller cable ties. We suggest you stock up on some good quality cable ties of various lengths before installing the product.
The plastic display window on the original unit came with a big fingerprint that defied attempts at removal. It didn’t affect the visibility of the readout, but in general, we weren’t too pleased with the quality of the original unit and wished for better quality control. The replacement unit had no problems in this regard.
The instructions call for first mounting the Sportvue unit to the helmet visor, then mounting the control box, then mounting the wheel speed sensor. We didn’t want to mount the unit to the visor until we knew for sure that everything else would fit and that it would work, so we reversed the order.
Sportvue suggests that the project will take 2 hours. It took us just about exactly 4 hours to mount the control box and speed sensor and two more hours to figure out how to mount the heads up display unit to the visor. If we had to do it again, it would probably take half the time. But there are some definite tricks to completing this project, so if your mechanical and electrical skills are weak, we suggest you find some assistance.
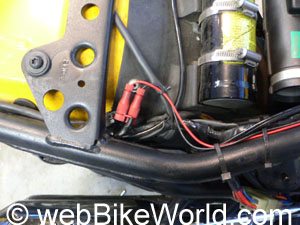
Mounting the control box was relatively easy. Sportvue suggests mounting it under the seat or behind a fairing. We used the webBikeWorld “hack”, a 1999 Triumph Thunderbird Sport, as the test bike. There isn’t much room on this “naked” bike to mount accessories, but we found a suitable location in back of the faux air cleaner trim piece on the right hand side (see photo).
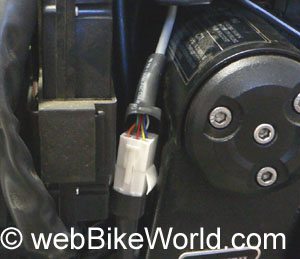
We then ran the wiring for the power and ground up under the seat and spliced them to the ground (black/yellow wire) and power (red/silver wire) coming from the tail light assembly. Note that on our bike, the red (power) and black (ground) wires change colors forward of the connector located just under the seat (see photo below).
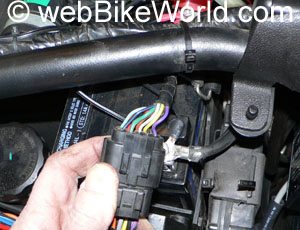
Finding the wire that carries the RPM information from the cam to the tachometer was difficult. We consulted the Haynes and Triumph shop manuals and finally traced it to a black/blue wire in a large wiring harness under the seat.
Sportvue provides three Posi-Tap splice connectors to use for tapping into the power, ground and RPM sensor wires. However, the power and ground leads coming from the Triumph’s tail light are very light 18 gauge wire, and it took us some time to discover that the wires were too thin to make a good connection.
Although we really like the Posi-Lock products, the small gauge Posi-Tap connectors in this case are just too big to work correctly with the thin 18 gauge wire, so you may have to improvise.
Sportvue sending unit (yellow arrow) mounted to rear of air cleaner on Triumph.
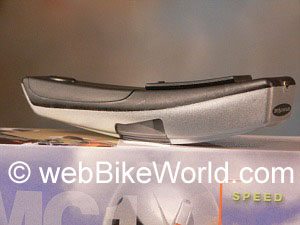
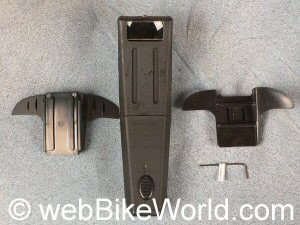
Visor mounting brackets flank the Sportvue MC1 heads up display visor unit. The mount on the left has the mounting bracket installed. The two grooves on the bracket are designed to slip into the two grooves visible on the back of the display. Note that the double sided tape is missing from the mounting brackets (original unit). The replacement unit had the correct double-sided tape applied. The small Allen wrench is provided to adjust the display mirror if necessary.

Looking down under the seat of the Triumph. The two Posi-Tap connectors splice the power and ground leads to the bike’s tail light, which is switched on and off with the ignition.
This is the main wiring harness for the Triumph. The RPM sensor wire on this bike is the blue and black wire on the far left in the front row of wires.
The rear wheel speed sensor can be mounted under a rear caliper bolt if necessary. We were lucky – there was an empty 6×1.0MM bolt hole on the bike’s rear caliper that is perfectly suited to hold the sensor.
Sportvue provides a choice of two brackets to use to mount the sensor, a straight bracket and a bent bracket, but neither fit, so we had to modify the straight bracket to fit our application.

This took a lot of time, and since each motorcycle is different, anticipate spending some time designing a fabrication that will fit your bike.
This photo (top left) shows the sensor (pink arrow) mounted on the bracket; the magnet (yellow arrow) on the brake disk and the 2 mm gap (blue arrow) between the sensor and the magnet.
The instructions are clear regarding the sensor and magnet. Just make sure to spin the wheel around with the magnet on the brake disk to make sure there is enough clearance before the included epoxy is used to permanently mount it.
Follow the instructions very carefully – we read them 4-5 times to make sure everything was done correctly. This is especially important because of the wires and the sensor near the rear wheel and brake disk.
Once the sensor was mounted and the power, ground and RPM wires were spliced to the correct locations, we installed the Sportvue helmet heads up display unit on our visor.
It took us some time to figure out the correct orientation for mounting the display unit to the sliding bracket to the visor mount because the instructions that we printed for the original unit were not clear and because of the missing parts on our display assembly. The replacement unit was assembled correctly and the instructions have better photos and are easier to understand, so this shouldn’t be a problem with later units.
The .pdf instructions were not clear about why there are two visor mounts, but we were able to eventually figure it out by looking at the photos and going back to the website several times. We finally realized that the two are asymmetrical; one is used to mount the unit on the right side and the other for the left side, depending upon the rider’s dominant eye. Instructions to help the owner determine which eye is dominant are included.
The instruction manual that came with the replacement unit has better photos which help to correctly locate the visor mounts.
As mentioned earlier, we had to improvise to get the bracket mounted to the original display unit. It also took a trip to the hardware store to get some quick-setting glue and double-sided tape, but we eventually got the unit mounted on the helmet visor. This was not an issue with the replacement.
When mounted, the display unit blocks the right-side air vent on the Scorpion EX-700 helmet shown here, but there is enough clearance and it doesn’t seem to cause any inordinate problems.
Programming the Sportvue MC1
The instructions step the owner through the process for “teaching” the heads up display unit to recognize the RPM and gear selection for the motorcycle on which it is mounted. We used the Steel Horse paddock stand to hold the bike in position as we ran it through the gears per the instructions.
This is a very sturdy unit that works well. However, accelerating a motorcycle through 6 gears on a paddock stand can be extremely dangerous, so use extreme caution and make sure your paddock stand is very secure. Again, follow the Sportvue directions to the letter.
In general, the bike is run through the gears as the unit “learns” to sense the speed, gear and RPM. The display tells you when to shift and eventually reads “done”. However, although everything worked fine on the paddock stand, for some reason the original unit would not display the RPM and gear selection after the bike exceeds about 2,000 RPM on the road.
The replacement unit displays the graph showing RPM, but the gear indicator still does not display correctly.
Since the RPM indicator is only a graphic bar that runs across the top of the display, it isn’t really that useful anyway (especially since there is a lag between the time the engine is revved and when the results are displayed). The speed reading works off the rear wheel sensor and it seems to display with no problems.
We tried running through the teach mode several times with the original unit before and after several rides and we spent extra time trying to determine why it won’t work, but eventually ran out of patience. We have not been able to determine why the gear display does not work with the replacement unit. It could have something to do with the motorcycle we used, a 1999 Triumph Thunderbird Sport.
Using the Sportvue MC1
The display doesn’t really block the vision very much when riding, because the rider’s other eye is open, which makes the display seem transparent. The black background on the display makes the numbers stand out, even in bright light. The display can be seen even when riding directly into bright sun.
The heads up display is fun to use and one has to be careful at first because the tendency is to continually watch it to the detriment of safety. But we found that after a while the display sort of fades into the background of the rider’s consciousness and is only used when needed. It’s nice to be able to see the speed without having to take one’s eyes completely off the road.
Note that this is not the type of heads up display that is projected on to the rider’s retina. The display is in the rider’s peripheral vision and the eyes must be redirected upwards to see it, but it is useful nonetheless.
Conclusion
The Sportvue MC1 is an interesting item that proves that the technology is valid for motorcycle use. The quality of the device and the features are indicative of a first generation product. Sportvue seems intent on capturing useful information from owners and posting it on their website for others to see.
They have a knowledge base where owners can ask questions and obtain product support. Spare parts are available, which could theoretically allow an owner to set up two or more motorcycles to run the display.
The price is relatively high, and in the end, all that it’s doing is giving the owner a visual display of speed and gear selection. We’ll leave it up to you to determine if the price satisfies a value equation for your personal needs.
In the meantime, kudos to Sportvue for taking the lead on making this technology available.
|
wBW Review: SportVue MC1 Helmet Heads Up Display |
|
| Available From: Sportvue | Suggested Retail Price: Approx. $329.00 |
| Color: Black | Made in: Unknown |
| Summary: Can be difficult to install for non-mechanically inclined. Works as described, but ours does not display all the data all of the time. We’re not sure if this is the rule or the exception, but because our unit was one of the first to be produced, we’re assuming that the units produced more recently won’t have the same problems. Review Date: February 2005 | |
| More: wBW Motorcycle Safety Page | Motorcycle Helmets | |
Note: For informational use only. All material and photographs are Copyright © webWorld International, LLC – 2000-2011. All rights reserved. See the webBikeWorld® Site Info page. NOTE: Product specifications, features and details may change or differ from our descriptions. Always check before purchasing. Read the Terms and Conditions!
Owner Comments and Feedback
Not all comments will be published (details). Comments may be edited for clarity prior to publication.