The Garmin i3 is nearly identical to the Garmin i5 we reviewed not too long ago.
The i3 uses the ingenious (and tiny) TransFlash memory card for map storage, rather than the i5’s 20MB internal hard disk.
The i5 is not currently available in the UK. The i3 comes with a 256mb TransFlash card in the UK, and 128mb in the U.S.A.
In our review, we noted that the i5 is very easy to use and would be nearly perfect for motorcycle riding if only it was waterproof and had an external speaker.
We’re still waiting for the waterproofing, or for someone to manufacture a waterproof cover.
In the meantime, James Yarwood took on the challenge and adapted his Garmin i3 for an external speaker, which is the subject of this article. One note: opening the case of your i3 or i5 will void the warranty
Introduction
With GPS systems being the latest must-have accessory for four-wheeled vehicles, us two-wheelers have been left a little in the background; you’ll have to look far and wide to find a GPS unit that will fit onto your motorcycle and not be too obtrusive and bulky.
About the only motorcycle-specific GPS units currently available are Garmin’s Quest and the TomTom Rider.
But they’re somewhat expensive, due to the bracketry and water-proofing that are necessary to allow them to be used on a bike.
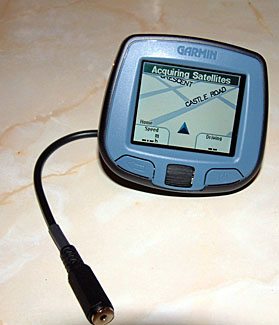
I wanted something that was relatively cheap, small, compact and could be easily detached from my bike without fitting additional brackets, and I came up with the Garmin Streetpilot i3.
Although it’s not waterproof, its size, which is not much larger than a tennis ball (some 3” wide x 2.74” high x 2.15” deep) and weight (5.3 oz. or 15g) fitted the agenda perfectly.
There was only one downside: the i3 didn’t come with an earpiece socket that would allow the rider to hear directions from inside the crash helmet when riding.
But I already had a cunning answer to the problem … read on!
Dissasembling the i3
Fortunately, my son is an electronics wizard, and since I can wield a spanner and a drill, it was relatively simple to take the Garmin i3 apart.
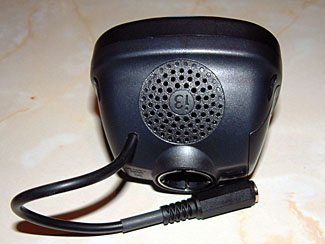
Four small (very small!) 1.5mm hexagonal screws, one in each corner, hold the i3’s case together.
Once these are removed and the outside casing is gently prised away from the main chassis, you are left with the main unit.
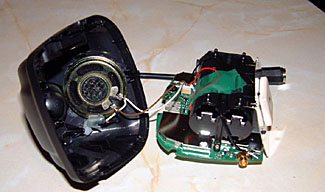
Carefully removing the click wheel and placing this with the hexagonal screws to one side, it’s possible to see the speaker with its soldered wires.
The speaker can then be carefully moved away from the unit (still connected to the main board by the existing wires).
To install the new extension speaker wires we first had to drill a small pilot hole in the outer casing of the i3.
You’ll need to determine where the wire is going to exit; I wanted it to come out at the base of the unit just to the left-hand side of the existing pre-drilled speaker holes (that is, looking at the unit face-on).
Be very careful not to drill too close to the lower inside fixing point. Use a smaller pilot drill first, and then move up in drill sizes until the new extension speaker cable (mine is 4mm thick) is a tight fit through the hole, and then feed the cable through.
Now comes the slightly tricky part! To do the job correctly, my son de-soldered the existing speaker wires.
Then with the new dual-core speaker cable (approximately 4”-5” in length), to which we had previously soldered a 2.5 mm female connection to take the ear-piece extension (available from any good hi-fi or Radio Shack outlet), we soldered both the old and new wires together on to the back of the speaker.
It might be a good idea to have a small bench vice (vise in the U.S.) or model-maker’s vice to hold the unit firm whilst trying to solder if you’re attempting this on your own.
We didn’t have such a luxury, it was done using the kitchen table as a worktop, and so I was the vice…steady hands and good eyesight are needed, oh to be young again!
Make sure you let the solder set before putting the unit back together.
Carefully refit the click wheel, the outer casing and the four hexagonal screws — if you haven’t lost them in the meantime!
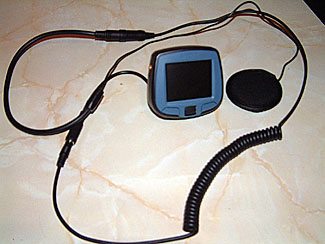
Now your i3 (or i5) has an extension cable for use when biking and it can still be used in the car if necessary.
The new cable extension doesn’t cut off the main speaker when you plug in to the ear-piece; this could be done, but I wanted to keep the costs and complications to a minimum!
Before I did the modification I went onto eBay and located a seller in the UK who specifically sells motorcycle earpiece units plus all the relevant cabling that can be attached to the lining of a crash helmet with Velcro, and it works absolutely fine!
Garmin StreetPilot i3 vs. i5 Comparison Table
Source: Garmin USA
| Feature | StreetPilot i3 (U.S.A. and UK) | StreetPilot i5 (U.S.A. Only) |
|---|---|---|
| Receiver | 12 channel | 12 channel |
| Batteries | 2 AA Batteries | 2 AA Batteries |
| Number of Waypoints | 500 | 500 |
| # of Routes / # of waypoints per route | 1 stored (Automatically calculated with turn-by-turn instructions) | 1 stored (Automatically calculated with turn-by-turn instructions) |
| Database, Basemap, or Built-in Maps | Americas Lite Routable (USA) or Atlantic Lite Routable (UK) 256MB Transflash data card preloaded with UK and Ireland MapSource City Navigator NT street data | Americas Lite Routable (USA) or Atlantic Lite Routable (UK) |
| Additional map options | City Select CD ROM uploadable information (Unit includes full coverage area) | Pre-programmed internal memory that stores City Navigator NT detailed maps of North America or Europe. |
| Battery Life | 6 hours | 6 hours |
| Display Size | 1.3″ x 1.7″ | 1.3″ x 1.7″ |
| Display Type | 32,000 color sunlight-readable TFT with backlight | 32,000 color sunlight-readable TFT with backlight |
| Display Resolution | 176 x 220 | 176 x 220 |
| Standard GPS Antenna | Built-in Patch | Built-in Patch |
| TracBack Mode | N/A | N/A |
| Unit Weight | 5.3 ounces w/o batteries | 5.3 ounces w/o batteries |
| Audible Alarms | Yes (with voice prompts) | Yes (with voice prompts) |
| Waterproof Standard | IPX0 | IPX0 |
| Unit Dimensions | 2.74″ x 3″ x 2.15″ | 2.74″ x 3″ x 2.15″ |
| Screen Orientation | Horizontal | Horizontal |
| Map Storage | Removable TransFlash memory card | Pre-programmed memory |
| Backlit Display | Multi-level | Multi-level |
| Ext. Ant. Hookup | Yes (MCX) | Yes (MCX) |
| WAAS/EGNOS capability | Yes | Yes |
| Voice Commands | Yes | Yes |
| Turn by turn routing | Yes | Yes |
| Custom POI’s | Yes, imported from CSV files. | Yes, imported from CSV files. |
| 3D Perspective Map View | Yes | Yes |
| Proximity Alert / Safety Camera Support | Yes, requires Custom POI data. | Yes, requires Custom POI data. |
| Speed Alarm | No | No |
| MSRP | $428.56 (£249.00) | $535.70 |
More on the Garmin i-Series GPS
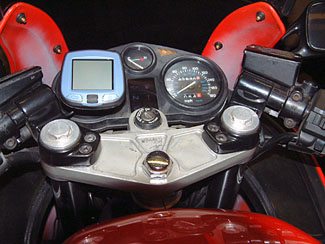
The Garmin “i” series is perfect for use on most motorcycles that have a tacho (tachometer); this is where I put the suction cup and unit.
When out riding, due to the wind noise, you’ll have to dial up the sound so that you can hear the voice-over as opposed to using it in the car on a lower setting.
I’ve also taken a 12-volt supply direct from the battery. Using a cigarette lighter fitting, I can use the unit without fear of losing power.
Although again to its credit, the Garmin “i” series is one of a very few units that comes with its own battery source, good enough for 4-6 hours running off two AA batteries.
The only downside to this exercise is that it probably will invalidate your Garmin warranty. When I approached them (Garmin), they just didn’t want to know about the potential of modifying the “i” series.
Such a pity really, because from a marketing and selling point of view the unit is in my opinion absolutely perfect for what I need, it’s small, completely portable and extremely comprehensive in its mapping capabilities — someone at Garmin should take note!
You’ll also have to be aware, as I mentioned at the beginning of the article, the “i” series is NOT waterproof in the inclement English weather.
So it sits in a small self-sealed plastic bag with the cables protruding in the cockpit of my bike’s fairing.
Not ideal, but again, if any plastics manufacturer wants to make a killing then start manufacturing a waterproof soft case for this very popular satnav unit.
Europe beckons me this summer plus a few other long rides and with my satnav sound system I’m hoping not to get lost.
If I do however, then I’ll be looking for the nearest bar or café, anticipating that my unit will be able to re-direct me there!
Good luck with your modification, however I take no liability if you drill or solder too close to any of the internal components and render your unit useless!
Owner Comments and Feedback
See details on submitting comments.