
Brake light and tail light improvements are usually first on the agenda for any new motorcycle that enters my garage, and the Multistrada 620 is the latest victim.
Since this is 2007, “improvements” usually means either replacing the incandescent bulbs with an LED equivalent, or adding some lumens in the form of auxiliary LED lighting.
We’ve been reporting on LED lights since 2000, back when the first reliable units became available in sizes to fit motorcycles. So as an FYI, there’s not much new in this article that we haven’t covered before, although Multistrada owners or those new to motorcycle LED lighting may find some of this information useful.
There are several LED articles on webBikeWorld, but in all this time, I’ve used the same set of Life Brite LED brake lights and the Signal Dynamics LED brake light bar since then on a variety of bikes, and they’ve served very nicely and have never let me down, so there’s no reason why they wouldn’t serve just as well on the Multistradino.
The Life Brite and the Signal Dynamics LEDs are pretty easy to install, and we covered this years ago in the articles “LED Motorcycle Brake Lights” and “LED Brake Light Bar on a Triumph Thunderbird Sport“.
This LED combination also graced the rear of our old Triumph Tiger, but I haven’t “improved” the rear of theGT1000 because I think its retro-look round tail light looks fine just the way it is. But since the Multistrada obviously has no pretensions towards retro-ness whatsoever, I figured that a touch of LED light in the rear wouldn’t hurt the Multi’s looks at all.
Tearing into a Ducati is always an adventure, especially without a shop manual (although I did just get one finally and will report on that soon). But since I’ve become an experienced LED installer over the years (without knowing a thing about electricity, believe it or not!), I didn’t really have any qualms about diving in to the Multistrada.
The key is to proceed slowly and patiently and to make sure the locations of all the nuts, bolts and parts are accounted for. This is where a digital camera and voice recorder come in handy — I keep an Olympus VN-3100 handy in the toolbox and use it to record every step of the project, along with plenty of digital photos. I can’t tell you how many times this has saved me, especially if the project has to be postponed and I don’t get back to it for a couple of days.
Of course, removing and replacing brake and tail light bulbs is not really a complicated project, but because this was the first time I was messing with the Multistrada, the extra time used for the precautions were prudent.
Looking back on it, I can say that the Multistrada was the simplest bike to work on out of any that have received this modification. I happily discovered that the Multistrada has a single brake/tail light assembly that is very easily removed from the bike.
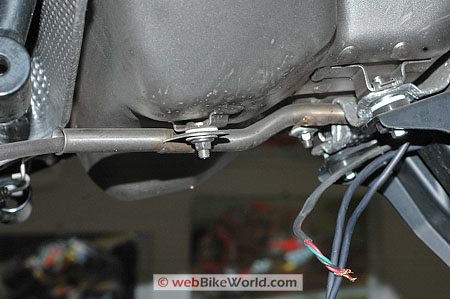
A couple of 4 mm Allen bolts underneath the tail section of the bike hold the Multistrada’s tail light assembly in place, along with one 4 mm Allen bolt pointing out the back at the top of the brake light above the red lens. Once they’re all removed, the assembly is held only by a square wiring harness connector (see second photo below); press the lever on top of the connector and the assembly slides right out.
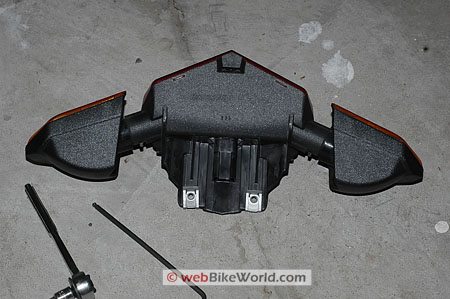
Here’s a photo of the assembly, shown upside-down and sitting on the floor. The two lower attachment screws go through the metal tabs that can be seen towards the bottom of the assembly:
I haven’t yet taken this assembly apart to see what type of bulbs Ducati uses, but I will do that one of these days to see if there are better LED replacements.
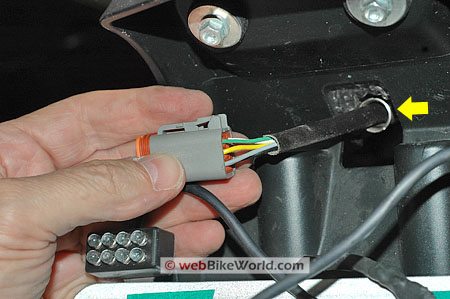
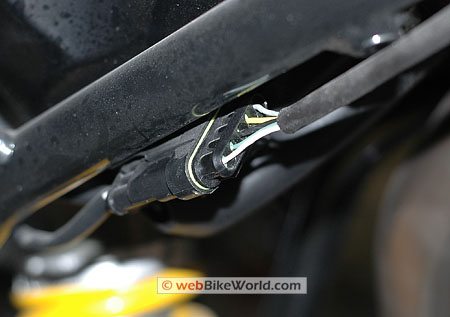
Here’s a photo of the connector at the end of the wire harness. This is the connector that plugs into the back of the tail light assembly and provides power and ground to the brake light, turn signals and license plate light. This plug is located under the tail section and it must be disconnected from the tail light assembly so the assembly can be removed:
The tab at the top of the connector is visible; this is what must be pressed to release the connect from the tail light assembly so it can be removed. This connector is at the end of a wiring harness that feeds through a tube (yellow arrow). that goes under the tail section and down towards the left-hand side of the bike.
Here’s a peek underneath the tail section, looking up and back towards the tail on the right, showing the tubing that holds this wiring harness:
The tubing not only protects the wiring harness, I assume it also protects it from the heat of the catalytic converter and exhaust.
At the other end of this wiring harness, towards the front of the bike (left-hand side of the photo above), the harness ends in another flat connector, seen in the photo below.
So the tail light wiring harness starts at the flat connector shown below and ends at the square connector shown two photos above. This harness provides the power and ground to the tail lights and brake lights.
So what does all this mean? Well, it means that it’s pretty easy to tap in to this wiring harness to add the Life Brite LED brake lights and the Signal Dynamics LED brake light bar.
I chose to splice the wires right before the square connector, because, in typical Ducati fashion, the protective sheath tubing that covers the wiring harness ends about 2″ before the connector. I’ve noticed that other wire bundles on both the GT1000 and the Multistrada are missing a few inches of sheathing — like the sheathing wasn’t cut long enough to fit?
Some of the wire bundles on the front end of the GT1000 look pretty ragged, because some of the wires are visible. Oh well… “Charm”, I guess they call it!
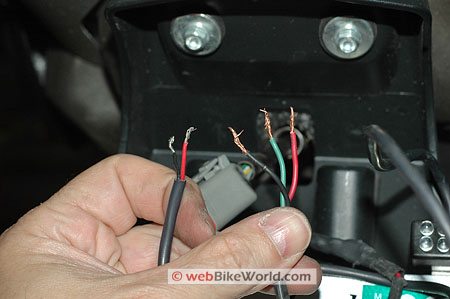
The Life Brite LED brake lights have very basic wiring: red (positive) and black (negative/ground). The Life Brite wiring harness is seen on the left-hand side in the photo above.
The Life Brite LEDs work differently from other types of LED auxiliary brake lights (e.g., Hyperlites); they blink about 6 times when the brake light comes on and then they burn steady as long as the brakes continue to be applied. Release the brakes and reapply and the same cycle starts again.
Actually, now that I think of it, since both the Life Brite and the Signal Dynamics LEDs are several years old, the newer versions may have a different functionality, I’m not sure.
The Signal Dynamics LED brake light bar I’m using here has a dual function, which makes it slightly more difficult to install. It lights when the bike is started and the LEDs act as a running light, but when the brakes are applied, the LEDs become brighter, kind of like an advanced 1157 incandescent bulb. The Signal Dynamics LEDs do not blink when the brakes are applied, but again, it’s possible that newer versions have this functionality.
So for the Signal Dynamics light, this means that in addition to the positive (red) and negative/ground (black) wires, the green wire (seen in the photo above in the right-side bundle under the thumb) must be spliced to a source of continuous power, to light the LED running lights.
OK, so where are the corresponding wires on the Multistrada? Shown below are two wiring diagrams; the top one is the wiring diagram for a Multistrada 1100, which I have in electronic format. Note how the wire colors have two designations; “W/Bk” for white/black; “W/G” for white/green; and “Gr/R” for grey/red. Can anyone explain why they use these dual designations on the Multistrada 1100? This is different from the Multistrada 620, as seen below.
The next wiring diagram is for the Multistrada 620. It’s a marked-up version of the diagram above, with the wiring color changes as described in the Multi 620 shop manual — at least the official hard copy manual that I own — which lists single colors for the wires.
Again – anyone know why the 1100 and 620 have different wire colors listed? Also, note the differences in the numbers in the circles (the connector). These represent the differences between the Multistrada 1100 and 620 and I’m not sure why, nor do I understand what the numbers mean.
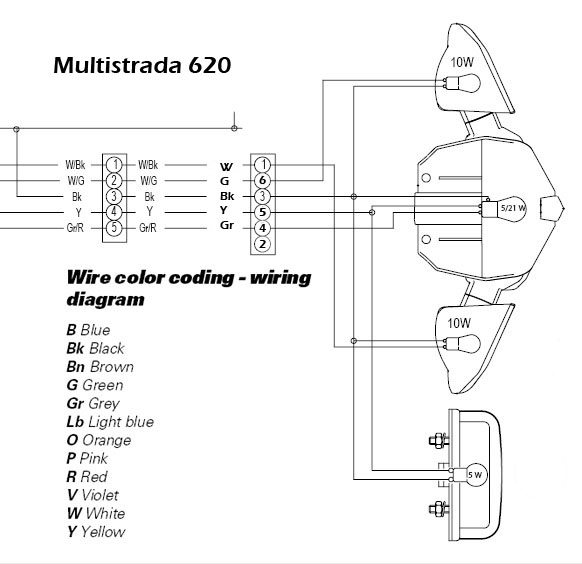
In any case, the two wires needed for the Life Brite LEDs are simple: brake light power and ground. The Signal Dynamics LED brake light bar needs those two plus an additional “always on” power wire.
My 620’s wiring harness is black for negative/ground; grey for the brake light power and yellow for the “always on” running light (license plate light). Your bike may be different, so use caution.
I spliced everything together using Posi-Lock connectors and I wrapped it up with some high-quality electrical tape. The photo below shows the final wiring with the Life Brite mounted but before the tail light assembly was reinstalled.
I installed the Life Brite LEDs behind the license plate, using the license plate bolts. They are mounted vertically, as shown in the photo above, but they can also be installed horizontally, as “ears” on the outside of the license plate (or in other locations, like glued or Velcro’d on to the back of the bike, saddlebags, etc.).
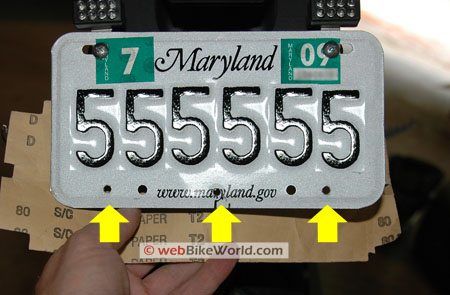
Mounting the Signal Dynamics LED brake light bar was more complicated. About the only place to install it is on the bottom of the license plate, so I drilled 3 holes; two on either side and one in the center (a larger diameter), which is used to thread the Signal Dynamics wiring harness through so it’s hidden behind the plate.
Here’s a photo of the holes drilled in the license plate, indicated by the yellow arrows:
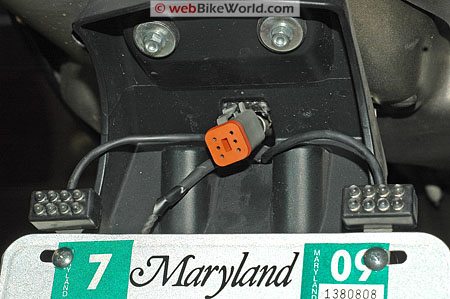
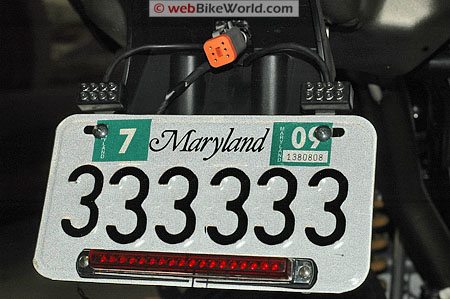
And here’s a photo of the final product, with the Life Brite LEDs mounted up top and the Signal Dynamics bar along the bottom:
Conclusion
It’s very hard to tell from the animated photo at the top of the page, but the LEDs add some good visibility to the rear of the bike by providing a running light (the Signal Dynamics product) and more brake light visibility. These lights don’t affect the styling of the Multistrada as I think they would on the GT1000. Publish Date: August 2007.
See Also: wBW Review of the HeavyCycles Multistrada LED Brake Light | Ducati Designs Multistrada LED Brake Light
Note: For informational use only. All material and photographs are Copyright © webWorld International, LLC – 2000-2011. All rights reserved. See the webBikeWorld® Site Info page. NOTE: Product specifications, features and details may change or differ from our descriptions. Always check before purchasing. Read the Terms and Conditions!
Owner Comments and Feedback
Not all comments will be published (details). Comments may be edited for clarity prior to publication.