Tight tolerances make this job more difficult than it should be. The bags can interfere with the frame and the saddle. And watch out for soft aluminum threads, which strip all to easily!
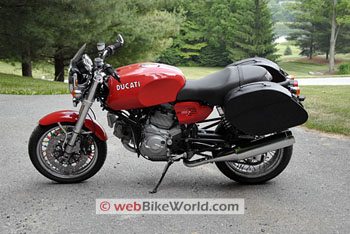
I bought the GT1000 back in August of 2006, ordering a set of Ducati saddlebags and windscreen on delivery day.
But I’ve had so much fun riding the bike I just didn’t want to take the time out to install the bags. But here we are, almost 10 months later — time to do the deed.
The dealer offered a discount on any accessories ordered within 30 days of taking delivery of the bike, so I ended up paying $643.17 for the bags, which is a lot of dosh, but less than the list price. Which is…I can’t remember? If any readers know the list price of the Ducati “Side Panniers”, please let me know at the email address below.
I dusted off the installation instructions and read through them a couple of times. The job seemed pretty straightforward so I gave it a shot. As it turned out — and I’m getting ahead of myself here — I had to install them twice because I realized after everything went together that the bags and the mounts were rubbing against the frame and the seat. I was afraid this would eventually cause problems, so off it all came to try again.
But alas! The second time around proved much harder than the first. The problem, in my opinion, is that Ducati has manufactured the mounts with tolerances that are way too tight for the bike. If the exhaust mounts and under-seat bolts are at the outer range of their tolerances, the bag racks may have a very, very tight fit.
I ended up removing both exhaust hangers in addition to the rear footpegs to get everything lined up so the racks would fit properly, and that’s where I got into trouble. I wanted to add a couple of washers here and there to add some space between the bike and the bag racks so they wouldn’t rub on each other, but this made the fit even tighter.
The bottom line is that I struggled with this installation for a total of about 4 hours over two days — far too long for something that should be so simple. I’m not sure if other GT1000 saddlebag owners experienced the same problems? I can say that I did talk to one other GT1000 owner who said his racks were also a very tight fit and he struggled to get everything lined up correctly, so I can only assume this is a common problem.
Ducati did use slots instead of holes in a couple of places on the racks, as can be seen in the photo below, but there still wasn’t enough play to get everything lined up smoothly and easily on my GT1000. Also, the racks could have easily been designed to provide more space between the mounts and the bike itself, so I think Ducati should have spent more time on this or perhaps not have assigned the project to a junior engineer.
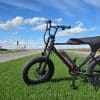
I eventually got everything sorted out — not the way I preferred, but the bags work nonetheless and I must say they’re pretty handy and they nicely fill out that big open space between the GT’s tire and fender.
The Ducati instructions ( here are the GT1000 Saddlebag Installation Instructions in .pdf format) are a good guide, at least to a certain point. So I’m not really adding any new intelligence to the process; just illustrating some of the points and issues that affected this particular installation. Let’s take a look:
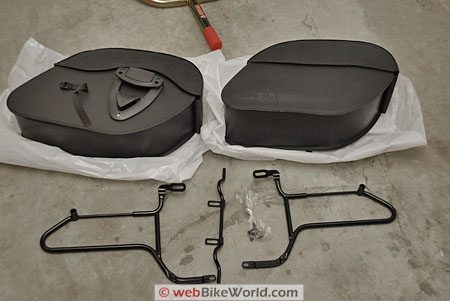
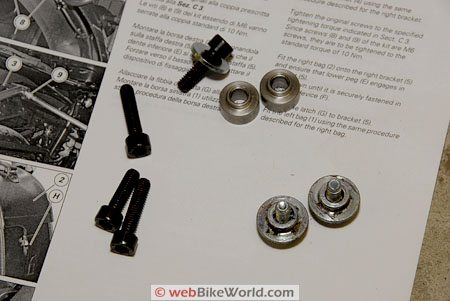
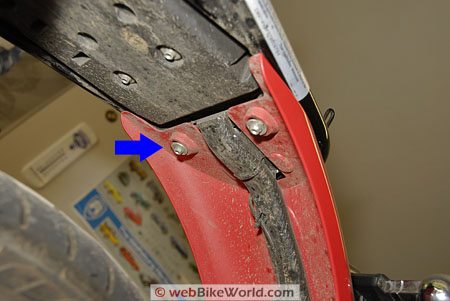
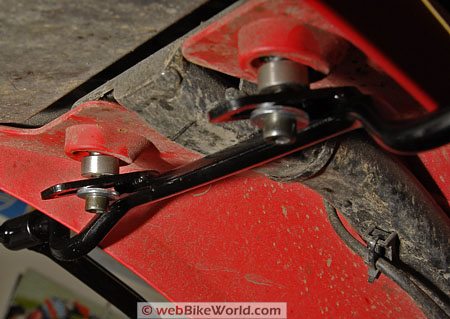
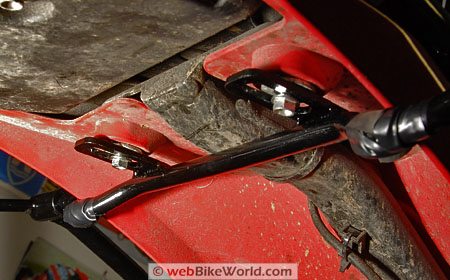
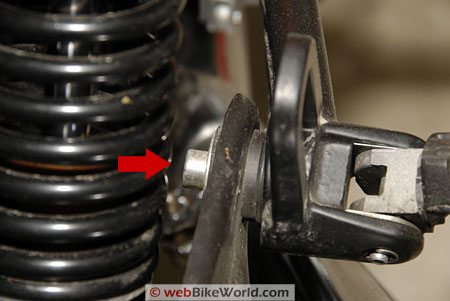
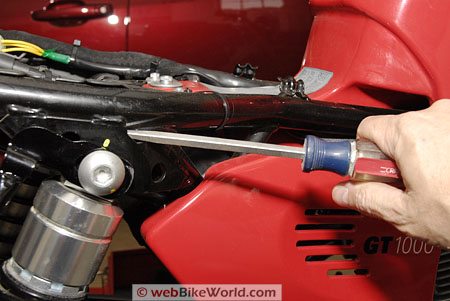
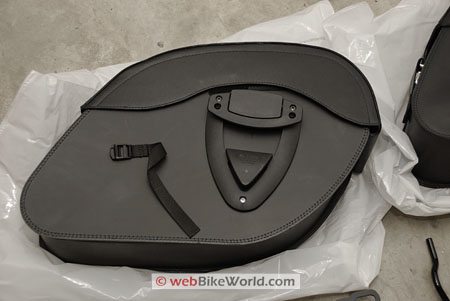
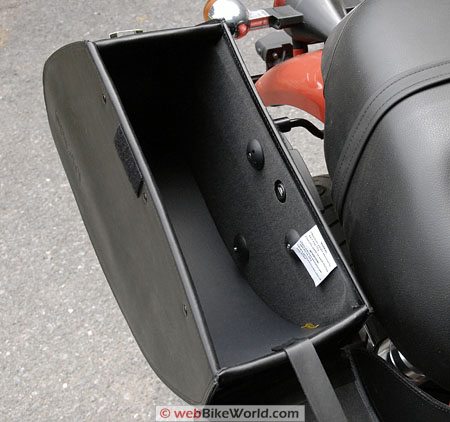
Nearly 10 months after I took delivery of the bike and the bags, I opened the box and laid everything out on the floor for this photo. Two bags; two side racks or mounts; a center support (seen between the two side racks) and a bag o’ bolts. Looks easy, right? As an aside, I lost the instructions somewhere along the line, but the dealer printed out a new set from a CD-ROM that he had and faxed them over. Nice guys at Battley! Here’s the hardware supplied by Ducati (minus one washer not shown). The bolts and spacers to the lower right are the original Ducati bolts that fit underneath the rear fender (next photo). Two of the hex head cap screws are used to bolt the center support under the rear fender and the other two are used to attach the side racks to the center support. As shown below, the upper shock bolts and the passenger footpeg bolts are used to secure the racks to the frame of the bike. Ducati does not provide longer bolts or additional washers to offset the racks from the side of the bike, which, as you’ll see, is necessary to prevent interference. Here’s a look up into the underside of the rear fender. The blue arrow indicates the original fender bolts and spacers. These bolts must be removed and the center bag support bar is bolted in place using the new, longer bolts and longer spacers provided by Ducati. However, as you can see in the next photo, I couldn’t get the longer spacers to fit correctly; they are not machined to fit the slots in the center support bar nor do they fit into the plastic bosses, seen in the photos above and below where the bolts fit into the fender. Here’s what happened when I tried to use the new spacers (shown here with the original screws and washers); they don’t fit in the fender or the slot on the center support. This looks better — the original bolts and spacers fit correctly. Notice the electrical tape I added at either side at the bends in the center support bar. This was to protect the fender during assembly. But as it turns out, the bar nearly rubs at that point anyway; Ducati should have added more bend in the support bar for clearance. The red arrow indicates the original equipment hex head cap screw that holds the rear footpeg. This bolt must be removed to hold the lower part of the side rack. Here’s one of the problems; you can see that the lower part of the saddlebag bracket, indicated by the red arrow, touches the exhaust hanger after it has been assembled using the Ducati instructions. I was afraid that this would rub off the paint and cause rust, so I decided to add a washer between the rack and the footpeg to add some space, as shown in the photo below. By the way, the lower part of the rack will only fit on the inside of the exhaust hanger as shown and this placement is consistent with the mounting instructions provided by Ducati. Here’s what the lower part of the rack looks like with the washer installed. The washer offsets the rack enough to prevent the rack and the exhaust hanger from touching. To get the hanger to fit, I had to remove the exhaust pipe from the bracket on either side (two hex bolts hold it on; it’s very easy to remove). This freed up the exhaust hanger to give me more play. But I couldn’t get the footpeg bolt to thread correctly when I put it back into the frame. Since the frame is made from aluminum, it’s easy to strip the threads. I ended up having to run a thread chaser through from the inside to clean things up. The threads were not cut all the way through the footpeg holder at the factory, which is curious. The upper part of the saddlebag racks attach underneath the top shock bolt, which must be removed. I had the bike on the Pit Bull rear stand, which puts some pressure on the top of the shock, making it difficult to remove the bolt. I ended up using a screwdriver to push down on the top of the shock to relieve some of the pressure. This isn’t really the best solution, as the pressure from the screwdriver scores the top of the shock body, which is made from aluminum. Be careful also not to scratch the black paint on the shock bracket. Here’s a close-up of the shock mount after the bolt has been removed. You can see how the bolt hole in the shock is out of alignment with the frame mount. This is the distance that the shock must be pushed to remove the bolt. Note also the anti-seize compound, which helps prevent the bolt from galling the aluminum shock body. Other than general guidance, the instructions weren’t much help; I ended up loosely assembling both sides and finally got everything lined up enough to fit. Here’s how it looks after the racks are installed. The bags also rub on the seat. I tried adding a thick washer under the shock bolt, but it wasn’t enough to offset the bags from the seat. I’m afraid that the rather sharp edge on the seam of the bags will eventually wear against the seat covering. Do other GT1000 owners have this problem? A view from the top showing the bag rubbing against the seat.
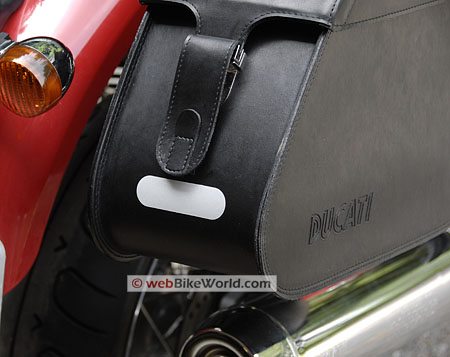
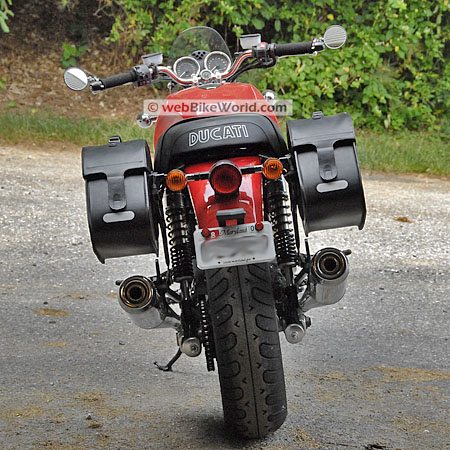
A view from the top showing the bag rubbing against the seat. Here’s a look at a saddlebag latch. The lower section fits over the lower bar of the side rack and the upper section fits on the upper bar. The upper latch clicks into place and the webbed strap is looped over the back of the rack just in case the latch lets go, although if the bag flies off the bike, the strap won’t do much… The leather strap covers a chrome clasp. Ducati provides two keys. The bags can be locked closed but not locked to the racks, which is curious. I had some pre-cut 3M reflective tape left over from a ROOF helmet and decided to add a piece to the back of each bag. The bags could probably be customized with stickers, paint or whatever, if desired. The bags have a decent capacity but Ducati recommends a maximum load of 3kg. Here’s how the installed saddlebags look from the rear The bags hide the big gap between the top of the rear tire and the bottom of the fender
From “M.S.”: “I have a new two-tone Ducati GT1000 SportClassic. Due to my recent travel schedule I’ve put few miles on it, but I do have several comments about three factory accessories:
The OEM saddlebags look great on the bike, but their forward position makes it impossible for a passenger’s feet to safely reach (and stay on) the passenger foot pegs. If you’re only going to ride one-up (w/o a passenger) this isn’t a factor. But if you want to ride double this is a serious consideration. My advice is to “try before you buy” — I ended up returning my bags to my dealer.
The large OEM tank bag (a full tank cover with tank bag on top, a la Bagster) fits the tank well, but two sets of the tie-down straps (the two pair to the rear of the tank, not counting the most rear-ward set) are too short to reach around the frame and secure in their intended connector. The other tie-down straps are fine as to length — you’d think that they’d have figured out how long to make these buckle/strap combinations by now! I’m going to buy some matching black (nylon?) strap material and have a local shoe-repair guy replace my too-short straps.
Finally, I think the guy who drilled the mounting holes in the OEM chrome rear luggage rack never got introduced to the guy who drilled the mounting holes in the rear subframe of the bike. The holes (sort of) match, but you need to take it easy when mounting the rack. I had to buy longer bolts, and carefully tighten them in sequence — these bolts support the rear fender/taillight assembly, up through the rear luggage rack, and into the rear subframe. You have to support the rear fender/taillight assembly — you really need three or four hands for this job. Once attached, though, the rear rack and OEM Ducati bag make up a beautiful and practical accessory.
All in all, though, the GT1000 is one of the most beautiful bikes I’ve ever seen — especially in the two-tone (black and cream) livery. I love to ride it, and in fact I’m going to do so right now! (It’s 7:00 a.m. here in Kansas City, USA on a summer Saturday morning — can you blame me?)”