
Comagination Motorcycle Brake Light Flasher Review
Note: See comments about Comagination and their products in the Comagination VisiPath Headlight Modulator Review.
Also see our updated article “Multistrada LED Brake Light Installation” for more information on installing the Life Brite LED brake lights and the Signal Dynamics LED brake light bar
In Part 1 of this installation, we noted that we receive many emails related to the topic of improving motorcycle visibility.
These emails, questions and suggestions cover a broad range of topics: headlight modulators, brake light flashers, LED auxiliary brake light bars, brighter or more durable brake light bulbs and more.
These same issues are debated continuously in just about every motorcycle related email group in cyberspace. So there’s obviously a concern among motorcyclists that they’re not being seen or aren’t visible enough to other vehicles.
Part 1 of this article detailed an installation of Comagination’s VisiPath motorcycle headlight modulator. Comagination offers another product that flashes a brake light or auxiliary brake light; it’s called the VisiStop Brake Light Flasher.
Although there are U.S. and Canadian regulations governing the use of headlight modulators, which are legal in all 50 states and Canada, there are no similar regulations governing the use of brake light flashers. But this hasn’t prevented motorcyclists from modifying or increasing the output of their brake lights, or from installing additional lighting in the hopes of improving their rearward visibility.
Unfortunately, there are no studies that we’re aware of that have compared features like type, quantity, area or brightness of motorcycle brake lights to determine the best or safest ways to notify following vehicles that you’re coming to a stop. But one of the most common motorcycle brake light modifications is the addition of some type of LED lighting that will temporarily flash when the brakes are applied.
The theory is that the flashing (and the brightness and extra surface area of the auxiliary lighting) will attract attention to the rear of the bike and hopefully to your intention to stop or slow down. LED lights are popular because of their brightness, low wattage, resistance to water incursion and vibration, low weight and ease of installation.
Where to Buy Motorcycle Brake Light Flasher
Check Reviews & Prices on AmazonAlso Shop for: LED Lights and Bulbs, Auxiliary Driving Lights, Motorcycle LED Headlights
Comagination VisiStop Brake Light Flasher
The VisiStop flasher consists of a small, sealed electronic unit that can be located either in the brake light shell or somewhere on the bike’s frame. The electronics are self-contained in a potting compound that I’ve seen used on many devices that will face “heavy duty” usage in severe weather.
The unit can flash either one or all brake lights, and has a 115 watts maximum power rating, which should be ample for most combinations of brake lights and/or auxiliary units. When installed, the VisiStop will cause the brake light that’s attached to the unit to flash for about 4-5 seconds and then stay on.
The difference in the VisiStop is that it has some “intelligence” — if you release the brake but then apply them again, the flashing cycle will repeat, but will be a shorter duration, depending upon how long the brake was off. A complete reset of the system takes about 30 seconds. This is a nice feature designed to help prevent following drivers from getting annoyed by the constant flashing if you’re in stop-and-go traffic. If the control circuit fails for some reason, the brake lights will continue to work as normal.
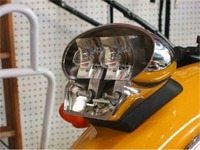
Comagination recommends that you use the bike’s installed brake light as is, and only use the VisiStop to flash auxiliary brake lights. I installed a Signal Dynamics LED Brake Light Bar on our test Triumph Thunderbird Sport to use for the VisiStop installation.
The Signal Dynamics unit is a well-made device that I’ve used before, and it fits nicely on the T-Bird. It doesn’t have a built-in flashing feature; it acts as a running light, then becomes brighter when the brakes are applied. I installed the VisiStop to work with the Signal Dynamics unit and have it flash when the bike’s brake lights are activated.
The Comagination VisiStop Brake Light Flasher was very easy to install on the test T-Bird, and should be just as easy to install on any bike. In fact, it took me much longer to figure out how to disassemble the T-Bird’s brake light housing than it did to install the VisiStop unit itself.
The basic idea is that you connect the VisiStop’s ground wire to your bike’s ground; then splice the VisiStop between the wire that powers the brake lights and the the wire that supplies power to whichever device or devices you’d like to have flash when the brakes are applied. Pretty simple, actually!
Where to Buy Motorcycle Brake Light Flasher
Check Reviews & Prices on AmazonAlso Shop for: LED Lights and Bulbs, Auxiliary Driving Lights, Motorcycle LED Headlights
Comagination supplies all the parts necessary for the installation, including a couple of wire taps and black cable ties, in case you need to secure the VisiStop’s wires or control unit to the bike’s frame.
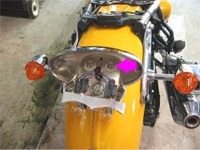
The control unit was small enough to fit neatly inside the T-Bird’s brake light housing, however, and it’s small enough that it should fit into just about any bike’s brake light housing or lens assembly (yellow arrow, Photo 6 below).
Let’s take a look at the procedure on the T-Bird. I first mounted the Signal Dynamics LED brake light bar to the bike; the installation of this product is detailed in the wBWarticle “Improving the Brake Light Visibility of a BMW K75“.
No matter which auxiliary brake light you want to have controlled by the VisiStop, you’ll need to tap into the bike’s brake light system for control. I mounted the LED brake light bar over the license plate, using the bolts that hold the license plate to the bike.
I then routed the wiring harness from the LED up under the bike’s fender and tapped into the brake light circuitry. I decided to also hide the VisiStop system inside the bike’s brake light housing so that everything was neat and clean.
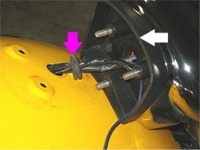
On the T-Bird, this means removing the brake light housing from the bike. After you unscrew the T-Bird’s brake light red lens (two Phillips head screws on either side), you’ll need to remove the 3 nuts under the fender (Photo 2) that hold the 3 bolts through the housing.
I was surprised at first to find that the nuts were not very tight — they are held on with lock washers, but I thought perhaps they were working loose.
But I realized why this isn’t an application where a lot of torque is called for when I looked inside the brake light housing.
The housing is made from plastic, and the heads of the bolts are held by two little plastic tabs holding two opposite flats of the bolt head (pink arrow, photo above). So if the nuts were tightened too much, they could easily break the plastic ears.
The lesson here is to be very careful with this part, and if the nuts can not be removed or installed with very little effort, something is probably wrong, and you may end up breaking the plastic tabs.
Once you remove the nuts (photo left), push the bolts back through the fender and pull them out of the housing. The T-Bird’s brake light bulbs are held on by another plastic assembly, this one holds the two bulbs and the reflectors.
Three Phillips head screws attach this bulb assembly to the housing. Unscrew these and you should be able to gently pull the assembly away from the housing.
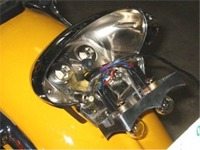
There are a couple of rubber washers used to help prevent vibration, so you may have to rock the bulb assembly back and forth a bit to break it loose, but again, be careful.
You can see two of the Phillips head screws sticking out of the bottom half of the housing in photo 1.
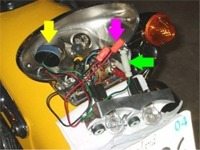
Removing the bulb assembly will give you access to the brake light bulb wiring.
On this bike (yours may be different), the red wire (photo 2) is for the running light filament of the 21/5W (2397’s on this bike), the blue wire controls the brake light filament, and the black wire is ground.
The T-Bird’s brake lights use 3-wire connectors, similar to those found on an H4 headlight bulb.
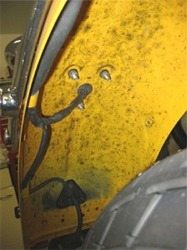
Next thing I did was feed the cable with the Signal Dynamics brake light bar wires up through the fender. To do this, carefully pull the bike’s brake light housing away from the fender.
Pull the rubber grommet (pink arrow, photo 3) out of the hole, and feed the auxiliary brake light’s wires through the grommet. A quick spray of silicone works really well here to make this procedure easy.
If you don’t have any silicone spray handy, a solution of water and dishwashing liquid should to the trick.
Also, notice that the plastic brake light housing on this bike sits on the painted fender without a gasket. While I had the unit disassembled, I cut some 3M Scotchcal strips and attached them to the brake light housing so that there would be some cushioning when I reattached the unit.
I’m hoping this will prevent any scratching or rubbing of the brake light housing on the fender, which could cause rust if the paint wears away. I think it would have been a good idea for Triumph to have provided some type of gasket between the brake light housing and the fender.
Although Comagination provides a couple of wire taps with the VisiStop, I used Posi-Lock connectors to splice the wires (pink and green arrows, photo left). They work great for jobs like this, and they’re waterproof, vibration proof, and they meet all sorts of Military specifications.
They’re also reusable, so if you make a mistake, you can start over again no problem and with no loss of efficiency. The Posi-Lock connectors are a “must have” when working on any type of motorcycle wiring; see the wBW Review of Posi-Lock connectors).
I spliced in the green ground wire from the VisiStop to the bike’s black ground. The next step is to find the wire that powers the brake lights.
On this bike, the red wire powered the running light (the light that always stays on while the bike is running), and the bike’s blue wire powered the brake light. Once you find the wire that powers the bike’s brake lights, you need to cut it and splice in the VisiStop
I’m hoping this all doesn’t sound confusing, because it’s really rather simple. What I wanted to do on this bike is get the LED brake light bar to flash when the brakes are applied.
The LED has 3 wires: ground (black); power for its running light feature (white); and power for its brake light feature (red).
The steps necessary for this installation were:
- Join the ground wires from the bike’s brake light, the VisiStop, and the LED;
- Cut the bike’s blue wire that powers the brake lights;
- Join together the two cut ends of the bike’s blue wire and the VisiStop’s red wire;
- Join the black wire from the VisiStop to the red wire from the LED that powers the LED’s brake light function.
Another way to think about it is that power gets to the VisiStop through its red wire will cause whatever is connected to the VisiStop’s black wire to flash.
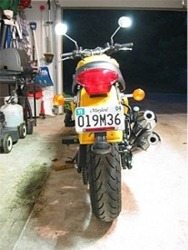
Here’s the end result: the Signal Dynamics LED brake light bar at the bottom of the license plate; the bolts that hold the light bar on to the plate also hold the plate on the bike.
You can just barely see the wire from the brake light bar on the bottom left hand corner of the fender, under the “1” on the plate.
No, I didn’t drill those holes under the license plate — Triumph was kind enough to provide them with the bike! I don’t know what they’re for, probably mounting license plates in other countries. Those holes may come in handy some day for other projects…..
Conclusion
I think the VisiStop is a great addition to the bike; the unit is inconspicuous, easy to install and adds good functionality to the auxiliary LED brake light. And the price is right!
| wBW Product Review: Comagination VisiStop Brake Light Flasher | |
|---|---|
| Available From: Comagination | List Price: $29.95 |
| Colors: N/A | Made In: U.S.A. |
| Product Comments: “Intelligent” flashing decreases the number of times the connected light(s) are flashed in stop & go traffic; easy to install; small size easy to conceal; flashes up to 115 watts of lighting. | |
| More: The VisiPath Headlight Modulator | Motorcycle Lighting Page | |
| Review Date: Circa 2002? | |
Where to Buy Motorcycle Brake Light Flasher
Check Reviews & Prices on AmazonAlso Shop for: LED Lights and Bulbs, Auxiliary Driving Lights, Motorcycle LED Headlights
Owner Comments and Feedback
See details on submitting comments.
From “S.S.” (02/11): “After reading your reviews I purchased both a headlight modulator (review) and brake light flasher from Phil at Comagination.
The headlight modulator was very easy to install, and I really liked being able to have the low beam flash instead of the high beam. It works well.
The brake light flasher, not being plug-n-play, took some work to install, but still not too difficult.What I found, unfortunately, was that the flash was slow. The on-to-off-to-on cycle left the brake light off for too long. It wasn’t a rapid flash, just a slow pulse pulse pulse.
I felt that, rather than grabbing someone’s attention with the flashing brake light, it actually increased the chance that a following driver might not notice that the brake light was on, if it was in the long off stage when they happened to glance my way.
I contacted Phil about this, and his message was essentially that it was working as designed. I took the brake flasher off and moved on to a competitor’s product, that creates a flash that no one will mistake for a brake light being off. I would like to pass this along because riders should be careful of this problem if they choose to install a Comagination brake light flasher.”
Other WebBikeWorld Motorcycle Lighting Reviews