Coolant Change on the Thunderbird Sport
It seems that the Thunderbird Sport is turning out to be a pretty easy bike to work on.
Routine maintenance, so far, has been straightforward.
The “nakedness” of the bike helps — you don’t have to peel off layers of fairing before you can start the task you set out to do.
And the Haynes manual for this bike is for the most part a real gem.
I hadn’t used Haynes manuals since way back in the days of the Meriden Triumphs, and back then, they were hard to understand, used convoluted English, and had really crummy photos.
Modern Haynes manuals seem to be very well written, with procedures described in a logical and orderly fashion, and have good photos that are directly referenced from the text.
Each chapter is divided into subsections, and the photos are numbered according to the sections, so it’s easy to follow along.
Where to Buy Triumph Coolant
Check Reviews & Prices on AmazonSee More: Motorcycle Accessories, Motorcycle Tire, Motorcycle Helmets
Changing the Coolant
Changing the coolant on the TBird is easier than changing it on other water-cooled bikes that I’ve owned.
Even motorcyclists with minimal mechanical skills can do this. Here are some photos and text to help guide you through the process:
Remove the fuel tank to access the coolant fill tubes and overflow tank.
I suggest that several hours before you’re going to change the coolant, run the bike and shut off the fuel flow while the bike is still running, then run out all of the fuel in the lines and the carburetors.
This will help prevent fuel from spilling out when you disconnect the fuel line.
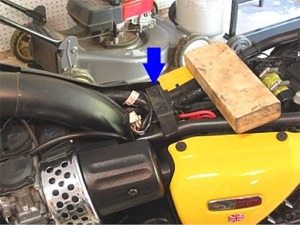 Photo 1
Photo 1 shows the tank removed, but before you do that, you’ll need to unscrew the two bolts that secure the tank to the bike.
The blue arrow in the photo points to the bar where the two hex head screws are located.
I used a piece of 2×4 block of wood to place under the back of the tank after I removed the screws.
This raises the tank enough for you to get your fingers underneath to remove the fuel overflow line and the fuel line that leads from the petcock to the carbs (see next steps).
 Photo 2
To remove the fuel line, first make sure the petcock is in the “off” position. Squeeze the fuel hose clamp (pink arrow, Photo 2) and move it down along the fuel line, away from the petcock.
It’s a good idea to place a towel or catch basin underneath the hose before it’s pried loose; this helps to catch any fuel that might spill out.
The hose should come off easily; it may take some prying back and forth to get it loose, but take your time and try not to use too much force.
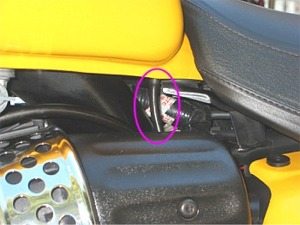 Photo 3
The fuel filler overflow tube (circled in pink, Photo 3) is held on by friction to a nipple that sticks out from the bottom of the tank.
Gently pull it down while wiggling back and forth, and it should come free with little effort.
Once the two bolts that hold the tank are removed and the two fuel lines have been disconnected, gently lift the fuel tank by pulling backwards and it should come off the bike.
Be careful not to loosen or lose the two rubber bumpers that live under the front of the tank and protect it from hitting the frame of the bike.
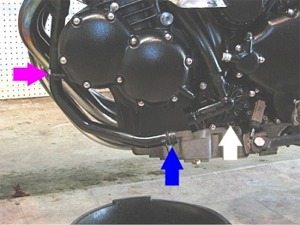 Photo 4
The manual suggests draining the coolant at the water pump (white arrow, Photo 4) drain plug.
But it looked like the joint between the tube coming from the radiator to the water pump was the lowest spot in the cooling system, so I disconnected this tube and drained it from there.
It’s held on by one bolt at the water pump, and one bolt at the frame (pink arrow).
The coolant pressure cap should be opened to relieve the pressure and let the coolant flow more freely.
Be careful, because the coolant will come out really fast and furious, so make there’s a big catch basin underneath.
Hold the catch basin close to the water pump area for the first few seconds so that the coolant doesn’t come splashing out all over the floor.
There’s a gasket in the water pump that seals this tube, but I didn’t replace it and it hasn’t leaked. The next time I change the coolant though, I’ll probably replace the gasket.
TIP: Here’s a tip that I will use myself next time I change the fluid: buy a replacement O-ring from the Triumph dealer next time you order some parts so that you’ll have one on hand “just in case” the original gets twisted or cut when re-assembling the tube.
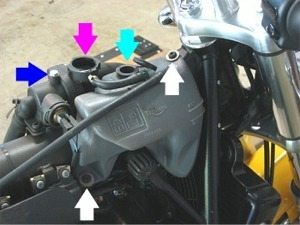 Photo 5
After the fuel tank is removed, the coolant fill point (pink arrow, Photo 5) can be accessed. The overflow tank fill point is indicated by the light blue arrow, and the bleed screw by the dark blue arrow.
Disconnect the overflow tank via the two screws (white arrows, Photo 5) to remove it and empty out the contents.
The manual suggests using commercially available coolant flush, but this bike only has 9,500 miles on it and the coolant looked fine, so I simply drained it and refilled it.
Re-attach the hose to the water pump, being careful not to pinch the gasket where the tube attaches to the water pump.
Re-install the overflow tank and loosen or remove the bleed screw (dark blue arrow) and you’re ready to refill.
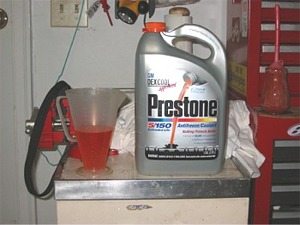 Photo 6
Coolant
Make sure the replacement coolant is compatible with aluminum engines (most of them are).
I chose Prestone Extended Life 5/150 Antifreeze Coolant (Photo 6), hoping that I’ll maybe never have to change the coolant again? This Prestone product is supposed to last for 5 years or 150,000 miles.
I measured the old coolant that came out of the bike; including the overflow tank, it amounted to about the 2.8 liters that the manual says the engine should hold.
Refilling the Coolant
To refill the coolant, pour the mixture (50/50 or 60/40 coolant/water) to the correct level in the overflow tank. Loosen or remove the bleed screw (dark blue arrow, photo above).
Then slowly fill the engine, pouring it in slowly and carefully. Pause frequently to let the air bubbles escape.
Eventually the coolant will come out of the bleed screw hole. Let it sit for a while and come back and top it off.
Put the bleed screw and the coolant pressure cap back on and close the lid on the overflow tank.
Check Your Work
You’ll have to temporarily re-attach the fuel tank, start the bike and let it run until it warms up. Let the bike sit until it completely cools off again (important!) and then come back, take off the fuel tank again and check the level. It will probably need some more coolant.
After you’re satisfied that it’s full, you can button everything up.
You may want to invest in a graduated cylinder, like the one shown in the photo.
This one holds 500 cc’s (1/2 liter). These can be purchased at most motorcycle shops. It comes in really handy to precisely measure the amount of fluids you’re putting in your bike.
You should probably measure the amount of coolant that comes out of the bike so you know if it’s all out.
You’ll also need one to create the correct coolant/water mixture. I didn’t know how much the bike would take to refill the system, so I poured out individual measurements of 500 cc’s of mixture at a time; 250 cc of coolant and 250 cc of water (be sure to stir the mixture also).
Publication Date: 2005?
▪ Motorcycle Product Reviews
▪ Maintenance and Repair Articles
More: The wBW Triumph Thunderbird Sport Blog
Where to Buy Triumph Coolant
Check Reviews & Prices on AmazonSee More: Motorcycle Accessories, Motorcycle Tire, Motorcycle Helmets
Owner Comments and Feedback
See details on submitting comments.
Other WebBikeWorld Accessories Posts