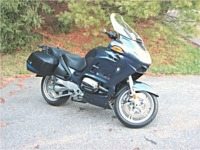
Summary
Is it just me, or do motorcycles seem to collect scratches, dings and stone chips faster than any other type of vehicle?
And the problem may be getting worse instead of better – bigger and more complex fairings give better protection than ever, but that surface area also means more places to attract scratches and dings. Also, some of the manufactured fibers used for protective clothing can scratch the paint on fuel tanks, side covers and other areas.
And don’t forget tankbags — I’ve never seen a tankbag that doesn’t eventually mar the tank it’s riding on, no matter what type of soft material is used for mounting it. It’s almost impossible to keep tiny pieces of grit from under the tankbag, and the constant vibration and movement of the tankbag eventually causes the grit to ruin the paint.
So I’m always on the lookout for neat ways to protect the paint on my bikes without making it appear too obvious. After I learned about the clear paint protection films that are available, I decided to give them a try.
There are various brands and qualities of these clear paint protection film products, but after trying several, I’m convinced that the 3M Scotchcal product is the best of the bunch. Scotchcal is a clear urethane film that comes in various thicknesses. It was designed to protect painted and other surfaces on vehicles, and is used by some of the luxury auto manufacturers, such as Porsche and others.
If you look close enough, you can usually find it on areas that have a good chance of getting dinged by stone chips, such as hoods, wheel arches and rocker panels. Although clear plastic coatings of various quality have been around for a while – there’s a piece on my 1986 BMW R65 between the seat and the gas tank – the 3M product has an excellent reputation for quality. The 8 mil thickness is most commonly used for protecting painted surfaces, although it is also available as a 40 mil thick film for covering headlights.
But finding bulk Scotchcal and then cutting it to the correct pattern can be troublesome. I’ve probably wasted more film than I’ve used, with my unsuccessful attempts to get the exact shape I need. Simple shapes or flat panels and small pieces aren’t that big of a problem, but complex areas like fuel tanks can be really tough to model. I installed a few pieces on various bikes recently, but these were pretty simple, homemade patterns that covered the obvious places; the sides of fuel tanks, battery covers and other flat areas.
So I was intrigued when I was contacted recently by Jim Lawson of Dallas Motorcycle Accessories recently to test his new “SheerMask” kit for the BMW R1150RT. You may know Jim from his well-respected “Ezy Mount” PIAA light mounting kit for BMW’s.
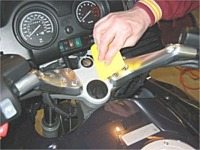
The kit includes a computer designed, precision-cut pattern with pieces to cover part of the bike’s lower fairing behind the front wheel; the complete fuel tank with pieces to fit the top of the tank, both in front and behind the fuel filler; and a small piece to cover the metal section on the handlebars under the ignition (see Illustration A). By the way, the Scotchcal material is guaranteed by 3M for a period of 5 years against manufacturer’s defects not to yellow, crack or craze.
I was impressed with the quality of the kit. It includes one large sheet with the cut pieces laid out on the Scotchcal backing. It also includes a plastic squeegee, which is necessary to install the product.
Although the instructions claim that the R1150RT kit can be installed by a novice, my feeling is that this particular kit should not be installed as your first Scotchcal project. The compound curves on the fuel tank of the R1150RT turned out to be quite a problem to get installed correctly.
Mike Koeniger, a fellow “BMW Bikers of Metropolitan Washington” (BMWBMW) club member, “volunteered” his beautiful brand-new R1150RT for the treatment. Mike rode up to my house one Friday when we both had off from work, and after a bite to eat, we fired up my kerosene heater in the garage and it was soon warm enough to work in our shirtsleeves on the cold, late fall day.
3M suggests that the temperature should be no lower than 60 degrees Fahrenheit to successfully install the product, and I wholly agree. Any colder than that and you probably won’t be able to get the Scotchcal to adhere to the surface.
Jim includes two sets of instructions with the SheerMask kit, and we found them a bit confusing, as they each give a slightly different take on the spray mixture used in the installation process. In theory, installation isn’t really that difficult. The only item you’ll need that isn’t included in the kit is a spray bottle mixture of water and dishwashing liquid necessary to lubricate the film during application.
The mixture is used to spray both the film and the surface where it will be installed. If you’ve ever built a model car or airplane, you’ll be familiar with the next steps. Carefully peel the film from its backing; thoroughly (and I mean thoroughly), soak the area where it will be installed and also soak the film itself on its front and back sides, and then slide the piece on to the bike.
With a good soaking, the film should easily slide into place and can be maneuvered around a bit if necessary for any final adjustments. Then it’s a matter of using the squeegee to gently squeeze out the water from under the film, starting from the middle and working outwards. Lots and lots of patience is needed at this point to get it right.
Problem areas include anywhere there is a sharp radius or transition – you have to keep working the film a little bit at a time to get it to stick (see the area indicated by the red arrow in Photo A below). Sometimes a bit of finger pressure is necessary to hold down a problem spot long enough so that it starts to stick.
Jim’s instructions warn about avoiding creases and wrinkles, but maybe I’m lucky – I’ve never found this to be much of a problem. But I don’t think Jim’s instructions are as emphatic as they could be about how much spray mixture to use. In my experience, you can’t use enough! Everything has to be really soaked for a successful installation. It makes all the difference in the world.
Mike and I decided to first install the small piece on the handlebar. This section on his new bike was already showing signs of abuse from his key chain bouncing around. We cleaned up the metal using some soap and water mix, then cleaned it again with rubbing alcohol to make sure no dirt or grease was left.
This piece went on very easily and should definitely solve the problem of the key chain scrape marks. I would have never thought of covering this section if the piece wasn’t included in the kit, so this is a great idea!
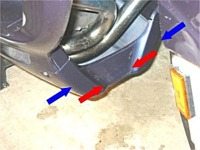
Next, we decided to go for the “chin” fairing in back of the front tire. Mike and I both felt that the piece that’s included in the SheerMask kit for this area is too short. The red arrows in the photo point to the edges of the film.
The piece doesn’t go completely across the fairing, so it ends up only offering about 50% of the coverage that it could in this area that really takes a beating.
We both felt that this piece should cover the complete area behind the wheel, as illustrated by the blue arrows. I talked to Jim about this section; he feels that if the piece was longer, the curves in this area might be too complex for a first-timer to install.
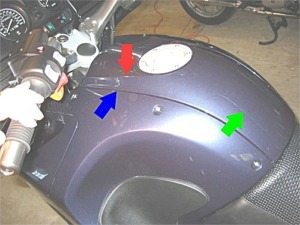
Then came the hard part. We studied the tank for a while and realized that it would not be easy to get it right. After rolling up our sleeves and taking a deep breath, we decided to try the front section of the tank first. After cleaning off Mike’s nice new Zymol wax job, we soaked it completely with our sprayer, then peeled the film off its backing. We must have worked on this section for 20 minutes before we realized that the piece was just a bit too wide for the tank.
We simply couldn’t get it to fit in its proper place between the gaps in the fairing on either side of the tank (blue arrow in the photo below). We finally decided to peel it off and trim the edges. The film is designed to come off, but it isn’t easy to do – we took it very slowly and used lots of juice from our sprayer as lubrication.
We eventually got it off without tearing it and trimmed off about 1/16″ from each edge, using a metal straightedge and a razor. Our second try proved successful, with the only problem being the very sharp transition from the top of the tank down the sides (red arrow in photo below).
|
|
||||||
|
Photo A – R1150RT Fuel Tank
|
It definitely took the two of us to get this piece on correctly. Even with my experience in installing paint protection films, my feeling is that there is no way either one of us could have done this alone.
A professional installer would probably have no problem, but not the first time do-it-yourselfer.
The back part of the tank was somewhat easier, but it was tricky to get the cutout for the fuel filler lined up correctly with the corresponding cutout on the front piece.
Eventually, we got everything “squeegeed” to perfection and it looked like all of the pieces were going to lay nicely. There’s always some cloudiness here and there when the film is first installed, but that usually disappears in about 24 hours.
Jim suggests using regular auto polish to take out any of the scratches that may appear in the softer Scotchcal from the squeegee. You should probably wait several days to do this, to make sure everything is nice and dry.
It also would be nice to have a piece to cover the area on the fairing above the headlight. This section takes a lot of abuse from stones and bugs. Even on the cold fall day we chose to install the SheerMask kit, Mike had some bug splatters on the front of the fairing from his ride over to my house.
All things considered, Mike is very pleased with the outcome of the project and with the added protection that the SheerMask kit provides, especially on the fuel tank and on the handlebar. Since there is no way we could have cut a template ourselves to cover some of the more complex areas, we felt that the cost of the product was fair.
Note: For informational use only. All material and photographs are Copyright © webWorld International, LLC – 2000-2011. All rights reserved. See the webBikeWorld® Site Info page. NOTE: Product specifications, features and details may change or differ from our descriptions. Always check before purchasing. Read the Terms and Conditions!
| Product Review: SheerMask Paint Protection Kit | |
| Available From: Dallas Motorcycle Accessories, 4514 Tranquility Drive, Garland, TX 75043 or Cyclegadgets | Suggested Retail Price: $59.95; $39.95 for the K1200RS |
| Fits: BMW R1100RT; R1150RT; K1200RS; K1200LT | |
| Product Comments: Provides good tank coverage; excellent protection from stone chips and tankbag scratches; computer designed and CNC cut film patterns; nicely designed and packaged. Installation is a bit difficult due to the curvature of the RT’s fairing; could use another piece for the front of the R1150RT’s fairing above the headlight; a bit on the expensive side. | |
| More: wBW Motorcycle Accessory Page | BMW Page | |
More Information
Thomas Cheng of Secondary Exposure Incorporated, a company specializing in paint protection film, writes:
“Paint chipping is going to get worse since the government came out with a bulletin recommending the decrease in usage of lead based paint by vehicle manufacturers. Lead is toxic, but it adds strength to paint. Instead, paint with higher water content (in place of lead) is now commonly used among all car manufacturers; just ask a Ferrari owner and you’ll realize that the paint is often described as soft as butter. In addition, car makers get an increase in revenue from the repainting/repair of damaged paint by their own body shop (dealer price!). Thus, it’s the consumers who’ll have to cough up money for the inevitable — paint chips, nicks, and scratches.”
“There are many 3M Scotchcal paint protection film vendors. Unfortunately, most people do not know how to chose one. What people should look for is the price for the amount of coverage, how thoroughly will an area be covered (does a full bumper get wrap to the wheel well?), how many pieces to cover a big area (minimum number of seams), and most importantly, how competent is the installer (don’t even bother doing the hard pieces yourself, you’ll just be throwing away money since extensive training is a MUST!). Majority of installers will not be able to install a piece to fully cover the front bumper from wheel well to wheel well. Look for those who can do it competently with MINIMUM amount of silvering, haze, bubbles, and imperfections; remember that you are paying for protection not perfection, and installers are only human.”
“An experienced installer is the #1 indication that you are getting what you pay for, since they don’t come cheap, and cheap installers don’t do good work. Anybody can sell the film (the cheaper the film, the smaller the pieces?!), but it’s hard to find a competent installer who is passionate in applying the film; it’s LITERALLY an art to them not just a job. And they are their own hardest critics. Good Luck on your quest to stop the paint manufacturers from decreasing the value of your motorcycles! All paint protection question welcome!”
Thanks Thomas — you can contact Thomas with your paint protection questions.