

The Sena 10R now holds the middle ground in the new Sena 10 series intercoms.
If it looks familiar, you’re right!
This is similar to the Sena SMH10R (review), which introduced the low profile format.
In this design, the intercom and battery pack are separate modules. Stick ’em on your helmet, install the (outstanding) speakers and you’re ready to rock.
The Sena 10R uses the new Sena handlebar remote control as the main controller for all the features. Sena is experimenting with packaging; for now, the 10R is available as a single kit only with or without the remote.
The handlebar and wrist remote we described in the Sena 10U (review) works with any of the new Sena 10 series intercoms (not the SMH10 series), so if you have one (or both), you can control the 10R, 10U and 10S.
Before we get into the details of the 10R, there’s one huge feature here that should make many owners happy: a replaceable battery.
webBikeWorlders have been asking for that for years and now you have it. Buy an extra battery, keep it charged and it slides right into the battery holder.
Frankly, the “problem” of a non-replaceable batteries isn’t really, but in any case, the 10R replaceable battery is the solution.
The 10R also includes the latest Bluetooth 4.1 and new noise reduction technologies that really do seem to work.
Sound and voice quality on the 10R is outstanding and new technology has been added to increase the volume. Now the improved speakers can be cranked up to about as loud as we’ve ever heard in any motorcycle intercom system.
The 10R also has an updated “Advanced Noise Control” technology that works very well to reduce background noise during intercom conversations.
As is the case with the higher-end intercom systems, the 10R has a ton of features and you’ll have to spend some serious book time with the owner’s manual to learn how everything works.
The instructions could be organized better but everything is there, it just takes time (and some memorizing the various button-pushing sequences) to absorb it all.
There’s no real-time embedded help system to guide you through the button selections, like there is on the latest Interphone F5MC (review) and the 10 series intercoms could really use this. Our advice to Sena would be to spend more time on voice control rather than remote control.
Other advanced features (that we haven’t been able to try) on the 10R include playlist sharing with up to 4 intercoms (not sure really what that means) and you can connect up to 4 intercoms to a phone conversation, although we can’t imagine trying to do that while riding.
The range of the 10R is just short of a klick at a claimed 900 meters; we got just about that on a straight, flat and open road with one 10R and the 10U.
Sena 10 Series Differences?
Generally speaking, the new 10 series unfolds something like this:
- The Sena 10U is designed to fit inside specific helmets (Arai, SCHUBERTH C3/Pro and Shoei) for a factory-look installation that’s barely noticeable. The 10U is best controlled by the handlebar and wrist remotes.
- The Sena 10R has the same features as the 10U, with slightly less range (the 10U has a dedicated antenna) and slightly less battery life. But the 10R will fit nearly any helmet and it has the removable battery pack. Use the remote or the 10R buttons.
- The Sena 10S replaces the popular Sena SMH10 (review), the intercom that started it all for Sena. The 10S has a redesigned “Jog Dial” but the remote will also work.
To summarize, the 10 series spans the range from “use the remote control” (10U) to “use the jog dial” (10S).
Since the Sena 10R (and 10S) shares many/most of its feature set with the 10U, much of the information from our 10U review will be repeated here. If you’re familiar with the 10U, you know the 10R (and the upcoming 10S).
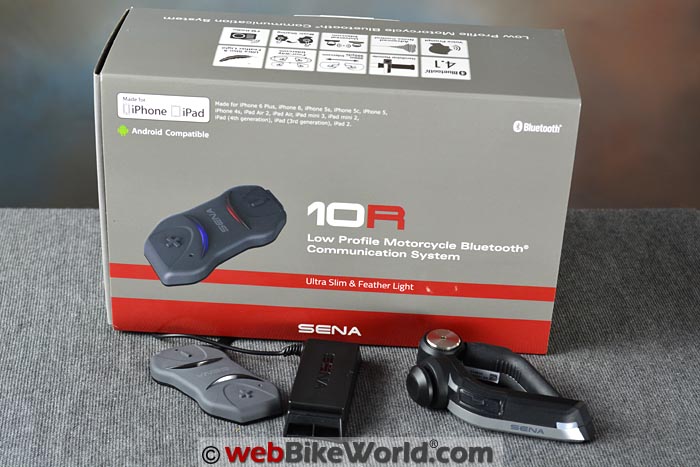
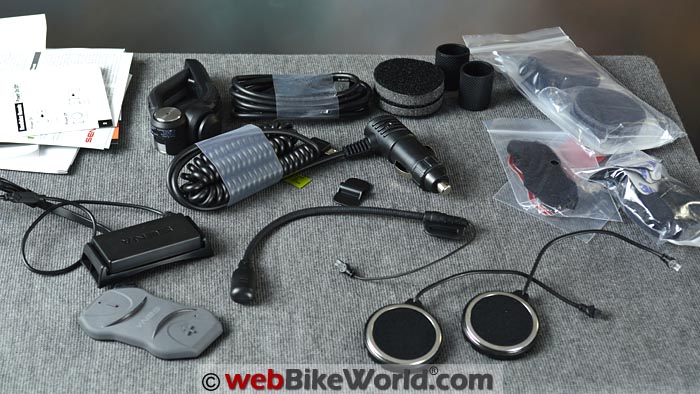
In the Box
- The 10R kit includes the battery module, intercom module, speakers.
- Kits are available with or without the handlebar remote (priced accordingly).
- Handlebar remote rubber bands for friction (if needed) included in the kit.
- Various foam pads for mic, speakers and speaker attachment.
- Micro-USB power and data cable.
- Various double-sided tape stickers.
- Boom and wired mics (our kit had a boom mic only though).
- No wall charger but there’s a Euro-style accessory outlet USB charger included. The 10R can be used while the battery is being charged.
10R vs. 10U vs. SMH10R Features
The Sena 10R is has the same feature set as the 10U. As a 10 series, it’s among the top-of-the-line Sena intercoms, with all of the bells-and-whistles you’d expect.
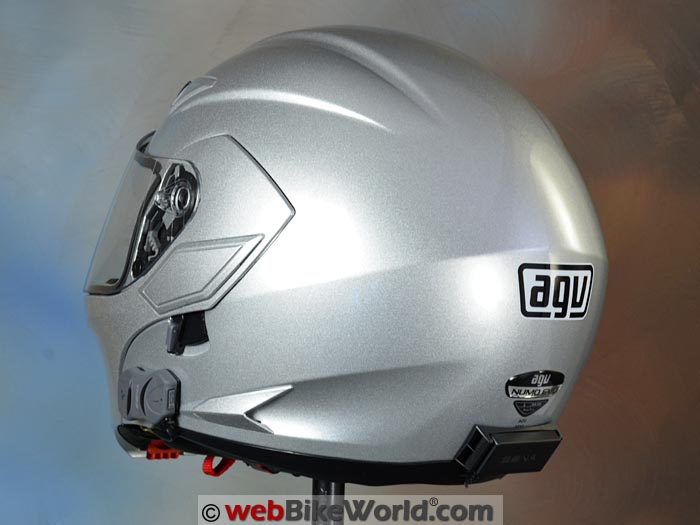
The 10R has the same (very) low profile form factor as the Sena SMH10R (review) and, in fact, it shares a nearly identical shape.
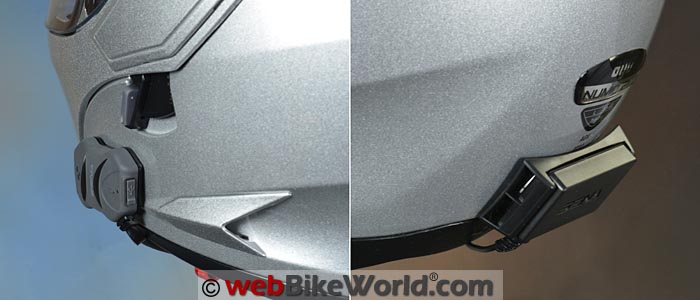
The intercom and battery pack are split into two separate modules, both mounted via double-sided adhesives. Typically, the battery pack is mounted in the rear of the helmet and the intercom module on the left side.
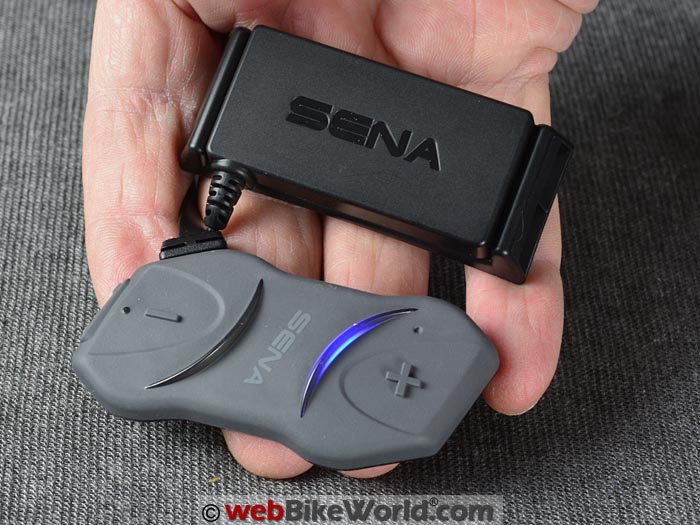
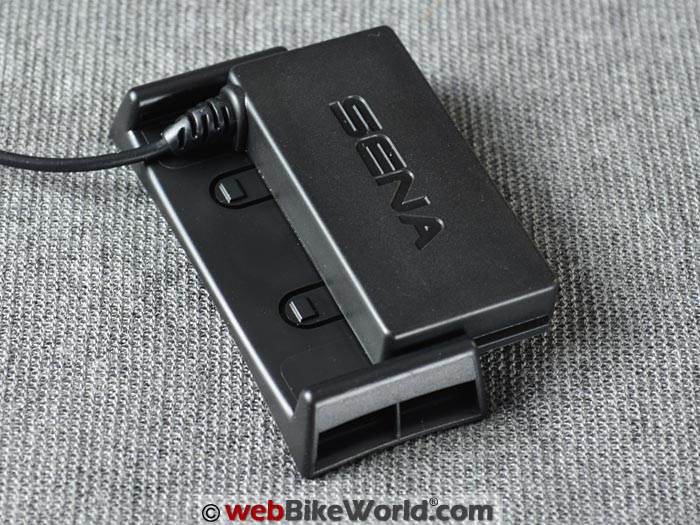
For the 10R, the battery pack is easily removable and replaceable. Simply slide it out of the holder that sticks on the back of the helmet (and is attached via a wire to the intercom module), slide in another battery and keep going.
Of course, the intercom must be turned off first and then re-started once the new battery is installed. This means you can keep a spare charged battery in a pocket, but in reality, it’s pretty rare to be riding for so long that you’ll deplete a battery.
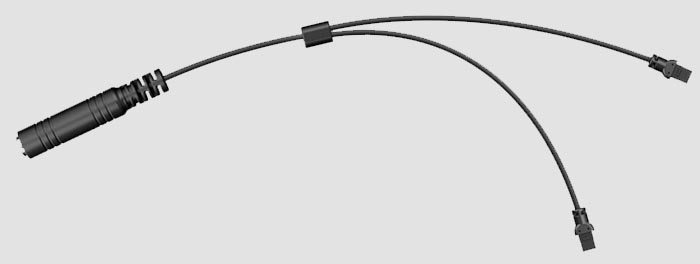
UPDATE: Sena 10R Earbud Adapter Split Cable
Sena announced the availability of Part #10R-A0101, the Earbud Adapter Split Cable. This connects to the special Sena speaker connectors on one end and it has a standard 3.5 mm port for earbuds. List price is $12.95.
Low profile 10R mounted on helmet with battery pack in the rear.Sena 10R Main Features
The Sena 10R includes:
- FM Radio: FM radio with RDS AF (Radio Data System Alternate Frequencies), 10 preset station memory and an automatic scan function.
- Battery: The 600 mAh lithium polymer battery has a charging time of approximately 3 hours and claimed talk time of 10 hours.
- Bluetooth: Headset Profile (HSP), Hands-Free Profile (HFP), Advanced Audio Distribution Profile (A2DP), Audio Video Remote Control Profile (AVRCP).
- Built-in SBC Codec Advanced Noise Control Wide volume control.
- Sena rates the 10R at approx. 900 meters max range (the 10U is rated at 0.8 to 1.6 km).
- The 10R has an SBC Codec (Low Complexity Sub-band Coding for digital audio encoding and decoding for Bluetooth speaker output).
- Included is the Sena Advanced Noise Control for wind noise reduction.
- The “wide volume control” on the 10R allows a very large range from very quiet to very loud.
- The bit sample rate is 48 kHz (DAC).
- Bluetooth pairing for mobile phones (can connect dual mobile phones).
- Some voice prompts in the configuration menu.
- Firmware upgradeable.
- Two-year warranty.
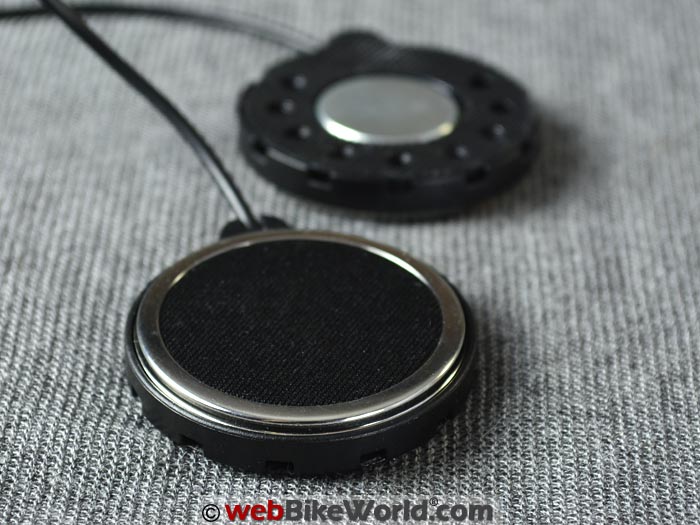
The wiring harness starts at the intercom module in a flat cable, then separates into 3 branches. One of those branches further separates into 2, for the left and right speakers. One branch is for the microphone and one branch for the battery pack.
The connectors are a dual-pin type, specially designed for the 10R, so at this time it’s not possible to use auxiliary speakers or earbuds.
Close-up of (L) intercom module and (R) battery pack mounted on helmet.Additional 10R Capabilities
It’s really difficult to review a modern high-end intercom system, because there are now so many features included in these complex devices that it’s virtually impossible to describe (or even to use) them all.
But the 10R has a few more advanced features shared with the rest of the 10 series that we may not have completely described these before, so here are a few.
Universal Intercom: A feature of Sena intercoms of all types for some time now, this allows pairing between the 10R and one other non-Sena Bluetooth intercom system for basic rider-to-rider or rider-to-passenger communications. Note that there are some limitations to this, so be sure to read the full version of the Sena 10R owner’s manual (.pdf).
Three-Way Conversations: Two 10R systems and a non-Sena Bluetooth intercom can be connected for intercom conversations.
Four-Way Conversations: The 10R can be configured to connect with up to 4 different devices, mixed Sena and non-Sena, for intercom conversations. This is rather complex and will probably take some practice to learn but it’s all described also in the full version of the owner’s manual.
FM Radio Temporary Presets: If you’re passing through a city or region beyond the range of your normal FM radio preset stations, you can scan for and set up to 10 temporary stations without losing the original presets. Tap the rear button 3 times on the remote to scan for 10 temporary preset stations but note that those 10 will be cleared from memory when/if the 10R is switched off.
Second Phone Pairing: You can simultaneously pair up to 2 Bluetooth-enabled phones with the 10R, although why you’d want to do this is a mystery.
Speed Dial: This comes in handy if you need to call someone when you’re on the bike (and pulled over safely on the side of the road, of course). Up to 3 speed dial numbers can be programmed, using either the configuration menu or the My Sena app.
Audio Boost: This 10R feature is enabled by default. It increases the maximum speaker volume at the cost of some fidelity (although we don’t really notice a difference). It can be enabled or disabled via the configuration menu or My Sena app.
Voice Activated Phone Answering: The voice activated phone answering feature is enabled by default. It allows you to say “Hello” loudly into the mic if a call comes in and the system will answer. As is usual with this feature on any brand of intercom, it doesn’t always work consistently. Voice activated intercom
Voice Activated Intercom: The voice activation can also be enabled to initiate an intercom conversation. We don’t know how this works when multiple intercoms are connected.
Vox Sensitivity: 5 levels can be set in the configuration menu or the My Sena app. Level 3 is set by default.
Voice Prompts: Minimal voice prompts are enabled by default, for configuration menu, battery level, speed dial and FM radio. Voice prompts can be disabled also.
Sidetone: Sidetone is sort of a full-duplex for your voice. It can be set to hear your voice through the speakers when you talk on the intercom or phone call. This is a useful feature; it helps you to know how loud you need to speak to be heard (usually not as loud as you think). This is disabled by default and it can be enabled in the configuration menu or My Sena app.
RDS AF: RDS AF allows the system to tune to a second FM radio frequency (if available by the station) to help pull in some stations.
Advanced Noise Control: If enabled, the background noise is reduced during an intercom conversation. When disabled, the background noise is mixed with your voice during intercom conversations.
Battery pack on top and intercom module on the bottom. The battery slides out of its holder for easy replacement.Tip: GPS Pairing
The 10R can pair with both the cell phone and a GPS device simultaneously. We haven’t used a dedicated GPS in some time, instead using Google Maps, Waze, Here maps or other smartphone-based direction systems, streamed directly to the intercom.
(See the webBikeWorld article “Using a Tablet as a GPS“). But many motorcyclists do use Garmin, TomTom and other dedicated GPS units.
Connecting a dedicated GPS to the 10R is a bit tricky; this is where you’ll have to dive into the full instruction manual to learn how, and there’s also a specific button-pushing sequence.
The process is described in section 5.2 of the owner’s manual. Follow the directions as if you are pairing a second mobile phone (HFP pairing).
To pair a dedicated GPS, press/hold the front button on the remote for 5 seconds until you hear “Intercom pairing”.
This is where the instructions aren’t quite clear. Keep pressing the front button while you press the rear button once, then you’ll hear the voice prompt “Second mobile phone pairing”.
Presumably your GPS is in pairing mode and it should then pair and connect. (This is also how you can pair a second cell phone if desired.)
The instructions in this section aren’t clear, it reads “…tap the rear button again” but there’s no “again” about it.
Once the GPS is paired and your route is being relayed over Bluetooth, the guidance instructions will take priority and interrupt an intercom conversation, then the intercom is re-connected once the GPS instruction is ended.
By the way, you can also use the Sena SR10 (review) two-way radio adapter with the 10R and the two-way radio audio will be heard along with the intercom conversation as part of it, useful for group conversations when using a two-way radio.
By the way, the highest level of priority is a phone call, next is the intercom, then music sharing, then FM radio and the lowest priority is music streaming.
Tip: Connecting the Remote
The 10R intercom fires up easily and immediately. Just press the plus and center buttons simultaneously and you’ll hear the familiar Sena “Hello” voice.
But don’t forget the remote control. To start it, simply tap the front button once and the blue LED should flash.
The remote is paired at the factory, so to re-connect it with the intercom after both are turned on, hold any button on the remote for about 1 second and the intercom should say “Remote control connected.”
Tip: Turning Off the Remote
This will probably be the most difficult thing to remember, because there’s nothing to indicate that the remote is on and it’s easy to forget to turn it off.
To turn off the remote, press and hold the joystick and the LED at the top of the front remote arm will glow red. The tip here is to keep holding and wait about 2 seconds, then press and hold the front button really firm and do not let go.
You should see the red LED flash and then you can release both buttons and the remote should turn off. To check, after the LED has gone out, push on the joystick. If you don’t get a red flash, the remote has successfully been turned off.
If you do get a red flash, the remote is still on and you’ll have to repeat the above. The front button on ours doesn’t work consistently and needs a lot of fingernail pressure and an exact push in the center to work.
Tip: Handlebar Remote Control Pairing
Our 10R kit has the remote, but the remote was not paired with the intercom as it should have been. But this actually helped us learn how to pair it.
To re-pair the remote (or if you buy a new handlebar or wrist remote), follow the instructions in section 13.15. Also, see the special printed insert for pairing the handlebar remote, included in the box.
Enter the configuration menu, then use the joystick to navigate to the voice prompt “Remote control pairing”. Then press the rear button and hold until you hear the high/low beep pairing tone.
Then put the remote in pairing mode by holding the rear button for 5 seconds and the intercom should say “Remote control connected”.
10R Handlebar and Wrist Remote
Like the Sena 10U, the primary input for the 10R is the handlebar remote, but the 10R is pretty easy to control using the buttons on the intercom module.
The design of the Sena handlebar remote has a few quirks however, as we described in the 10U review.
Since remote devices for controlling a motorcycle intercom involves relatively new technologay, the designs will probably go through several iterations over time.
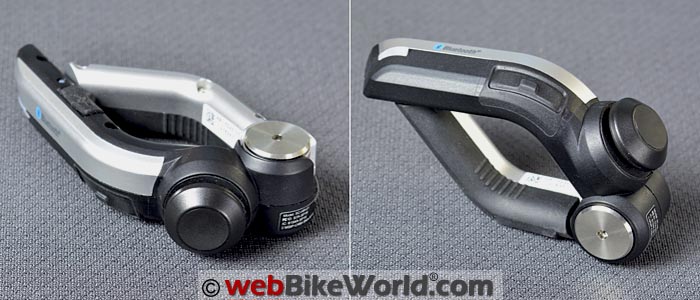
The Sena version of the remote has a sort of “U” or “V” shape, with a large rotating joint at the bottom. The two arms have a strong spring to hold the remote on the handlebar.
This design can be a little difficult to use; on some motorcycles, it makes the reach to the inside controls (e.g., horn, lights, turn signals, etc.) a bit of a stretch.
Also, the front and rear buttons on the remote can be difficult to use. They’re flush-mounted membrane type buttons and — especially on the remote that came with the 10R — the buttons require a hard and direct center push.
The two of us have been using the remote and we haven’t been able to get consistent performance from the buttons, even without wearing gloves, so it may take some practice and it will certainly take some studying of the manuals to learn all the button-pushing sequences.
This is the compromise for having the low-profile 10R or the built-in 10U system, both of which have been designed with space saving in mind, so the Sena “Jog Dial” is not included.
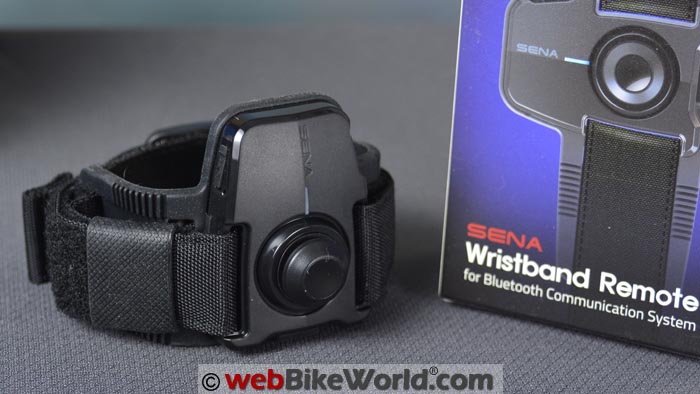
The optional Sena wrist remote we reviewed with the 10U also works with the 10R and the upcoming 10S. The buttons on that are larger, easier to use and the wrist remote can also be mounted on the fuel tank, which we found to be the optimal location.
So at this point in the evolution of the Sena remotes, we’d recommend buying the 10R kit without the remote and buying the optional wrist/tank remote instead.
Don’t forget, depending on the neighborhood where you park the bike, be sure to take the handlebar or wrist remote with you. One of the benefits of using the wrist remote on your wrist is that it comes with you when you leave the bike.
The downside is that leaving it on your wrist means using two hands to work the buttons. In fact, you may want to experiment wearing it on your right wrist, but then the buttons may be upside-down.
There’s also still an issue with button naming. Sena hasn’t yet standardized on this; on the 10U and 10R intercom modules, the buttons are “+” and “—”, while on the remote, they’re called “front” and “back”. Plus the joystick, which toggles left and right, up and down and also acts as a button when pushed.
The intercom module also has the plus, minus and a center button, so all of the functions can be accessed that way as an alternate. Some owners may prefer to simply memorize the button-pushing sequence on the intercom module rather than using the remote.
They’re easy to find and use when wearing gloves and it’s a good idea to learn this method anyway in case the battery on the remote dies before the intercom.
The upcoming Sena 10S uses the standard Sena Jog Dial, so if you don’t want anything to do with a remote control, that may be your intercom (the 10S will also pair with the remote if desired).
Bottom line? The remote system for controlling the intercom is an excellent idea, but after using two of them now for several months, we feel it may take a few generations of evolution before it’s perfected.
In the meantime, instead of putting lots of effort into a remote control, how about voice control? Interphone has taken a few big steps in that direction and with the current state of voice recognition, that’s where we’d be spending our R&D dollars if we were in charge…
Using the 10R
Once you’ve figured out how to work all the buttons — whether on the remote or on the intercom module — the 10R works very well indeed.
In fact, it seems to have a more “polished” functionality and performance than the 10U we reviewed.
In all fairness though, our 10U was a very early production version, so it may received some improvements before general release.
As we noted in the 10U review, basically if you have used any other Sena or even any other type of modern Bluetooth motorcycle intercom, you’ll pretty much know everything about how the 10R (and 10U) operates.
Every feature on the 10R worked the first time and works well. That includes pairing, phone dialing, music streaming, GPS instructions (via smartphone), the My Sena app and the rest.
The 10R software system also seems more “polished” than ever, working without a glitch. And the 10R sound volume is outstanding, as is the voice quality when we’re on the intercom or paired with a phone.
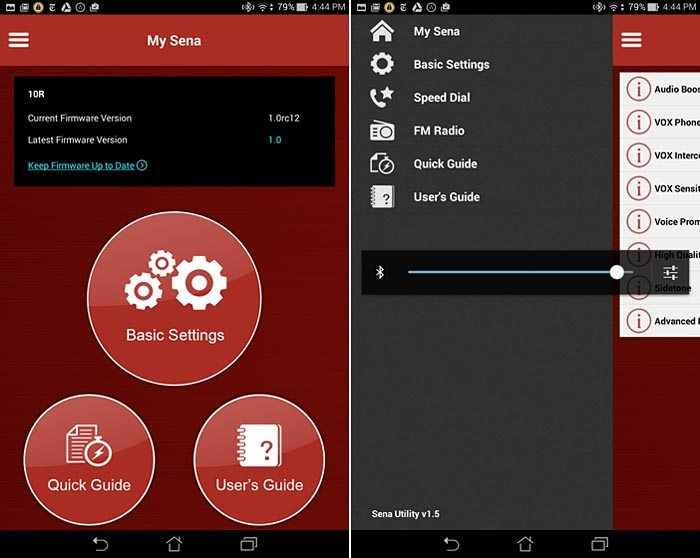
My Sena App
Be sure to download the My Sena app (screenshots below), available for Android or Apple devices. Unfortunately, there’s no Windows phone version, so good thing we have a couple of Android tablets available.
Our 10R immediately paired with the tablet and we had no problems at all using the app to configure the 10R.
The app allows you to quickly and easily set any of the features, although it’s not something you’ll have to do very often once you tweak a setting or two, add your speed dial numbers and set your FM radio stations.
In fact, the My Sena app works best for setting the radio stations; the rest you really should do via the button pushing routine using the remote or the intercom module, because it will help you learn the system.
Sena 10R speakers.Accessing the 10R Configuration Menu
Speaking of which, here’s another tip: to access the configuration menu, push really hard on the front button on the remote (or center button on the intercom module) and…don’t let go!
You’ll go through a series of beeps and spoken voice announcements and the tendency is to let go of the button as soon as you hear something.
It’s the strangest part of accessing the configuration menu in our opinion because you have to go through the pairing choice, which sounds like it’s starting to pair (with the high/low tone sounds) and you may think you’ve done it wrong.
This is especially a problem with the remote, which has the flush membrane buttons.
On our remote, it takes a lot of pressure directly on the center of the button and the pressure must be held until the configuration menu is reached, or it may stop on an intermediate choice before it reaches the configuration menu.
A better design would be a single button-pushing sequence to get directly to the configuration menu instead.
The problem is that if you activate one of the other pairing modes by mistake, there’s no escape from the pairing mode other than waiting about 30 seconds until the pairing mode ends or you can stop and restart the intercom.
Or, just use the My Sena app instead, but sometimes you want to change a configuration without having to stop, pair the app and work the app buttons on your phone.
Listen to It
Just for kicks, we recorded a couple of .mp3 files so you can hear the sequence of events:
1. This recording starts from the very beginning, turning on the intercom, connecting the remote and the phone and then pressing and holding the front button to get to the configuration menu.

Then the joystick was used to scroll through all of the configuration menu choices. At the end, note that after 10 seconds if no choices are made, the system will exit the configuration menu (you can hear this in the recording).
2. Here’s a recording of just the voice prompts when the front button is pressed and held as the system gets to the configuration menu. This is mean to illustrate the point that you have to press the front button to start this sequence and hold it tight and don’t let go until you hear “Configuration menu”.
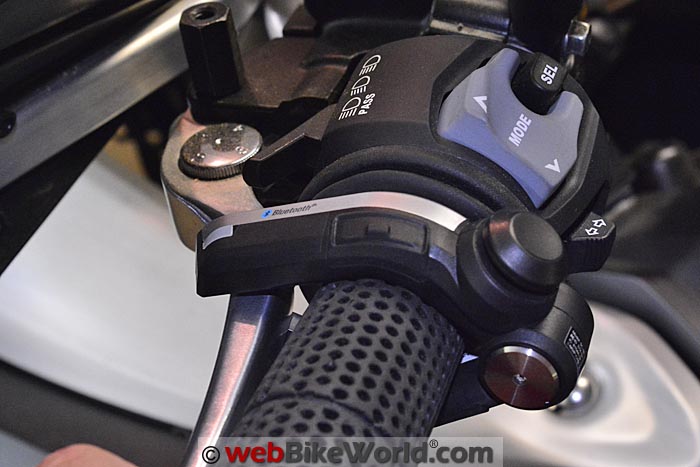 Be sure to orient the handlebar remote so that it does not interfere with clutch lever travel. The optional Sena wrist remote works with the new 10 series intercoms.
ADDENDUM: The Wrist Remote
We also have the optional wrist remote from the 10U that we’ve been using with the 10R. It’s a wide and flat device with two larger buttons and a joystick and it is on a thick and fully padded wrist strap that can be placed over your left or right arm.
But the trick is that it comes with a couple of hook-and-loop pads that you can stick on your fuel tank or other handy location. We find it easier to use the wrist remote buttons, but if it’s on your left wrist, you’ll have to take your right hand off the throttle to press the buttons.
You could wear the remote on the right wrist (not recommended), but then the buttons are “upside down” and you’ll have to take your left hand off the grip to use the remote.
With the wrist remote installed on the fuel tank, you’ll still have to remove your left hand from the grip, but it’s less cumbersome and unusual than moving your left hand to your right.
But don’t forget: using the buttons on a helmet mounted intercom requires taking your left hand off the grip also.
In the end, for most uses, the handlebar remote is probably the way to go.
But we wonder if they’re couldn’t be a different design; perhaps some type of vertical “box” that has a circular clamp-type attachment that would allow the control to stand up from the left hand grip.
Or, something similar (like the Vertix Raptor-i intercom (review) remote control shown in the photo in the comments section below).
We’re also reviewing the new handlebar remote for the UClear HBC200 (review), a very different design than the Sena remote, so be sure to read about that soon too.
[UPDATE: Sena told us that the Wristband Remote was originally designed for a passenger but it can be used as we noted by the rider on the left or right wrist or attached to the fuel tank using the included hook-and-loop pads.]At the very least, we’d like to see larger buttons on the handlebar remote, to make them easier to locate and find when wearing gloves.
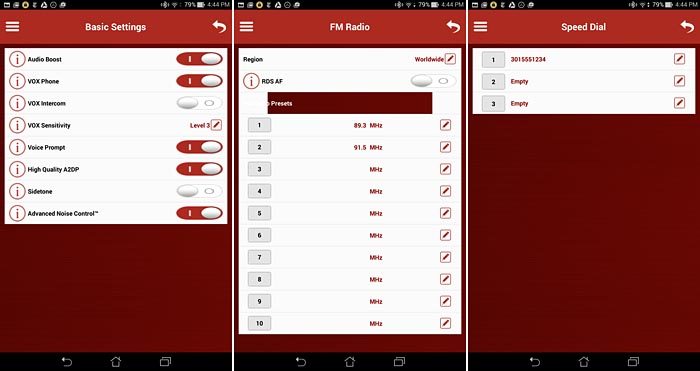
ADDENDUM: My Sena App Screenshots
Here are a few screenshots taken from the My Sena app, downloaded to an Asus MeMo Pad 8 Android tablet.
Left: My Sena app home screen. Right: Basic settings (screenshot taken during volume setting by mistake). (L to R): Available basic settings. FM radio presets. Speed dial numbers.Conclusion
The Sena 10R may just be the best Sena intercom yet, although we’ll hold judgment until the 10S arrives.
The low profile of the 10R and the really good news about the removable/replaceable battery makes it an excellent compromise between the 10U and the 10S.
The only hitch is the short length of wire that sticks out from under the 10R intercom and battery modules before it hides under the helmet liner, but that’s a minor issue.
The best part about the 10R is the software or firmware. Everything on ours works as expected and it works really well, without the customary quirks, glitches and bugs that seem to be part of the normal motorcycle Bluetooth intercom discovery process.
The only fly in the ointment is that we’re still not completely satisfied with the design of the Sena remote. The buttons are much too small and too difficult to use and the remote just seems a bit clumsy on a hand grip.
Fortunately, you can easily use the flush-mount membrane buttons on the 10R module to control all the features and you also have the My Sena app to set the configuration.
And since the 10R is available without the remote, you don’t have to bother with the remote if you don’t want to.
In fact, as of this writing, the 10R kit without the remote has been a sellout, so apparently many 10R owners are voting with their wallet.
The other 10R bonus is the sound volume. We’d guess for sure that the 10U will be firmware-updated with the equivalent, but the hidden design of the 10U speakers means that the volume may never equal the output of the 10R, which is loud!
There’s also a big learning curve for the Sena 10 series.
But that’s not really helped by a sometimes confusing owner’s manual that, by the way, does not come in printed form in the box. You have to download a .pdf version and you’ll probably want to cut and paste some portions to print as a fuel tank cheat sheet.
Unless you really want the mostly hidden look of the 10U, our recommendation is to go for the 10R. It’s probably the best Sena intercom system to date, despite the issues we have related above in our review, and it’s easier to mount, fit and use than the 10U.
It’s also better than any of the previous SMH10 series intercoms, which although still in the retail pipeline, are apparently ending a long and very successful production run.
Owner Comments and Feedback
See details on submitting comments.
From “L.R.” (March 2016): “Long-time Sena user, made the leap from the SMH10B to the 20S, then tried the 10R:
20S — Should be the holy grail: great sound, great features, but too damn big/always in the way/doesn’t mount well to SCHUBERTH C3 Pro.
In addition, the buttons react to even the tiniest bit of pressure, so buttons get pressed whenever I turn my head to the left or raise my left arm. Adhesive mount doesn’t feel secure.
Awesome feature: intercom can be in use while sharing music, so me and my girl can listen to the same thing and comment on the scenery without stopping the music. Once you have that feature, you don’t want to ride 2-up without it.
10R — Recessed buttons + gloved hands = better make sure the remote is charged. Without the remote, good luck finding the right buttons, and you’ll need more than good luck to press them correctly in combinations.
Unlike the buttons on the 20S that are actuated by a stiff breeze, these recessed little things need much more of a push, or maybe that’s just because you can’t tell where the button is.
But even with the remote, the 10R can’t replace the 20S: while the 10R has music sharing, it lacks the hardware support to have the rider and passenger keep a live intercom open while sharing music. Would that I knew this before purchasing!
So now I have a 20S for use 2-up, and a 10R for one-up (with the remote!).
Given that the boom mics and speakers are the same, if these were more thoughtfully designed, one would be able to change the 10R for the 20S and vice versa without having to change out the mic and speakers, effectively re-wiring the helmet. If only.”
From “S.G.” (December 2015): “You mention how loud you can turn up the speakers on this unit but I’m curious as to the quality of the sound. I’ve been thinking about getting a Cardo SHO-1 (review), a big part of the reason being how well you spoke of the quality of the speakers in your review.
That review is now close to 2 years old so I would like to have a comparison between the two if possible.”
Editor’s Reply: It’s very difficult to tell and compare, thin helmet speakers have basic quality, probably about as good as a basic pair of earbuds. All I can say is that the sound quality of the 10R is good for this type of system.
You’re just not going to get audiophile quality from any helmet speaker, especially when wearing ear plugs and with the road and wind noise when riding.
This is why volume is important, but once you get over 70 k/hr or so, it’s difficult to hear anything well.
Also…it’s probably not fair to compare the 10R with the Cardo SHO-1, because the Cardo is specifically designed for certain helmets.
Helmet design and quality and helmet sound suppression through padding and the neck roll, plus windscreen type, motorcycle type, riding environment and more can make a big difference in volume and perceived sound quality in an intercom system.”
From “J.M.” (December 2015): “I own/use 6 Sena SMH10R Bluetooth communication systems and absolutely love ‘em. I’ve figured out how to hide the battery safely inside my various different helmets, so it’s a very clean setup.
I was really excited about the new Sena 10R until I realized that it is not compatible with earphones.
As an old geezer with substantial hearing (read an idiot when I was younger with guns/pneumatic tools/motorcycles/airplanes etc.) I simply have not had any luck using helmet speakers. Custom molded earphones have been a godsend for me.
They serve as both hearing protection and crystal clear communications at a very low volume level. With the Sena SMH10R, you have your choice of helmet speakers and/or earphones.
You may have mentioned this lacking feature in your article, and I simply missed it. If so, I apologize.
Next time you’re talking with Sena, ask them if they have any plans to make the use of custom earphones an option with new 10R. For the life of me, I cannot figure out why they eliminated that option.
You mentioned that the speakers were as loud as you’ve heard. Think there’s a chance they would work for me?
You and I are on the same page concerning wearing earplugs/ear protection. My life would be infinitely easier if I could get speakers to work, but the clarity of custom molded earphones is “off the charts” good.”
Rick’s Reply: Yes, we forgot to add info about the speaker connectors, I just did that. The connectors are specially designed, so you can’t use auxiliary speakers. (NOTE: See update above about the new 10R Earbud Adapter now available.)
One of the problems with using earbuds or custom molded earphones is that in-ear devices are illegal for use while in a vehicle in many jurisdictions in the U.S. and other countries.
We always wear high-quality, correctly fitted disposable ear plugs when riding and when reviewing the products like an intercom.
With speakers, it’s important to place them as close as possible to your ears when the helmet is on. I’m not sure if the combination of ear plugs and the 10R speakers would work for you or not.