The R&G Racing boot guards are simple stick-on protectors for the motorcycle frame.
They are precision cut and made for many different motorcycles
The frame plugs cover the various holes on the motorcycle’s frame to keep out dirt and grime.
R&G Racing makes boot guards for many different motorcycle makes and models.
The boot guards are precision-cut, stick-on appliqués that help to protect the finish on the frame.
The R&G Racing frame plugs can be used alone or in combination with the boot guards.
They’re also designed for many different motorcycles to fit into open holes in the frame.
This provides a more finished appearance to the bike.
The boot guards and frame plugs are also available in sets, depending on how much coverage the owner desires.
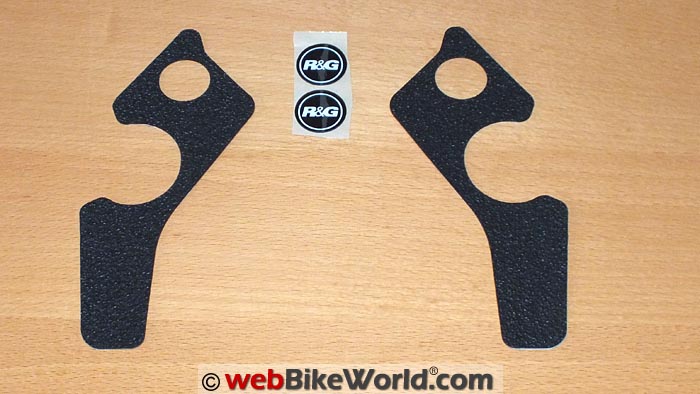
The set shown here is the two piece kit for the BMW S1000XR.
R&G Racing boot guard kit for the BMW S1000XR.R&G Racing Boot Guard Kit
The 2016 BMW S1000XR is getting lots of use on and off pavement and I typically wear a pair of adventure-style or enduro boots to cover the various riding options.
Most of these boots have heavy soles and wide welts. For example, the BMW Santiago boots (review) also have metal impact strips on the front edge.
So it is not uncommon for parts of the frame, foot pegs and, of course, the brake and shift levers to take the brunt of the wear and tear.
As such, having the R&G boot guards adhered to the frame sections is a good thing.
Some owners use 3M Scotchcal or other types of heavy-duty adhesive pads to provide similar protection, but they don’t look as good as the R&G boot guards.
At nearly 2 mm thick, with a pebbled cushion surface on the outer or impact side, the boot guards are cut to match a specific section of the motorcycle’s side frame.
The cut out areas on the boot guards provide clues as to their placement, which is good, because the back of the package insert has only a minimal set of instructions.
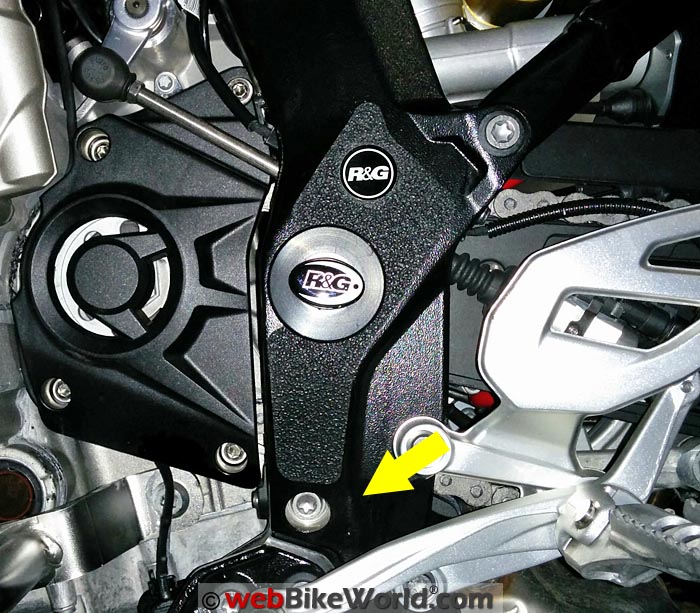
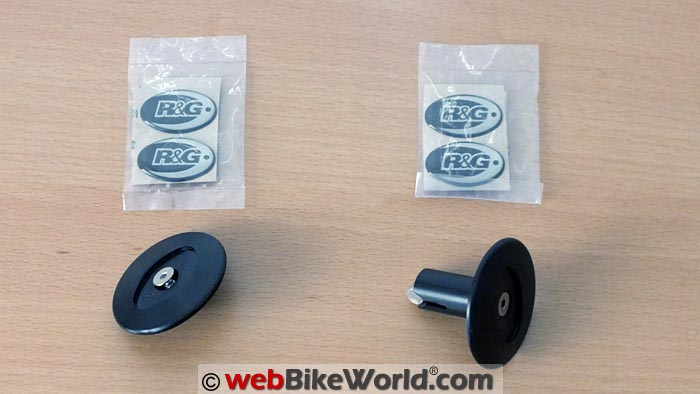 R&G Racing frame plug kit for the BMW S1000XR.
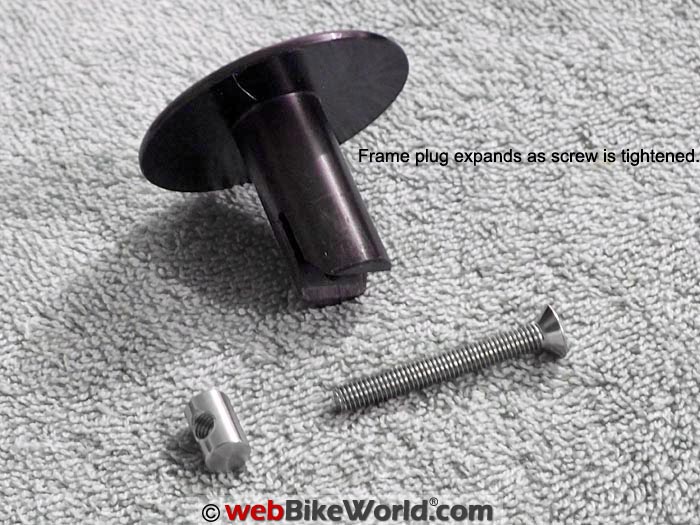 R&G Racing frame insert.
R&G Racing Frame Inserts
The R&G Racing frame plugs or frame inserts can be fitted with or without the boot guards.
The plugs are made from High Density Polyethylene (HDPE), which should make them highly resistant to road debris, fluids, rubbing or pressure from the boots and also temperature swings.
The frame plugs fill various holes in the motorcycle frame; holes that may be used to locate assembly nuts or bolts or other fittings.
Admittedly, the left and right frame plug kits are not as purely protective as the boot guards, but they do serve a purpose in covering up what many consider to be unsightly holes, such as the swingarm spindles.
On the BMW S1000XR, the large diameter (~40 mm) spindles show off the shiny aluminum construct of the frame but they also attract a lot of grunge, which equates to the need to clean.
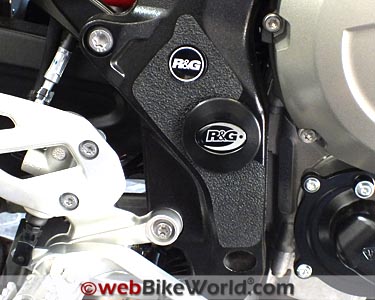
Each frame insert or frame plug fits into and over the openings, providing a good seal while adding a bit of bling to the area, aided by an oval R&G sticker that mounts in the centre of each plug, once the screws underneath are secured.
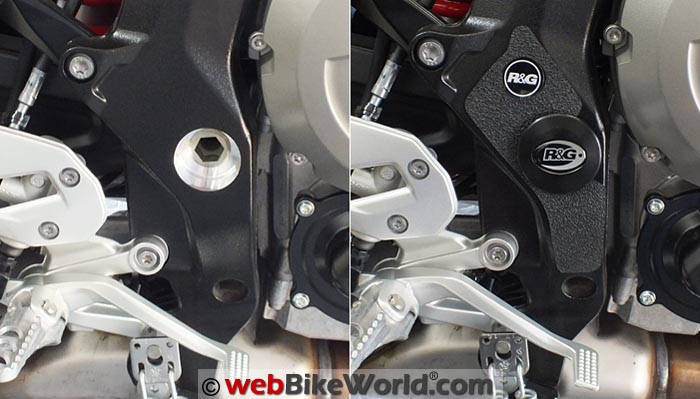
R&G Racing boot guard and frame plug on the BMW S1000XR.Pre-Installation Check
Like everything else I have found so far with R&G products, the Boot Guard kit for the S1000XR (P/N EZBG0104BL) is simple and easy to install.
The heavy-duty adhesive-backed boot guard sections are about 2 mm thick and have a distinctive texture that goes well with the finish on the frame.
The individual pieces are well formed and cleanly cut.
However, for the S1000XR, they are not exactly the same shape and size as depicted on the packaging or even on the R&G website. Each boot guard piece is a bit short for this bike, ending at about the same height as the foot pegs.
When they’re installed, the boot guards end just across from where my boots are located, so I anticipate that the welts of my size 46 adventure-style footwear may impact or catch on the lower edges of the boot guards and that’s something I’ll monitor.
Before installing the guards, a quick visual check should be made to identify the left and right boot sides.
Also, laying each of them out on the designated areas of the frame is a good exercise to undertake before preparing the surfaces and mounting the pieces.
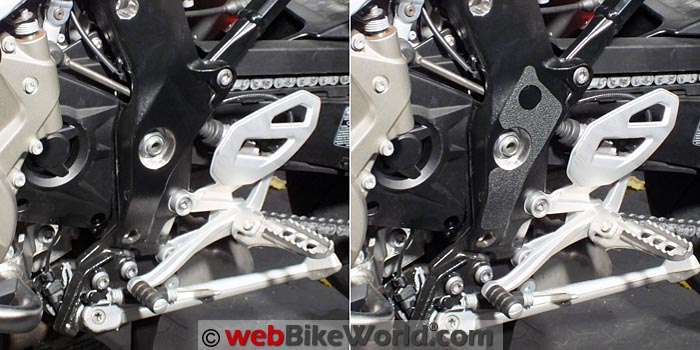
R&G Racing boot guard kit before (L) and after installation on the BMW S1000XR. Surface Preparation
For surface preparation, two chemical-based (IPA) cleaning pads are included in the kits, but my experience with this type of chemical on some metal and powder coated or painted surfaces has been less than positive.
So without doing a test cleaning, I used a lint-free cloth and a drop or two of Goo Gone to clean the surfaces, followed by soap and water and drying.
It never fails (rubbing alcohol can be used also).
It hasn’t warmed to 20 degrees C here yet, so as is normal practice when working with this type of material (and as recommended in the instructions), a minute or so with the heat gun set on low did the trick.
This helps to get the metal and the adhesive warmed and easier to work with.
Installation
Starting with the left boot guard, I sliced the backing material at the mid-point and peeled the top section and located the upper half around the pivot point opening.
Then I worked up and outwards to the edges to prevent any air bubbles or raised surfaces.
But the cover over the adhesive on the lower part would not peel away cleanly, coming off in thin strips, even though the piece was warm and pliable. Otherwise, the pieces are very easy to work with.
Just pay attention to the round cut-out at the top of each piece during installation.
It is easy to stretch and distort that area during mounting, which would then not provide the perfect circular area for one of the included R&G stickers that is the finishing touch.
Before moving to the right side, another 30 seconds with the heat gun on low and a couple of minutes exercising the fingers in applying even pressure over and then around the edges serves to assist the adhesive curing process.
Repeating the exercise for the right side and experiencing the peel issue again added a minute or so, but other than this, this piece ended up adhered without any other issues.
The S1000XR boot guard isn’t quite long enough to provide full protection.Issues to Note
R&G should extend the amount of material in the lower sections of the BMW S1000XR boot guard stick-ons so they are down below foot peg level to provide better protection to the frame.
And while my kit might be an exception, the adhesive seems a bit thin and it tends to self-destruct rather than stay in place.
 The frame plug installed over the swingarm spindle (R&G insert removed).
R&G Racing Frame Inserts
Each frame insert or frame plug kit has a different part number for the left and right sides. The part numbers are FI0114BK and FI0115BK for the BMW S1000XR, for example.
The three-piece assemblies fit into the recesses on the frame and are held in place by an expanding pressure insert. Tighten the hex bolt with a 3 mm Allen wrench but don’t overdo it.
Once they’re located in place, the outer or cap section of the insert covers the hole in the frame.
Installation
The left side assembly uses a 20 mm long screw inserted through the short insert plug and the conical nut is added and screwed on until it just touches the expanding face of the plug.
Push the assembly into the opening until the outer cap surface is flush against the metal of the frame.
Take the 3 mm hex wrench and tighten the screw, keeping the oval centre section level while tightening the assembly.
In tackling the right side piece, I discovered that it didn’t seat fully, sticking out about 2 mm and this became a bit more pronounced with the R&G boot guard in place.
A couple of quick depth measurements later, I trimmed exactly 2 mm of plastic from the expansion end of the plug and cap piece.
This modification did the trick and the frame insert now sits flush against the frame and even with the R&G boot guard section in place.
And in undertaking the final step — adding one of the small oval adhesive R&G stickers to the centre recess of each frame slider — the adhesive issue again raised its less-than-sticky head.
None of the eight stickers (four per package) would stay in place — maybe this is why R&G puts so many in each kit?
So after some slight heating of the stickers to peel off the non-functional adhesive, shaped bits of 3M VHB let me complete the final step.
Conclusion
Other than the issues with the adhesive backing on the boot guards and the adhesive itself on the frame insert stickers, both kits work as advertised.
The frame inserts stick out a couple of millimeters, as they are overlaid on top of the boot guards. But with some riding done with everything installed, this doesn’t seem to be an issue.
Note to R&G: One way to clean up the installation of both the boot guard and frame insert kits would be to resize the cut-outs on the boot guards to match the diameter of the frame inserts.
This would also provide a more integrated look.
Also, the boot guards should be longer and it seems that the expanding plug on the right side frame Insert needs to be shortened just a bit.
Installing them both is more of a recreational activity than work. Even the small things can bring a smile, right?
In This Series:
▪ R&G Racing Aero Frame Sliders Review
▪ R&G Racing Boot Guards Review
▪ R&G Racing Fork Sliders Review
▪ R&G Racing Swingarm Sliders Review
▪ R&G Racing Radiator Guard Review
Master Listing of All wBW Motorcycle Product Reviews
Owner Comments and Feedback
See details on submitting comments.