You could wear sunglasses, but then you have to fit them under your helmet, and as an eyeglass wearer, I can tell you that it’s not easy to fit a pair of eyeglasses into most full-face helmets.
Also, many sunglasses today (including clip-ons) are polarized, and when you wear the polarized lens behind a helmet’s visor, weird things happen when the light bends through; you get strange and distracting patterns in the visor.
Motorcyclists would probably tell you that the perfect solution would be something like a helmet-mounted adjustment knob that lets you dim or brighten the helmet’s visor in a flash.
Yep, I know — the SCHUBERTH flip-up has an internal sun visor that can be rotated down, but the SCHUBERTH has a strange shape that doesn’t fit my round head, and besides, its short sun visor seems kind of cheesy to me anyway.
So what’s left? There are a couple of replacement visors that have recently been developed that use photo-sensitive material that darkens somewhat when the sun gets brighter, but the reviews so far have been much less than complimentary, and you can’t control how dark they get. They’re also pretty expensive. Maybe in ten years or so?
Then there’s the Polar-Optics product. An elegant concept, actually — a lightweight, high-quality “lens” that goes over the helmet’s visor, and can easily be removed when necessary. The Polar-Optics lens has a strip of the “loop” portion of a hook-and-loop fastener (can’t call it Velcro unless it is!) across the back.
You stick the supplied “hook” strips on your visor, and you can attach or remove your lens pretty quickly. When not in use, the lens stows flat and comes with a carry bag, so it’s fairly easy to store under your seat or in your jacket’s back pocket. Install a couple of strips on spare helmets, and you can move the lens from one to another, which greatly increases its utility, and can save a lot of the expense of buying additional tinted visors for every helmet you own.
Before we get into the installation procedure, which is probably much easier than I’m making it out to be, the bottom line is that the Polar-Optics lens is rock-solid at any of the speeds I ride at. I tried it on bikes with and without a fairing, in cross-winds and turning my head from side to side at speed, and it’s as solid as can be.
The dark lens does a nice job of blocking the sun; it provides UV/A and UV/B protection, and it’s polarized. Having the polarized portion of the lens on the outside of your helmet’s visor is the way to go; you’ll get no weird patterns, but you will get greatly reduced glare. There was lots of snow on the ground (not on the roads!) when I tried the lens, and the glare would have been blinding without a polarized lens.
Installing the Polar-Optics Lens
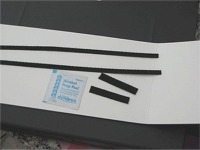
The Polar-Optics lens comes with two long strips of “hook” material, one of which is used to place across the top of your helmet’s visor, and the other to be used as a spare in case you make a mistake when you’re mounting the lens.
The two shorter strips are used to secure the sides of the lens. The directions are pretty easy to follow, although I have a couple of suggestions that I think will make for a more tidy installation.
First you must make sure your helmet’s visor is clean. I usually wet my visor under running water in the sink, and use a tiny drop of dishwashing liquid and rub it around with 3 fingers to remove any bugs or grime.
I almost always use just plain water and my fingers to remove bugs, and only add a drop of dishwashing liquid when it’s really dirty. Polar-Optics then suggests using the supplied alcohol prep pad to clean the area where the hook-and-loop strips will be applied to the visor.
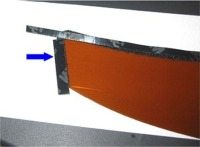
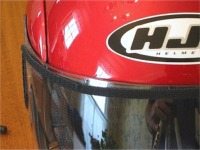
The long strip might be wider than your helmet’s visor; not all visors are the same width. I used a scissor to trim the hanging piece to fit the curvature of the top corner of the lens. I also fit the side “hook” pieces (blue arrow, photo left) over the “loop” fabric on each side of the lens and trimmed those to fit.
Notice the “3M” labeled backing material on the strips; this protects the sticky side, and must be peeled off prior to installation.
I tried the lens on the helmet a couple of times, but realized that I’d be guessing if I just laid it on the visor without knowing where the middle was. I wanted the lens to end up even on both sides of the visor, so I had an idea.I measured the exact middle of the lens and the exact middle of the helmet’s visor.
I made a small mark at each point with a black felt-tipped marker. Although it’s still hard to get the lens exactly centered on the visor, these marks will get you close enough so that no one will notice.
What I didn’t do at this point, and what I suggest you do, is to put on the helmet and make sure the lens is comfortably placed vertically on the helmet’s visor. I assumed that the lens would be long enough so that it wouldn’t be in my line of sight, but I wish I had mounted it about, oh, 1/4″ farther down, because the bottom of the lens slightly interferes with my vision as it’s currently situated.
Not a big problem really, but it’s probably a good idea to try on your helmet with the lens before you commit the fastener. Polar-Optics does suggest that the clear view under the visor is to provide a bit of non-tinted visual area to use when traveling through a dark tunnel or shady area.
The folks at Polar-Optics are always looking for constructive feedback on their products and they are serious about improving them. After discussing the width issues with Paul Vondrak at Polar-Optics, he told me that a second set of 3/8″ fasteners will be placed in all X1 and X2R lens packages (Standard & Arai Helmet lenses) starting with shipments as of April 1 2003.
The X1R series will move into Series B of the product and grow approx 1/4″ in height to allow for a larger assortment of helmet types and applications starting with all new production. They will need to work through a small amount of inventory which should be depleted by the 1st of May 2003 depending on order rates.
After you get everything lined up, you carefully peel off the protective backing and press the lens with the hook-and-loop attached on to the helmet’s visor. A little press here and there and you’re done.
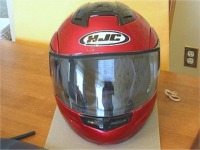
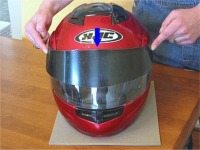
Here’s how the helmet looks after the hook-and-loop strips are installed; even after all my fussiness, the strip is still a bit crooked, but you don’t notice this when the lens is installed.
The only downside is that the hook-and-loop strips become a semi-permanent artifact on your visor.
Polar-Optics recommends leaving the helmet rest for about 24 hours prior to use, to let the hook-and-loop glue cure and bond to the helmet visor.
Here’s a close-up of my screw-up. In actuality, if I would have mounted the entire strip at the lower distance, I’d probably have been better off.
For some reason, I was too focused on making sure that the lens was mounted exactly even with the top of the helmet’s visor.
The final result is shown in the lower photo, left.
By the way, you’ve probably heard arguments pro and con regarding the 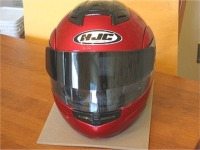 use of a polarized lens for riding motorcycles. The cons say that the polarized lens can remove the glare that you might see from, for example, spilled oil or diesel fuel on the road.
While I’ve never experienced this problem (at least not that I was aware of!), my feeling is that the benefit of reduced glare is less stress on your eyes, which could keep you more alert, especially on a long ride.
Polar-Optics notes that all Polar-Optics lenses meet or exceed the ‘suitable for driving’ standards for the U.S.A., Europe and Australia. These standards test for signal light recognition and also for visual acuity. Polar-Optics claims that their experience over the years demonstrates that a polarized lens that meets or exceeds these ratings will not keep a rider from seeing the oil but, will in fact allow you to see it better than with a darker acrylic lens or no sun lens at all.
The Polar-Optics lens is made from a special optical-quality material; this is the same material used to make prescription sunglasses. The lens meets the American ANSI Z80.3 standard, and they block a minimum of 99.8% of UV rays. For an explanation of the importance of blocking UV rays and using eye sun protection, see this article.
The lens also meets the U.S. Food and Drug Administration (FDA) signal light and impact tests, as well as meeting the Australian standard AS 1067.1-1990 and the European Standard EN 1836:1997.
Polar-Optics claims that the lenses have been “successfully tested to speeds in excess of 170MPH and temps down to -25F”.
The Polar-Optics lens provides effective and relatively inexpensive protection against the sun, glare and UV rays. It’s easy to install and surprisingly stable at all speeds. I plan on using this product on all my helmets!
Note: For informational use only. All material and photographs are Copyright © webWorld International, LLC – 2000-2011. All rights reserved. See the webBikeWorld® Site Info page. NOTE: Product specifications, features and details may change or differ from our descriptions. Always check before purchasing. Read the Terms and Conditions!
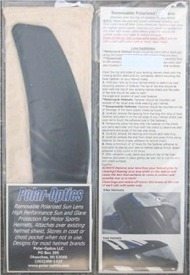
| Product Review: Polar-Optics Motorcycle Helmet Faceshield Lens | |
| Available From: Moto-Optix (Previously known as Polar-Optics. | Suggested Retail Price: Dark Gray – $29.95; Amber – $39.95; Mirror – $49.95 |
| Colors: Amber “Blue Guard”, Dark Gray, Prism Mirrored, Silver Mirrored, | Made in: U.S.A. |
| Product Comments: Stable at all road speeds and in cross winds; easy to remove when desired. Leaves strips of “hook-and-loop” on the helmet’s visor when not using the lens. | |
| More: See below for comments from Polar-Optics owners | Motorcycle Helmet page | |
Owner Comments And Feedback
wBW Visitor “L.R.” first wrote us about the Polar-Optics lens and prompted us to obtain one for review: “Rick, I thought you and your readers would be interested in a product I’ve been using for the past two years. It’s a removable sun lens that attaches over the shield of a full face helmet. This product eliminates the need to carry a separate tinted shield or sunglasses. Polar-Optics has been making a similar product for snowmobile helmets for quite a few years. In fact, a snowmobiling friend introduced me to this product. They now have a product line designed for motorcycle helmets.
This sun lens attaches to the outside of your regular shield with Velcro. This means that when the sun goes down, you simply remove the lens and store it in a pocket, tankbag or saddle bag. These lenses are available in gray, amber and various mirror finishes. The Polar-Optics website provides technical details about their product.
The lens is polarized to reduce glare and the lens is optically correct. I am amazed at the difference a polarized lens makes. I find that my eyes are less tired after long rides in bright sun. I can see through automobile windshields that I couldn’t before because of glare (Does that driver see me or is he looking at something else?). I’ve used mine at track days at speeds over 100 MPH and it stays firmly attached regardless of speed, wind, etc. I know many riders hate squeezing sunglasses inside a full face helmet not to mention the pinching and pressure once the sunglasses are in place. Carrying a separate tinted shield is also a pain. Here’s an alternative and one that helps you see more clearly as a bonus! If you get a chance, you may want to do a review of this product. I think it’s a great idea and a great product.”
R.M. wrote: “Pros: stays in place at all speeds, reduces glare more than anything I’ve ever used, pretty easy to install and remove. BIG con: tint gradually chipped off, it was useless within 6 weeks. Lots of bugs so I had to run it under cool water daily -a soaking wet paper towel was too much for it! Totally unacceptable. I’ve since installed a progrip strip to the inside of the visor and while the glare isn’t reduced much, it stays clean!”
Response from Paul at Polar-Optics LLC
paulv@polar-optics.com
Dear R.M.,
Thank you for your post on webBikeWorld.com regarding our removable polarized sun lens products. While it appears that your experience with the optical quality, convenience and initial performance of our product was positive, the optional mirror finish on top of the lens was not. Polar-Optics has 2 different base lenses, Dark Gray or Amber and in addition we offer an optional mirror tint placed over the top of the base polarized lenses. The mirror tints are the result of placing a thin film metal coating over the base lens surface along with an additional hydrophobic coating on top of the metal.
Our experience has shown that while this is the most robust, and expensive means of producing the mirror finish for a sun lens, it does not make it indestructible or unsusceptible to damage from solvents/detergents or abrasives. Because of this susceptibility, we are very liberal with our return/exchange policy (which states that we will replace free of charge any lens that is defective due to manufacturer defect) and we have an on going continuous improvement program for our mirror coated products. Typically, all we ask is return of the damaged lens for evaluation. Please feel free to contact me directly to resolve this issue. Thanks again for your interest in Polar-Optics products.
Sincerely,
Paul Vondrak
Polar-Optics LLC
PO Box 395 Okauchee, WI 53069
(262)369-1437 Tel (262)369-1517 Fax