
I recently purchased an R100RS (see photo), and as I was going through it to check the routine maintenance and prepare it for the state’s motor vehicle inspection, I noticed that the turn signals were not working correctly.
When the turn signal was on in either direction, all 4 directional lights would come on and stay on without blinking. This led me to believe that the turn signal relay was not working correctly.
I first thought that I would have to remove the entire R100RS fairing to get to the relay, which is buried inside the headlight shell. However, Bob Fleischer of the BMW Airheads list sent me a great tip on accessing the headlight shell without removing the fairing.
Maybe the experienced R100RS owners know about this trick, but I figured I’d post some photos anyway for those who don’t.
Thanks to Bob “Snowbum” Fleischer and the Airheads.org website for this Airhead inspiration!
Here’s my tip: Since the headlight will have to be moved during this job, it’s a good idea to have a reference point for where the headlight is aimed so that you can realign the headlight when you’re done.
So before you start this project, turn on the headlight and make a mark on the garage wall to indicate where the beam is aimed. If your bike is on its centerstand, make sure the front wheel is on the ground before you do this. Checking the headlight alignment first will help you to get the headlight realigned after you’re replaced the relay.
By the way, you can adjust the headlight without having to remove the glass on the front of the fairing. To move the headlight shell for alignment, first sit on the bike and reach around the handlebars into the fairing. You should be able to grab the headlight shell and move it slightly up or down to aim the beam.
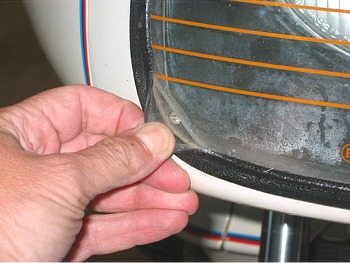
Peel back the rubber gasket that surrounds the glass that protects the R100RS headlight. On each corner, you’ll see a small Phillips head screw.
Carefully remove the screws — be careful not to damage the glass. I used a thin magnetic Phillips head screwdriver, which held the screws as I removed them.
There’s not much room for your fingers when removing the screws, but they should come out with no problems. I had to use a pair of needle-nose pliers to grab the head of one screw to remove it after it was loose.
.
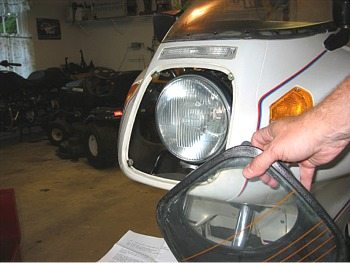
The headlight is now accessible. The headlight shell is held by two rubber bushings on either side, which are tight but allow movement for aiming the headlight beam
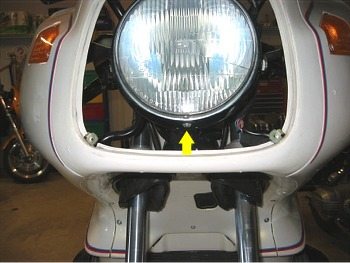
Carefully push the headlight assembly up to access the Phillips head screw at the bottom of the shell (yellow arrow, photo left).
Unscrew the Phillips head screw at the bottom of the chrome headlight surround. It’s not necessary to completely remove this screw.
Carefully pull the headlight out from the bottom. The top is hooked over the top of the headlight shell, so lift it up and over and you should be able to easily remove the headlight. Carefully pull off the 3-prong H4 light bulb plug.

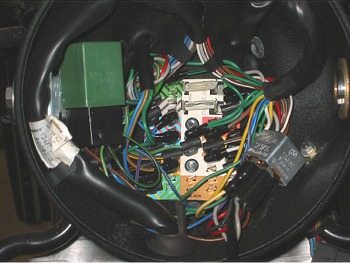
You now have access to the internals of the headlight shell. The turn signal relay is the green box on the left. There are some fuses on the back circuit board that you may want to check and clean.
I first tried re-inserting the old relay, but the turn signals still didn’t work correctly. I replaced this relay with a new one, and the turn signals worked perfectly.
Does your headlight have that “foggy” look? While you have the headlight off, you can clean up the foggy insides by pouring in a little rubbing alcohol and swishing it around. It cleans up very nicely and shines like new and takes away any fogging. I turned it upside down to let it drain, then gently blew it out with compressed air until it was dry.
I also cleaned the H4 bulb with alcohol. Don’t touch the bulb with your fingers when re-installing. I went all out and removed the glass from the gasket and got the glass nice and clean inside and out, then cleaned up the rubber gasket also. I then cleaned up the old dried up wax that collected under the edges of the gasket on the bike. Everything looks like new!
Note: For informational use only. All material and photographs are Copyright © webWorld International, LLC – 2000-2011. All rights reserved. See the webBikeWorld® Site Info page. NOTE: Product specifications, features and details may change or differ from our descriptions. Always check before purchasing. Read the Terms and Conditions!