Adjusting a Ducati GT 1000 chain is a fairly straightforward project.
Thankfully, there aren’t any quirks that might make this job more difficult than it should be.
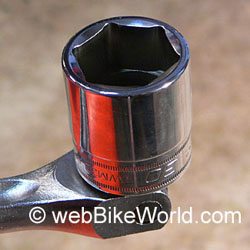
However, there are two items that I think the GT 1000 owner will require: a six-point, 30 mm socket and a paddock stand.
No, make that three items: it would be nice to have the official Ducati service manual for the GT 1000, which is still not available at the publication date of this article.
Before You Start
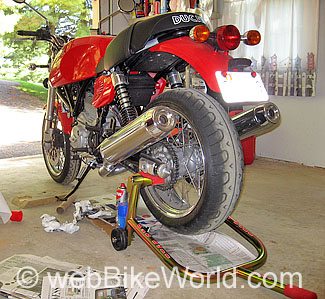
We’ve been using the Pit Bull paddock stand (review) that was specifically designed for the Ducati SportClassics.
My feeling is that it would be very hard to clean, lubricate or adjust the chain on the GT 1000 without it, or without a similar type of rear swingarm stand.
Another tool that is required for this project is the 30mm socket.
I have a 30 mm 12-point socket on hand but I didn’t want to use it for this job because I thought that the torque levels required (72 Nm, or 53 ft. lbs.) suggested the use of a 6-point socket instead for its better grip on the big axle locknut.
More on the torque issue later…
Adjusting the Chain
The Ducati owner’s manual recommends measuring the chain sag with the bike on its side stand.
Motorcycle chains can sometimes bind or become tight in certain spots, and the owner’s manual also recommends turning the rear wheel until you can find the tightest spot (e.g., the spot with the least amount of sag or tension) at the mid-point of the swingarm.
Unfortunately, there isn’t much room underneath the GT’s upswept muffler on the left-hand side, unlike our recent Triumph Tiger, which has a much higher suspension and dual high-mounted mufflers.
So it’s a bit tricky to get underneath and measure the chain sag unless the bike is raised up on the Pit Bull or other paddock stand.
After placing the bike on the stand, I used a low automotive creeper to lay on next to the chain while I took the measurements, but even then, the clearance is marginal compared to the Tiger.
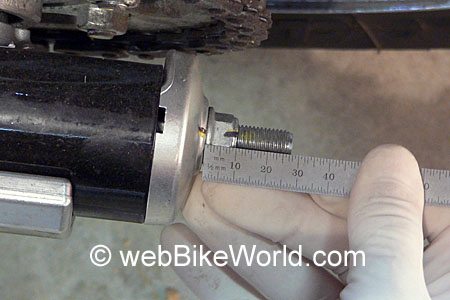
Ducati calls for a chain deflection of “approximately” (their words) 27 to 29 mm.
Two millimeters isn’t much more than a whisker and the short distance is hard to measure, especially when the person taking the measurements is crunched up under the side of the bike.
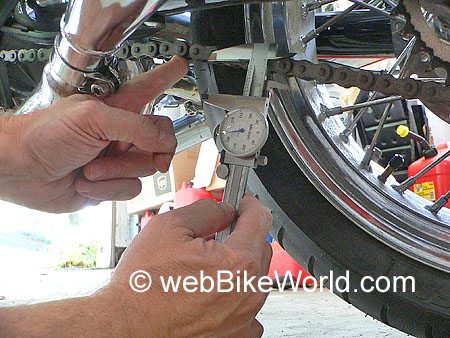
I tried taking the measurements using a couple of different methods.
I normally use a set of Vernier calipers, which are obviously overkill in terms of accuracy but which sometimes come in handy because the tips can be spread apart to the maximum width and the chain can be moved up and down to see if it’s in spec or not.
However, I found that I didn’t really have enough room between the bottom run of the chain and the floor to fit the calipers, which made it difficult to take the reading.
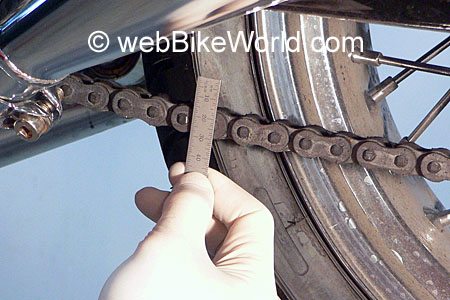
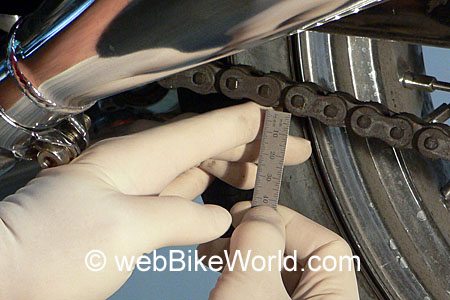
So I broke out my trusty old Starrett metric rule instead, which fits in the confined space but is harder to read because the markings are tiny.
When I use the rule, I usually try to rest my hand against the tire or something steady and then move the chain up and down with the other hand and try to eyeball the deflection.
It’s not as easy, nor is it as precise as using a set of calipers, but it’s close enough.
Chain Sag Notes
It would be nice to find some type of chain deflection tool that is designed for this particular job. I’m not sure if such a thing exists, but if it does, I’d love nothing more than to add another specialized tool to the collection!
Addendum: Visitor M.R. (see comments section at the end of this page) wrote to remind us to check the chain sag with the bike on the side stand. I wasn’t clear about this in the original text, but I did check the sag initially and after adjustment with the bike on the side stand, as directed in the Ducati GT 1000 Owner’s Manual.
As you can (sort of) see from the two photos above, the middle photo shows the rule set at approximately 30mm along the lower edge of the bottom run of the chain.
Holding my right hand steady while pushing up on the chain shows that it is about 2 mm over the 29 mm recommended maximum deflection.
So the chain needed to be tightened up by about 3 mm, which isn’t very much but which would put it about in the middle of the tolerance.
Note that I’m also wearing disposable rubber gloves, which help keep the chain grime and grit off the hands.
Inexpensive disposable rubber gloves can be purchased at most any local pharmacy (chemist) shop and they are a near-necessity around the shop or garage.
Where to Start
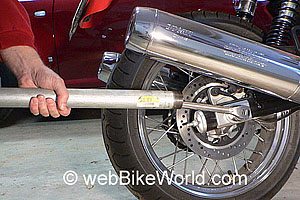
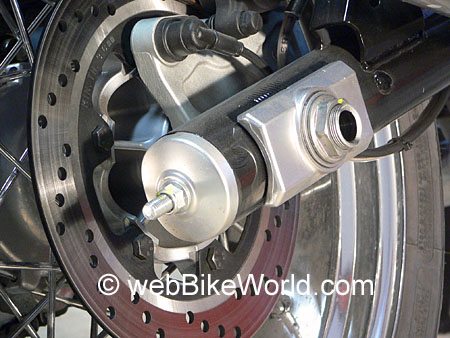
The first step in adjusting the chain is to loosen the axle nut on the right-hand side of the bike.
I used a 1/2″ breaker bar with the 30 mm, six point, 1/2″ drive socket but the nut was installed so tightly at the factory that I couldn’t budge it without using a pipe over the breaker bar as a cheater (photo right).
Addendum: This should be done with the bike on its side stand and not the paddock stand.
It turned and turned and I started to think that perhaps it was stripped, but it eventually came loose. This got me thinking about how much torque was actually used for this nut.
The nut is very thin at only about 9.5 mm wide (3/8″) and the threads on the axle are fine pitch, which taken together is a recipe for disaster.
The thin nut means there are fewer threads inside, meaning there is more torque and pressure per thread on a smaller surface area, which means that the potential for stripping is high.
The owner’s manual calls for 72 Nm of torque on the axle nut, which equates to only 53 ft. lbs.
This doesn’t seem like very much for a rear axle nut to me — if the 72 was in foot pounds rather than Newton-meters, I’d believe it, because that’s about how much torque was required on the axle nut of most of the other chain-driven motorcycles I’ve worked on.
And it sure felt like the nut was installed with about 72 ft. lbs. when I loosened it and needed the cheater bar.
In the end, I compromised by tightening it to 65 ft. lbs. instead of the recommended 53, but I’ll have to investigate this further.
Addendum: Note visitor M.R.’s comments below regarding the possibility that the Ducati recommended grease on the threads may effectively lower the required torque.
Perhaps I should believe the owner’s manual that the nut requires only 53 ft. lbs.?
If anyone can clarify this, perhaps with experience gathered on one of the other Ducati SportClassics, please contact me at the email address below.
Hopefully, when the GT 1000 shop manual comes out, this issue will be cleared up — but I am interested in learning how much torque is recommended in the shop manuals for the other SportClassics?
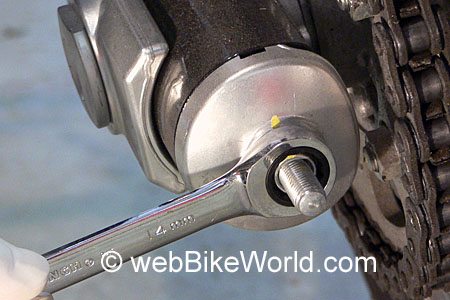
Anyway, once the axle nut is loosened (not too loose — only enough to move the chain adjuster nuts), the chain can be tightened by turning the 14
mm nuts on the end of the threaded rods that extend from the back of the swingarm.
Lesson Learned
Here’s the most important lesson learned on this project which I am passing on to you:
I discovered that it doesn’t take much movement of these nuts to dramatically change the tightness of the chain, which in hindsight probably makes sense because of the small 27-29mm adjustment range for the chain sag.
I first tightened the nuts in one-half turn, which was way too much (tighten the nuts to tighten the chain; loosen the nuts to loosen the chain).
After measuring the chain and finding it way too tight, I had to loosen the nuts.
But since the friction on the parts holds the chain in its new tightened position, I had to take the bike off the paddock stand and run it forward and then quickly grab the brake to move the parts back to their original position.
This is kind of a pain and to be avoided, so the lesson here is to move the adjusting nuts in very small increments and creep up on the correct chain adjustment rather than overdoing it.
In the end, all I needed was a movement of about a single flat on the nut to take out about 5mm worth of chain sag.
Check the Marks
There are some crude hash marks on the top of the swingarm that are supposed to show the amount of movement of the axle plate.
These are designed so that both sides of the swingarm can be adjusted the same amounts (to keep the wheels aligned).
But instead of those — and as a double-check — I measured from the end of the cap on the back of the swingarm to the end of the threaded rod.
I was hoping that if this measurement was even on both sides then I would know that each side was adjusted the same.
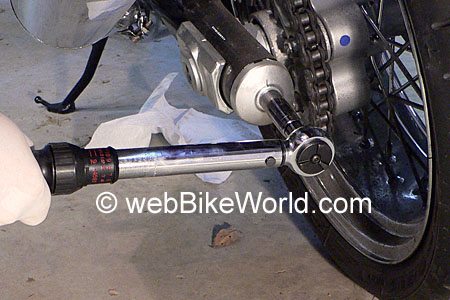
Check and Torque
After checking and re-checking the chain sag by moving the rear wheel and measuring the chain several times, I torqued the adjusting nuts to their recommended 8 Nm (only 6 ft. lbs. or 72 inch pounds using the inch pound torque wrench shown in the photo directly above).
The following section is the verbatim (albeit simple) instructions that were included in my GT 1000’s owners manual:
Tensioning the Drive Chain
Turn the rear wheel slowly until you find the position in which the chain is most taut. With the motorcycle resting on its side stand, push the chain with your finger in correspondence with the mid point of the swingarm.
The lower run of the chain should deflect by approximately: 27 to 29 mm. To adjust the tension, loosen the axle nut and screw in the adjuster screws on both sides of the swingarm by the same amount to tighten the chain or unscrew them to slacken it.
In the latter case, you will need to push the wheel forward. Important: An incorrectly tensioned chain will lead to accelerated wear of the transmission components.
Check that the notches in the sliders on both sides of the swingarm are lined up with the same positioning marks to ensure that the wheel is aligned correctly.
Grease the thread of the axle nut with Shell Retinax HDX2 and tighten to a torque of 72 Nm. Grease the threads of the adjuster nuts with SHELL Alvania R3 and tighten to a torque of 8 Nm.
And Finally…
The last step is to tighten and torque the axle nut and then check everything over again and check the chain sag to make sure everything is correct.
While I had the bike up on the paddock stand, I cleaned and lubed the chain; see our articles on lubricating motorcycle chains listed in the links in the right-hand column on this page.
Owner Comments and Feedback
See details on submitting comments.
From “G.M.” (4/09): “I recently adjusted mine for the first time.

I found after carefully measuring the deflection and tightening it to the correct amount (as best I could measure it given the difficulties already mentioned), that when properly tensioned you should be able to push the chain up to contact the rubber guard on the bottom of the swing arm with some effort.
If you can contact the guard without any resistance, it’s probably too loose.
If you can’t contact it at all, or if it takes a lot of effort to do so, it’s probably too tight.
This is all based on the “better a little loose than tight” perspective.
I checked both pre- and post- adjustments on the side stand at about a dozen different points on the chain, always using the same reference point on the swing arm, by rolling the bike a total of maybe 15 ft. back and forth.”
From “TD”: “Also adjusted my chain while on the side stand. A big crescent wrench loosened the axle nut.
I found that the distance of the axle on left and right sides were different by 1/8″.
I confirmed the 1/8″ difference by measuring from the center of the swing arm pivot point (round plastic piece with a tiny hole in the center) to the axle.
To move the rear wheel forward (after I over-tightened the chain) I used a hardwood block and a hammer, placing the block against the aluminum piece that the axle goes through. Much easier than the braking method.”
From “D.B.”: “Regarding the torque spec for the rear axle of the Ducati GT1000. As a engineer that has worked with automotive fasteners, the torque of any specific fastener is determined by the material used in the bolt.
The optimum torque is determined by how much the steel stretches at a specific torque.
Over torque = stripped threads. Under torque = loose nut.
The application of thread locker is not recommended nor is it required if the the torque wrench is used and torqued to what the engineer calls out.”
From “T.S.”: “I have been a Mercedes-Benz mechanic for 40 years and I own a Paul Smart.
I would add just one thing to your very good instructions. I remember entering the first ever AMA “Battle of the Twins” race at Daytona in 1981.
When I went through tech inspection, one of the many areas they check, is for a cotter pin in the axle nuts. The safety rules they insisted on have been applied to every motorcycle I have owned.
Believe it or not, (I know you believe it) it is far more dangerous riding to work then flying down the back straight at Daytona.
The last thing I want to happen (well maybe not the “last”) is a axle nut coming off while I’m zipping along in rush hour traffic.
So, the first thing I did to my new Paul Smart was buy a hand full of 1/8″ drill bits and start drilling holes in all of the nuts and bolts that I would hate to have fall off while cutting in front of a 18 wheeler.
Motorcycles vibrate, and I forget things. But if I see a cotter pin in my axle nuts, I know they are not coming off.
As for the chain alignment, you absolutely must have a alignment tool. The marks on the swingarm are worthless on my bike. Plus, you are better off to be a bit loose on the chain then to tight.
Tight is not only very hard on the sprockets and chain, but hard on the axle bearings together with the bearing at the counter shaft.”
From “M.R.”: “As a fellow GT1000 owner I read with interest your experience adjusting the chain on your GT1000. Just a couple of comments — and bear in mind that I am not a tech:
First, as far as the torque on the rear axle nut, torque wrench readings result in different actual clamping pressure depending on whether the fastener (nut) is dry or lubed.
Since the GT1000 manual specifies that the axle nut be greased the amount of torque “felt” by the fastener is greater than if you used the same torque on a dry nut.
Therefore the recommended torque may be more than adequate.
Second, having made the adjustment I think you should verify the chain sag with the bike on the side stand.
Depending on how the swing arm is set up relative to the front sprocket, the weight of the bike on the side stand can give you a different sag reading then when the bike is suspended on a track stand or center stand.
Therefore, since the manual instructs that sag be measured with the bike on the side stand I would be careful to double check the final results with the bike on the side stand.
(For example, In the old days some manuals recommended checking with the bike on the side stand while leaning across the seat to load the suspension).
Finally, with respect to centering the wheel and sprocket in the the swing arm — just be warned that if the dimensions of the two arms of the swing arm are off, verifying your results by measuring the adjuster bolts may not really be that helpful.
I think the only real verification is to run a straight edge or string along the sides of both tires while compensating for any difference in tire thickness.
On the other hand the marks on most swing arms are close enough and I think that sometimes people make too much of this. In my experience if the adjustment is off the bike will track funny and you’ll will notice it immediately.”