Before I get into the fitting of the stand I’d like to pass on a few things that I’ve discovered.
There were two centre stand kits available for the Ducati SportClassic range when I purchased mine.
One kit is designed to fit the Sport 1000 (bike info) and the Paul Smart 1000 (bike info). This kit has instructions.
The other centre stand kit is the one described here for the GT1000 (bike info | blog), without instructions.
It is possible that one or the other of these kits would also fit the Sport 1000 Biposto (bike info) or the Sport 1000S (bike info); if anyone can confirm this, please contact the Editor.
My opinion is that the kits are not interchangeable, although they are similar.
As an aside, I got into a debate at the Ducati Owner’s Club of NSW concourse that the GT stand may fit the Biposto and Sport 1000S (not my idea), but the foot peg hangers and exhaust are different on these bikes although they share the same swing arm as the GT.
Ducati GT1000 Centre Stand Information
The fitment of this centre stand is straightforward and only took about an hour including time out for taking these photos.
But before you consider purchasing the GT1000 centre stand, there are a few things you should keep in mind:
First, the answer to the question that many webBikeWorld readers have been asking:
This stand will touch down. If you’ve decided to fit aftermarket rear shocks that are shorter than stock, then my advice is do not fit this stand!
The stand will also touch down with standard length shocks; the rear Öhlins shocks that I’ve fitted when at 370 mm height scraped like nothing else and even now at 380 mm and with a very firm spring rate, “exuberant” riding will get the stand to gently touch.
A quick point to consider here: many a rider thinks touching down various bits of their bike can be a good lark and to a point I might agree, but with any shocks shorter than the stock 380mm height, the contact was at best concerning and at worse mid-corner line altering.
I managed to grind off about 5 mm on each side of the stand and lived to tell the tale – so just be aware.
This centre stand was designed with the stock GT1000 in mind and to enhance the concept of a “Grand Tourer”. To that extent, the stand does its job well, with road contact only occurring when the bike is fully laden and/or the rider is pushing hard.
If the stand was fitted as a stock item to the GT1000, I’d consider the touching to be a gentle reminder that I was going beyond the design parameters (in concept, not performance) of the bike. A good riding mate of mine could get the belly pan and clamps on the header pipes of his monster to touch … but I digress …
In my opinion, this stand will not replace the need for a good quality rear paddock stand and front stand combo if you want to perform servicing at home – sorry, that’s probably not what you wanted to hear, but that’s the way it is.
Why? The centre stand can’t be used in conjunction with a front stand – don’t even attempt to do this, because the stand simply isn’t stable enough to be used in this type of set up, and doesn’t lift the bike high enough to be used in this way.
It will, however, make quick post-ride and touring chain servicing easier – ever tried carrying a paddock stand with you on a ride?
It also makes chain adjustment easier, and if you’re ever thinking of swapping out your rear shocks it makes this task so much simpler, as the bike is lifted from mid-chassis, not from the swingarm. General work and tinkering around the bike is also much easier, so is checking the oil level as the bike is held upright and stable, so in essence, the pros do outweigh the cons.
But before thinking of fitting the centre stand – or if your funds are limited – do yourself a favour and get a good quality front and rear (paddock) stand set. You’ll use them – even during the fitting of this centre stand.
If you do, ensure that the rear swingarm stand on whichever one you get can fit the wide and rounded swing arm on the GT1000 (see the webBikeWorld review of the Pit Bull rear stand designed specifically for the GT1000).
I’ve had my GT1000 slip off a paddock stand because the swing arm “sprung” an incorrectly positioned paddock stand. Remember that Termis are expensive, but the correctly sized pickup brackets and time taken to correctly position a paddock stand isn’t.
If you’ve gotten this far you may get the Idea I’m a bit disappointed with this product. Not so, but I have previously purchased most of the Ducati Performance catalogue plus a multitude of other aftermarket bits for the GT1000 and the stand was the last item on a long list.
If I had limited funds, didn’t do any touring or was just starting my wish list I’d put the centre stand…not at the top…but now that I’ve got it I wouldn’t be without it.
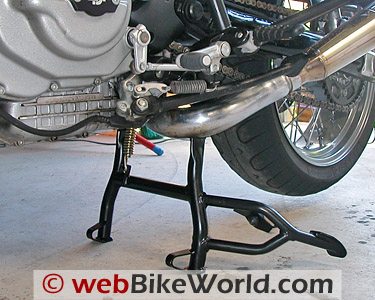
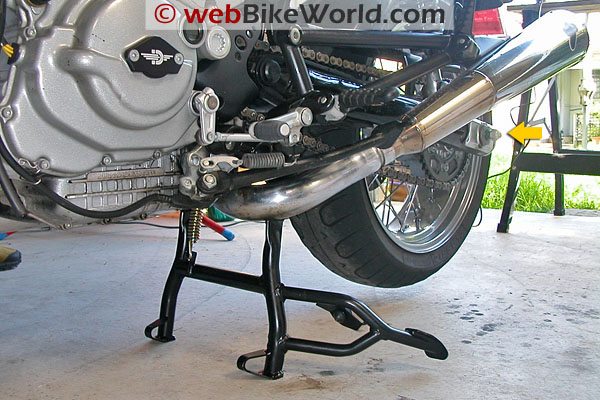
Fitting the Ducati GT1000 Centre Stand
The Ducati centre stand kit is well packaged and presented with good quality powder coating and a general impression of solid construction. It is holding up 180 kg+ of motorcycle, and it looks up to the task.
The kit is packaged in two main parts: the lifting handle and the stand itself, with various bags of bolts in each kit, so I’ll break down this into the assembly and fitting of these sub-components.
Tools (and other bits) You’ll Need for This Project
-
Socket set with 8mm Allen socket and 14mm standard socket.
-
Torque wrench.
-
14 mm open or ring spanner.
-
Allen keys (various metric sizes).
-
Dremel or die grinder – I needed it; you may not.
-
Front and rear paddock stands – optional but do make fitting much easier.
-
Molybdenum based grease (or other anti-seize compound).
-
General purpose grease.
-
5/16 (?; see notes below) Nylock nut and washer – stainless is best (I’ll get to this)
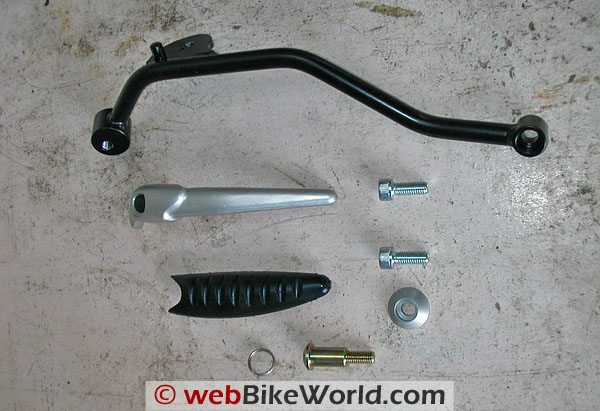
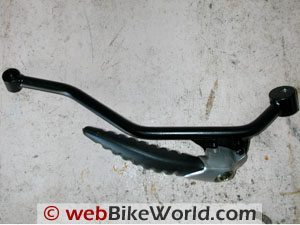
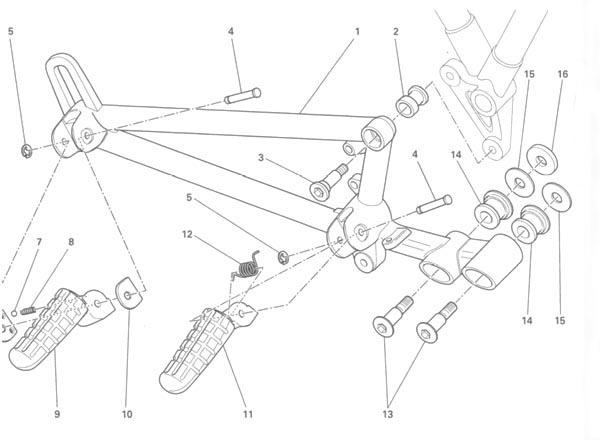
GT1000 Center Stand KitLifting Handle
This kit consisted of a circular spring, shanked bolt, cupped washer, rubber handle cover and alloy handle, two Allen bolts and the mounting bracket.
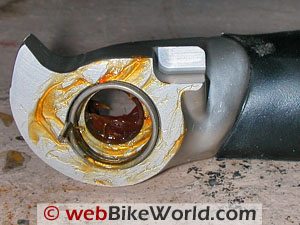
Slip the rubber handle cover over the alloy handle, but don’t be tempted to use any form of lubricant. Don’t forget that this handle is used to assist in lifting and stabilising the bike when placing it on to the stand, so the last thing you want is the rubber cover slipping off with your pride and joy half on the stand.
Insert the circular spring into the alloy handle – it only fits one way – and apply some grease; in my case, excessively apply grease. Here are the photos:
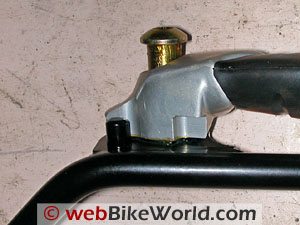
Offer up the handle, spring and shanked bolt to the mounting bracket, align the tab on the spring with the hole drilled in plate on the mounting bracket whilst threading the shanked bolt into the threaded hole on the mounting plate.
When assembled, there will be some play between the handle and mounting plate (photo below, left) even when the bolt is fully tightened.
The handle should move cleanly on the mounting bracket with the recess in the handle moving around to contact the rounded stop welded onto the mounting plate. When released, the spring will return the handle to parallel to the bracket with the top tab on the handle contacting the stop (photo below, right).
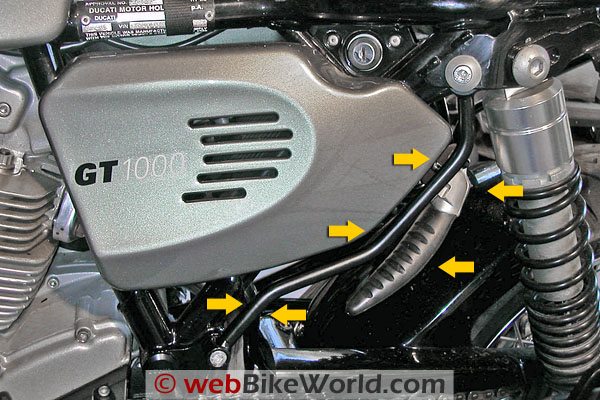
The lifting handle is fitted to the left hand side of the GT1000 with the larger threaded end mounting just forward of the rear shock and the lower mount in the bolt hole just above the foot peg assembly.
In my case, the supplied Allen bolt wouldn’t clear the hole in the bracket – a Dremel and stone cleared away some excessive powder coating and the bolt was a tight fit.
The upper mount uses the remaining Allen bolt and cupped washer. The upper mounting hole is larger than the supplied bolt, so only nip up each bolt at the initial fitment.
Don’t fully tension the lower bolt until the upper bolt is inserted and the bracket and handle checked for operation and adequate clearance of the rear shock and the side cover; there is some room for adjustment.
If everything clears, tighten fully both bolts (sorry no torque specs for this bit). The fitted handle has a tidy and unobtrusive appearance, as shown in the following photo.
GT1000 Center Stand – Lift Handle InstalledThe Stand
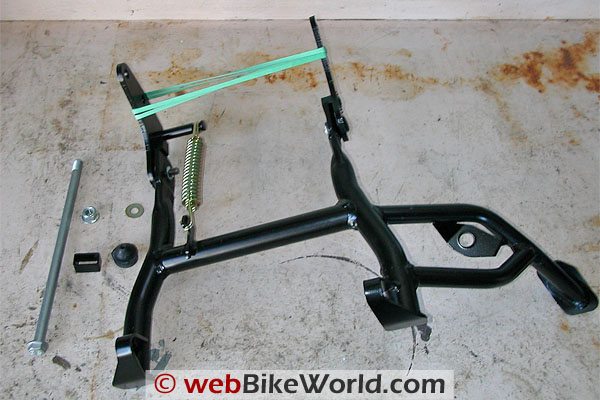
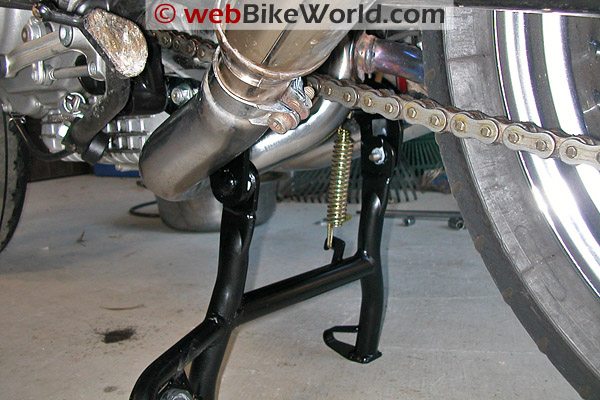
This consisted of the main stand, one long bolt (zinc coated?) washer and locknut, rubber stop and a “BRT” (Black Rectangular Thing), a part for which I have no idea what it is supposed to be used for.
Some web forums have discussed that it may be used to retain the springs onto the stand; however these springs are always at tension so I don’t know how they could fall off. After 3000 k with this stand fitted they haven’t, and I’ve now lost the BRT, so I hope the GT1000 won’t fall to bits without it!
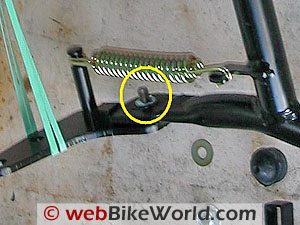
Ducati GT1000 Center Stand Base PartsOne essential component Ducati didn’t supply is another simple lock nut (Imperial thread 5/16?). I happened to have one in my box of bolts so can’t confirm thread pitch / size). This goes onto the threaded tab where the stand mounts to the right-hand chassis bracket (near the spring in the photo below, left:
Put one on here before going any further, the last thing you want is the chassis bracket and springs slipping off during fitment!
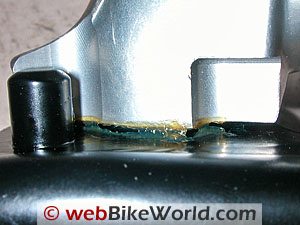
Fit the rubber stop into the hole in the main stand (photo above, right). The stop goes taper down into the hole as per the orientation in this photo.
Don’t try pushing the stop in by hand – the easiest way is to lubricate the tapered end of the stop and place the stop inverted (flat side down) on a workbench or etc., invert the stand and align the stop with the hole and then push the stand onto the stop. The stop slips easily into the hole this way.
Next, put the bike onto front and rear paddock stands. You don’t need to do this, but the extra clearance and stability offered by doing this makes this job so much easier. The use of a front stand (in my case) provides enough clearance for the centre stand to move through its full range of motion and check stops and etc. before putting the stand under stress.
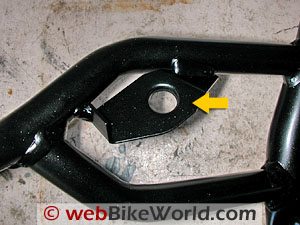
Starting on the left-hand side, remove the rear most mounting bolt from the foot peg assembly. There is a washer behind this that is not required when fitting the stand (photo below).
Arrow indicates washer to be removed.
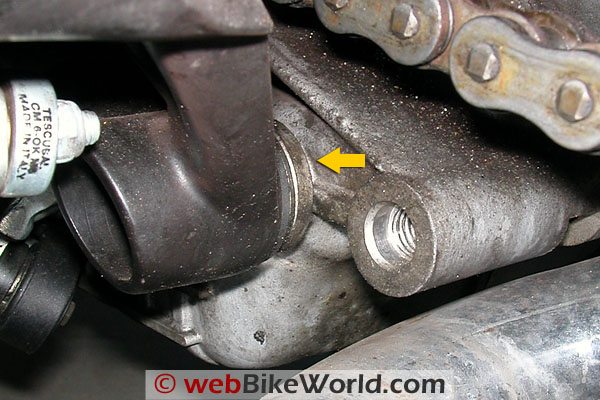
Do the same on the right-hand side; offer up the stand so that the chassis plates slip between the foot peg assembly and the engine occupying the space where the washer once fitted.
The left-hand side chassis plate can be removed from the stand if required to facilitate easier fitting.
Lubricate the zinc plated bolt with an anti-seize compound or molybdenum-based grease. Yes, it concerns me too that Ducati supplied a zinc plated bolt to fit into an alloy engine case. It may just be grey paint on the bolt, but I wasn’t taking any chances so coated it in molybdenum-based grease.
The bolt will slip into the spare hole in the engine located behind the foot peg assembly and effectively clamps both plates to the engine, only slightly tension this bolt at this time.
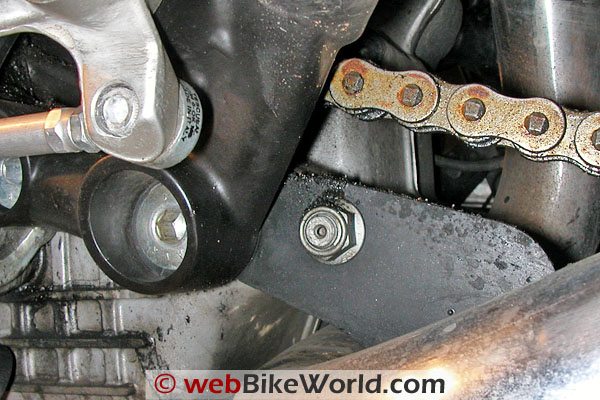
Re-insert the foot peg assembly mounting bolts back into the mounting holes on both the left and right sides, apply anti seize compound or molybdenum based grease to these bolts prior to fitment.
Because the stand is only loosely tensioned the chassis brackets can be gently manipulated to facilitate easier insertion of these bolts, take care not to cross thread the bolts, torque up to factory specifications and tighten up the through bolt to similar torque.
Check the stand for full range of motion. The final fitting should look similar to these photos:
 Notice the piece of threaded rod (wrapped in garden hose, indicated by orange arrow) that I put through the hollow rear axle? I found this allows me to use the scalloped pick up brackets that came with my Anderson stand rather than the 90 degree angled ones that are far too flat and short for the GT swing arm. Anderson ( I think ) now make curved pick up brackets to fit the GT’s round swing arm, giving you another rear stand alternative. The factory Ducati paddock stand isn’t all that great — my GT1000 fell off one due to poor positioning.
Setting the Rest Position of the Centre Stand
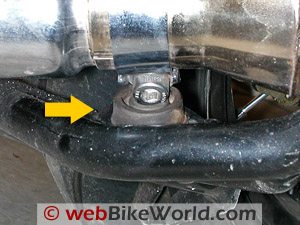
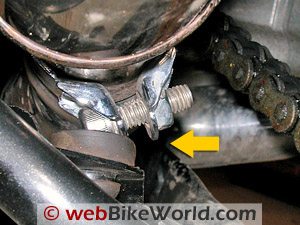
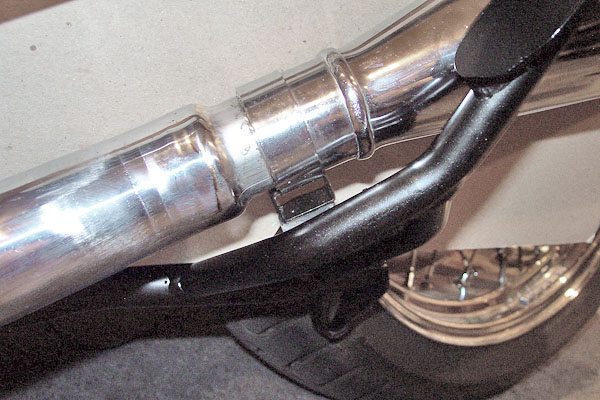
I can’t stress how important setting the correct rest position of the centre stand is. Nor can I stress how unimpressed I am with how Ducati have gone about this! To the best of my ability, the only thing I can gather is that Ducati intend this stand to rest on is the EXHAUST CLAMP!
The clamp is rotated around so that its bolt comes into contact with the rubber stop, illustrated in the following photos:
Some fiddling of the final bolt location is required to get the best possible rest location, too low and the stand will touch down everywhere, too high and the foot tab on the stand will contact the exhaust.
When adjusting watch the final resting spot of the “toe” of the stand, I was able to get a full inch of difference depending on where the exhaust clamp bolt was placed, with the best setting with the clamp at approx 45 degrees.
But honestly — this is tacky, Ducati…
Comments, further information, tips or other guidance, please send to: editor@webbikeworld.com
Owner Comments and Feedback
See details on submitting comments.
From “Brass Monkey” Canada (4/09): “If you have the GT luggage rack and reasonably long arms, you don’t need the lifting handle assembly at all; I left mine off and have no trouble using foot pressure and a grip on the rack. I came to the same conclusion about The Black Rectangular Thing (that it slips under the exhaust clamp) but left it off anyway to gain maximum clearance.”
From “J.M.” (3/09): “Thanks for the tips on the GT1000 center stand installation. Greatly appreciated.
There was a comment that the purpose of the small box-section piece of metal (“black rectangular thing”) included in the kit was unknown. It finally dawned on me one night as I woke from a deep sleep!
It slips over the muffler clamp and provides a more finished, flat contact area with the rubber stop than does the head of the Allen bolt. I have attached a picture.”
From “C.W.” (10/08): “I had similar problems with the center stand on my 2007 Multistrada 1100S. Riding two up, the center stand would drag on parking lot speed bumps, not to mention any decent lean angles. I compared the center stand foot design to my Triumph Thunderbird Sport and Suzuki DL650 and discovered the Ducati “feet” are unnaturally long, easily eating up 0.75”-1” of ground clearance unnecessarily.
I took the stand to a local machine shop and had them modify the feet in about 10 minutes and it now functions perfectly. IMHO, Ducati is guilty of a poor design which borders on an unsafe design. You can see my center stand modifications (here) on Multistrada.net.
Thanks for your very informative articles, they have been a great help in working on my TBS (now with Daytona 12:1 pistons, Speed 3 cams, and S3 igniter J ).”
From “M” (10/08): “I’ve had the GT1000 specific center stand on my bike for the past 6 months and last month had to add a piece that should have come with the kit.
I was heading out for the start of a full day of riding when I noticed the lift handle flopping around. Sure enough that bolt had backed itself pretty much all the way out. Oddly enough, I rarely put the bike up on the stand aside from the occasional wash and chain maintenance so I doubt use was what caused it. I added a lock nut to the open end and tightened everything back down. I’ve been checking it out of paranoia lately, but thankfully it looks well buttoned up now.”
From “E.W.” (10/08): “I wrote an article about installing the GT1000 center stand for the Ducati.ms web site. You are free to use it in your web site if you like.
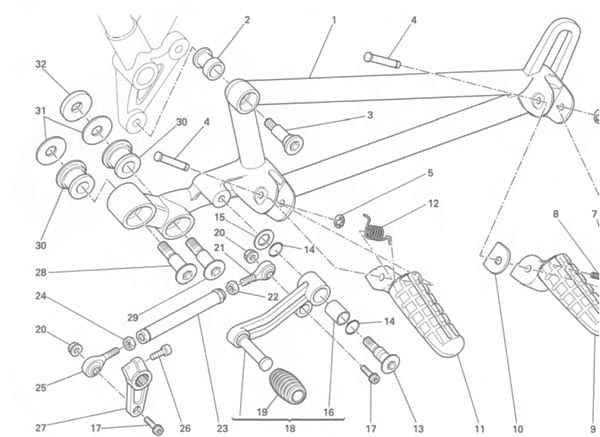
Editor’s Note: Here are two scans from the GT1000 shop manual and some information from E.W. that may help illustrate where the center stand attaches to the bike:
Referencing the above illustration: “Loosen both screws (#13), and remove left #13 screw and #16 washer. You will need an 8mm metric Allen wrench. Be careful not to mar the RH foot peg holder plate (#1). I don’t have any torque specs, so pay attention to how tight bolts were tightened on bike, or try and get them from a Ducati shop.
At this stage I used a flat blade screw driver to pry the holder plate away from the engine casing to ensure that the RH center stand bracket can be inserted into the space created by removing washer #16 washer.”
Referencing this illustration: “Now, working on the LH side, remove the shifter linkage screw #17 and nut #20 (10mm). The linkage drops down and allows access to the two #28 screws.
Remove the right most #28 screw with washer #32, and loosen the left most #28 screw. Again, use a flat blade screw driver to pry the LH foot peg holder plate #1 from the engine casing. This will allow the LH center stand bracket to be inserted in between engine casing and LH foot peg holder plate.”
Aron’s Comments on Above: “I found that I didn’t need to use a screw driver to pry away the foot rests. The washers slipped out with little effort – surprising when you see how grotty the bike was at the time of stand fitment.
I think EW may have the screw numbers back-to-front, I believe the LHS screw that I removed was 29 and the washer was 32 (and the rear most 31).
I also didn’t need to remove the gear shift linkage – I removed both the LHS and RHS rear most set of bolts and washers and then slipped up the stand from below fitting the RHS – side plate and stand and pushed in the through bolt half way and then slipped in the LHS – taking advantage of the fact that the LHS side plate could be removed if required ( I tried to keep the RHS of the stand complete to avoid disassembling the tensioned springs).
Then tightened it all up – the hardest part is getting the bolts back into the rubber collars (14 + 30) and finally adjusting the exhaust clamp to get the height of the stand set.”