
Decisions, decisions…so many lights, but which to choose?
The Denali DR1 lights have the classic spot light pattern that throws a pencil-sharp beam for high-speed night adventures.
Or you can have a set of flood or fog lights with their shorter but wider beam.
Wait — why not combine the two? The new Denali D4 lights do just that.
The D4 lights are an interesting hybrid that combines two 60 degree flood lights with two 10 degree spot light LEDs for a combination pattern that reaches both wide and far.
The Denalis lights are very nicely made and relatively easy to install.
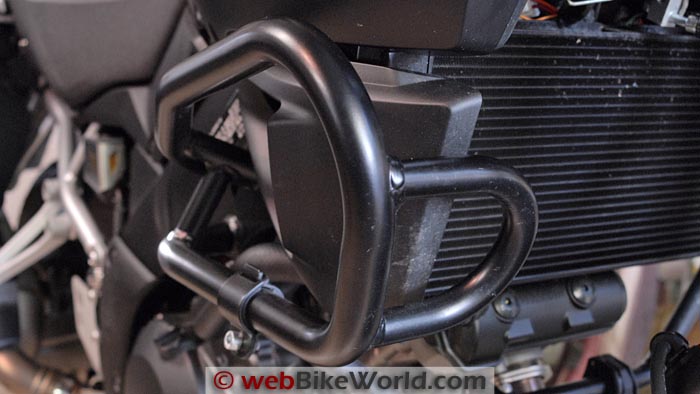
This worked out beautifully on the 2014 Suzuki V-Strom 1000 ABS (Blog) by using the Denali Auxiliary Light Mount Kit on the smaller front section of the Adventure version’s crash bars.
Choosing a DR1 or D4 light set is a matter of preferences, but if you live in the wide open spaces and/or need a long-distance, precision spot light, the DR1 is for you.
The light from the D4 doesn’t reach quite as far but has a wider spread that is useful for riding in wooded rural areas to help illuminate the sides of the road and, hopefully, those pesky deer.
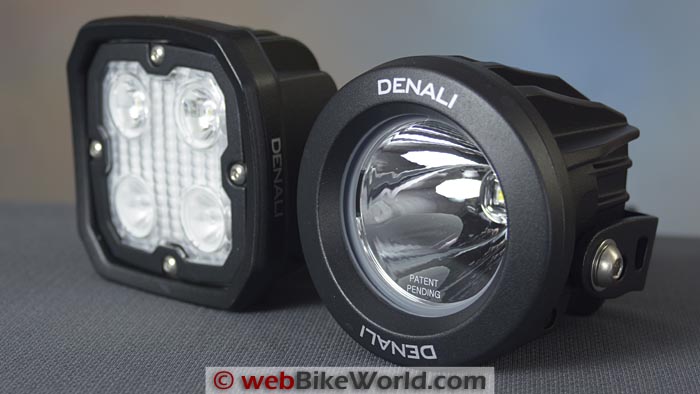
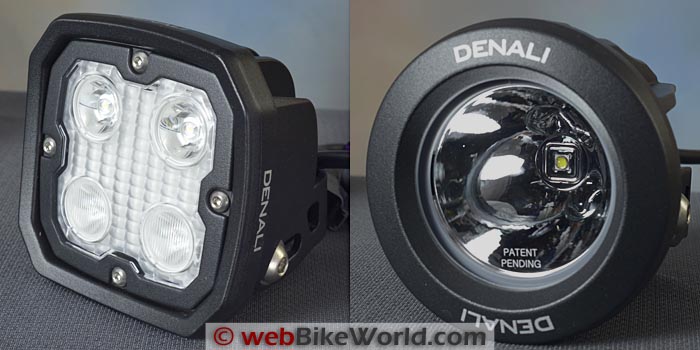
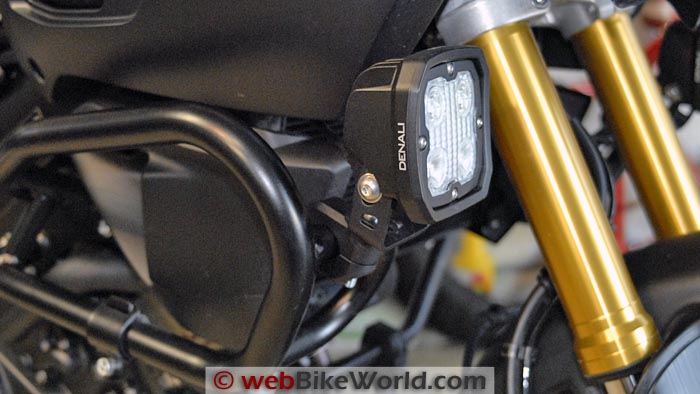
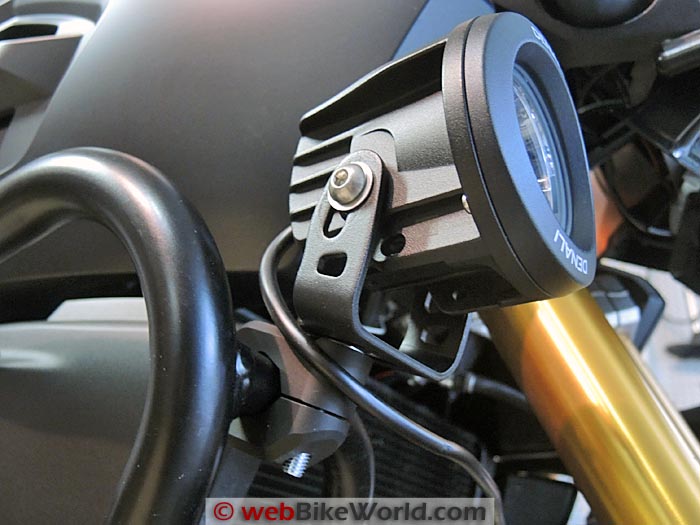
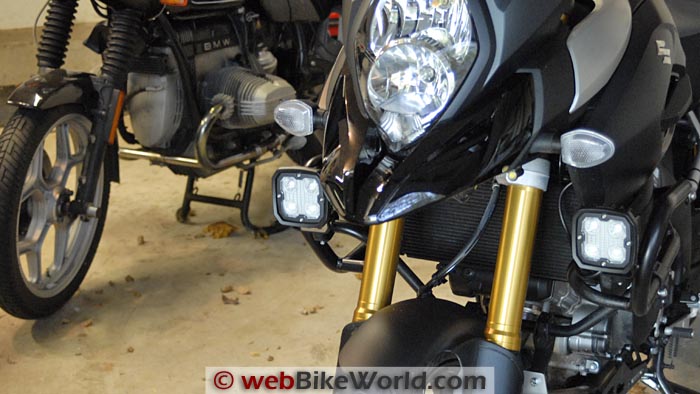
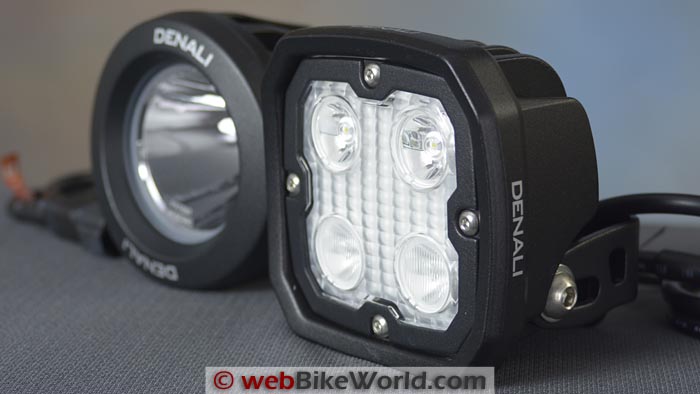 The Denali D4 lights have four LEDs. The two on top have a spot lens and the lower lights have a diffuse lens. The Denali DR1 is a classic round spot light with a deep reflector.
Background
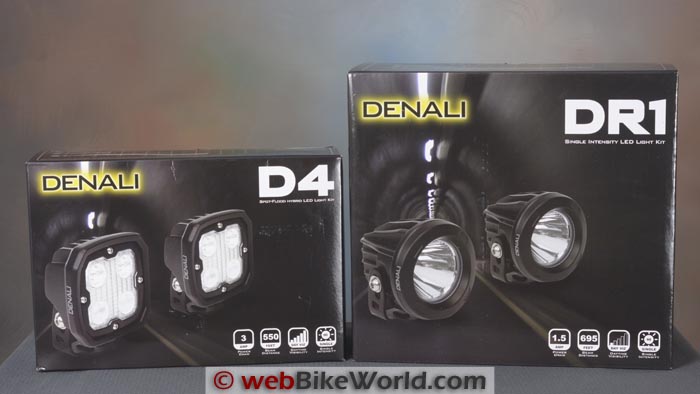
The Denali brand now includes 5 different LED auxiliary motorcycle lights. To date we have reviewed the Denali DM Micro lights (review) on webBikeWorld, along with the Denali D1 lights (review), which were since replaced by and updated version called the Denali DX Xtreme lights.
Denali lights are known for very good quality at reasonable prices.
The kits come with basic mounting brackets, the wiring harness and instructions, but most likely you’ll also need one of the optional bike-specific mounting brackets for a bespoke fitment.
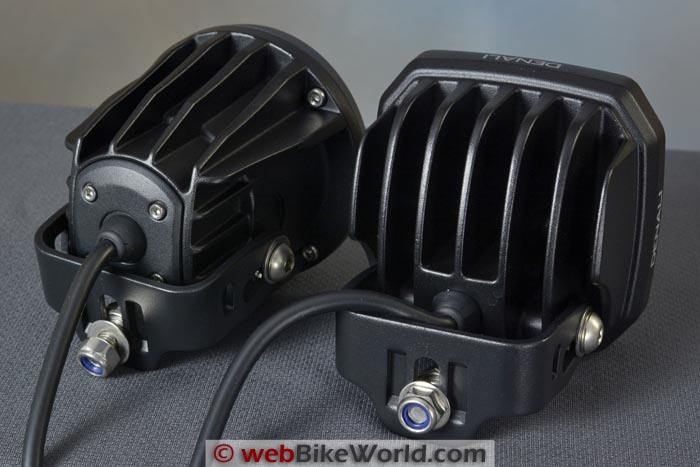
We have a set of the Denali D4 and DR1 lights for this review. The DR1 is a “classic” round spot light with a single LED at the bottom of a deep cone-shaped reflector with a clear lens up front.
The D4 lights are quite different; they have a square housing containing four LEDs. The lens covers the entire front and forms a spot focus for the two LEDs on top and a diffuser lens covers the two lower LEDs.
This gives the D4 a unique narrow/wide pattern that is an excellent compromise that is also very useful for the majority of nighttime riding conditions.
Hardware included in the Erica lights “Basic” kit.Denali D4 vs. DR1 Details
The Denali D4 light module is a square shaped housing containing four LEDs in a square configuration. The two LEDs on top have a 10 degree lens while the lower two LEDs have a 60 degree diffuser lens.
This yields a nice wide and long pattern, useful for the heavily wooded rural roads in our location.
Each LED in the D4 is a 5 Watt CREE XP-G2 for a total of just 20 Watts per light or 40 Watts for the pair. Almost any motorcycle electrical system should be able to handle that and we were surprised to find just a 5 Amp fuse in the wiring harness.
The pair of lights draws only 3 Amps.
The DR1 is a classic round shaped spot light with a large clear lens. The deep reflector is designed to focus the single 10 Watt CREE XM-L2 for a claimed 695 foot (212 meter) reach with a narrow 10 degree beam.
Each DR1 draws just 0.75 Amps for a total of 1.5 Amps for the pair.
Both the D4 and DR1 are enclosed in a massive powder-coated aluminum module that is waterproof to IP-68, which should be way more than you’d ever encounter on a motorcycle (unless you’re using it for scuba diving).
What’s in the Box?
The Denali kits each include a pair of the lights and each light has an attached waterproof cable and connector. Each light has a “Universal M8” mount attached with a stainless steel bolt, flat washer and nut.
A completed wiring harness is included with relay and fuse. And finally, a set of instructions and a Posi-Tap and some cable ties are included.
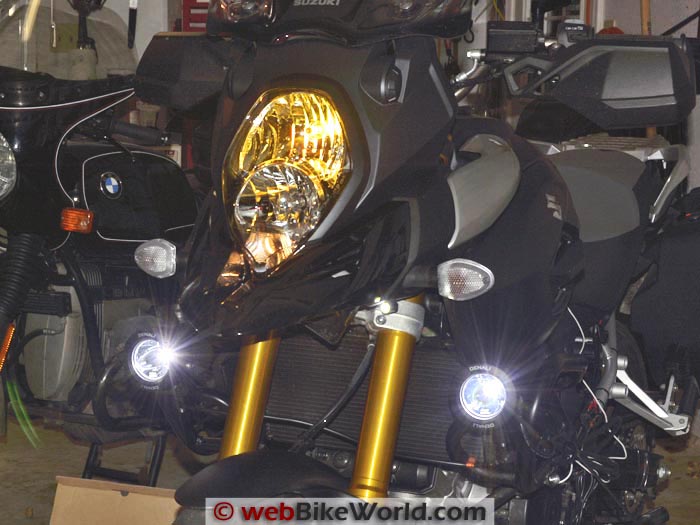
The front crash bar section on the 2014 V-Strom 1000 ABS is perfect for mounting an out-of-the-way auxiliary light. The Denali Auxiliary Light Mount Kit for 22 mm to 28 mm crash bars is optional and costs $62.99.Installation: Mounts and Light Modules
Installing the Denali lights is easy compared to other auxiliary lights we’ve reviewed, because there are fewer connections; the lights are on/off only with no rheostat or dimmer controller.
The most difficult part of the installation will be choosing and installing the mount for your particular motorcycle.
Twisted Throttle, the developer and distributor for Denali light products, sells fender and body mounts, light bars and mounting clamps for crash bars so you should be able to find one that works for your bike.
A custom mount for the 2014 Suzuki V-Strom 1000 ABS (DL1000A) is in the works, but in the meantime, owners of the Adventure version have it easy.
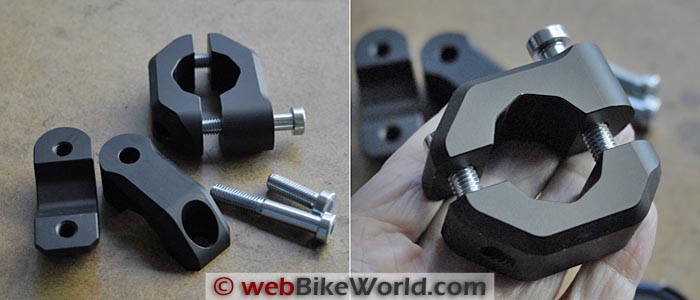
The Denali Auxiliary Light Mount Kit (for 22 mm to 28 mm crash bars, $62.99) fits the front section of crash bar on the V-Strom Adventure, which has a 21.5 mm diameter (photo above).
In fact, this front section of crash bar is the perfect spot to mount a pair of lights, because it keeps them towards the inside of the outer crash bars so the light module won’t get hung up on brush or damaged in a tip-over.
The mount kit is a precision machined set of two pre-threaded clamps with stainless steel Allen bolts and it’s powder-coated for durability.
By the way, since the D4 and DR1 light modules use the same Universal M8 base mount, the lights can be swapped back and forth in the mount and simply connected to the wiring harness, should you care to switch out the lights.
We rough mounted the lights on the crash bar and then went to work on installing the wiring harness.
After everything is connected, you’ll need to bring the bike out at night and aim your lights and then do a final tightening of the mounting bolts.
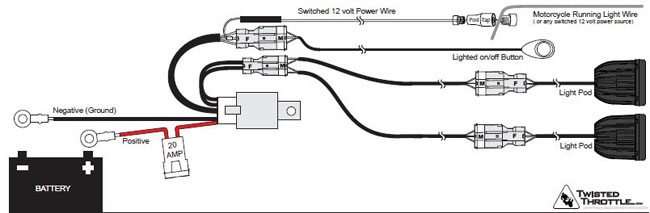
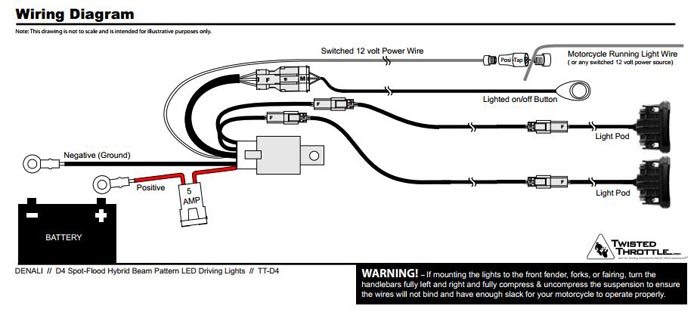 The included wiring harness for the D4 and DR1 lights is relatively simple.
Installation: Wiring Harness
The wiring harness that comes with the Denali lights is easy to install, as these things go.
First, remove the 5 Amp fuse in the wiring harness before you start, to help prevent any sparks or short circuits while you’re messing about with wires around the battery.
Only three connections are needed to get your lights powered: the positive and negative battery terminal connections for power and the third connection is the white wire, which can be used to tap into either a switched power wire (e.g., running lights) or the high beam hot lead.
If you tap into a switched wire and not the high beam, the Denali harness on/off switch can be used to turn the lights on and off with both low and high beam.
But the best way to do this is to tap into the motorcycle’s high beam power wire so that when the Denali lights are switched on via the wiring harness button, the D4 or DR1 lights will turn on with the high beam.
This automatic method is easier and less cumbersome and confusing when you’re riding at night.
The light kit also comes with one 16-18 gauge Posi-Tap but sharp webBikeWorld readers will always have a selection of Posi-Locks (buy ’em here!) on hand, right?
You may need a good quality wire cutter/stripper for those hair-thin wires; we use the Klein 1000 (here).
This is a basic stripper that also has a wire cutter. It’s just a touch more expensive than those too-cheap-to-use strippers, it’s made in the U.S.A. and it works really well. Another good one is the Gardner-Bender GS-366 (here).
These tools work well for narrow gauge “hot’ wires on a motorcycle. (Also see our Vice Grip Self-Adjusting Wire Stripper review and Quik Strip Wire Stripper review).
Denali D4 vs. DR1 light output patterns.Denali D4 vs. DR1 Light Patterns
The light output patterns from the D4 and DR1 lights are quite different, as you can see in the IsoLux light output diagrams above (from Twisted Throttle). The diagram is about identical to our experience with the lights.
There’s no definitive answer for which light to choose; it all depends on your needs and preferences.
Both are useful and you may even want to mount both lights on your motorcycle, which probably could be done with some extra fettling.
The concept behind the D4 light is to have long reach with wide spread in front of the bike, which is the best of both worlds.
In fact, for our local roads here at night, the D4 is the way to go and ditto, we suspect, for the majority of motorcycle owners also.
We live in a rural area with one- and two-lane secondary roads full of curves, hills, lots of trees and wooded areas with plenty of deer and other critters messing about in the dark.
You really don’t want to be riding too fast for these conditions at night anyway and you have to be always on the alert, so ultra-long distance isn’t as important as plenty of light as wide as possible in front of the bike.
On the other hand, if you live in the “wide open spaces” found in the western U.S., the DR1 may be the way to go.
Although when you look at the IsoLux patterns in the graphic above, you can see that the D4 lights have about 3/4 of the reach of the DR1 lights, so the D4 really is an ideal compromise for many nighttime road conditions.
UPDATE (November 2014): Note also that there is a kit with two different snap-on filters for the D1 lights, a yellow fog filter and a clear protective lens. Both are made from polycarbonate and their use doesn’t affect the 10 degree spot beam pattern of the D1 lights.
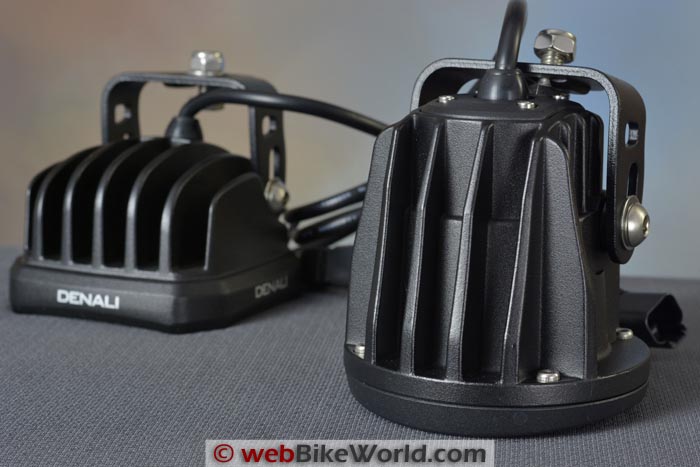
Denali DR1 spot light on the left and the D4 hybrid on the right. Depth or height of the D4 (L) compared to the DR1.Denali vs. Clearwater Lights
Anticipating the questions we’ll get from webBikeWorld readers, here are a few thoughts on the differences between the Denali lights and the Clearwater LED lights we’ve reviewed.
The main difference is that the Denali lights do not have the rotary dimmer dial (rheostat) found on all of the Clearwater lights.
This means that the Denali lights are on/off only (although there are aftermarket dimmer modules which may work but we haven’t confirmed this yet).
So the Denali lights should be used for night riding only; they’re too powerful to be used as visibility lights during the day.
This is understandable for the DR1 but it would be nice if the D4 lights had a dimmer.
Or, it would be nice if the D4 lights were switchable so that the lower LEDs could be switched on for a diffused flood pattern during the day or even better, if just a single lower LED on each side could be switched on during the day as a visibility light.
Also, the comparable Clearwater lights, such as the Clearwater Darla LED lights (review), which is the mid-range Clearwater light roughly comparable to the D4, has a more powerful beam with a wider and longer reach than the D4.
The larger Clearwater Erica lights (review) are beyond category; they’re the most powerful auxiliary motorcycle LED lights we’ve seen and they beat both the Denali D4 and DR1 (and everything else) for width and reach.
But…those same Clearwater lights cost more than the Denali lights.
The Denali D4 light pair has a current list price of $309.99 and the Denali DR1 light set is $339.99 (although you also have to add in the cost of the mounting brackets at $62.99 for the 22 mm to 28 mm type, for example).
A pair of Clearwater Darla lights will set you back anywhere from $499.99 to around $675.00 and they come with bike-specific mounting brackets.
The Clearwater Krista LED Lights (review) run from about $700.00 to $1000.00 for a pair with mounting brackets and the ultra-powerful Erica lights go for around $1,000.00 to $1,200.00.

Bottom line here is that the Denali D4 light set, even with the additional 22mm to 28 mm mounting brackets, costs $372.98.
That’s actually a relative bargain that gets you about 3/4 of the output of a set of Clearwater Darla lights, which cost from around $125.00 to $300.00 more, depending on the bike and mounting arrangement.
That’s a pretty good compromise.
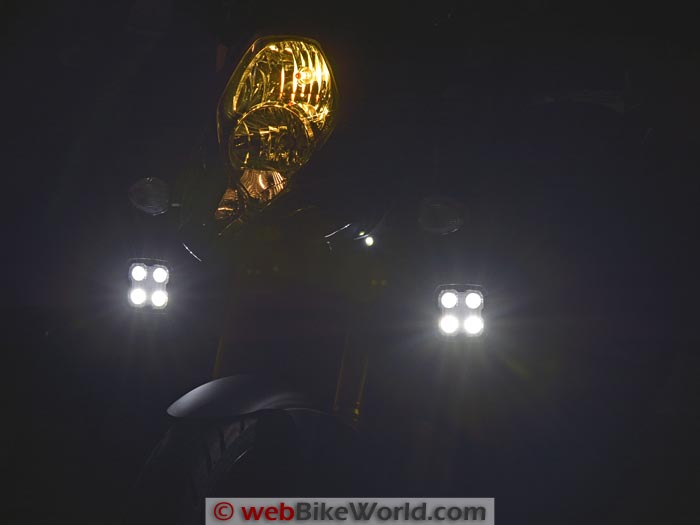
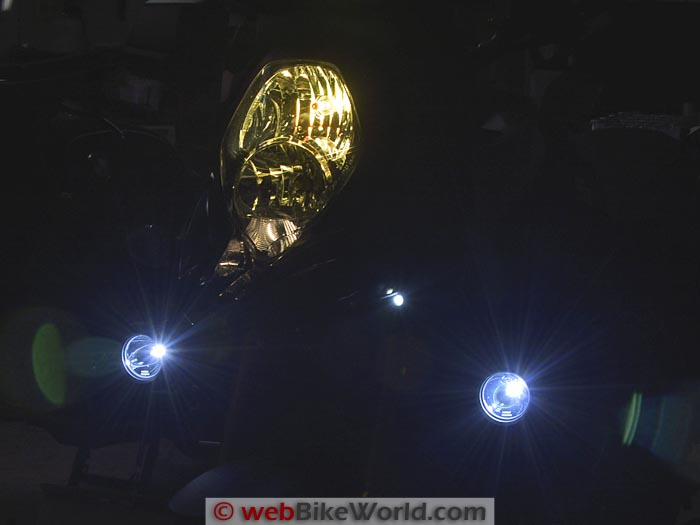
Denali D4 on the left and the DR1 on the right. Denali D4 mounted using the 22 mm to 28 mm brackets on the front section of the V-Strom Adventure crash bar. Close-up of the 22 mm to 28 mm mounting bracket with the DR1 light. The D4 lights have a unique four LED array. You can see the diffusion in the camera’s lens from the lower two lights. The DR1 lights have the classic spot light or pencil beam pattern with a clear lens. Denali DR1 lights on the V-Strom Adventure. Denali D4 lights on the V-Strom Adventure.Let’s Take a Look!
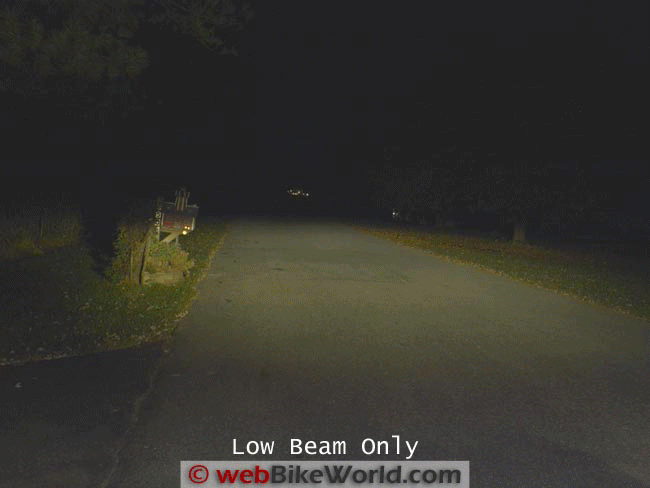
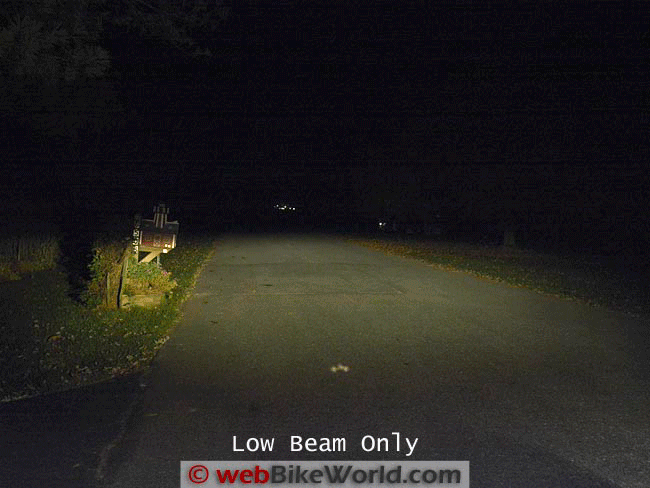
Here is an animated .gif illustrating the differences between the V-Strom low beam, high beam and the Denali D4 with both low and high beams.
Note that the stock V-Strom low beam H7 bulb has been changed to a yellow H7 bulb (review).
Low beam, high beam and the Clearwater Erica lights on the Suzuki DDR650 (.gif).Next is the same comparison, but this time with the Denali DR1 lights:
Clearwater Darla vs. Krista vs. Erica lights comparison (.gif).Next is a slide show: headlight on low beam; headlight on high; then low and high beam with the D4 and DR1 lights. You can select an individual photo and/or pause the slide show to study the effects.
You can see in these slides that the V-Strom high beam doesn’t really reach much farther than the low beam.
In fact, the low beam on the V-Strom is pretty good and adding the high beam doesn’t do all that much; a quirk of the V-Strom’s reflector design, apparently.
This affects the amount of light when the D4 or DR1 lights are turned on but seems to affect the DR1 results more.
Since the V-Strom’s high beam is relatively weak, the DR1 has to do the job to gain an effective light pattern when combined with the high beam.
Conclusion
The Denali D4 or DR1 lights are competitively priced and relatively easy to install (at least on the V-Strom Adventure).
The light output of the new D4 is a good compromise between reach and width, which makes them our choice in this comparison.
The DR1 lights have a pencil-thin pattern that, for the local riding conditions, isn’t as useful. The Denali D4 lights are a better compromise.
They’d be even better with an adjustable dimmer or if the D4 lights could be hacked to allow just one of the LEDs to be turned on during the day as a visibility light.
And by the way, for visibility lights on the V-Strom, we added the very nice BikeVis Bullets (review), gluing the light modules to the edge of the “beak”.
wBW Review: Denali D4 and DR1 LED Lights
Owner Comments and Feedback
See details on submitting comments.
From “J.B.” (October 2015): “My plane stopped breaking down long enough for me to finally finish installing my new front shock and the DR1 lights and WOW, how pathetic is the stock lights compared to these dudes.
Everything was in the box, not missing anything and your description was spot on (see what I done there “SPOT ON”).
This time of the year, the deer are on the move in the morning so more light the better. Now please do a review on a wide spread beam pattern light so I can buy those too! Thanks and keep up the good work.”
From “D.W.” (December 2014): “Well guys, another great review. I have a Triumph 800 XC with Rigid Industry lights on them. I have both the Rigid Dually and Rigid D2 lights on my XC.
The Dually spots are on the lower section of the crash bars (I have since moved them in closer to the motor from when I took these pictures) and I made mounts for the D2 up higher near the headlight.
I also put in the PIAA 110 bulbs as electric power is not an issue. Rigid Driving Dually and the wider Rigid D2. These seem comparable.
Seems like everyone is moving toward the square look.
Which my Rigid Industries lights have. I still like the look of the PIAA 530 LED lights. Have you done any comparing to say these and the PIAA LED 530?
What I am looking at are LED headlights. I see some on the market now. I picked up two (and) I put them in the DR 650s the wife and I both ride. Do you have anything on LED headlights?
They are bright, and very white. Use less watts that conventional H4 bulbs.
BTW, she has 33,000 miles on her DR 650 (I’m much behind her at 21,000). We also use the Sena SMH10 (review) radios (thanks to your site). And Rick Meyer seats. Hers is designed from her Rick Meyer seat on her Wee. We have done many 350-400 mile days on.
I have also replaced the 1157 bulbs in the DRs and her Wee with LED bulbs. She does like her heated grips and vest so we need all the help we can get. Thanks, you guys are my go to site.”.