
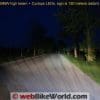
Excellent quality, ruggedized, lightweight, superb output are key descriptors for the Cyclops Adventure Sports Long Range Optimus Prime LED Light Kit.
This kit has two lights, one with a 10 degree and one with a 20 degree lens. Mix and match is available.
Both provide a distinctive and extremely effective lighting combination for the road ahead.
These efficient lighting units are one of the best examples of the benefits realized from LED technology, with only 10W draw per LED.
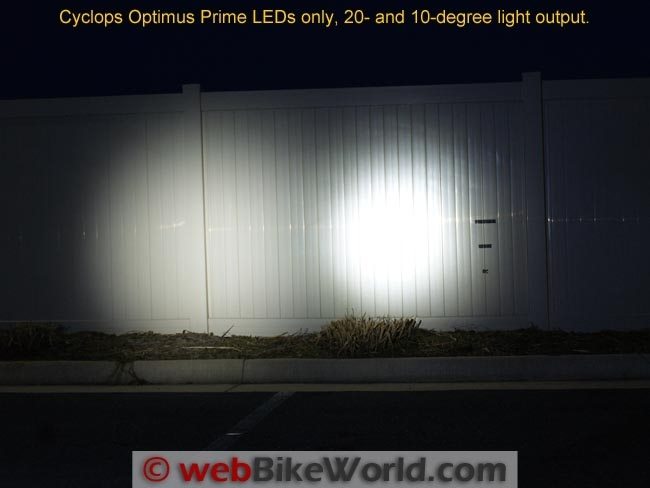
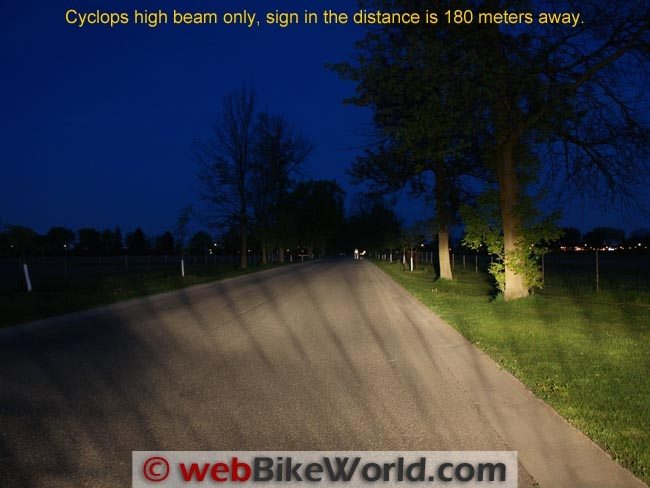
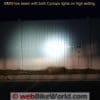
And despite a very modest lumens rating, the Cyclops Adventure Sports LED lights have an amazing output, with 600+ feet of projection; the lenses really do make a difference here.
With the optional dimmer harness and handlebar switch wired in, the lights can be turned off or switched between 50 and 100 percent. The lights can also be wired to work with the headlight switch settings.
Compared to other LED light sets that have multiple LEDs and higher output, the Cyclops Adventure Sports Optimus Prime LED kit with a single LED per module.
And the 10 and 20 degree lens combination is the most effective lighting system I have used.
Cyclops Adventure Sports calls these the “Light Cannon”, an apt term and well deserved.
A number of auxiliary motorcycle lighting reviews have been published on webBikeWorld, with the most recent focusing on LED products — and for good reason.
The development and evolution of LED technology for efficient and effective lighting is a well-established and growing market segment. We now enjoy a pretty wide selection of products varying in size, output, quality and of course, price.
Like the motorcycles we ride and accessorize, LED lighting kits also come in various types.
These range from small marker lighting like the BikeViz Bullets (review) lights or daylight running lights (DRLs) like the Clearwater Glenda LED lights (review) or Denali D1 LED lights (review) that can also provide some nighttime augmentation as well.
As LED, power management and lens efficiencies improve, smaller lights like the Denali DM1 micro LED lights (review) or the Clearwater Darla LED light set (currently being evaluated) really do provide a multi-purpose auxiliary light capability.
Editor’s Note
Since the instruction guide provided by Cyclops Adventure Sports was minimal, we’ll provide more detailed information in this review than usual for owners who might want to learn more about fitting these LED auxiliary lights to their motorcycle.
Motorcycle LED Lighting Choices
In considering a motorcycle LED auxiliary lighting system, most riders will look for the maximum output rating.
But output measurements and efficiencies of lighting — including (and, perhaps, especially) LEDs — is a hotly debated topic and in general it is “caveat emptor” when looking for the best solution.
The lighting industry uses the lumen as the standard unit of measurement.
A lumen is the International System of Units or SI measure of the total amount of visible light emitted by a source and is used as both a measure of intensity and brightness.
Think of the differences between a spot or narrow beam light versus a wide or flood style light and you’ll start to get the picture.
Some good easily understood technical information provided by Clearwater was included in theKrista LED Light review; it sheds more light (pun intended) on how lighting output and efficiencies are calculated both objectively and subjectively (perception).
Higher output LED lights, such as the ADVMonster M60 4-LED wide beam unit at 3600 lumens and soon the Clearwater “Erica” with six LEDs and over 6000 lumens of output per unit, both can and will literally “light up the night”.
They have performance that has to be seen to be believed while delivering efficiency levels unequaled by other lighting technologies.
But having one high output system with the greatest lumen rating isn’t always the best solution for overall use. Thankfully, many lighting systems on the market offer the ability to switch output levels discretely or in a variable manner with a rotary control or wireless remote.
As such, one set of long-lasting LED lights can provide years of daytime augmentation.
These can provide enhanced low visibility safety and when needed, increased output for increased range and coverage at night, using a spot or wide lens or a combination of the two — a popular solution for many riders.
Of specific interest has been the marketing of ruggedized LED modules; some adapted from designs for four-wheel vehicles and some specifically designed for motorcycle application.
One very good adaptation example is the Rigid Industries “Dually” LED lights; and after two years of use, my long-term evaluation is finally being completed.
And speaking of ruggedized LED lights…that brings us to the Cyclops Adventure Sports Long Range Optimus Prime LED Light kit, the subject of this review.
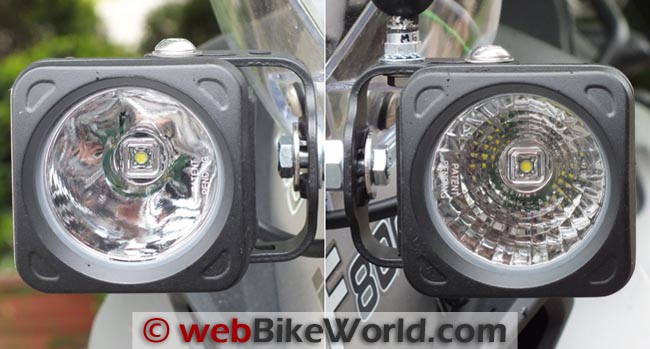
Cyclops Adventure Sports Optimus Prime LED with 10-degree lens (L) and 20-degree lens (R).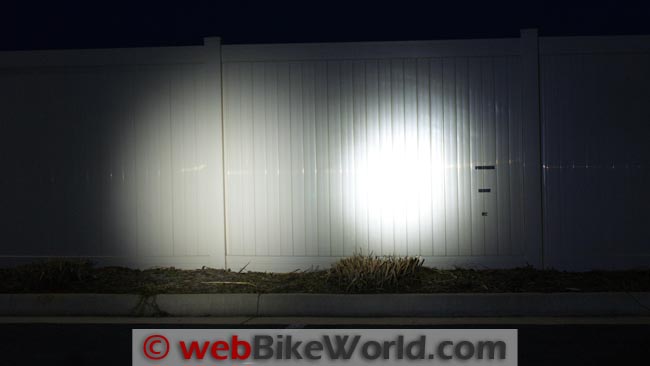 Cyclops Adventure Sports Optimus Prime LED lights only with 20-degree lens (L) and 10-degree lens (R).
Overview
When the Cyclops Adventure Sports Long Range Optimus Prime LED Lighting Kit is first opened, two large die-cast aluminum housings immediately attract the eyes.
With substantial-looking cooling fins that also add strength along with increased heat dissipation, there is no denying that this is one heavy-duty set of LED lights.
The only other units I own that are comparable to the Optimus Prime housings are the already-mentioned Rigid Dually housings that are my benchmark for being “built”.
Cyclops Adventure Sports states that the Long Range Optimus Prime lights with “Prime Drive” (the dimmer) drives the LEDs more efficiently, while managing heat levels correctly, resulting in more light and longer lifespan.
Electronic Thermal Management is used to monitor heat output, with Pulse Width Modulation circuitry used to maintain safe operating temperatures — again prolonging lifespan of the LEDs.
With an anticipated life of 50,000 hours (17+ years based on 8 hours of use daily), the LEDs should outperform traditional halogen solutions in both distance and output.
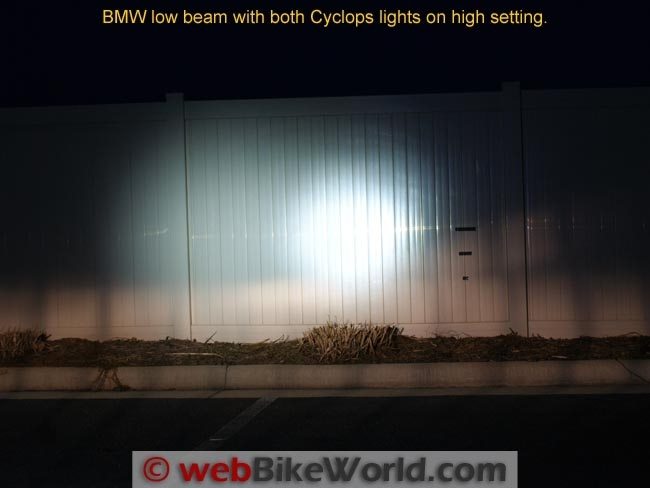
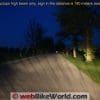
For comparison purposes, the LED is said to throw one lux (defined as one lumen per square metre) of light a whopping 693 feet, compared to a motorcycle’s low beam, which is measured at one lux at 88 feet (one lux at 153 feet on high beam).
Along with this stellar projection range, the Optimus Prime LED lights employ other tricks, such as “IRIS Optic Technology”. All of these technologies come together so that output remains constant and heat is managed properly.
Multiple Beam Width Patterns Available
But Cyclops Adventure Sports takes the improvement philosophy one step further by offering the Optimus Prime LED lights in your choice of combinations.
The most popular kit consists of one light with a 20 degree beam width and one with a 10 degree pattern.
The narrow 10 degree beam provides the most distance, while the 20 degree unit complements it from a distance perspective and provides a wider view with more fill.
Included in the kit in this review are the following:
- Two Optimus Prime LED modules (10 and 20 degree lens) with brackets and M8 hardware.
- One multi-function handlebar control with a kill button and 3-position switch.
- One multi-part harness with relay and in-line fuse modules.
- One Cyclops Adventure Sports Prime Drive Dimmer Control assembly.
- Instruction sheet (with coloured diagrams).
- Connectivity Handout for the handlebar control component.
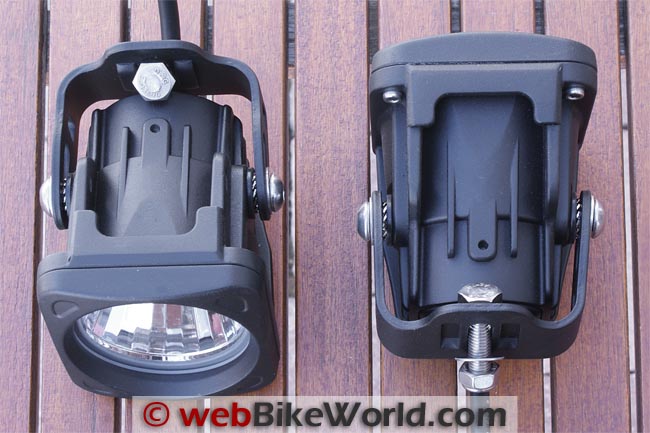
Side view of the Cyclops Adventure Sports Optimus Prime LED light housings.Mounting the Cyclops Adventure Sports Lights
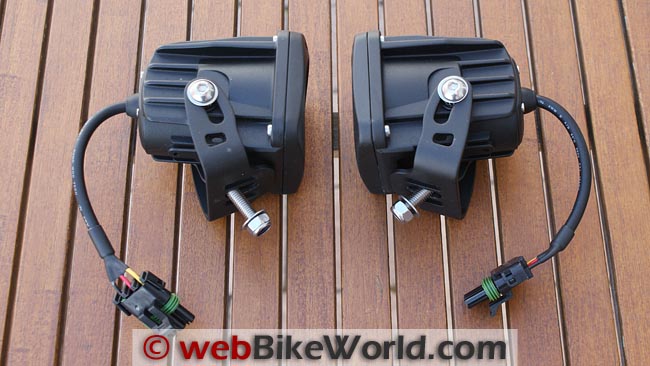
Each IP-68 (waterproof/dustproof) rated LED light module measures 78 x 96 mm (3.07 H x 3.80 D) and tips the scales at 576 grams (1 lb., 4.30 oz.), compared to the Rigid Dually modules that come in at a heftier 614 grams (1 lb., 5.6 oz.).
Housing a single large Cree XML T6 LED, the Cyclops Adventure Sports Optimus Prime light modules are differentiated only by the lenses.
The wide 20 degree lens with its distinctive slivered or pillowed-look and the narrow 10 degree lens being smooth overall.
A single LED putting out (approximately) 900 lumens may not seem like much compared to the ever-increasing output ratings stated for other LED lights.
But I have to agree with the Cyclops Adventure Sports representative who feels that lumen or output ratings are not representative and that the units need to be assessed on their actual performance.
Cyclops Adventure Sports also states that the 10 and 20 degree Optimus Prime LED light combination “surpasses every other LED auxiliary light in the market in terms of distance”.
Trust me — it is hard to dispute this statement, because long-range projection is just what these lights provide.
For mounting and adjustment purposes, a simple trunnion (U-shaped) holder provides 90 degrees of adjustability and mounts to each side of the module with an M8 screw, star washer and rubber washer combination for strength, shock isolation and tension so the modules won’t move around once adjusted.
The brackets are drilled to accept up to 10 mm hardware for installation.
The short 16 cm (6.3 inch) module leads exit the back of each module protected by a strain relief boot and these leads terminate into large three-pin Delphi weather-proof (pressure-fit) connectors.
Far larger than needed, the connectors are in keeping with everything else about the Cyclops Adventure Sports kit — big and heavy-duty.
A RAM mount can also be used with the Optimus Prime light housing for video camera duties.Wiring Harness Background
The complete wiring harness for the pair of Optimus Prime lights might seem intimidating — a fact not aided by the minimalist instructions.
But working through system functions reveals three groupings — Power, Switching and Dimmer Control — each with interconnectivity depending on whether the handlebar switch and dimmer control components are used.
In reviewing the documentation and visualizing all the connections, I thought it might be worthwhile to break down the wiring harness by the groupings; call it a pre-installation exercise if you will.
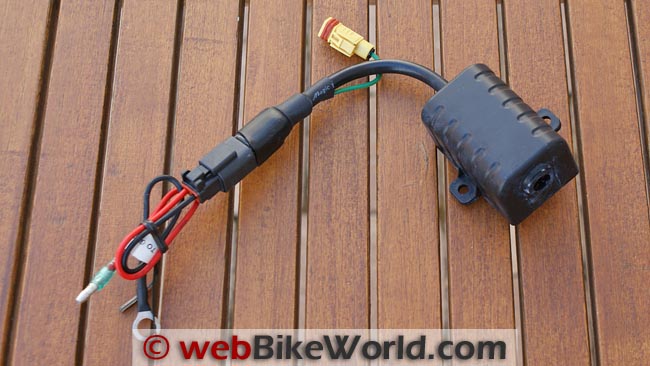
Cyclops Adventure Sports Prime Driver Dimmer Control
The optional light dimmer switch allows switching from 50 percent to 100 percent power to the Optimus Prime lights via the Lo/Hi functions of the switch.
The large plastic housing has the following connections: a green wire to a (yellow) modular connector with a 1-into-2 for connecting the orange wires from the LED leads; and a two-wireDeutsch connector (review).
The red wire goes to the green connector on the handlebar switch and Black wire is a ground.
Also, the optional Cyclops Adventure Sports “Prime Drive Dimmer Control” is identified briefly in the LED lighting kit instruction guide along with some cautions, but no specific instructions are provided.
So one is left to sort it all out based on the other handouts.
As an option for the two-light kit, it should at least have its own documentation and at the minimum, an interconnectivity diagram.
Cyclops Adventure Sports Optimus Prime Dual-Light Kit Wiring Harness
The Main (Power) Harness is used for positive and negative battery connections from the relay to the LED modules and for optional coded connections to the handlebar switch if used.
This section of the harness uses 14AWG wiring and a large industry-standard plastic housing relay with its own 20A in-line fuse battery connection lead.
In deference to the instructions, the left and right connector leads have three wires vice two; red and black being the positive and negative connections with the third (orange) wires reserved for use with the (optional) Prime Drive Controller dimmer assembly.
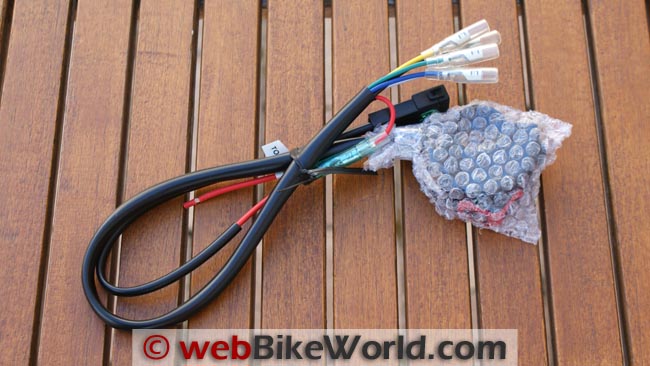
The Switch section of the harness controls a multi-function handlebar switch with a kill button and three-position slider switch (Off, Lo and Hi).
It can be wired in a number of ways, particularly if used for one or more switching functions — it is often used on off-road machines to provide a single component handling multiple functions.
Six leads with bullet connectors are bundled together from the switch, with the use of each coloured lead identified on small labels. These assignments are also identified on the instruction sheet, as listed here:
- Green: ON on Low, OFF on High (used only with Prime Drive Dimmer lead).
- Blue: ON on Low, ON on High (12V + trigger from switch to single Black relay lead).
- Red: 12V input power (trigger from a power source, preferably switched).
- Yellow: OFF on Low, ON on High (not used for this installation).
- White: Kill Switch ground (not used for this installation).
- Black: Kill Switch power (not used for this installation).
Cyclops Adventure Sports light dimmer assembly and harness.Example: Optimus Prime Light Installation on a BMW R 1200 GS
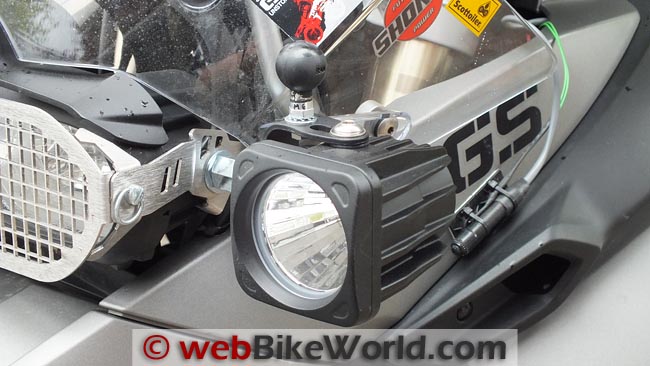
While the lighting kit was intended for the 2009 BMW F 800 GS test mule, having the kit in hand while down south this spring, with the R 1200 GS, was an opportunity not to be ignored.
Even though that bike already had five LED lights mounted — two sets and a fork-mounted single for trail use.
One set is the Denali DM1 (review) with the 25-degree fog lens installed, mounted on the engine guards; these units pull double duty as DRLs and low-viz augmentation.
The second set is the previously mentioned ADVMonster M60 wide beam LEDs hung off the corner “decks” of a Wunderlich Rallye Edition tank protection bar. A single ADVMonster M30 off-road spot LED sits just above the front fender providing effective duty as a trail light.
Everything is powered and managed by the Arboreal Systems Dispatch 1 (review) ,including the3BR USB and coaxial outlets (review) on the handlebars and the 15A coaxial lead peeking out from the front edge of the seat.
This is ready to provide the connection for the Powerlet RapidFIRe heated jacket liner (review) that hopefully won’t see use for a few months yet!
As the objective was to see how the supplied Cyclops Adventure Sports harness was going to come together the direct connection to the Dispatch 1 option was bypassed.
With the harness intended for use on the F 800 GS that has its battery well forward under the dummy top panel, I knew some of the harness leads would be short for the R 1200 GS installation, given that bike’s mid-frame mounted battery.
First up: the Cyclops Adventure Sports Optimus Prime LED modules, initially prepped by using a 5 mm Allen-head bit to loosen the screws that secure the heavy duty U-mount to each LED module.
Don’t lose the hardware if you take the brackets completely off…
The two outer 6 mm holes on each of the corner decks were drawn into service along with a set of aluminum spacers from the travelling parts bin to raise the light brackets 10 mm off the surface of the deck clearing the tubing.
This allows unobstructed horizontal and vertical adjustment of each module.
The three-position multi-function multi-wire switch was up next, mounted to the last viable real estate on the left handlebar of the R 1200 GS, next to the left control housing.
Two small sheet screws mount from the back through the thin metal clamp into the plastic housing of the switch.
A home for the optional Prime Drive Dimmer Control was found between the two cross-tube sections that anchor the rear shock and ESA components on the R 1200 GS.
This location kept it out of sight under the seat and close to required connections less the one lead to the handlebar switch.
With the harness laid out and the switch and dimmer controller installed, the only wiring extension needed was for the Red coloured lead of the handlebar switch.
I added a 60 cm (24 inch) section of red 14AWG wire and a single red Posi-Lock (buy ’em here!) to extend this lead back to the battery area.
Cyclops Adventure Sports multi-function handlebar switch harness assembly.Example: Optimus Prime Light Installation on a BMW F 800 GS
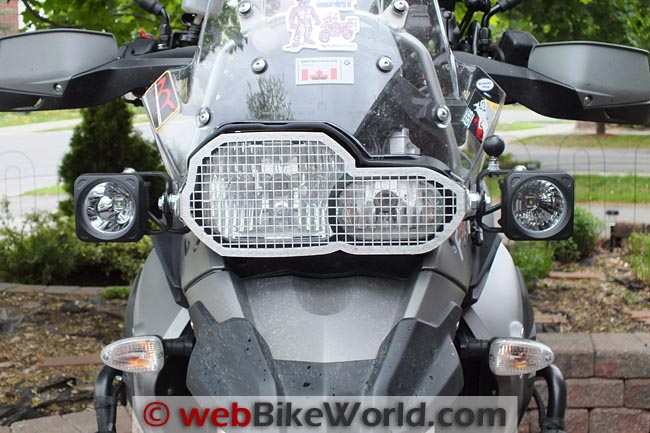
With the Rigid Dually LEDs removed from the BMW F 800 GS to make room for the Optimus Prime light modules, the main headlight mounting points were again available, so the 20 degree LED module was again mounted on the left and the 10 degree LED on the right.
As with the Dually modules and other lights previously installed, the 30 mm spacers were retained.
They provide clearance between the module housings and the lower edges of the BMW Touring Screen so that nothing touches and room for adjustment is provided.
The short module leads sit on the top edge of the front side panels just ahead of the windscreen mounting points and once connected to their counterparts from the main power harness.
They are close to the front forks when turning the handlebars; a zip-tie keeps the connectors secured to a handy frame point.
With the connectors positively engaged with a loud click, existing adhesive cable holders/guides are reused to route and secure the leads back along the inside edges of the side panels, with the leads routed up to the battery/air-box area where most of the accessory wiring terminates.
I snipped the two mounting lobes off the sides of the Prime Drive Controller module (optional light dimmer) and adhered it to the inside of the right side panel using 3M double-sided tape.
As oriented, the front edge is one inch from the fork for clearance and the leads pointed to the back.
Having previously isolated the three wires that connect the switch to the rest of the system, they were now bundled in 3/8th inch Flexo F6 wrap (buy it here) and routed along the left side of the steering head to meet the multi-wire harness from the switch itself.
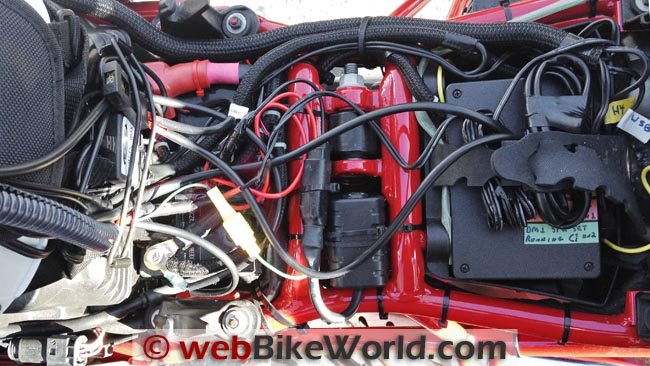
With excess wiring coiled and tucked down first, the relay sits at the top of the space between the battery and the front wall of the air-box, held in place by one of the conveniently located tabs on the plastic battery cover.
This area isn’t pretty, but it is relatively organized; everything is coloured-coded and labeled, with a mix of Deutsch and Posi-Lock connectors used depending on the “permanency” of any harness.
The only inconvenience is that it takes an extra minute to access the air-box cover.
BMW R 1200 GS Optimus Prime wiring installation in progress. Temporary installation was cleaned up later.Example: Step-by-Step Connection Guide for the Optimus Prime LED Lights
This generic step-by-step is based on using the two Cyclops Adventure Sports Long-Range Optimus Prime LED light modules, the handlebar switch and the Cyclops Adventure Sports Prime Drive Controller as a single integrated system, although there are options as described below.
Switched or Un-switched: Power to the handlebar switch that acts as the trigger to the controlling relay can be connected to any 12V DC source.
Athough it is recommended that a switched source be used, especially if you don’t want the lights to have power all the time whether the motorcycle is running or not; avoiding dead battery syndrome.
Prime Drive Controller: If the Prime Drive Controller option isn’t installed, the applicable steps listed below are not needed.
Without the dimmer control in the loop, sliding the Switch from off to low or high activates the lights at either setting. If the controller is wired in, then the low and high settings will function accordingly.
Any additional connections needed for wire extensions or specific adaptions applicable to the motorcycle were made with Posi-Lock or Posi-Twist connectors.
Stainless steel hardware and medium strength thread-locker are standard. Remember that your requirements may differ and as such your installation steps different.
Battery: Disconnect the negative and then the positive battery connections and make sure they are isolated to prevent any accidental contact.
I keep a bunch of short colour-coded lengths of plastic wire protector at hand to slip over the terminal and accessory leads.
LED Module Leads: The red (power) wire from each LED is connected to one of the two red wires from the relay, while the black (ground) wires are connected to the 2-into-1 black ground lead.
I marked this round terminal connector as (G-1). The orange wires are connected to their colour-coded counterparts emanating from the Prime Drive Controller harness.
Switch Connections: Of the three leads used, the green coloured lead is connected to the single long red wire from the Prime Drive Dimmer harness (now marked with green bands for coding).
The blue coloured lead connects to the single black lead from the relay (now marked with blue bands) and identified as (P-2). Additional colour coding and “P” and “N” assignments are my own, all done for standardization and to facilitate installation. Stainless steel hardware used.
Trigger Power Source: The third connection is the red coloured lead, mated to its extension length of red wire (with in-line fuse) — now marked as (P-3). This wire is the 12V DC+ trigger for the system via the switch.
Any switched source (headlight trigger wire, diagnostic plug tap, etc.) will work; I cheated and used the positive (lettered) side of the now unused Rigid Dually connection from the Dispatch 1.
Prime Drive Dimmer Control: With the orange wires connected to the LED module leads and the long red wire from the Prime Drive Dimmer harness connected to the green coloured connector on the switch harness, only the black or ground wire remains.
After marking it (G-3) it is connected to the unused ground (dotted line marking) wire of the Dispatch 1 lead using another red 18-24 Posi-Lock.
This layout allows easy insertion or removal of the Cyclops Adventure Sports Prime Drive Controller without disturbing anything else.
Main Relay: The main red lead from the relay, now marked as (P-1) is readied for connection to the positive terminal of the battery. The black ground terminal lead from the relay, marked as (G-2), is also readied.
Battery Connections: The main (P1) positive connection from the relay was added along with the Dispatch 1 and Scottoiler eSystem (review) terminals to the main harness lead and secured.
The (G1) and (G2) grounds were added to the negative terminal stack and it secured. Note: remember that I used a Dispatch 1 lead for (P3) and (G3).
But if something like a Centech or Blue Sea product is installed, the (P3) and (G3) would go to the appropriate sides of those devices, or alternatively, an available 12V+ switched source and ground.
Power Test: Initially with all connections made but before components are mounted and wiring tucked away, then repeated once all the housekeeping is done. With the ignition on and the switched power source activated, a loud click from the relay will be heard.
Moving the handlebar switch from off to low should activate the LED modules at fifty percent output and with the switch moved to Hi the lights go to full output.
Function and Performance
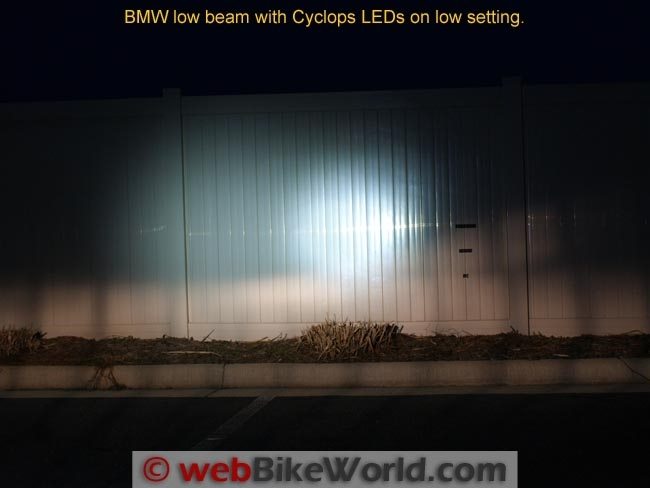
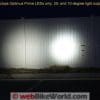
The Cyclops Adventure Sports Long-Range Optimus Prime LED light set functions as advertised with the handlebar switch and dimmer components providing ease of use and output versatility.
One may have to look closely to note the differences in the lenses, but when its dark at night and the properly adjusted LEDs are turned on, the differences are visually evident and there is no doubt about their effectiveness.
Just remember — even when set on low and 50 percent output, these LEDs are BRIGHT; common sense is needed in their use when riding (and don’t look directly into the lights either).
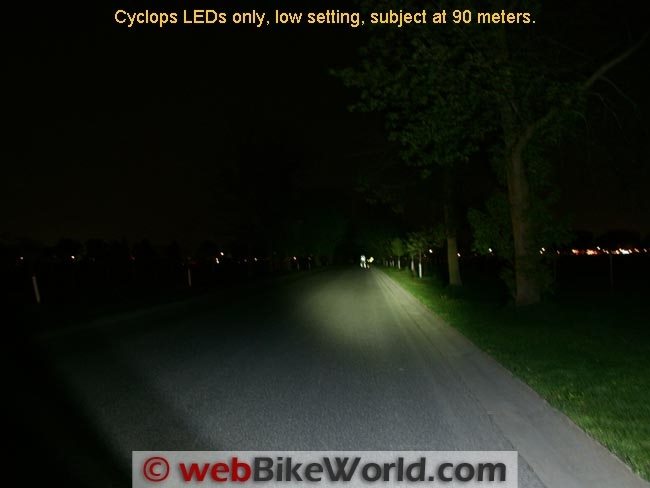
Offering a 10- and 20-degree lens combination is very smart.
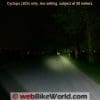
The wider beam on the left (or the road side, depending on the country in which you live or ride) cuts a wide comforting swath of white light extending far beyond the stock lighting while the narrower beam from the right side module focuses a tight white path or illuminating beam far ahead.
Of all the LED motorcycle lights I have on hand, only the 3600 lumen ADVMonster M60 units come close to equaling the coverage and projection provided by the Cyclops Adventure Sports Optimus Prime set.
Note I said close; in reality — and acknowledging that the M60s are a wide beam light — the Cyclops Adventure Sports 10- and 20-degree combination is actually more effective.
Conclusion
The word “performance” cannot be taken lightly when talking about or using the Cyclops Adventure Sports Long-Range Optimus Prime LED lighting system. Cyclops Adventure Sports also calls these “light cannons” and that is an apt descriptor.
Outside of the overly large and heavy-duty multi-part harness that is very much out of place based on electrical requirements (current Clearwater Lights wiring harnesses are the best example I can provide), the only other issue is the minimalist documentation.
A combined system view or master wiring diagram is needed for standardization, increased clarity and a more professionally packaged product.
There is no doubting the overall quality, function and performance of the Optimus Prime LED light kit however; the system has been installed and used constantly on three of my motorcycles.
The ultra-reliable and ultra-enjoyable BMW F 800 GS, the BMW R 1200 GS Rallye and now, the latest addition to the home fleet, a 2014 BMW F 800 GS Adventure.
Nothing has broken or failed to work and the lights as mounted and used get a lot of positive comments from other riders.
Output from the Cyclops Adventure Sports LEDs is outstanding and the combination kit of the 10- and 20-degree Optimus Prime LEDs is an excellent solution.
|
wBW Review: Cyclops Adventure Sports Optimus Prime LED Light Kit
|
|
|---|---|
| Manufacturer: Cyclops Adventure Sports | List Price: $328.00 |
| Colors: Black powder coated | Made In: Korea and wiring from U.S.A. |
| Sizes: 10 or 20 degree beam width. | Review Date: July 2013 |
Note: Item provided by a retailer, distributor or manufacturer with these Terms and Conditions.
Owner Comments and Feedback
See details on submitting comments.
From “C.G.” (September 2014): “Your reviews are much appreciated but I’d like to respectfully revisit the “beam cut off/indirect reflectors aren’t coming any time soon” conversation in the comments section following the Cyclops Adventure Sports LED light review from 2013.
If PIAA can make rear facing LED driving lights, BMW can design factory LED headlights (R1200GS) and bicycles can have LED headlights with amazing beam patterns, why can’t mc auxiliary light designers do the same?
(Check out the Luxos U beam pattern photos at Peter White Cycles website; wide and long beam but doesn’t light up the tree canopy).
Would I still need to dim, or even turn off, a beam cut off style driving light when there is traffic around? Sure, but I could keep them on until that traffic is a lot closer than I could compared to the current ‘light cannons’ available.
Am I completely off base?”
Editor’s Reply: Advancements are being made all the time in lighting, so maybe the problem will be solved. Also, it’s pretty easy to tweak night-time photographs to make lights seem different than the reality, so keep that in mind.
But, I think it will probably always be a good idea to either cut the additional lights when oncoming traffic is in view, or perhaps someone will develop an automatic dimmer that dips the lights plus lowers the amount of light?
The issue is making sure not to blind oncoming traffic, which can happen with too much light even if it’s properly dipped. I’ll be attending the upcoming AIMExpo show in Orlando next month so I’ll ask some of the lighting manufacturers what they think about this issue.
From “D.T.” (July 2013): “Actually E.L. (below) is right. The percentage of readers of your website who want to ride off-road at night is probably pretty small (uh, perhaps vanishingly small).
And you do your testing and show pictures of the light’s throw on a road. So lights are being bought for night riding on roads pretty much and to augment stock lights.
So cut off and usability for road riding, when there is other traffic is a hugely important consideration. Please do comment on that in your reviews.”
Editor’s Reply: Again, these lights are almost always used on the road but should never be used when following traffic or in oncoming traffic.
They are absolutely not designed for that, which is why they all come with off switches or can be wired to the bike’s lighting to turn on and off with the high beam.
Just like you would never use a high beam in traffic, you don’t use these lights in traffic either.
When the road is clear with no traffic, as it is on rural secondary roads, they’re perfectly fine, but must be turned off when traffic is present. The output of this type of auxiliary light is just too overpowering for use in traffic.
I don’t understand why anyone would need this much light in traffic — that’s what the motorcycle’s headlight is designed for.
Reply From H.B.C.: Looking for a “beam cut-off” of sorts isn’t going to happen soon, at least for current LED technology because their effectiveness is based on pure output with a focusing lens of some design.
This principle doesn’t allow for an “indirect” or reflector approach to any great degree, something other lighting technologies can and do use.
Some manufacturers do supply filters, coloured or otherwise, that can reduce the eyeball burn, but a lot of effectiveness is then lost as well. So as we keep stating, alignment and proper use is key…
From “E.L.” (July 2013): “The Cyclops lights in the latest review look good. Unfortunately, like almost all other LED auxiliary lights, they have no cutoff for the top of the beam.
This makes them of limited usefulness for on-road riding: unless they’re aimed too low to take advantage of the long throw, they will produce a lot of glare for oncoming traffic.
The only LED lights I’ve seen that address this issue are the PIAA LP530 and LP570. They feature LEDs that face back into a reflector, which shapes the beam like a conventional lamp. Hopefully other manufacturers will jump on this innovation, which seems so obvious I’m surprised more haven’t done it already.
In the meantime, I hope you’ll review the LP530’s. And it would be great if you and other reviewers would mention the beam cutoff issue.
I’m seeing more and more bikes with glaring LED lights which, while they certainly help the rider see better, make it more difficult for other drivers to see and judge the distance of motorcycles using them. As always, thanks for all your dedication and hard work.
Editor’s Reply: We assumed that readers know that these lights and all of the auxiliary driving lights we have reviewed are definitely NOT designed to be used in traffic (unless they are specifically designed as marker or visibility lights).
These lights are for off-road use only or for use on dark roads with no oncoming traffic, and must be switched off when oncoming traffic is visible, at least at night and, of course, they should not be used when following traffic.
During the day, some of them can be used on the lowest settings, as visibility lights only.