Ducati Evaporative Emissions Canister
The evaporative emissions canister mounted on modern Ducati motorcycles is, in a word, ugly.
I have no idea why they mounted it in such an obvious and noticeable location on the left-hand side of the motorcycle, hanging off the engine in a location that’s as obvious as a wart on a nose.
I have not seen this canister on any of the Ducatis in Europe, which meet the tough Euro 3 emissions standards, and I don’t know enough about the details of U.S. vs. Euro emissions standards to know why the canister is necessary in the U.S. and not in Europe (Note: See comments below).
An evaporative emissions system is generally designed to route fuel vapors from the fuel tank into a carbon filter inside the canister. The canister is then routed into the engine intake where the vapors are merged with the normal fuel intake and burned in the cylinders.
The evaporative emissions canister and system should be checked occasionally to ensure proper operation. Also, the owner may wish to eliminate variables when tuning the motorcycle or when troubleshooting, and the evaporative emissions system may have to be removed to eliminate it as a potential variable when checking the Ducati’s fuel injection system or when balancing the fuel and air mixture.
Although there are no moving parts in the system, the Ducati owner may also find it necessary to remove the system for maintenance, repair or replacement.
If the vehicle has an evaporative emissions system, it is considered to be part of the vehicle’s air pollution control system and is usually inspected during any emissions tests. Note that it may be illegal to run the motorcycle without the evaporative emissions canister or if the vehicle’s emissions control system has been tampered with or modified.
Therefore, this article covers the removal of the Ducati evaporative emissions canister and hoses for maintenance, repair, testing or replacement.
There is no original information covered in the article you are reading; details on removing the evaporative emissions system on a Ducati can be readily found on several of the Ducati enthusiast websites like the Ducati Monster List and others.
Removing the evaporative emissions canister on the GT1000 is a relatively easy project and should take no longer than 1/2 hour or so. The owner may want to purchase two short M5 socket head cap screws with thin 5mm washers to plug the threaded holes in the engine’s intake system after the evaporative emissions system is removed so that the engine can be tested or tuned without a vacuum leak. (Update: These may be M6 screws on the Monster and other Ducatis).
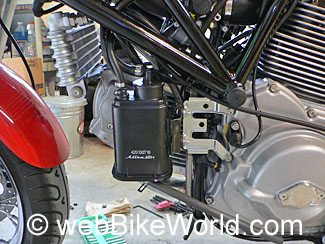
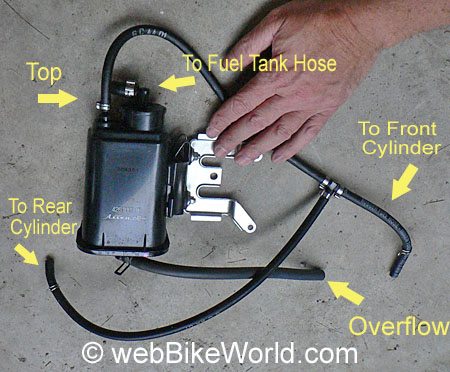
The evaporative emissions system on the Ducati GT1000 consists of the canister (mounted on the left-hand side of the engine) and a series of hoses as shown in the photo at the top of this page. The hoses are shown in the photo below with labels indicating their routing.
One hose runs down from the fuel tank to the canister and is attached to the top of the canister in the location marked “To Fuel Tank Hose” in the photo below. This hose must remain on the motorcycle and can be routed down the chassis to evacuate a fuel tank overflow.
Another hose runs from the canister to the horizontal (front) cylinder and one hose from the canister to the vertical (rear) cylinder. The hoses running from the canister to the cylinders are joined with a “T” connection.
It’s interesting to note that in addition to the hose routing for the evaporative emissions system, the fuel tank on the GT1000 also has an overflow hose that runs down from the bottom of the tank and allows fuel overflow to spill out on to the ground.
This hose completely bypasses the evaporative emissions canister and system and, in fact, the canister also includes an overflow hose. So I’m puzzled as to how the evaporative emissions system on the Ducati does indeed capture all of the fuel vapor if the fuel is still allowed to bypass the canister and spill on to the ground?
In any case, to remove the system, the hose leading from the fuel tank to the top of the canister must be removed at the canister. I then routed this down the left-hand side of the frame, between the front cylinder and the frame, along with a number of other hoses that are bundled and routed towards the ground. This keeps that hose out of the way and allows any fuel overflowing from the fuel tank to spill on the ground rather than the engine during testing.
By the way, don’t overfill the GT1000 with fuel. Enough room should be left in the top of the tank for expansion if the weather turns warm. I filled the tank right up to the top once and left the bike in the garage, which became very hot one warm day. An overpowering smell of gasoline hit me when I opened the garage and I traced it to the overflow. The situation could have been disastrous, so use caution when filling the fuel tank.
UPDATE: I now think the best way to finish the removal is to simply cut the hose coming from the “T” down to the canister and leaving all the other hoses intact. Plug the end of the hose you just cut with a screw and some silicone and then tuck all the hoses up under the bike. This leaves the majority of the hoses and parts in place just in case they’re needed and it saves a lot of work. And, the canister could be re-attached very easily if necessary.
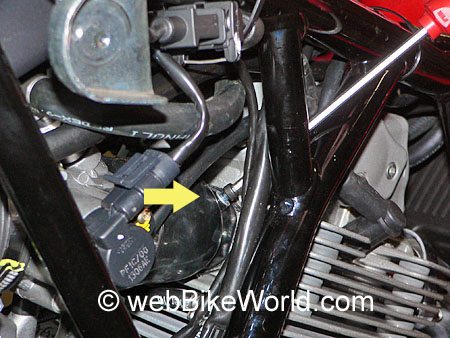
Next, I then loosened the hose clamp (see photo below) that secures the hose to the front cylinder intake. This hose is routed to the front cylinder intake on the right-hand side of the bike (1000DS engine).
This photo (below) is a close-up of the fitting that is screwed into the front cylinder intake manifold. The technician’s hand is holding the hose that leads back to the evaporative emissions canister and the hose clamp can be seen towards the end of the hose.
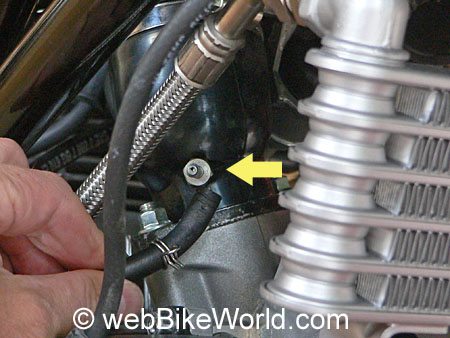
The fitting shown in the photo above can now be carefully removed. The intake manifold tube is made from some type of plastic material which has a metal threaded fitting to allow the nipple fitting shown above to be screwed into place. Caution is warranted when removing or replacing this fitting; don’t force it and don’t use too much torque when replacing it.
After removing the nipple fitting, I replaced it with an M5, fine thread hex head cap screw. I had to use a Dremel cut-off tool to cut the M5 screw down to size because I couldn’t find a short screw in the hardware store. The screw should only be as long as the threaded part of the nipple fitting that was removed. It’s not a good idea to have a screw protruding into the air stream inside the intake manifold, as it may cause unwanted turbulence in the air stream that may affect performance.
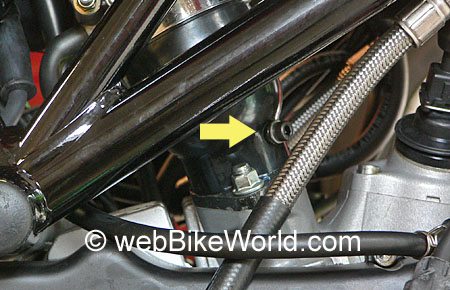
Next, I removed the hose and fitting from the rear cylinder. This is located in a barely accessible on the left-hand side of the bike, just near the evaporative emissions canister. The next photo (below) shows a close-up of this fitting. Note how the Wiha bit driver is routed through the frame to access the screw.
I was only able to access this fitting using the Wiha bit driver, which is a long, thin screwdriver-like tool with a magnetic receiver on the tip. It takes different size bits and has been enormously handy for many motorcycle related projects. This is the only tool I own that fits the hard-to-access screws that hold the Ducati GT1000’s rear taillight assembly. I will cover the removal of that assembly in an upcoming article.
I removed the hose and the nipple fitting on this intake manifold tube and also replaced it with a cut-down M5 hex head cap screw. I used blue Loctite on both and did not over-tighten the screws.
The final step is to remove the canister bracket. This is attached to the engine using the side cover bolts. I had to add a couple of washers under the top bolt to make up for the thickness of the bracket and to prevent that bolt from bottoming out in its threaded hole.

I don’t have a shop manual for the GT1000, so I’m not sure of the torque value for these bolts. I used a bit of blue Loctite and just snugged them up. If anyone can tell me the correct torque values, I will add it to this article.
That’s all there is to it… Although some owners say that instead of replacing the nipples with M5 screws, they should be left in the intake manifold tubes and a hose should be run from one nipple to the other to balance the intake manifolds. I did not do this and the bike seems to run fine, but if anyone can shed some light on this topic, please contact me.
If you have further information, tips or guidance on this project, please send it to me at
Owner Comments and Feedback
Not all comments will be published (details). Comments may be edited for clarity prior to publication.
From “M.H.” (3/09): “I just removed the charcoal canister on a (2008 Ducati Hypermotard S). I used two M5x10 Phillips screws from Ace Hardware with a little blue Loctite on each. I’d have preferred to use hex cap screws, but they were all too long. And I didn’t want to bother cutting/grinding the ends off to shorten them. Worked like a charm, cost $1 and took about 15 minutes.”
From “C.Y.”: “Couple of comments. One does not need to connector the two cylinders for balance. Please seemy detailed post (on the Ducati Monster board). Also, there seems to some confusion as the M5 or M6 is the right screw. Is it because M5 goes with the GT and the M6 goes with the S4RS?
Editor’s Reply: I’m not sure if different Ducatis use different size screws, but the screws on both the GT1000 and Multistrada 620 use a 5mm hex wrench.
From “A.”: “Regarding the procedure for the charcoal canister removal for 2V Ducati’s, I would recommend using rubber vacuum plugs instead of the 5mm bolts and Loctite, as the existing nipple fittings are used for synching the throttle bodies by the dealer or whomever. Also, I connected the two overflow hoses using the existing ‘T’ connector to make it more tidy and just have one hose coming out. This would also prevent someone from accidentally plugging up the overflow hose to the canister, which has been known to happen.”
From “A.I.B.”: “You ponder in the article why the canister is on US models. CARB (California Air Resources Board – Ed.) compliance requires an evaporative emissions system. The other 49 states do not require it. To make things simpler for the tiny Ducati factory, they only make one US model and it is California compliant.
It can legally be removed in any other state, but any bike owned in California must keep it, or be fined $500.”
Note: For informational use only. All material and photographs are Copyright © webWorld International, LLC – 2000-2011. All rights reserved. See the webBikeWorld® Site Info page. NOTE: Product specifications, features and details may change or differ from our descriptions. Always check before purchasing. Read the Terms and Conditions!