Make Your Own Carbon Fiber Motorcycle Parts
Carbon fiber moldings look great on a bike.
They’re light, strong, generally unaffected by fuels and oils. I could go on and on.
They can cost a fair bit, especially so if you buy “one-off” moldings from a commercial manufacturer.
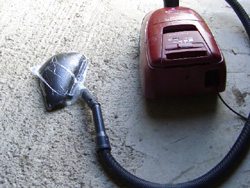
I took up bikes again after a 40 year lay-off, ending up with a black Guzzi California (Jackal).
Having a bit of a poke around my machine, I took off a side cover.
I found that the plastic had cracks round the bolt holes. I decided I had to replace the covers and had a look to see what was available.
After asking around, and talking to experts like the guys at Motorworks in the UK, it seems that although there are some carbon replacement parts for other models, there is nothing in the UK made for Cali’s.
Because I like the look of carbon fiber, have a little experience in laminating and molding, my mind was made up – replacement side panels had to be made out of carbon fiber.
I know that there are people reading this who are true experts in this kind of stuff.
Ad they will most certainly be capable of picking holes in the fairly crude methods I have used and described below.
It is however, a pretty accurate description of how I actually went about successfully producing the moldings and it worked for me.
The Skinning Process
This is a description of how to make a carbon fiber molding by ‘skinning”.
You could, I suppose, describe skinning as a reverse of molding; in molding, carbon fiber is applied into or over a mold and the finish that will eventually be seen is the surface that was next to the mold.
In skinning, it is the opposite way round; you apply a carbon fiber skin over a mold and the finish is achieved by building up successive coats of resin and rubbing down till you end up with a smooth surface.
By using the skinning technique, you save all the work of making a mold.
With modern materials and a bit of care and practice using the skinning process, you can end up with a finish that is as good as a commercially molded item.
You can also (hopefully) re-use the part that you used for pattern and it’s fairly simple, very quick and very cheap.
Making Patterns
One point on the molding of other bits for your bike: if you don’t have a pattern, one can be produced in a soft, easy to shape material such as white, blue or pink foam.
Rough out the shape by carving the foam using a bread saw, (this works better than it sounds),coping saw or the like and then sand it to shape.
If you have an old vacuum cleaner in your workshop it will save you, the workshop, the cat, et al from becoming covered in small blobs of foam.
Smooth things off by sanding it with a “Permagrit” sanding bar (see the ‘suppliers and Data Sources” section at the end of this article).
When satisfied with the general shape, finish off by filling any dents, dings, seams etc. with something like Polyfilla and sand it smooth.
When satisfied, paint on a coat of thinned PVA glue (thin it with water about 50/50) over the whole thing, which will act as a sealer and the carbon fiber can be applied over that.
When you have completed the molding, you can either release it from the pattern or if it’s stuck, remove the foam by either cutting it away or dissolving it with a suitable solvent.
As with many things in life, once you have tried it, the mystery, but not necessarily the fun, tends to go out of it and thus it is with making foam patterns.
Without going into hot-wire cutting techniques, I have seen some very clever things done with foam and a bread knife. But I digress…
Commercial molders generally produce carbon fiber moldings using a vacuum box and an autoclave.
They produce moldings which tend to be bit lighter, but not really all that much stronger, than the ones we are going to make although I don’t suppose a few grams of weight is of much consequence to the average Guzzi owner.
Although not everyone has an autoclave, it is possible however, to replicate part of the commercial process by using vacuum bagging techniques, and it allows us to reproduce fairly complex shapes.
Vacuum Bagging
The technique works as follows:
You place the carbon fiber over your pattern.
Then wet out the weave with epoxy resin and then shove the whole lot in a polythene bag.
Next, remove the air inside the bag using a vacuum cleaner.
Give it a good suck to remove all the air, tie-wrap the end of the bag to maintain the vacuum and allow it to cure.
By creating a vacuum inside the bag, you are applying approximately 14.5 lbs. atmospheric pressure to each square inch of the molding.
That forces the carbon fiber to take up the shape of the pattern and without much effort on your part.
The pattern may be a fairly complex shape but with a bit of practice, you can achieve an excellent result.
Once the first coat of resin has cured, you have the shape “set” and can apply subsequent coats of resin without any problems.
Carbon fiber doesn’t really enjoy being forced into complex shapes or around compound curves, and if you try and do it manually, the weave can become distorted and spoil the look of the thing.
Try it with a spare bit and you’ll see what I mean. Using the vacuum bagging technique is an excellent way to teach it some manners.
Materials, Properties and Handling
Resin:
- In principle, the warmer the ambient temperature, the faster the mixed resin will cure (harden). More later.
- The warmer the resin (up to a point) before mixing it, the easier it will flow during application however to balance this, each coat will be thinner as the viscosity is lower
- There are many different types of resin – don’t be a tightwad and buy the cheapest.Get a good quality laminating resin – it really is worth paying a little extra and it’s pointless spoiling the road for a ha”p”worth (Editor’s Note: A Yankee translation is “being penny wise and pound foolish”) of tar.
- Resin is exothermic when mixed with hardener i.e.: it can give off a surprising amount of heat as the chemical reaction of curing takes place.(Note: see the bit on “volume mixed” in the “Note” below – the degree of exothermic reaction can be dependent on the amount of hardener added and the volume mixed.).I tend to mix it up in containers such as those plastic pots you get coleslaw / whatever in from the supermarkets.When finished applying the stuff, sit the pot containing the excess either outside or on the concrete workshop floor to cure and cool.
Carbon fiber cloth:
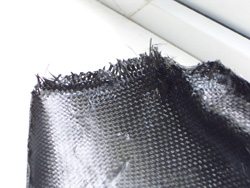
- It needs to be handled gently, in fact the less handling the better. Be careful of the weave fraying at the edges.
- Use very sharp scissors to cut it. If you hack away with a blunt pair, you will end up with frayed and raggy edges. A sharp scalpel and a steel rule can also do the job.
- To prevent fraying, you will sometimes find that it has masking tape applied to the edges. Don’t even think of peeling it off or you will end up with a mess. Cut it off with sharp scissors.
- Work over a flat surface when you are cutting it and make sure you have plenty of room to move it around.
Whilst I may be stating the obvious (something they tell me I am very good at) it had to be said, as does the next bit.
Health & Safety, Furry Moldings, Stiff Trousers
I have no idea of what you know so I have had to address the basics here and include health and safety aspects, however it really is only common sense well applied to a specific operation.
- Resin fumes are an irritant. Make sure you are working in a ventilated room / workshop.Don’t eat, drink or smoke whilst at it. The fumes are pretty pungent so don’t do it in the house unless you can afford the divorce settlement.
- Always wear latex gloves when working with resin. Dermatitis is not nice. Wear eye protection if the possibility of splashes exists.If you want to do belt and braces, get some barrier cream and apply to your hands (for the person that’s bound to ask – yes, before you don the gloves).
- Carbon fiber dust is really not good for you – wear a dust mask at all times when carrying out cutting, filing or any other operations that will cause dust. Wear latex gloves when handling the raw material.
- Know this: Before you do any laminating, lock up, give away or sell the cat (the bagging technique may be found useful at this point).The cat that owns us generally comes down to the workshop when I am in there to keep me company and have a bit of a purr.He once rubbed himself against a lamination before the resin had fully cured – ergo: furry moldings. He then rubbed himself against my legs – ergo: stiff trousers.Animal lovers please note: don’t write in whinging (Editor’s Note: “to complain fretfully”) at this point or the cat gets it.
Consumables
Carbon fiber cloth – use a woven type. There are different types of weave / weight / thickness.
You don’t need too heavy a cloth, but although a thinner one is generally easier to mold, it means a single thickness molding is more flexible and will need stiffening.
I tend to buy offcuts of whatever thickness I can get from a bike place that does moldings.
That way it doesn’t cost too much per sq. meter and I can modify the methods I use to suit what I get (cut the coat to suit the cloth?).
- Two-pack laminating resin. Within reason, get the best you can afford.
- Mold release agent.
- Hard carnauba wax (don’t use the liquid stuff)
- Wet & Dry paper, around 380 and 600 grit size should do the trick.
- Chopped strand glass fiber mat (optional).
- Spray tin of automotive clear lacquer.
- Plastic mixing pots and lollipop sticks for mixing.
Tools & other Equipment and Consumables
Rubbing down block: The rubber ones are best. Flat one side and curved on the other, they have pins to hold the wet & dry paper in position).
Stainless steel washers for reinforcing the bolt holes or offcuts of Aluminum sheet (16 or 18 SWG) for load spreading plates for fixing holes (optional).
(Editor’s Note: SWG is (British) Standard Wire Gauge; AWG is American Wire Gauge. Here’s a conversion chart.)
Dust masks: Paper disposable type are OK (not optional). Note: these are for protection against dust particles and NOT fumes
Tac Rags: Wipe down the molding after rubbing down in between coats to get rid of dust. “Tac rags” (used in the automotive painting industry) are good as they pick up all the surface dust – get them from car accessory dealers.
Latex Gloves: Disposable type (not optional).
Paintbrushes for applying the resin to the molding. You will get through a few.
Acetone which is used as a brush cleaner.
Note: Acetone fumes are toxic. It should be used only in a well-ventilated place. Not to be used to remove resin from your hands as it is a skin irritant.
Read the warning labels on the container or get the COSHH (Control Of Substances Hazardous to Health) for Acetone.
(Editor’s Note: Also Material Safety Data Sheet (MSDS) – here’s a list of MSDS’s for Acetone) data sheets at the web address shown at the end.
Methylated spirits which is used as a (safer) brush cleaner. Also use it to get any resin off your hands. Has a very low flashpoint and consequent fire hazard. Try not to smoke when using it unless you are keen on self-immolation.
Molding
Pattern Preparation
Relax. If you screw anything up in the following stages, don’t worry about it. Have a good swear at the cat (it’s probably stuck to the molding anyway), a cigarette / mug of tea / coffee and start again.
This particular molding is so small that you can easily start again from scratch which won’t waste too much time, certainly won’t break the bank and as a further bonus, you are adding to your experience and skills all the time.
Worst case scenario is if you screw up the molding and get it stuck to the pattern however to do that, you really have to try hard.
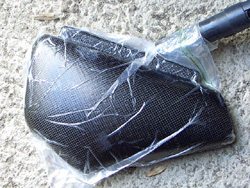
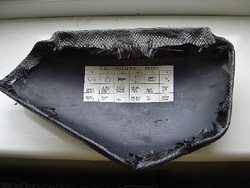
Ensure that the pattern surface finish is as good as you can get it. In this case, the plastic cover normally has an excellent finish that needs no additional work other than waxing.
If you need to, fill any pinholes with filler, finish off with fine wet & dry used wet. Polish out any minor imperfections with ‘t Cut”.
Apply a good quality hard wax. Any make that contains a high proportion of “Carnauba” wax is the business but tends to be more expensive.
However for the amount you will be using, hang the expense — chuck the cat another canary.
Apply a coat of mold release agent. Allow it to dry, polish with a soft cloth and apply another coat. Repeat in accordance with the manufacturers instructions.
You can reckon on between 3-5 coats of release agent. The release agent should be applied to the pattern both inside and out for reasons that will become apparent later.
Applying the Resin and Molding the Carbon Fiber Cloth
Don’t do molding if the temperature where you are working is less than about 15 degrees C (59 degrees F); the ideal range is about 15-25 C (59-77 F).
If it gets cold, I usually shove the molding in a cardboard box with a small hole cut in one corner and poke a hairdryer into the hole and go and have a smoke and a cuppa (Editor’s Note: be careful doing this!).
This gives you a very crude, but very effective curing “oven”.
This technique also helps maintain matrimonial (or should that be matriarchal) harmony.
I was once read the riot act when I tried to lightly bake a molding in the oven…only in the interests of science and technology you understand.
The riot act was also read when during a wet season, I once tried to dry our Walnut harvest in the tumble drier but that’s another story (the noise by the way, was pretty awesome).
Shape the carbon fiber cloth gently over the pattern making sure you leave about 15 mm (or ½” in old money) or so overlap hanging over the edges of the pattern which will be trimmed later.
Don’t pull it as you will stretch it out of shape and it will spoil the uniform look of the weave.
Trim the edges of the cloth to size, using a set of very sharp scissors taking care not to fray the edges too much.
Have the Hoover, the poly bag and a couple of poly bag ties on standby (V. large sandwich bags work well).
When satisfied that the carbon fiber cloth fully covers the pattern, mix up some resin.
Ideally, you are looking to get an even coverage of resin over the carbon cloth – you can always rub down any runs later.
Make sure when spreading the resin that you don’t pull the weave, raise any individual strands of carbon or stretch it; we need to try and keep the weave looking even and flat.
The method that works for me is to make sure the resin is warmish before I mix it (reasonable “runny”). I pour it on the cloth and brush it out very gently and only as much as absolutely necessary.
The objective of this stage is to wet the carbon fiber right through the weave with resin and provide a hard “shell”. You should have no problems with air bubbles doing it this way.
Vacuum Bagging the Molding
Apply the resin carefully and gently spread it evenly to cover all of the carbon fiber cloth including the overlap.
Use enough resin to wet-out the fiber but don’t put great dollops of the stuff on.
Shove the whole lot into a plastic bag, taking care not to alter the position of the carbon fiber over the pattern.
Gently shape the carbon fiber over the mold through the bag and shape the overlap around the edge of the pattern.
(This is why we applied release agent to the inside: the carbon fiber should curl round the edge and the overlap will mold itself to the inside of the pattern).
I would recommend that if you have any doubts about this part of the operation, don’t grasp any of it (and given my writing technique this is understandable), or even if you do, try a dummy run without the resin.
It only takes a minute or so and will give you a better idea of how it is done.
When satisfied that the carbon cloth is in the right position, turn the Hoover on, open the air bleed so that it isn’t sucking too much, gather the opening of the poly bag and stick it into the Hoover nozzle.
Have the bag tie ready and when the Hoover has sucked all the air out and starts to “redline”, tie the bag end.
Make sure that the vacuum is holding. If it is not, give it another good suck with the Hoover.
I had a problem holding a vacuum with one bag and just left the Hoover running until the resin cured (the Hoover motor re-build didn’t cost too much).
Anyway, sit the whole lot somewhere warm and it should cure within about 20 minutes.
Hardening times vary a bit with resin types, manufacturers and temperatures so that I can only give you a guide.
With an ambient temp. of around 25°C, I was working in the open air and the resin I was using was going off within 15 – 20 minutes.
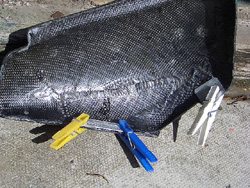
When the resin hardens, remove the molding from the bag. You might tear the bag when getting it off but that doesn’t matter.
When you are sure there are no bits of polythene bag left sticking to the molding, apply another coat of resin spreading it as evenly as you can.
The molding may well separate from the pattern at this point. If it is a large part that is being molded it will be a bit “floppy” in which case shove the pattern back to give it some rigidity until you have applied further coats of resin.
With small, rigid moldings like this however, it doesn’t really matter providing you handle it reasonable carefully.
Applying Further Coats of Resin
It is surprising how far the stuff goes and this is a very small molding; experience will quickly tell you how much you need to mix.
(Important: see also the note in “End Stuff” below on volume mixed).
What we are trying to achieve at this stage is to completely fill the weave by adding further coats of resin until we end up with sufficient thickness to rub down without cutting through to the carbon cloth.
Keep on applying thin coats until you have a layer of resin built up; you will probably need about 3 + coats to do it.
When satisfied, give it a gentle rub down with 380 wet & dry paper used wet.
We are trying to take the top off any lumps and bumps in the resin only. Again, be very careful not to cut through the resin and abrade the carbon cloth.
Don’t worry about the finish on the overlap as this will be trimmed, however, do make sure that it has been wetted out with at least one coat of resin.
After applying about 3 coats of resin, the overlap will need to be trimmed. There are several ways to go about this and you will have to choose the one best for you.
Depending on the method you use, make sure you wear a dust mask – as stated earlier, carbon fiber dust is not good for you.
Trimming the Mold Edges and Removing the Pattern
The goal is to leave about 2-3 mm of overlap to enable the edge to be sanded flat and even.
If the pattern has come away from the molding (either at this or at any previous stage), that is fine.
All we do is to fit the molding back onto the pattern and mark round the edges with a very soft thick pencil so we know where the edge is.
You can trim the edges using:
- A Dremel tool and a very thin cut-off wheel, however you have to take great care not to slip or allow the wheel to jump out of the cut and damage the molding. Causes a fair bit of dust doing it this way.
- A very fine bladed razor saw to cut off the excess. Tool stores or model shops will be able to supply them and they are a useful tool to have in your box.If you use a blade with large teeth or try to rush it, you will splinter the edges for sure.This is steady-away stuff and you need to be careful to cut at an angle so as not to tear any of the carbon fiber, break off chunks of resin or splinter the edge of the molding.This is not a bad way to do it; less dust and more controllable.
- A scalpel. It can be a bit tedious as it needs a fair bit of care and patience but provides good results with no dust.If you are a bit ham-fisted, make sure your local A & E (e.g., hospital!) has someone on standby who is good at stitching.
- If you are very careful, you can trim it using a pair of sharp tin snips or wire cutters. This is my personal preference but may not suit everybody.
Releasing the Molding From the Pattern and Trimming the Edge
 Whatever method you use, take your time, use the Mk.1 eyeball often and cut gently.
Don’t try to rush it; you have lashings of time.
Trim the overlap then gently twist the molding backwards and forwards a few times and you will hear clicks and creaks as the molding separates from the pattern.
Work your way around the molding easing the edges away from the pattern with your fingers.
 The molding should release from the pattern without too much effort. (This could be the point at which you find out whether or not you applied sufficient release agent)
Worst case scenario is if the molding is well and truly stuck to the pattern.
If it is, and there is nothing you can do to shift it, no problem (at least not with a side panel). Just use it as-is, in which case you have a carbon fiber molding with a bit of plastic reinforcement inside it.
 Once the molding is separated from the pattern, give it another couple of coats of resin making sure the remaining overlap gets a good coat.
I initially use a file to remove most of the lumps and bumps from the edge.
Then I place a full sheet of coarse wet and dry (something like 120 grit) on a flat surface.
Place the molding on it and rub the edge down by moving 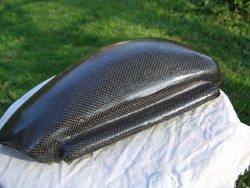 themolding back and forth until you are happy that the edge is nice and flat and that the overlap has been removed.
Don’t worry if it’s not absolutely perfect as we aren’t watch-making here.
Rubbing Down & Applying Logos
If the ambient temperature is at a reasonable level, you will not have to wait too long for each coat of resin to harden to the stage where you can rub it down.
If you are working in a cold, damp and draughty shed then it will take much longer to harden.
Build up the finish by brushing on more coats of resin. Rub down in between coats with 380 wet & dry paper used wet.
This way you get rid of many imperfections as they happen and they are not carried over to the next coat.
Just be careful you don’t cut through the resin and into the carbon fiber.
As you add subsequent coats the finish will improves. Use a dollop of washing-up liquid in the water (you don’t need much to do the job) which will give better wetting properties and prevent any sticking.
Once again, and I can’t stress this enough, when rubbing down, be very careful not to cut through the resin and abrade the carbon cloth (or the logo / transfer if you have applied one).
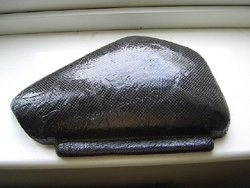
You don’t want to ruin the finish at this stage. You want to end up with a smooth pinhole free surface that is ready for polishing. I applied about 7 coats of resin, rubbed down between coats, to get to this stage.
When you have a nice smooth surface, you can get very tricky indeed. If you want to apply a decal / transfer / logo whatever you want to call it, this may be a good point to do so.
Make a test piece to make sure the resin is compatible with the transfer by applying a decal to a bit of aluminum or whatever, then pour a bit of resin over it to make sure the resin doesn’t melt the decal.
Wet slide decals are generally ok (the same as those you used on model aircraft when you were a kid?).
Apply the decals and after they have dried, you can apply further coats of resin to “cast” them into the finish. This can give a lovely “depth” to the final finish.
I normally take an alternative route and finish off the rubbing down before applying the transfers then spraying the molding with several coats of Acrylic lacquer.
This may suit you if you want to use other types of transfer. More anon.
Internal Reinforcement and Washers
I examined the molding after about 4 or 5 coats of resin and because I had used a fairly light cloth, decided that it needed to be a bit more rigid.
I also decided that I wanted to mold in some aluminum alloy (Dural) to provide load spreading plates at the fixing points.
To do this, I would apply a layer of cloth over the whole of the inside surface as the additional work was negligible, weight was not a consideration and strengthening the molding was no bad thing.

You could if you wish, just apply reinforcement locally. It is also possible at this stage to mold in other types of reinforcing, stiffeners or fastenings.
Fit the molding to the pattern. Mark through onto the molding the position of the fixing holes with a soft pencil.
Mark the hole centre, use a Mk.1 eyeball to get the position, and drill through with a very small drill.
Don’t forget to wear a dust mask for this operation. If you have a sharp “pyramid” hole drill, you could now use this to open the hole up to accept the fixing bolts.
Check as you go using the pattern as a guide until the holes are opened up to the correct size.
My preference is a rotating burr fitted in the Dremel however In the past I have used pyramid drills, rat-tail files etc.
In all cases, take your time and cut very gently or you will chip or splinter the resin if you rush it and try and remove too much material at a time.
Once done cutting the holes, get the reinforcement sheet.
Clean and degrease it and roughen the surface with a file, hacksaw blade or whatever to give it a bit of grip.
Then stick it on the inside of the molding using a bit of “Araldite” rapid or even a tiny bit of resin as an adhesive.
Make sure it is stuck centrally over the hole in the molding.
These plates will add strength to the molding in the area of the bolt heads and will spread the bolting loads, preventing cracking or splitting of the covers.
Once the stuff sticking the sheet into place has gone off, cut a piece of carbon cloth or chopped strand mat sufficiently large enough to cover the inside of the molding.
Lie the cloth or mat inside the mold and mix up some resin.
Apply it to the cloth/mat and make sure all is well covered with resin. Make sure you remove any air bubbles.
The objective is to get a layer of cloth/mat inside the mold to provide additional strength and to fully mold in the sheet.
Allow to harden and apply another layer of resin.
Definitely no watch making here; just get the cloth/mat fully covered with resin and without any fibers sticking up.
If you feel like applying another coat of resin just to make sure then go for it – any weight consideration is irrelevant.
Allow the resin to fully harden and cut or file off any hairy bits sticking out over the edge of the carbon fiber molding. Finish the edge off with wet & dry used wet.
The next bit is to clean the cloth or mat from the bolt holes. Drill through and clean out as before.
Finishing
When you are happy with the molding finish, and you want to have a logo or decal on the panel, the time to apply it is after the final rubbing-down.
Then spray on several of coats of acrylic lacquer.
Allow it to dry for a few hours and finish off by polishing with “T Cut” till you are satisfied. Then apply some of that lovely carnauba wax and buff to a mirror shine. And that’s it.
If a matt finish is the one that blows your skirt up, then instead of using wax you could try finishing off by gently rubbing the surface with a bit of metal polish.
You could also try jewelers rouge to the same end. Jewelers rouge by the way, is a very fine, red (hence “rouge”) abrasive paste used by, yes you’ve guessed, jewelers.
You should be able to get it at any good engineering equipment supplier shop or if they don’t have it, and they are at all worth their salt, they will know a man who has.
Finally, and this next bit really is mandatory, fit the molding to your bike, stand back and admire it for ages. Tasty stuff and you did it yourself.
Other Moldings
If you decide to make carbon fiber moldings using other panels or bits on your bike as patterns, the main points to consider are:
- Will the shape of the part allow the molding to release easily ?
- Will rigidity be a consideration? Depending on shape or size, you may have to use a thicker cloth
- Will it need reinforcement for such things as bolts, Dzus fasteners etc, as described earlier?
- Is it a complex shape with compound curves? Does it need vacuum bagging to mold it effectively (and do they really make sandwich bags that big)?
There may be other considerations but these are the main ones. If you don’t have a part to replace and want to make from scratch, get out the foam and bread knife.
A word of warning though: once you achieve success, and you will with only a bit of practice, it is very difficult not to look at other bits without wondering “what would that look like done in carbon fiber?”.
Usually, the answer is “very nice”.
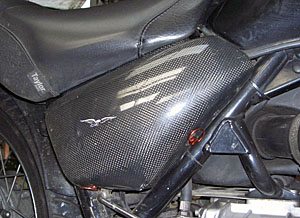
How did my side cover moldings turn out?
Well, there were/are a couple of slight imperfections in the finish.
For example, I didn’t notice the bit of cigarette ash that got stuck on the wet resin. It is now immortalized (like a modern-day fly in amber?) in my molding.
During a ham-fisted session, I dropped a molding after one or two coats of resin had been applied and there is a tiny star crack molded into the finish.
There was a little bit of de-lamination on the inside at one of the edges but I ran resin into it and it turned out fine.
Overall, not too shabby.
The bolts that hold the cover in place really had to go. Scrabbling around on the ground looking for a dropped bolt after replacing a fuse is not my idea of fun (and the spectators didn’t appreciate the bad language either).
Ducati fairings are held on with a Dzus type fastener (¼ turn to release).
They have a “D” shaped ring that lifts up and you can undo them by hand and they are the absolute business and are what I fitted.
Sources of supply are manifold; try Dzus fasteners.
Note on Volume
One REALLY important lesson I learned was that the volume of resin you mix can be important.
During the manufacture of the first side cover, I decided after applying a couple of coats of resin to reduce the volume I mixed up to try and avoid wastage.
However to my horror, this coat of resin did not fully harden in a couple of places and remained a bit sticky.
I originally thought it was traces of Meths on the brush that had caused the problem.
However, discussing it with a mate, I discovered that apparently some resins need a certain volume before the chemical reaction of hardening is fully effective — the “critical mass” I suppose — and I failed to make the connection at the time.
However, I rubbed down the sticky bits and after upping the volume of resin to that used originally, I slapped another coat on and all was back to normal.
If you get stuck, I will help where I can. E-mail me at vsheron@clara.co.uk.
If you do send an e-mail, please make sure you put a relevant and descriptive title in the subject box.
If I don’t recognize the sender or the subject of an e-mail, I delete it at the server without reading due to the sheer number of viruses flying around.
Replies may take a while as I am pretty busy at present (they’ve drained the swamp…etc.)
Other Stuff
The following is all biased towards UK suppliers (makes sense when you live there) however have a look at the Carbon fiber and Kevlar hybrid cloth on the Fibertech GB website.
I recently saw and handled this stuff on their stand at a show and the photo on the website really doesn’t do it justice.
I thought it looked awesome, however at £23 per half metre length, so, it would seem, is the cost of the stuff.
When you consider however, what you can do with it, and what a unique molding it would be, this tends puts the cost in context as the cost of a plastic OE replacement side cover is around £25 (ish) second-hand.
I definitely intend to make something out of this hybrid cloth as soon as time permits.
At present, I am fiddling around with the aim of replacing other parts on the Guzzi such as the alternator cover, the fairings just at the front of the tank next to the fork bushes (I don’t know the correct term).
Or even the rot-prone thin steel mudguards.
I am curious to find out if the raised letters on the alternator cover come out all right – I reckon with a light enough cloth it may be OK.
I have not yet decided what are, and what are not, viable options but when I do, and if it turns out successfully, I will pass the info on.
Suppliers & Data Sources
Engineering suppliers as described earlier for the various bits of kit. Car accessory shops for wet & dry, rubbing blocks, chopped strand mat, possibly resin.
Carbon fiber cloth suppliers via the web or off-cuts if you know a local outfit that does commercial moldings.
Model aircraft suppliers or shops are a good source of further info on carbon fiber cloth and resins.
Some websites I find very useful:
- Permagrit sanding blocks. Some good info and links. Know this: once you have used a Perma-grit tool, you will never be without one in your workshop)
- Materials some good epoxy application info.
- Resin range of resin types with application data.
- Composites and resins some good info.
- Materials too many to mention.
- Vacuum bagging stuff.
- All types of materials mail order. A good one for ease of use but limited technical content. Some good general info.
Knowledge is Power: Have a look at the University of Bristol site for COSHH data sheets. You can then be fully confident about using the materials described above.
End Quote
Of some relevance when trawling the net: Arthur C. Clarke (he of science fiction writing fame) is quoted as saying “getting information from the internet is like taking a glass of water from Niagara Falls”.
I reckon he hit that one right on the head.
Publication Date: September 2004
Master Listing of All wBW Motorcycle Product Reviews
Owner Comments and Feedback
See details on submitting comments.