
As I mentioned in my BMW R1150GS review, this bike has me looking for goodies to install. Most of them have a practical use, but not all are essential.
One of my first concerns was to protect those huge cylinders that stick out on each side of the bike’s frame — what I’ve come to refer to as “my foot warmers”.
The GS came with a set of plastic BMW cylinder head guards which are attached to the outside of the valve covers and are a popular accessory.
These guards can minimize the damage to the light alloy valve covers during a slow speed slide or a tip over, but I was interested in something more robust.
SW-Motech Crash Bars
My search yielded several crash bar choices for the R1150GS and I settled on a set made by SW-MOTECH, a manufacturer well known to BMW owners for quality accessories.
SW-MOTECH does not sell items directly from their website, but the products are distributed worldwide (see summary table below).
So why did I choose to go with this brand and style over some of the others?
I was looking for something that would protect the engine should I have an “incident” (otherwise known as an “unintended get off”); that fit in well with the GS’s go-anywhere attitude; and, of course, did not cost a fortune.
As I was searching for the perfect set of crash bars, I would check out any GS I found at the local dealer or elsewhere that had crash bars installed to check out their shape and location. I ended up choosing the SW-MOTECH bars based on their shape, the level of protection they appeared to provide and the price.
The fact that this design had a bar on each side that ran back just above the valve covers led me to believe that the heads would get added protection, something I had noticed that not all brands included. The SW-MOTECH bars seemed strong enough to reduce the possibility of one of the bar being forced/bent back during a crash. So the order was placed and the bars arrived promptly in just a few days.
Installation
The box that held the crash bars had taken a beating during transport, but everything inside was well packed and arrived unscathed. The SW-MOTECH crash bars are made from “heavy-duty mild steel”. I’m not sure what gauge steel tubing is used, but they measure 27 mm (1-1/16”) across the outside diameter.
Here are the mounting instructions for the R1150GS from the SW-MOTECH website (.pdf file)
All of the SW-MOTECH bars and brackets have a metallic silver powder-coated finish (which went perfectly with the color on the bike) with a high gloss clear top coat for added protection, all of which was flawless. The welds were a pleasure to look at too.
I have to admit that at first glance the instructions had me a bit puzzled, but it all made sense once I laid out all the parts and hardware, comparing each piece to the “instructions” and parts descriptions. There were no narrative instructions; just a picture of how the components were to be fitted together or bolted to the frame.
Each bolt has a number in the diagram which, when cross referenced with the materials list, gave its diameter and length. All of the bolts are standard grade 8.8 with a bright finish, but not they are not stainless steel.
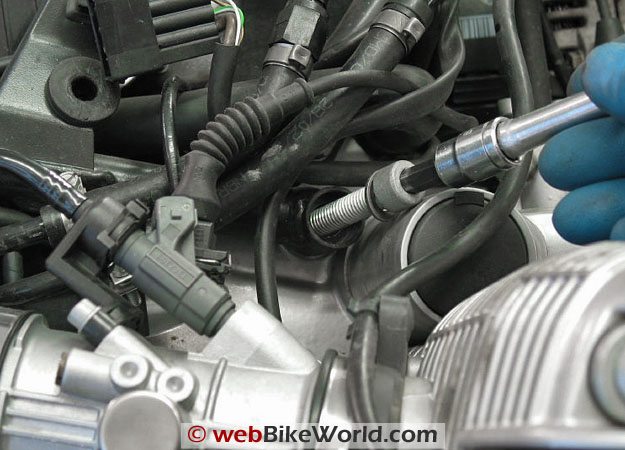
It was necessary to remove the fuel tank to access the two upper most mounting bolts, but since the tank comes off in about 3 minutes on a GS, this is a breeze. With the tank off, all bolts relevant to the installation were easily removed.
One of the two, high-strength steel cross brackets on the SW-MOTECH crash bars locates over the top of the plastic fan belt cover on the front of the motor using the supplied longer bolts installed in place of the stock bolts. The bolts secure the brackets that support the dash and the prominent GS “beak” to the bike’s frame, and the bracket would provide the front upper anchor point for the bars themselves.
It was necessary to lift up on the “beak” of the GS a smidgen to take some stress off of the side brackets so the bolt holes would line up and allow the bolts to be threaded correctly. One drawback I could foresee was that it would be necessary to remove this upper bracket anytime the belt cover needed removal.
Another cross bracket goes under the stock, oil pan bash-plate. This required replacing the original front mounting hardware with the supplied bolts and spacers. My concerns about having to remove this bracket each time I drained the motor oil would prove to be unfounded since the bracket and plate come off in mere moments.
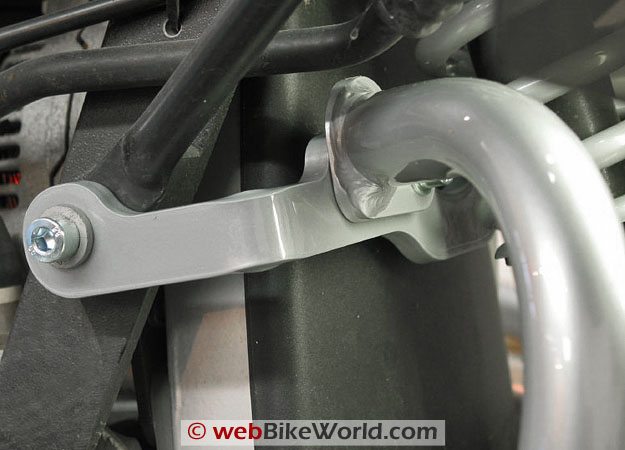
Next was the rear anchor/mounting point for the bars onto the frame. This would be the only point where the bars are directly bolted to the bike’s frame/motor assembly. On each side there’s an Allen head bolt in a tubular recess that secures the rear sub-frame assembly to the motor itself. These were removed, one at a time, and replaced with a spacer and much longer bolt.
Buttoning Up
As with any assembly that has multiple interlocking pieces, all bolts should be left loose until they have all been installed and correct fitment and alignment has been confirmed.
With all of the bolts started it was time to tighten everything down and see what the SW-MOTECH crash bars looked like fully bolted in place! What written material there was (in both English and German), recommended using the OEM (Original Equipment Manufacturer) torque specifications for each bolt.
But should you not have a manual on hand (you don’t have a service manual?) SW-MOTECH is kind enough to include suggested torque settings depending on the bolt’s diameter. They also recommended using a medium strength thread lock compound.
I chose to use Loctite #242 blue, medium (removable strength) thread fastener. I use this compound frequently both at work as an Automotive Tech and at home and have found it to be a reliable thread lock that allows easy disassembly without damage, provided you don’t go overboard upon application, yet keeps things from vibrating loose.
The Results
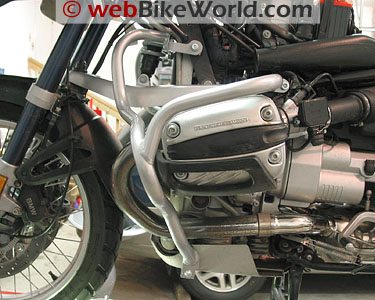
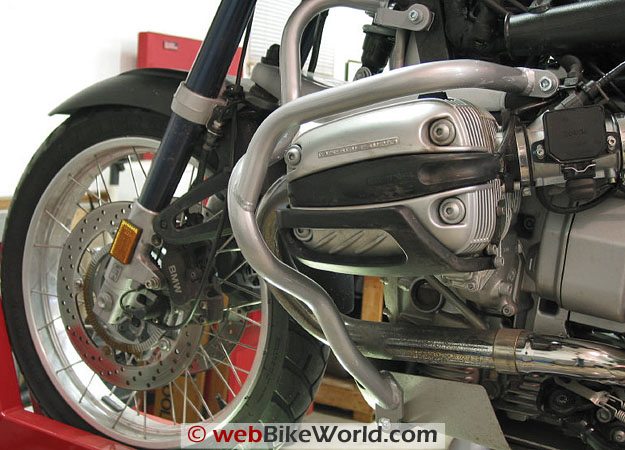
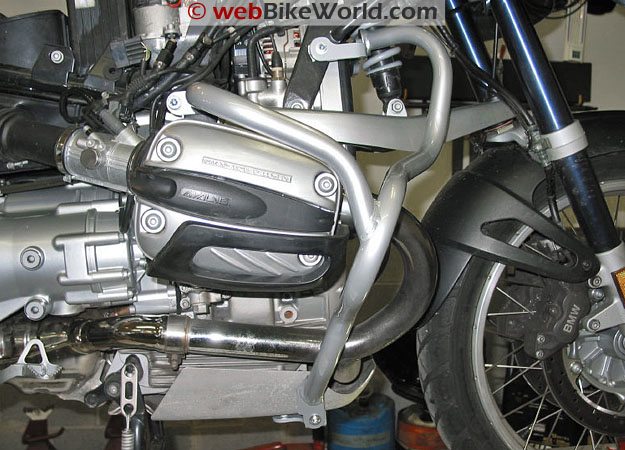
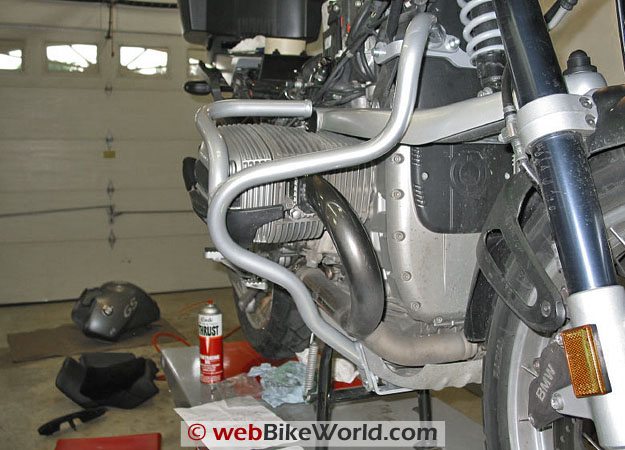
Upon final tightening, everything fit like a charm and looked great! The crash bars extend out far enough to provide additional protection for the heads and valve covers while blending in nicely with the frame and shapes of the bike itself.
The bars themselves do not have to be removed to perform a valve clearance adjustment; only the cross brackets need to be removed for servicing — the lower bar for oil changes and the upper bar whenever the fan belt covering is in need of removal.
As a bonus, I found on my trip to and from the Green Mountains of Vermont that I could stretch out my long legs and rest them on top of the bars and therefore saved myself the trouble of devising some sort of highway foot pegs. The bars are also a common point for mounting auxiliary lights with other GS riders. Brackets for mounting auxiliary lights onto the bars are also available from many retailers.
The GS was getting closer to looking like it was ready for a ride to the ends of the world, even if this rider lacks the skills necessary to do so, which would become evident. Little did I know that the bars from SW-MOTECH would soon be pressed into service.
Taking detours down unpaved roads was becoming commonplace. After all, I was on a GS, right? My riding friends would look at me in disbelief when I described my route to work. But, as luck would have it, while zinging down one of these back roads one day, I drifted a bit wide on a left turn and got myself tangled up in the loose gravel that collects at the edge.
Before I realized what I had done wrong, I had low-sided the GS in a cloud of dust. The impact promptly tore off the left side case (remember, I bought it used, thank goodness, online) breaking the mount bracket, scratching the crash bars, marking up the left valve cover a little and scratching the daylights out of the top and side bags.
As the pictures show, the finish on the new crash bars was removed in places, but I found no bending or displacement. All in all, I feel the SW-MOTECH crash bars did a marvelous job protecting the bike and engine, while suffering only cosmetic damage.
Since I’m a practitioner of A T G A T T (All The Gear All The Time), my Olympia AST jacket (review) and Motoport Kevlar Police Pants (review) protected my body, receiving only a light scuffing. It was my ego that suffered the most injury.
Conclusion
Despite how well we train and practice, unpleasant things DO happen to us as riders whether on or off the road. A set of crash-bars can not only protect your motorcycle from considerable engine and/or body damage, they can also provide protection for your legs in the event of a crash.
Beautifully built and finished, the SW-MOTECH crash bars just look natural installed on the bike. I know they certainly saved “Beeker”, my GS, from suffering anything further than some cosmetic damage. They were well worth the investment in my opinion. Stay tuned for more stories about further upgrades to “Beeker”.
| wBW Review: SW-MOTECH Motorcycle Crash Bars | |
|---|---|
| Manufacturer: SW-Motech | List Price (2008): $189.99 |
| Colors: Silver. | Made In: Unknown |
| Review Date: December 2008 | |
Owner Comments and Feedback
See details on submitting comments.
From “C.P.” (4/10): “As is usual with me, I’ve just found the write up about installing the bars on a BMW R1150GS, AFTER I’ve spent an hour or two this afternoon fitting a set to my own GS.
Wish I’d taken the time to search this nugget of information out beforehand, as it would have saved me a bit of head scratching and confusion.
You are right on the money about the lack of clarity and guidance from the SW instructions, but like wise, I checked off all the fasteners according to the list and did a dry fit/assembly on the floor before committing to the spanners.
Now they are on, the bike does look a lot better with them, and I feel a lot happier with the peace of mind they provide. Well done on a very useful and helpful article.”