
In my previous review of the No-Mar tire changer I mentioned that motorcycle owners can save money by changing their own tires.
Most people wouldn’t even think of changing the tires on their car, but changing the tires on a motorcycle is another matter.
It’s not that difficult — as long as you have the right tools for the job!
When I started this evaluation of the Cycle Hill product, I thought it had been only a year or so since I had completed my review of the No-Mar motorcycle tire changer.
So imagine my surprise when I realized that it has been nearly three years since the No-Mar review was posted!
Naturally, I agreed to try the Cycle Hill changer because I was curious to see how another brand would compare to the No-Mar unit.
It just so happened that both my BMW R1150GS and BMW K1200LTC were in need of some new tires, so the timing was perfect.
I’ll be making frequent references to the No-Mar product so you may want to refer to that review also. I won’t be describing the actual method of tire replacement, since the procedure for doing this with the Cycle Hill changer is pretty much identical when using the No-Mar also.
However, the bead breaking procedure is different with the Cycle Hill changer, and if you follow the video below, you’ll see the entire process of changing a tire using the Cycle Hill changer.
The Cycle Hill Motorcycle Tire Changer
I wasn’t familiar with the Cycle Hill brand, so I assumed it was made by a completely different company, and I got a hearty laugh when I opened the shipping container and found that the components had the No-Mar logo on them.
Unfortunately, I was unable to retrieve any company information about the Cycle Hill brand from their website other than that it is an “Officially Licensed No-Mar Product”. No big deal, it just left me scratching my head a bit.
My guess is this is No-Mar’s approach to compete with the cheaper imported machines without affecting the reputation of their existing product line and their reputation for building rugged commercial products.
It may be difficult for some motorcycle owners to justify the higher cost of a commercial grade tire changer like the No-Mar when it’s going to see only occasional use, and the Cycle Hill changer is perfectly adequate for the job.
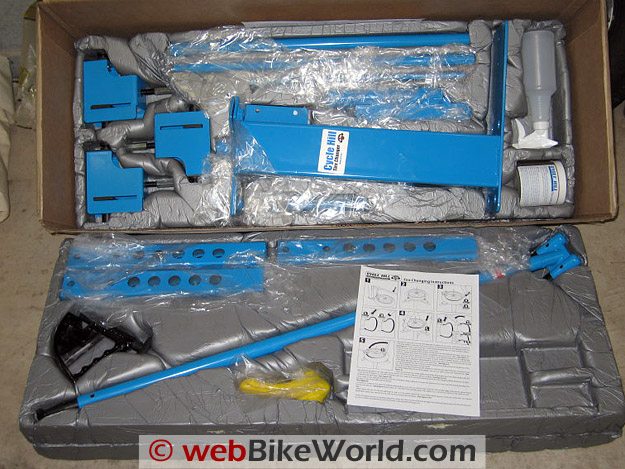
Good quality nuts and bolts and the kit contains replaceable nylon tips for the tool. The changer can be folded for storage. Nylon-tipped tire removal tool and urethane-coated “third hand”.To make the comparison as equal as possible, we ordered the same basic components from Cycle Hill, including the optional trailer hitch attachment.
Everything arrived nicely packed with no loose pieces that could have been banging around in the box getting dented or scratched.
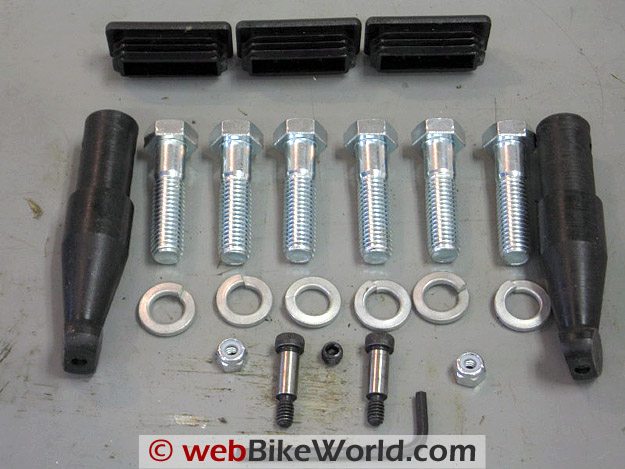
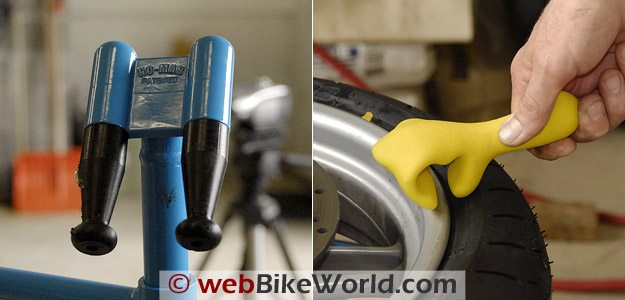
Included in the kit were spare tips for the patented Cycle Hill mount/dismount bar and what I jokingly refer to as the “Alien Hand”; a urethane coated, cast, “X-Tra Hand” clamp to help hold the tire bead down in the drop (photo below).
Unlike the No-Mar kit, the Cycle Hill changer does not include the large spoons for dealing with the some of the more difficult tires, such as those on the Honda Gold Wing.
As I mentioned, there were items that actually had the No-Mar brand printed on them, such as the mount/dismount bar; the included tire lubricant and the spray bottle, which were identical to those provided in the No-Mar unit except for the Cycle Hill label.
The bar used for mounting and dismounting the tires on to the wheels now comes with an additional grab handle.
I found this to be a great improvement; when mounting some of the stiffer tires, the mounting bar tends to twist and roll out from under the bead, and the extra handle provides the needed leverage to prevent this from happening.
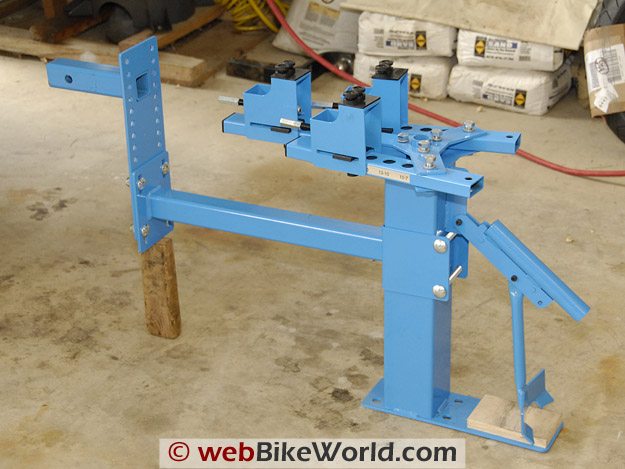
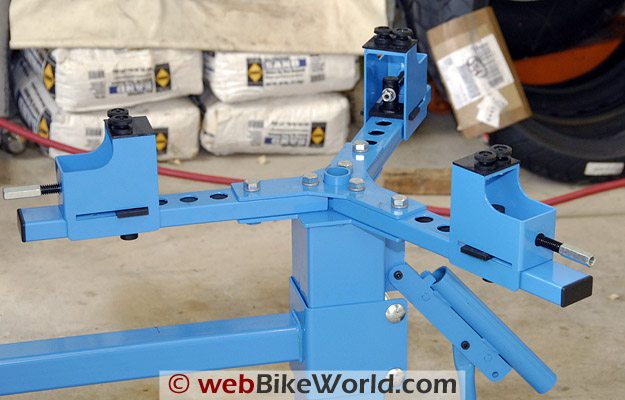
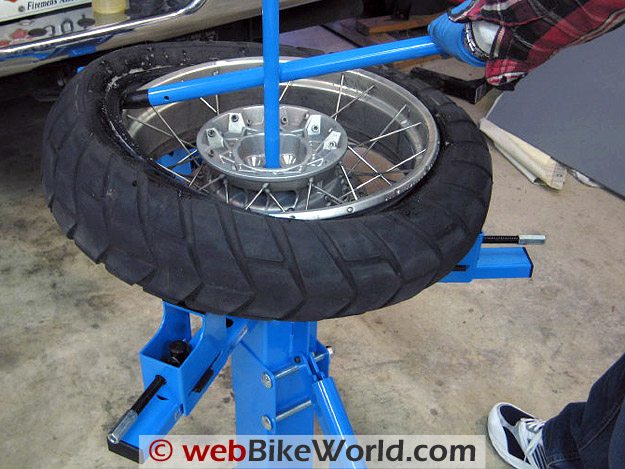
The changer can be adjusted to hold wheels from 7″ to 21″ in diameter.Assembling the Cycle Hill Tire Changer
“Some assembly required” applies to the Cycle Hill tire changer kit, but nothing complicated. If you’re into changing tires, chances are (I hope) you know how to take things apart and put them back together again properly, so this shouldn’t be a difficult task.
Assembly consists of attaching a wooden block for the bead breaker base with the supplied screws. The fulcrum point for the bead breaker is then bolted to the frame and the three arms bolted to the base plate.
There’s also a sticker that goes on one of the arms to aid in positioning the clamping blocks depending on the diameter of the rim you’re working with, since this machine is designed for use with 7” to 21” diameter rims.
The Cycle Hill rim clamping “table” consists of three arms that have to be bolted to the machine stand. Each arm is held in place with two ½” x 2” hex head bolts with lock washers (more on this later). Whereas both units use the same thickness steel in the arms, Cycle Hill uses a 2” x 1” box configuration versus the No-Mar’s 2” square steel which are welded together.
Identical gauge steel is used in the construction of both the No-Mar and Cycle Hill units with only minor differences.
This surprised me because the No-Mar unit appears to be made from heavier components (remember, the No-Mar unit is built to withstand even commercial use, so it’s going to be sturdier).
While I was assembling the bead breaker, one thing jumped out at me right off the bat and that was the fact that the “blade” was bare metal.
I envisioned this piece of steel slipping on the tire as I was breaking a stubborn bead and leaving a nasty gouge or scratch in the rim. But with just a little care taken when positioning the blade, this fear proved to be unfounded.
But if you’d like to absolutely certain, Cycle-Hill has an “Optional Non-Marring accessory” available. The base will have to be bolted to floor with the included lag bolts and anchors or used with an optional bumper hitch attachment.
Since I can’t decide where to bore holes in my garage floor, I opted to use the trailer hitch arrangement instead.
This works fine except when it’s cold outside since I have to pull the truck part of the way out, leaving the garage door open.
Voilà, you’re done unless you’re using the trailer hitch attachment, in which case you’ve got a few more bolts to install. If so, there are a series of adjustment holes in the bracket to tailor the machine to your trailer hitch receiver height.
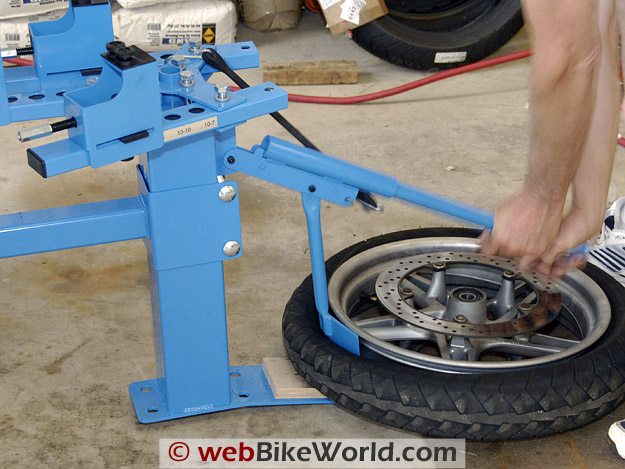
Breaking a bead with the Cycle Hill motorcycle tire changer.Breaking the Bead and Changing the Tire
The biggest difference between the No-Mar and Cycle Hill machines is in the bead breaking process.
Even though they both use a hand-operated lever device, the one from the Cycle Hill has you bending over with the tire on the ground and pressing down, versus the No-Mar unit where the tire is up on the table and you pull down on the bar.
The largest of the three supplied bars is inserted into bead breaker as the handle whereas the No-Mar bread breaker bar is attached to the blade.
Rarely does the entire bead break free with one press when breaking the bead on a tire. It’s often necessary to break the bead, rotate the tire a ¼ turn, break the bead again and repeat this process until the entire bead is loose.
Then the wheel has to be flipped over and the process repeated.
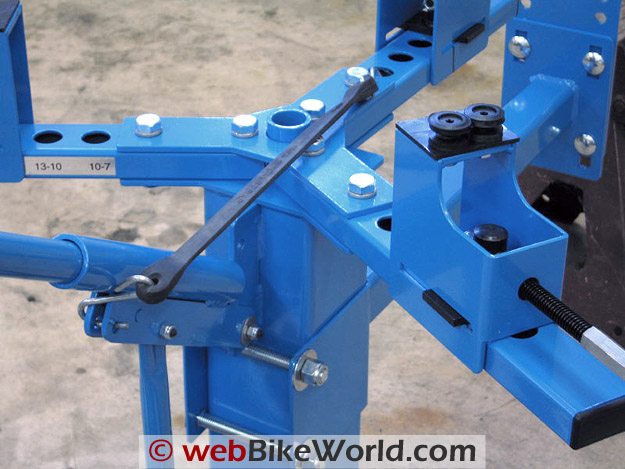
It was during this process that I found what I thought was the biggest weakness of the Cycle Hill changer — the bead breaker handle with the breaker blade will not stay in the “up” position on its own.
Chris added this bungee cord to hold the arm out of the way while moving the wheel during bead breakingThis makes rotating the tire while trying to hold the bar and blade up at the same time really awkward. My solution was to use a trusty bungee cord to hold the blade in the raised position (see photo above).
This allows the handle to swing up out of the way while I can easily rotate the tire. There’s enough stretch in the bungee cord to allow me to press the lever down and break the bead, after which the bar returns to the raised position.
Also note that the wheel is resting on the ground with only the edge of the rim on the wooden block during this process.
Depending on your style/size wheel, it would be wise to lay a mat on the floor to protect the brake rotor, hub or other parts (see the video below).
When breaking the tire bead on wheels with dual front brake rotors and an ABS toothed wheel, the overall width was such that I had to use an additional wooden block under the rim edge to keep the wheel level and spaced properly.
Depending on the width of the wheel, there are two fulcrum points where the bead breaker lever can be attached.
This brings me to another modification I made to the bead breaker: Once attached with the supplied shouldered bolt and self-locking nut, I felt there was way too much lateral (sideways) free-play at the fulcrum point.
This was easily remedied with a couple of spare fender washers I had laying around. Placed between the bracket and bead breaker, they eliminated nearly all of the free-play thus making the bead breaker far more stable.
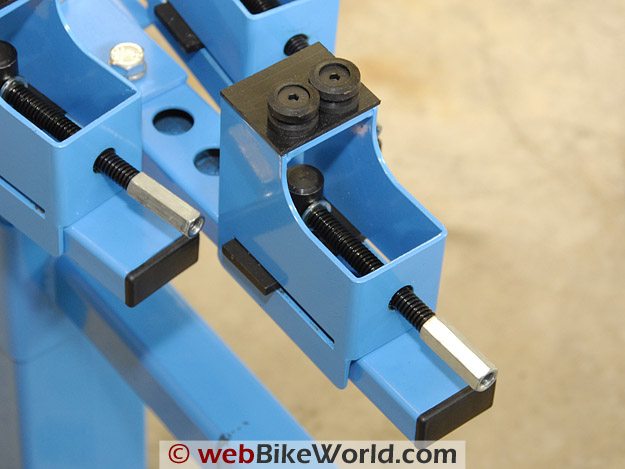
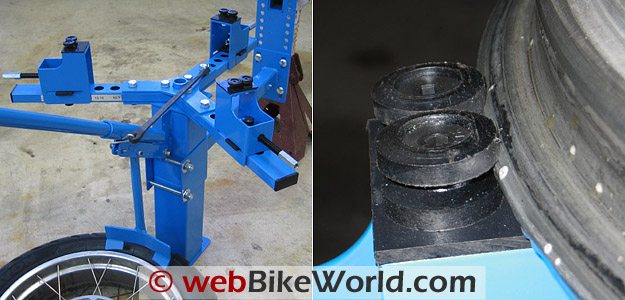
Close-up of one of the three adjustable wheel edge holders. The center post acts as a fulcrum during the tire removal process. Bungee cord and rim holders (L). Close-up of nylon rim holder (R).With the beads free it was time to mount the rim to the table via the rim clamps.
The Cycle Hill changer uses three screw adjustable rim clamps with non-marring nylon spool-like holders (photo above right), while the No-Mar uses notched rim clamp blocks and one rotating quick adjustable clamp block.
At first I was unsure about having to screw in each rim clamp.
But after using the Cycle Hill changer a couple of times I think I prefer this arrangement over the rotating style on the No-Mar machine (Cycle Hill has other size spools available for the three rim clamps should you have thicker rims than usual).
When clamping down the rim it’s important to line up the center of the wheel with the recess in the center of the table.
Depending on the size of the center hole in your rim, one of the three different diameter bars has to engage the bore in the table after passing through the rim.
Aligning the two holes is easily performed with adjustments via the three rim clamps.
In actual use I found the working height of the Cycle Hill changer to be comfortable (other than the bead breaker) and I liked the fact that there was no restrictive pole sticking up in the back, like the No-Mar, when mounting or dismounting the tire.
This gave me the ability to swing the dismount/mount bar 360 degrees around the table should I need to.
Now, about the bolts holding the arms to the table that I previously mentioned: Unless you’ve got loads of space in your work area, the machine has to be stored somewhere when not in use and this is where I feel the Cycle Hill unit has the No-Mar changer beat hands-down for home use.
By removing one bolt from two of the arms and then swinging them sideways, the entire unit becomes very narrow and easy to store against the wall or somewhere out of the way.
Since the No-Mar changer is welded together, it’s awkward to store and far heavier to pick up and move around.
Conclusion
I like the Cycle Hill Tire changer except for the fact that the bead breaker lever will not stay up in the raised position on its own.
Other than that, if I had to pick one over the other I would choose the Cycle Hill unit over the No-Mar, based mostly on the fact that it can be more easily stored out of the way.
Although not as cheap as some of the imported brands, if the cost is split among a couple of riding buddies or club, the cost is quite manageable.
If purchased in this manner it could pay for itself in short order. I also think you’ll end up with a far better product that will give you years of good service.
With some products, especially tools, it’s worth spending a little more to get a reliable product.
| wBW Review: Cycle Hill Motorcycle Tire Changer | |
|---|---|
| Manufacturer: Cycle Hill, Inc. | List Price (2009): $365.00. Hitch Mount $70.00 |
| Colors: Blue | Made In: U.S.A. |
| Review Date: July 2009 | Warranty: 5 years |
Owner Comments and Feedback
See details on submitting comments.
From “B.C.” (8/09): “Earlier this year my dad, brother & I split the cost and purchased the Cycle Hill tire changer and it has already paid for itself.
In my opinion, it’s well made and I can’t see ever having to pay someone else to change a tire (or maul a wheel) again.
I also have a Marc Parnes balancer which works great. Not only have I saved myself money and time but it feels good knowing you’ve done something yourself.”
From “D.G.” (8/09): “I was glad to see that you have introduced guys to the Cycle Hill tire changer. Anyone who has ever wrestled a tire on the ground with hand tools will surely appreciate the ease that tire changing is with one of these machines.
I mount my changer on a 2X10X 5 ft. oak plank and then drive one wheel of my truck on the other end of the plank. This is immovable and it comes apart for easy storage.
One hint that I don’t think you mentioned; place old and new tires in hot sunlight before changing. Makes things even easier.
Also, did you mention that the 6 hard rubber knobs that hold the rims are a different size for BMW rims?
If I had one improvement I could make on the changer it would be to make the tip of the tire removal bar somehow more solid/sturdy because of the heavy pressure it receives. Mine bent so I filled it with an epoxy and this helped, somewhat.
There is no question that the savings of doing your own tires will pay for the machine many times over. Thanks for the review.”
From “K.S.” (7/09): “First off, I love webBikeWorld for the reviews! Also, I have neither the Cycle Hill changer nor the No-Mar unit. I live in St. Louis and just wanted to clarify your thoughts.
The couple that own/run No-Mar are excellent people and I have toured their factory here in Fenton (Saint Louis). Everything is made and machined in house and very good quality.
As for the Cycle Hill, your assumptions are correct. The product is made by No-Mar. When I toured the factory, the owner showed me the prototype and it is a lower-cost, although still pricey and excellent, piece of equipment geared for us shade-tree type people.
Without saying it in too many words, the Cycle Hill was a concept to more or less directly compete with a China made unit and also some of the rickety setups sold at dealers/gearshops.
Hope this helps clarify that Cycle Hill does use the excellent designs that No-Mar does!”