One of the most popular webBikeWorld articles ever was our review of Rod Neff’s motorcycle wheel balancer, first published about 8 years ago.
I think Rod has since stopped manufacturing it, unfortunately, because it was very popular with “DIYers” and ours has served us well through all these years.
The reality is that a motorcycle wheel balancer isn’t actually used very often.
But if you commute by motorcycle or take many long-distance rides or tours, you’re probably going through tires much faster than you’d like.
If so, there are significant savings to be had by mounting and balancing your own tires — which can cost as much as $50.00 per tire if it’s done at a shop — so owning a good motorcycle tire balancer and tire changing tool can pay off in the long run.
Chris did the evaluation of the No-Mar motorcycle tire changer in 2006, and we just took some video of the tire removal and mounting process using that tool during our review of the Michelin Pilot Road 2 tires. I’ve posted a short video below that illustrates how the No-Mar tire changer works.
It was the first time I actually witnessed it in action, and all I can say is “Wow!” — what a difference from my usual “farmer’s” method of muscling the tires off and on the rims with a couple of cheap tire irons.
I’m getting too old for that nonsense, and the No-Mar is a must-have for high-milers who change a set or more per year. Definitely a worthwhile investment, so check out the video and the No-Mar motorcycle tire changer review.

The Tachyon Wheel Balancer
OK, back to balancing…I’ve known about Tachyon Motorsports’ motorcycle wheel and tire balancers for some time, and now that we’ve used one, I can definitely say that the product lives up to its reputation. Something about it speaks quality; it’s a professional, precision tool that is well designed and beautifully made.
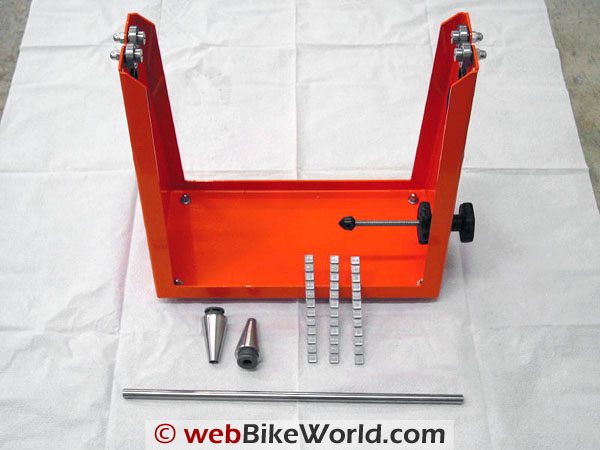
The Tachyon balancer is available in several different sizes, with a variety of parts and accessories and cones, arbors and adapters are available to fit just about any motorcycle wheel (or airplane wheels or boat engine propellers) made, including rear wheels for BMW, Ducati and other single-sided swingarm types.
Tachyon Motorsports uses the word “arbor” to refer to the shaft and cone assembly. It wasn’t immediately obvious to me that the cones are available in either aluminum or stainless steel or which features might be useful, so make sure you study their website carefully; it’s all there, but it may take some careful reading to understand the array of options that are available.
The Tachyon balancer is sold in kit form, and the lower-priced kits come with aluminum cones while the higher-priced kits have stainless steel cones. Customers can also design their own kit and choose “One from Column A; one from Column B…etc.” to put together a custom balancer package with their choice of balancer frame size, cone size and type, adapters for single-sided swingarm rear wheels and more.
Tachyon Motorsports also sells some nice-looking wheel weights and all the other goodies you’ll need to get the job done easily and efficiently – Rick.
The Tachyon Motorsports Elite 1 Motorcycle Wheel and Tire Balancer
Upon removal from the box I could tell this was one well-made piece of equipment. As an Automotive Technician for nearly 40 years, I have an appreciation for simple but excellent construction.
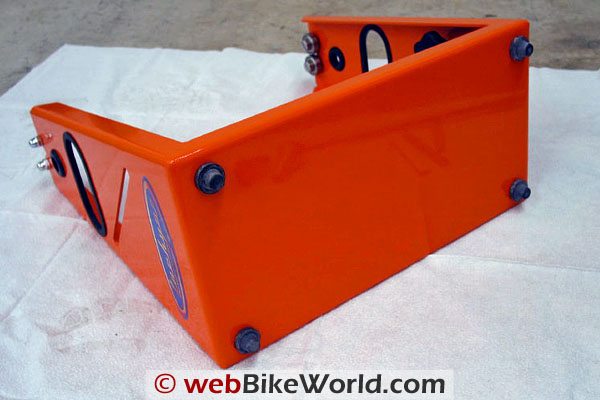
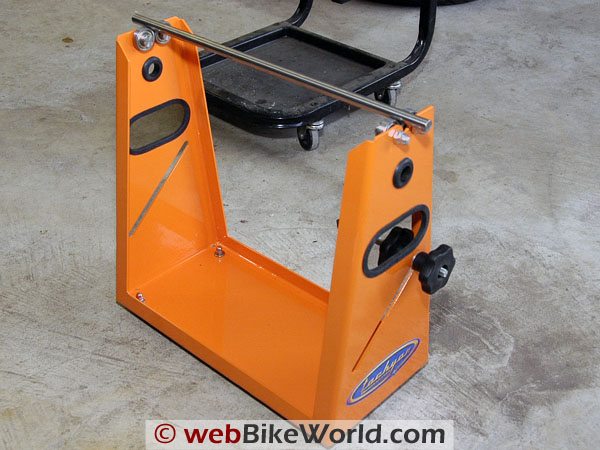
During the setup, I was surprised to discover that it is not necessary to level the Tachyon balancer, as long as the floor or surface is relatively level to begin with. The balancer I’ve been using does need to be leveled each time it’s used. The Tachyon balancer has four rubber “feet”, one in each corner, and simply sits on these 4 points and keeps itself level on most surfaces.
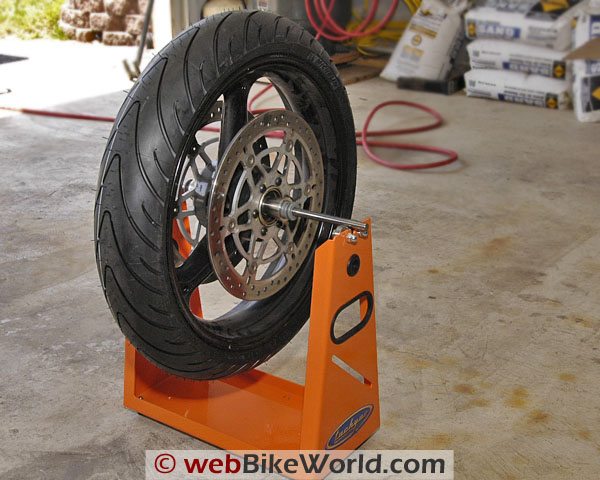
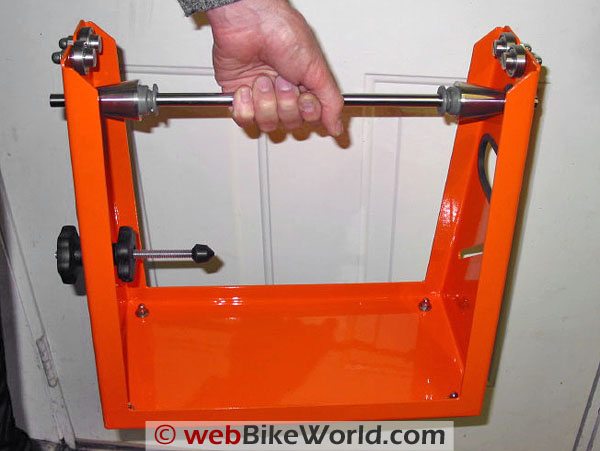
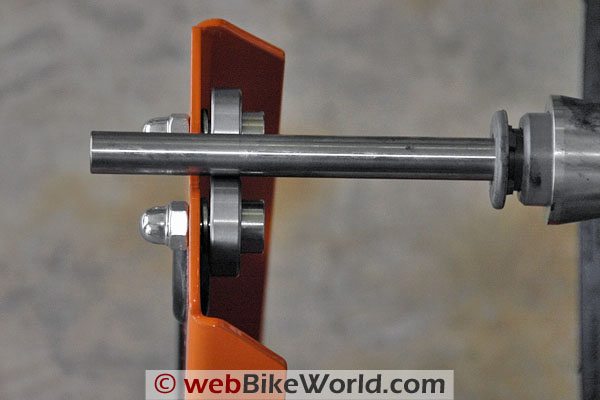
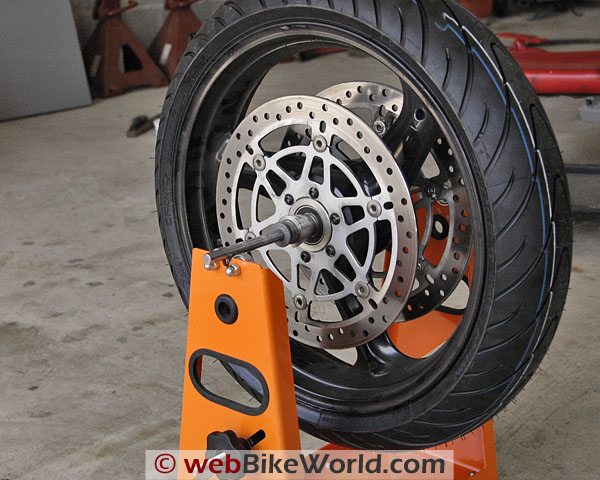
The Tachyon balancer has the usual two uprights with a pair of sealed bearings mounted on each. The arbor, or bar, rests on top of the bearings and rotates during the balancing process.
The balancer also has an optional adjustable pointer with a plastic tip that moves both upward and inward for checking or truing a rim. This pointer is easily adjusted with good sized knobs and a fast pitch on the threaded rod.
Tachyon Motorcycle Wheel and Tire Balancer – Elite 1 Kit with optional wheel truing pointer.
Wheel Balancer Setup
Most forged, stamped, cast or non-spoked wheels shouldn’t need truing unless the bike has been in an accident, but spoked wheels sometimes need tightening or adjusting to get the wheel to run true, and the Tachyon balancer can be used for that job.
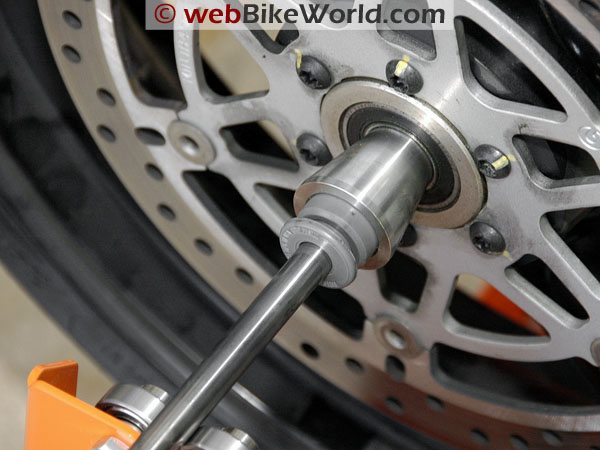
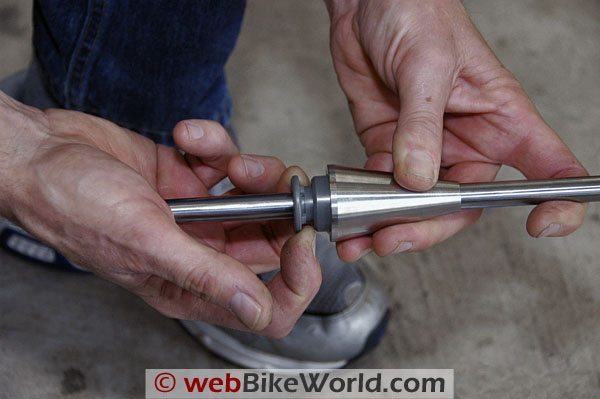
Setting the rim up for balancing is a simple matter of passing the precision ground rod through the center of the rim and sliding the self locking cones snug against the hub. The cones are either aluminum or ground stainless steel (preferred). Since this is an Elite 1 kit, it came with the stainless steel cones.
The rear wheels from BMW and some other types of single-sided swingarm motorcycles have a large center diameter “hole” in the hub, and Tachyon sells adapters that can be used with the cones for these wheels. The cones are available in either 1.5″ or 2.0″ diameter, so check to see which one you’ll need.
Cones and Set Screws
These cones are slick! They will slide on to the ground shaft in only one direction, towards the smaller end, which is the one that goes against the hub.
There are no set screws used on the adapter cones on the Tachyon balancer. To remove or loosen the Tachyon cones, it’s a simple matter of pulling back on the collar on the large end, which releases the locking mechanism and allows the cone to slide back. Simple, but very effective. Just how I like it!
By the way, before you start, remember to remove the old wheel weights from the wheel!
It’s a good idea to center the wheel on the rod before placing the rod on the balancer. This is when the cones really shine — making an adjustment is a snap, unlike my old balancer, which requires a locking screw be loosened and re-tightened each time.
Place the tire and rod assembly on the balancer, with each end of the rod sitting between the pair of sealed bearings. Let the tire go and see if it turns on its own. If it does not, turn it 90 degrees and let go. If it’s out of balance the heavy spot is going to “fall” to the lowest point.
The tire is going to “see saw” back and forth and then come to a rest. Notice we’re not spinning the tire, just allowing it to “fall” on its own. See the video below, which illustrates this.
Allow the tire to turn on its own while paying attention to how fast it moves during this stage. It will aid you in determining how much weight to add or remove. The instructions say to make a mark at the “low” (heavy) point (6 o-clock), but I prefer to mark the “high” (light) point (12 o-clock) because that’s where I’m going to be adding the weight.
| Tachyon Motorcycle Wheel Balancer – wBW Lightbox – Click photo to view. | |||
|---|---|---|---|
|
|
 |
 |
| Shaft makes carrying handle. | Rubber feet on base. | Balancer frame and shaft. |
Motorcycle wheel and tire on balancer. |
More: wBW No-Mar Motorcycle Tire Changer Review | Cycle Hill Tire Changer Review
how much to start off with, try starting off with one-half ounce (14 grams). I keep some old weights I’ve removed just for this purpose. Tape the trial weight near the center of the wheel at the point where you made your mark with some masking tape or duct tape.
Now move that spot to either the 9 or 3 o-clock position and see if the wheel “falls” back to the same places or changes. It should do one of three things: move back where it was, fall to the bottom or not move.
If it moves back where it was, more weight must be added. This is where watching how fast the tire “falls” comes into play; if it “falls” half as fast as before, then I would add half the weight previously added.
If the mark moves to the bottom (6 o-clock), then subtract some weight. If the wheel does not move then you’ve hit it on the nose. But, to be sure, rotate the tire to different positions, hold still and release. If it’s balanced, it’ll either stay in place or only move slightly.
Once the tire is balanced and no longer rotates on its own, remove the weights that were temporarily attached with the masking tape or duct tape and replace them with either the new stick-on weights or, if your rim accepts them, you can use the hammer-on style weights.
Unless the weight is placed directly in the center of the wheel, divide the total amount by two and place ½ on each side of the rim. If using stick-on weights, be sure to clean the surface with alcohol or glass cleaner to ensure they stay put and don’t fly off the first time the bike gets up to speed.
Repeat the process with the other wheel and you’re done.
Conclusion
I found the balancer by Tachyon to do an excellent job and to be more accurate and sensitive than my old balancer. Of course a lot of this is determined by the quality of the bearings and shaft, and the Tachyon’s bearings, the ground shaft and the stability of the balancer frame seem to make a big difference.
|
wBW Review: Tachyon Motorcycle Wheel and Tire Balancer
|
|
|---|---|
| Manufacturer: Tachyon Motorsports | List Price (2008): $139.95 (w/aluminum cones) to $244.95 (w/stainless steel cones). Various parts and accessories are also available. |
| Colors: Orange | Made In: Minnesota, U.S.A. |
| Review Date: May 2008 | Star Rating (1-5): |
| Comments: The Tachyon balancer is available separately and the company has a “build your own” option for customers to choose various size balancer frames and accessories. | |
|
Note: Item was provided by a retailer, distributor or manufacturer with these Terms and Conditions.
|
|
Ownar Comments and Feedback
See details on submitting comments.