A new system from Chatterbox and a new contender for top of the heap for me.
There is not much to complain about here. All of the new systems have leading edge features — some more, some less, but none of them have packaged it as well as Chatterbox.
Although the XBi2 doesn’t have the same media switching sophistication of other systems and the headset needs improving (most do — remember, A2DP…), everything else it does, it does better.
With other reviews ongoing and more systems coming out of the woodwork, the XBi2 might have challengers soon, but for now, it is my recommended pick.
Introduction
This review of the Chatterbox XBi2 Bluetooth rider-to-rider system is the third in an ongoing series of reviews covering new market arrivals and updated Bluetooth or Bluetooth-based communications systems.
In addition to the XBi2 systems, I have four other systems undergoing evaluation or in the queue along with three others, including one that is a mix of wired and wireless connectivity. These other systems have been providing daily service as well as serving as the baseline for comparison. So charger clag is a fact of life for me.
As with any technology-specific product, some will reward, some will not and some will just frustrate. The Chatterbox XBi2 system is in the ‘reward’ classification, for many reasons.
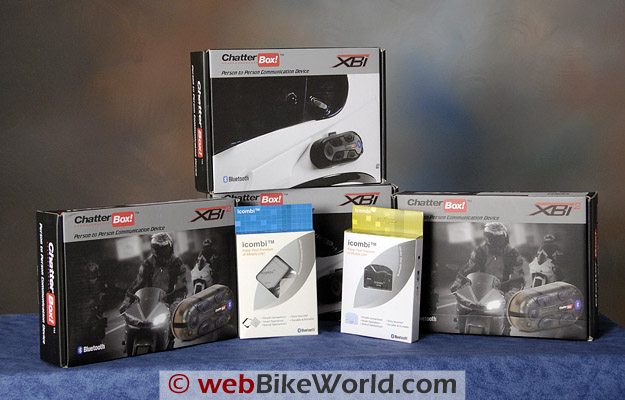
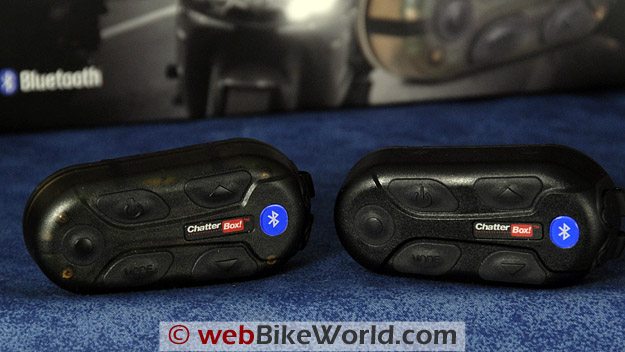
Some years have passed since I had a new Chatterbox system to play with so I was eager to tear in to the box sent up by the Editor (he really is a nice guy). Much to my surprise, the ChatterBox package included two rider-to-passenger XBi kits and two of the new XBi2 system kits for rider-to-rider or rider-to-passenger intercom use and also two iCombi Bluetooth Adapters (aka BTAs).
Chatterbox intercoms are sold as either an XBi or XBi2 module and then an open-face or full-face microphone/headset must be chosen, which provides flexibility when ordering (see Summary Table below).
Chatterbox has been making good communications systems for a number of years now and they have always taken a slightly different approach in their use of technology and in integrating unique but useful features. Current Chatterbox offerings include transmitter and intercom systems in addition to alarm and radar and accessories that complement their other products.
Given the rider-to-rider configuration needed during travel to the 2009 BMW MOA and RA rallies and the traversing of curvy mountain roads in between, the XBi2 systems and the iCombi BTA got the nod for use, along with two other systems.
System Overview
This latest rider-to-rider wireless intercom offered up by Chatterbox has some real enhancements over the standard but very capable XBi. In addition to most of the features offered by the XBi, the XBi2 has additional power for Class 1 (100mW) duplex communications between three (3) riders up to 500 metres or 1640 feet.
Equipped with A2DP technology the unit allows stereo audio to be streamed from any compatible Bluetooth source on a device to device basis or by using a compatible Bluetooth Adapter (BTA) such as the iCombi AG12 or AG12 from non-Bluetooth devices. A 3.5mm stereo input jack is available as well for wired connections.
The device supports the Headset Profile (HSP), Hands-Free Profile (HFP) and the Advanced Audio Distribution Profile (A2DP). It does not (appear) to support the Audio/Video Remote Control Profile (AVRCP) however.
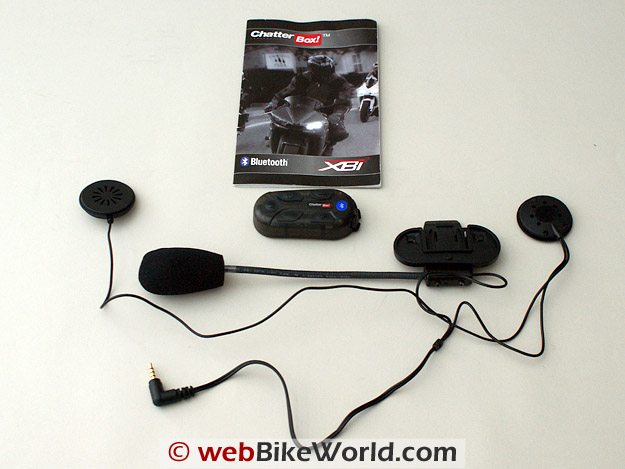
Of the two XBi2 systems on hand, one is an open face kit and the other a full face kit. Everything needed for a complete installation is packaged neatly in the separate boxes.
Both kits include a BT module, a light metal clip bracket, a plastic base plate, an integrated headset and microphone assembly, an accessory bag with mounting pads for the speakers and microphone and three small screws, a bi-adhesive cutout and two plastic clips for mounting wire leads along the bottom edge of a helmet.
A 110-240V AC adapter, the small 15 page guide and a popsicle stick for gently pushing wiring up into liners round out the packing list. The replaceable Lithium-Polymer battery is pre-installed. The primary difference between the two kits is that the Open Face kit has the boom microphone pre-mounted on the metal clip bracket.
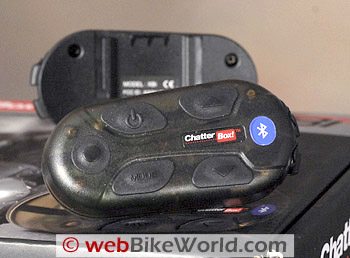
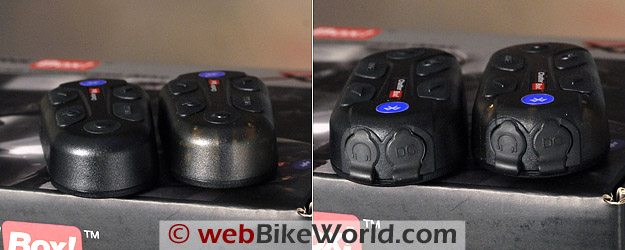
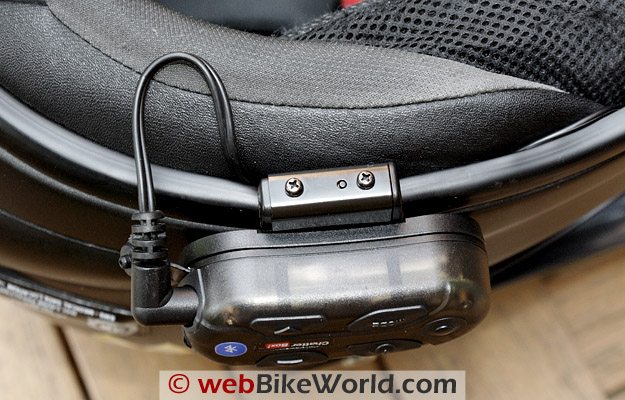
The translucent XBi2 Bluetooth module has five controls on its face. The front pressure button is for the Intercom, the upper forward button controls Power On/Off, the lower left is for Mode selection and the two rear controls are Volume Up and Volume Down.
Two 3.5mm four-element connection ports with tight weather seals dominate the back edge of the module. The lower port is for the headset connection and the upper port does double-duty as the DC charging point and the auxiliary connection for wired devices (MP3 player, FRS/GMRS radio, etc).
The XBi2 intercom housing is smooth with a solid polished-rock feel. The pressure controls are small but very positive in use. The two connection ports are recessed and with connection cables inserted everything is secure and weatherproof, at least it has been so far during our wet summer.
Helmet Installation
While the kit components are pretty simple, putting the mounting bracket components together is a little tricky, especially since the very small Phillips screwdriver needed to secure the plastic backing plate to the metal clip bracket is not provided with the kit.
With the required size screwdriver having been left at home, a quick stop at a local Radio Shack addressed the requirement and two minutes of effort had both brackets ready to clip to the helmets. For standards and completeness sake however the necessary tool should be included in the kit.
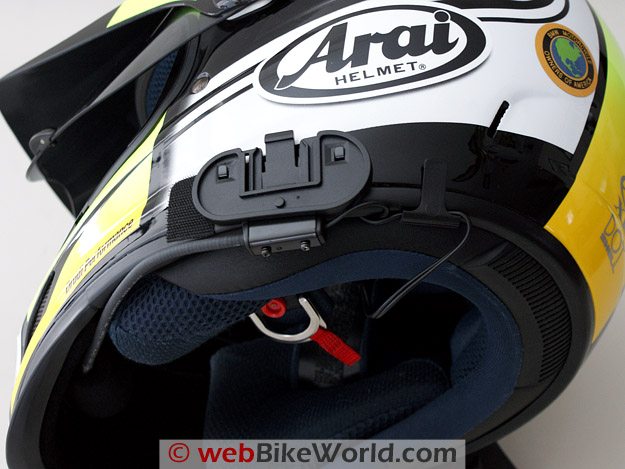
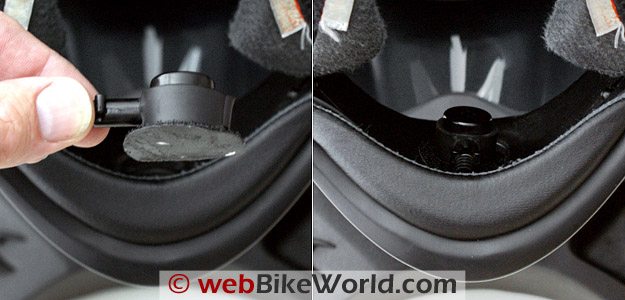
The metal clip is quite strong and should work well on most full face helmets. I also used the small square rubber pads between the helmet shell and the metal clip to mount the XBi2 modules on the Arai XD helmets. They are provided for that use and in addition they keep the assembly from sliding around.
The clip might work on some flip helmets, but if the bottom edge is thick or sharply curved, the bi-adhesive cutout pad is probably the better solution.
Of note is that the metal clip and plastic base plate are fitted together by tabs and slots on the two pieces, but only secured with that single small screw for a reason — the whole assembly is designed to break away on impact. If the bi-adhesive mount is used, it gets applied directly to the back of the base plate.
At 3.5 cm in diameter, the speakers with foam covers fitted are small and fit well into the recesses of most helmets. Just be sure they are centered on the ear and use the spacer foam pieces from the accessory pack as needed to get them close to the ear.
For most users, this provides the most effective audio delivery in terms of clarity and ability to keep volume levels minimized.
The boom microphone which fits well in the XD has an elongated windsock over it for noise reduction and typically, more comfort inside the helmet. But the full face thin-wire microphone, while the same size, is thicker due to its mounting pad and was missing its foam wind sock. Or maybe it is now just used with the rubber cushion that surrounds all but the input or face surface. But still…
In any case, given its height, it couldn’t easily be mounted off to the side as it intrudes well into the chin bar area. I ended up mounting it inside the large recessed air vent on the front chin-bar. Even then it was still possible to hit the microphone while taking the helmet on and off.
The other downside to this arrangement was that the air vent had to be kept fully or partially closed to minimize intake noise at speed. But to its credit, at reduced speeds with the vent partially open, the microphone worked just fine in blocking out a lot of ambient noise
When we could each hear the other rider shifting, we knew that sensitivity was good and that noise filtering was effective.
Chatterbox XBi2 microphone sits high and close to the rider’s mouth.Initial System Configuration
The initial pairing was at the peer-to-peer level between the two systems. With the XBi2 turned off, press and hold the Power button until the LED is a steady RED, then wait another six seconds or so until the LED starts to flash Blue. The unit is now in pairing mode.
An anticipated feature is the ability to pair three (3) XBi2 units together (Main and Satellite 1 and 2), but with only two systems on hand, this feature could not be tried, so I had to console myself with just setting up the two for rider-to-rider intercom use.
As an aside, I am really curious to see how well a three-user net will work however and hopefully some feedback will be forthcoming from owners who have been able to use this feature.
Back to pairing, turn both systems on and with the Main unit, simultaneously press and hold the Power and Mode buttons. Once the LED flashes Red with a periodic Blue (usually after three seconds), both buttons can be released.
Next get the Satellite unit, press its Power and Mode buttons simultaneously for one second. Its LED will start to flash and then the module will power off. About eight to ten seconds later the Main unit will power off as well.
Pairing should now be completed. Turning both units back will result in the two units automatically connecting, as they will do when within range. This pairing worked flawlessly the first time and I only repeated the pairing sequence once just for another test. The units have never failed to sync up, usually in only a second or two after the finger is removed from the power button!
Conditions
A clear warning in the manual identifies the need to always pair stereo audio sources to the XBi2 before pairing a mobile phone or phone(s). Another point that needs to be identified is that while the system can support two Bluetooth devices at the same time (one under the hands-free profile and another under the stereo profile), only one audio stream can be active at any one time.
Both paired Bluetooth devices are still subject to the built-in system priority: the highest being the phone, second is the intercom and lowest is audio. The exception to this rule is if music is being streamed from a higher priority phone or GPS device, in which case the device takes over management of its audio.
Adapter Pairings
With two iCombi Bluetooth Adapters (BTAs) on hand, I decided to exercise them first.
The iCombi AG12 is designed to work with 30-pin connector iPod devices and it supports both A2DP and AVRCP for stereo streaming and remote control functionality. The iCombi AG21 is the general purpose Bluetooth adapter (BTA) and supports A2DP only.
Not having a compatible iPod product on hand to try the AG12, the AG 21 which had already been charged via its power USB interface from the notebook was up to bat.
With the XBi2 in pairing mode (see above), the BTA is turned on and after ten seconds of flashing its RED Led, pairing mode starts, indicated by alternating Red and Blue flashes. Within a few seconds, the LED flashes once or twice and settles into a slow Blue flashing pattern.
The XBi2, after another few seconds reverts to its normal Red and alternating Blue pattern that indicates pairing has taken place and that the devices are ready for use. As long as the pairing is retained by the devices, pairing will be automatic once the audio has been activated.
A second audio source can be connected via the Auxiliary port at the same time and by merely pressing the Mode button for one second, the device will switch between the active Bluetooth audio and the wired device. Each time this is done, a four tone audio alert will be heard in the headset.
A Microsoft zune 120 music player and three other non-Bluetooth media players have all been connected via the ultra reliable iCombi AG 21. Just remember that only one audio input can be used at any one time – Bluetooth or wired, with switching done via the Mode button.
Mobile Phone Pairings
Pairing a Bluetooth mobile phone is basically the same procedure with the XBi2 put in pairing mode and the Bluetooth device search mode initiated on the target phone. The ‘XBi2’ should be displayed on the device’s screen in short order and if a pass code or PIN is requested, just enter ‘0000’.
Press ‘connect’ or ‘accept’ on the device and pairing will then be completed. A short tone may be heard in the headset, although with the HTC Touch devices, there is no audio generated until either the phone or MP3 player is activated.
Some of the other Bluetooth phones, once paired, will cause short audio tones to be heard. The tones appear to be generated at the same audio level as the input setting, which I feel is the better way to do it vice the default ‘loud’ that other systems use.
My HTC Touch and the XBi2 unit automatically link up again, but on occasion and as noted in the manual, it is necessary to press the Power button for one second to reinitiate. Once the link is made again, and depending on the device being used, the Bluetooth and applicable profile icons will/may be shown on the display.
While I am still rounding up devices to pair with the XBi2, and other systems undergoing evaluation, the current list of successfully paired devices is as follows: HTC Touch PDA, Kyocera X-tc, Virgin Mobile and Motorola i335 mobile phones and the usual two GPS devices (zumo 550 and a BMW Navigator III+ or Garmin 2820).
Of note is the Kyocera’s handling of the pairing exercise. With the XBi2 in pairing mode, the Bluetooth discovery mode was activated on the phone. In less than three seconds the ‘XBi2’ device was displayed on the phone’s screen and after two more seconds it was requesting the security code.
I entered ‘0000’ and pressed ‘enter’ on its slid-out keyboard. With the XBi2 displayed on the screen again I pushed the upper left button on the phone to ‘Accept’ the partnership and that was that. The Kyocera is typical of newer Bluetooth enabled devices – very smart and very fast. It has superb audio output as well, putting my HTC Touch to shame.
Part 2: Chatterbox XBi2 Review | Chatterbox XBi Review | Chatterbox iCombi BT Adapters
| wBW Review: Chatterbox XBi2 Intercom System | |
|---|---|
| Manufacturer: Chatterbox USA | List Price (2009): $195.99 |
| Colours: Translucent Dark Matte | Made In: Korea |
| Review Date: July 2009 | |
NOTE: The webBikeWorld evaluators wear properly fitted ear plugs for intercom evaluations. This is reflected in the opinions on sound quality and speaker volume. Your experience may differ. Always protect your hearing when riding a motorcycle (more).
Owner Comments and Feedback
See details on submitting comments.
From “K.M.H.” (April 2013): “Great review by H.B.C. on the XBi2 series of wireless Bluetooth intercoms. Based on this review, as well as wBW’s review of the HJC IS-Max BT helmet, I bought both. Specifically, the Chatterbox XBi2-H, designed exclusively for certain HJC models.
I now understand that Chatterbox has replaced/upgraded this model to the Plus series. Apparently, they’ve improved many facets including adding up to 16 simultaneous users, longer battery life, etc. Unfortunately, it is no longer compatible with the non-Plus models. Are you guys either planning, or already working, on reviewing the new version? It would be most helpful!
As an aside: kudos to Chatterbox customer service! I was able to upgrade for free my old Model for the new Plus model. I just had to pay S&H to/fro Chatterbox HQ in Cerritos, California. Considering I’m eligible, as a current MSF RiderCoach in good standing, for substantial discounts (sometimes cost) on a plethora of riding safety gear, that was a great deal indeed! So great that I bought a new HJC Symax III (review) in Hi-Viz (again based on your review, and past HJC experience), and another XBi2-H Plus to go along with it.
It should be noted that, for some reason (likely manufacturing issues) the XBi2-H does not fit the HJC Sy-Max III. Fortunately, the new Plus model does, and is backwards-compatible with the other HJC BT-enabled helmets.
Keep up the good work! Your reviews are unbiased and invaluable for the M/C Safety professional, as well as, the average motorcyclist-at-large.”
From “T.P.” (8/09): “What I did not read in the review (perhaps I missed it) is how is the intercom mode activated. Is it voice (VOX) activated or manually activated via a button push? A push button is not really desired as it might be a pain in the twisties. Would really like to see a comparison with the new Scala G4.”
HBC’s Reply: Actually the Intercom setup and use was mentioned in the Part One Initial Configuration and then initiating it via the Intercom button is identified in Part Two, User Impressions, Rider to Rider. But, I did not specifically go through the whole intercom setup as its an active feature when the units are paired, like the XBi units as well.
When the two paired systems are turned on, they will automatically establish and open the Intercom link, which can then be closed by pushing the Intercom button briefly, or pushing it again to reactivate the link. It is very simple and foolproof.
Yes, you may have to push the Intercom button to open a link, but only if terminated previously. An active Intercom session may be interrupted by a higher priority audio session, but once that terminates, the Intercom session is resumed automatically.
So if in the twisties, and I hear you loud and clear on the point raised, make sure the Intercom is active before you get otherwise occupied…”
From “S” (8/09): “Thank you for you review of the Chatterbox XBi2 Bluetooth system. I wrote to you several months ago requesting such a review and now, here it is!
Since you did not have a XBi2 review at the time I purchased my XBi2 sight unseen in May and have been using it ever since. Overall I am thrilled with the functionality and convenience of the device and wish to add comments from a “long term” user (well, as long as the unit has been available! I accepted delivery of the unit just 1 week after it came on the market).
I use my XBi2 in conjunction with a Garmin 2820 GPS, Samsung P2 Bluetooth PMP player and Motorola i335 phone. The phone is paired with the Garmin that in turn is paired with the XBi2; the P2 is paired directly with the XBi2.
When I use the full system I turn on the Garmin and allow it to complete its boot process and automatically re-pair itself with the phone. Afterwards I turn on the XBi2 and again allow it to automatically re-pair with the Garmin, then re-pair the P2 to the XBi2 to get A2DP music.
If I do not follow this sequence there is substantial risk that I will lose pairing between the XBi2 and the P2 PMP sometime during the trip. It might be in as quick as a minute, it might be 15 minutes…but, sooner or later, it seems, I will lose the music source pairing. If I pair the Garmin/cell phone combo first I will never lose music feed even if I later accept phone calls. This might be a fluke with the P2’s Bluetooth stack or it might be the XBi2 – no idea.
I can very easily make calls out using the cell phone via the Garmin’s cell phone interface; I have the Garmin’s Address Book synced with my favorite phone numbers as well has having access to a full dial pad. Phone calls are crystal clear on both sides of the conversation – indeed, phone calls come out even clearer, with higher volume, than A2DP music does (see later). However, I have problems *accepting* calls – they get dropped less than 15 seconds after I hit the ACCEPT key on the Garmin to receive the call. I am still trying to figure out why; I usually just call the person back as the Garmin displays Caller ID thanks to the synced Address Book.
The microphone, as you note, is HUGE. I use a Shoei RF1000 and there is no vent to ‘hide’ it in; it took me 4 to 5 tries to locate a position for the microphone where it did not try to bury itself into my skull as I donned the helmet. The Velcro disks fail with age but a trip to Home Depot to purchase the “Heavy Duty” grade of Velcro seems to have ended that issue.
Battery life is almost exactly the 6 quoted hours with continuous A2DP streaming. That is actually extremely impressive considering the (small) size of the unit and is good for most…but not for me, regretfully. I have run out of power on quite a number of occasions. Chatterbox has promised a 12V-power cable for the XBix series and I look forward to getting one (as long as the cord can function while the XBi is in use; the cord may just recharge the unit but not power it during use).
I have lost Bluetooth sync to both the Garmin and the P2 a few times – I blame high-end vehicles with Bluetooth-enabled communications systems. One raining day on the interstate a late-model Acura passed me, 10 seconds later BOOM, no Bluetooth.
Re-synching the Garmin was easy, the P2 less so because I keep it either in my pocket (hard to reach at speed) or in my saddlebags (impossible, of course). I have started to keep the PMP in the saddlebags because during fuel stops, when I walk into the station’s building to pay, I lose sync due to distance. It is easier for me to take off the helmet and just leave it with the bike than it is to spend the time re-synching the devices.
My major complaint? Volume output. In my helmet it just isn’t loud enough especially when wearing ear plugs; the volume, at highway speeds and when set to maximum, is “background” level, no more. :sigh: I know this is due to the speakers as when you plug in a set of Streetstyle headphones into the XBi2’s output, the volume will blow you away! The supplied speakers do not seem very efficient.
Otherwise I really have enjoyed my XBi2 for the past number of months. Although the weather has been horrible this year and therefore my longest trip has only been 8 hours one way, it’s really nice to have entertainment for the dull spots!
BTW, your review has some possible issues with the adhesive mount. I’m using the adhesive on my RF-1000 and it is GREAT, absolutely positively no issues whatsoever. Solid as a ROCK, even physical bumps against objects while carrying the helmet has failed to dislodge the unit even 1 mm.”