Roll your own custom LED lights.
These lights will wrap around forks or they can be arranged on saddlebags, turn signal stalks, anywhere!
They’re the best thing since … LEDs!
How would you like to improve the visibility of your motorcycle AND have a ton of fun doing it? I had a blast playing with these flexible LED light strips, and my Triumph Thunderbird Sport has a wild new look!
These adaptable LED light strips from the whimsically genius minds at Radiantz open up all sorts of possibilities for improving motorcycle visibility.
They can be cut, bent or twisted into many different configurations and will fit in places where standard bulbs or LED light clusters can’t be used.
Each flexible LED light strip consists of a series of LED light modules that are mounted on a flexible backing.
The modules are 15 mm long and each module has 5 mini-LEDs.
This means that a 150 mm long (just shy of 6″) strip contains 50 miniature LED lights.
The LED modules are joined together with flexible metal conductors underneath the backing strip.
The backing strip is partially cut between each module, which makes the strip flexible and also makes it easy to make variable lengths of LED lighting by snapping them off to the desired length.
The strips are only 3mm thick, and they’re available in 4.5″, 6″ and 12″ lengths, with either 0.5mm or 1.0mm spacing between each LED.
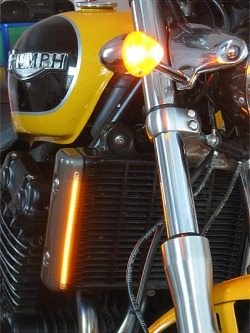
The LED strips shown in these photos were originally 12″ long with a 1.0 mm LED spacing, and I cut individual pieces to length to fit the radiator shrouds on my Thunderbird Sport.
Although I used the amber colored LED light strips as accessory turn signals, there are any number of locations on a motorcycle where the light strips might be appropriate.
Radiantz has a selection of photos on their website that illustrate the different uses for these lights, which are also available in an assortment of colors.
For example, the red LEDs could be arranged as additional brake lights on the back of saddlebags, or some of the other colored LEDs could be used as accent lights.
I’m sure owners will think of all sorts of neat ideas to dress up their rides and be more visible in traffic!
The LED strips are supplied with a specially designed clear plastic flexible tube for mounting on the bike. The tubes are about 9mm wide by 9mm tall with a half-round cross section on one side and double-sided tape on the flat side.
Once the LED strip is cut to length and inserted in the tube, the tube can be installed on the bike anywhere that the double-sided tape will stick.
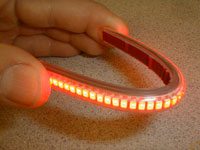
The photo above shows a lit LED array inside of a tube; you can see that the tube all but disappears when the LEDs are lighted.
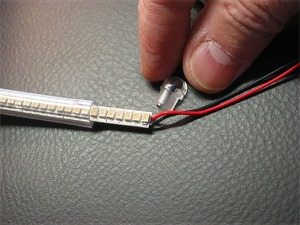
The tubes are sealed at both ends with round plastic end caps that were designed specifically to fit the special cross section. One end cap is solid, and the opposite cap has an opening for the thin 18 gauge wires that are soldered to one end of the strip.
Radiantz provides a few spare end caps of both types; for example, a 12″ length of LED strip comes with a 1.5 foot long tube and 8 end caps for making a variety of different length lights.
The only catch is that there are only one set of wires on each LED strip.
So once the strip is cut, a new positive and negative wire must be soldered to the remaining piece to provide it with power. This should be fairly easy even for tyro solder jockeys.
I thought about the various ways I could use the LED light strips on my Thunderbird Sport.
And after looking over the bike, it dawned on me that the radiator end caps would be a perfect location.
They stick out just a bit, and they’re placed up high, so they’re in a nice location to locate a decent sized strip.
Besides, for some reason the end caps have always bothered me, so I figured that this might dress them up a bit!
I also thought that by placing some extra turn signal muscle out pointing towards the front of the bike and at its widest point could be very useful in adding visibility.
One of the most frequent causes of motorcycle accidents is an oncoming driver who is making a left-hand turn and who don’t see the motorcycle.
I’m also afraid that oncoming drivers don’t see me if I’m stopped at a traffic signal with my left hand turn signal on, so anything I could do to help wake ’em up would be good.
After measuring the radiator end caps, I decided to use 165mm long LED strips, one on each side.
This is about the longest length that fit the end caps, and 11 LED modules equal 55 LEDs that add some extra punch to the bike’s turn signal visibility.
“Measure (at least) twice and cut once” is the method to use in this case.
I was a bit apprehensive about cutting the strips, but it’s not hard to get it right. I measured everything a couple of times to make sure I had the correct length.
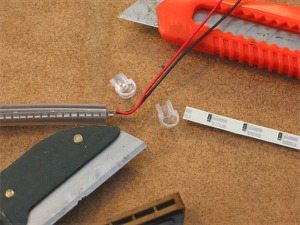
I counted off 11 LED modules down from the wired end, and I used a Sears Craftsman “Handi Cut” to snap off the required section.
The instructions claim that you can break off the sections by hand, but the Handi Cut made a nice, clean break and it also works great for cutting the clear tubing.
Each end cap protrudes into the tubing by 3/16″ (about 5mm), so it’s necessary to allow for this extra length when cutting both ends of the tube.
For the 165 mm long LED strip that I used, I cut the tubing 165 mm + 10 mm = 175 mm long.
The end caps fit very tightly in the tube ends, and I used a hair dryer to heat up the ends to make them more pliable, and the end caps popped right in.
I used a tiny bit of clear glue on each end cap, and then filled the open end with some clear silicone caulking, pushing it in around the wires to help seal it up to prevent water entry.
The last step is to install some heat shrink tubing over the exposed wires.
Lengths of heat shrink tubing can usually be found at your local electrical supply store; I buy them in 4-foot lengths and I try to keep a half-dozen or so lengths of different diameters around just in case.
After the strips were sealed inside the tubes, it was time to locate them on the Triumph.
Tapping in to the turn signal wiring is relatively easy on this bike.
Each front turn signal on the Thunderbird Sport has a hot lead and a ground lead, and the wires terminate in the headlight shell.I used my favorite Posi-Lock connectors to splice the wires with no problems.
I removed the radiator end caps and threaded the wiring from each LED strip around the back of the radiator and up around each side of the bike’s headstock and through the back of the headlight shell.
I oriented the LED strips with the wiring on the bottom. Locating them this way makes the black heat shrink coated wiring almost invisible.
You’d really have to search to see where the very short length of wiring is located.
I checked the clearance by turning the bike’s handlebars back and forth to make sure there was enough slack, and then secured the wiring with cable ties, one on each side.
An accessory wiring harness that allows the lights to work as running lights at about 50% brightness is available.
This then allows the lights to come on full strength when the turn signals are engaged.
But I think the effect is more pronounced when they start blinking from off to on.
Everyone who has seen these lights in action thinks they’re great, and their location makes them very noticeable. They’re thin enough to be almost unnoticeable when the LEDs aren’t lighted, and they look great when they are.
Owner Comments and Feedback
See details on submitting comments.