We receive a lot of email from webBikeWorld visitors asking for ways to improve the visibility of motorcycles in traffic.
I believe it was the Hurt study that first documented one of the leading causes of accidents involving motorcycles.
It’s because other drivers claim they didn’t see the bike or the rider.
There are several technical articles available on webBikeWorld that focus on improving motorcycle visibility from both the front and the rear (see the Motorcycle Safety page and the Technical Articles page).
These articles cover choosing and installing products like LED brake light bulbs and brake light bars; blinking LED’s; running lights; halogen and other brighter light bulbs and more.
But visitor emails indicate that there is a fairly significant interest in improving the visibility of motorcycle brake lights.
There may be a couple of reasons for this.
If motorcycles are hard to see to begin with, then coming upon the rear end of a bike at a stop light, where the bike is probably at its narrowest profile, is bad.
And the following automobile driver may be on a cell phone, drinking coffee, yelling at the kids, etc….
This surely must be one of the most dangerous situations a rider can encounter.
Also, since motorcycles have only one small brake/tail light, there just isn’t much candlepower available to attract attention.
I’ve seen some studies that claim that human depth perception is affected when a smaller motorcycle is viewed among bigger cars and trucks, making the motorcycle seem farther away than it really is.
Motorcycle brake lights are in a central location, rather than at a left and right end like a car’s.
And motorcycles don’t have the automobile’s “CHMSL”, or center high-mounted stop light that places a brake light pretty much in direct line of sight to a following vehicle. And finally, with few exceptions, motorcycle brake lights are pretty wimpy.
They have remained basically unchanged for the last, let’s say, 50 years or so, since the advent of the 12 volt electrical system.
I wonder why, with few exceptions, motorcycle manufacturers haven’t jumped on the LED bandwagon and design some big, bold, bright brake lights for bikes?
These reasons and more have created a demand among motorcyclists for ways to improve brake light visibility.
And the Signalfly system is one of the more unique ways to address this issue.
It’s sort of the “CHMSL” (Center High-Mounted Stop Light) for motorcycles!
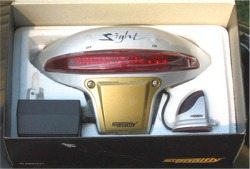
The Signalfly LED Helmet Light
The Signalfly system consists of an infrared sending unit and a wireless helmet device that functions as the auxiliary brake light.
The infrared sending unit sits on the tail of the motorcycle, and the wireless LED-equipped unit on the back of the helmet flashes on and off as long as the brakes are applied.
The helmet unit also has a continuously burning center LED that acts as a running light for the system.
There are a total of 12 LED’s in the helmet unit, covered by a red reflector that diffuses their glow to make them seem bigger and brighter than a “naked” LED.
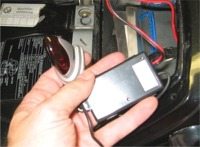
Installing and connecting the Signalfly is very straightforward.
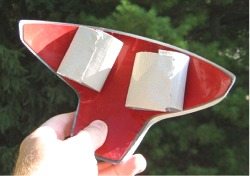
There is one red (power) and one black (ground) wire exiting the Signalfly’s controller box (see photo 1, below). Each wire must be connected to the corresponding ground and power wires of the motorcycle’s brake light.
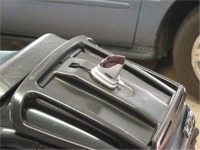
The Signalfly controller connects to the brake light wiring. The Signalfly sending unit on the back of the bike.Mounting the Signalfly System
For most motorcycles, this is a simple matter of removing the motorcycle’s red plastic brake light housing and locating the ground wire and the hot wire to the brake light bulb.
Splice in the Signalfly’s red wire to the motorcycle’s hot (power) wire; then splice the black (ground) wires together, and that’s all there is to it.
The controller can be placed anywhere in the motorcycle’s tail section or under the seat.
An easy way to splice wires is by using the Posi-Lock system; this is a really neat system for connecting wires that avoids soldering, crimping, male/female electrical connectors or other, less reliable connecting schemes.
See the wBW Posi-Lock connectors sale page for more information on this excellent product.
Signalfly Sending Unit vs. Helmet LED
The Signalfly’s sending unit is relatively unobtrusive; it measures about 1.75″ high by 1.75″ wide at the base (45 mm x 45 mm). The sending unit can be located just about anywhere on the tail of the bike (see photo).
Both the sending unit and the helmet unit have double-sided tape to allow near-permanent attachment. But I found that some alignment is necessary to make everything function optimally, so don’t attach the sending unit just yet.
By the way, although the sending unit’s base will remain attached to the motorcycle via the unit’s double-sided tape, for security reasons the infrared portion of the sending unit can be popped out and carried a pocket while the bike is parked.
After temporarily locating the infrared sending unit on the tail of the bike, but before securing it, the next step is to temporarily locate the Signalfly helmet unit on the helmet.
There are a couple of alignment issues that should first be resolved for best performance. The optimal position for the location of the Signalfly on the back of the helmet is one that will give following traffic the best view of the Signalfly in action.
Also, take into consideration the position of the infrared sending unit (on the tail of the bike) relative to the helmet unit’s infrared receiver; there should be a good, clear line of sight between the sender and the receiver.
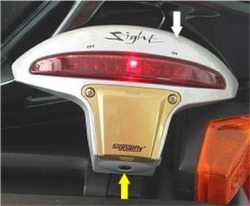
The yellow arrow in photo 3 (below) indicates the small infrared receiving port on the bottom of the Signalfly helmet unit.
I found that if these two aren’t optimally aligned, there’s a chance that there won’t be a powerful enough infrared signal to the Signalfly helmet unit, which could lead to erratic performance of the LED’s.
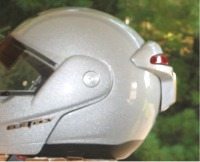
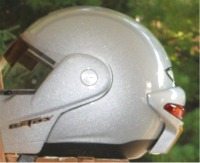
Photo 3 – Incorrect placement on Lazer Century helmet. Photo 4 – Correct placement on Lazer Century helmet. Photo 5. Photo 6.Mounting the Helmet Sending Unit
When I first examined the helmet unit to determine a good helmet location, I found that my first inclination was to set the Signalfly up high on the back of the helmet, at what I thought was a central location that would be visible to following traffic (see photo 3).
But I’m glad I didn’t just “peel and stick” the Signalfly unit on that spot.
We tested the best location first by temporarily attaching the unit so that we could identify the place where it would be most visible to traffic while also obtaining the best signal from the infrared sending unit (photo 4).
To temporarily attach the unit, we first made up a couple of temporary “double sided” tape stickers by breaking out “Ol’ Standby” — a roll of duct tape, and tearing off some 2-3″ strips.
Fold each strip over on itself to form a tape loop. We attached the loops to the back of the Signalfly helmet unit, over the plastic covering (the red area in photo 5, left) that protects the semi-permanent tape that’s attached to the unit itself, then pressed the Signalfly on to the helmet.
The test rider then sat on the bike in a natural, heads-up riding position while wearing the helmet with the Signalfly unit temporarily attached. This makes it easy to find the best position for optimum visibility to following traffic.
The rider applied the brakes, and by moving the sending unit around a bit while the helmet was moved through a normal range of motion, it was easy to find the spot where the strongest infrared signal is obtained.
The final position for the helmet unit is much farther down on the back of the helmet than one might first guess.
This is partially due to the fact that when a rider is sitting on a bike in a riding position, most helmets will naturally locate in an orientation that slopes downwards from the back to the front.
The center of the Signalfly’s LED’s are about 3.25″ above the unit’s infrared receiver (yellow arrow, photo 6, left), and it’s the LED’s that need to be aligned correctly for best visibility to following traffic, so take care to properly locate the unit before permanently attaching it.
Although the alignment procedure may sound complicated, it takes probably less than a minute or two to identify the optimal positions for both the sending unit and the helmet unit.
Once you’ve done that, just peel off the red protective film and attach the units in their respective locations.
Helmet Shape Issues
There may be a problem with fitting the Signalfly helmet unit to some helmet shapes.
For example, I could not fit the unit to the KBC VR-1 helmet because of its rear shape and air vents, and the Signalfly would also not fit the X-lite X-901 due to its narrow profile. The Signalfly will fit “normal” round helmets best.
It seems that a different shaped Signalfly might fit more helmet shapes.
If the unit was more rectangular in shape, with the longer sides being vertical (rather like a tombstone shape), it might have a less critical radius that could possibly fit a wider variety of helmets.
Using the Signalfly
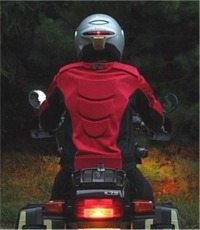
It’s very hard to photograph the differences between motorcycle lights and bulbs, but the Signalfly’s LED’s are very bold and bright — much brighter than they appear in these photos.
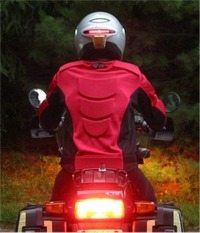
Photo 7 (below) shows the bike from the rear with the rider and no brakes applied.
The single LED “running light” that is always lit when the Signalfly is on can be seen. Photo 8 (below right) shows the brakes being applied and the photo is a single shot capture of the Signalfly unit with all LED’s on.
Other Considerations
The Signalfly isn’t very heavy — one of these days, I have to get a scale so I can accurately report on weights.
We don’t think it adds a significant weight burden on a helmet.
The unit also comes with rechargeable batteries and a charger — simply plug the charger into the back of the Signalfly helmet unit; a green LED shines when the unit’s ready to go.
Also, I’d like to see a removable Signalfly that could possibly be attached with “hook and loop” or some other type of easy-on, easy-off device.
If the infrared sending unit also had this capability (along with quick-detach wires), the Signalfly could be transferred from helmet to helmet or bike to bike (provided, of course, that the other bike had the sending unit’s wiring pre-installed).
And finally, the user has to remember to turn the Signalfly unit on or off (the white arrow in photo 6 above points to the barely discernable on button).
The unit will only work if it’s on. It would be nice if there was some type of automatic timer that turned the Signalfly off when not in use, because it’s kind of hard to remember to shut it off after a ride.
But I supposed this would be impossible, because if you were riding long distances without stopping, the unit might turn itself off unexpectedly. Perhaps there’s some way for the infrared sending unit to send a message to the unit to turn on and/or off?
Conclusion
All things considered, we think this is a unique and interesting product that has the potential to improve motorcycle visibility from the rear.
We’d like to see some studies conducted that prove whether or not brake lights should all be clustered around a single location, or if widely dispersed brake lighting has a better or worse effect on rearward visibility.
But in the absence of such a study (don’t hold your breath!), the Signalfly has the potential of waking up following drivers and letting them know you’re slowing down!
| wBW Review: Signalfly Helmet Brake Light | |
|---|---|
| Manufacturer: Signalfly (No longer in business) | List Price (2003?): $119.95 |
| Colors: Silver | Made In: Malaysia |
| Review Date: 2003(?) | |
Note: Item provided by a retailer, distributor or manufacturer with these Terms and Conditions.
Owner Comments and Feedback
See details on submitting comments.
From “R.D.”: “Signalfly has a winner! The flashing type, LED red brake lights mounted on the rear of my helmet catches driver’s attention, day and night.
Distracted cage drivers wake up when I hit my brakes and my helmet lights up!
Darndest thing they ever saw, never minding the “build board’ of flashing and steady LED lights on the tail of my Harley Road King.
The “die hards” who don’t like wearing helmets may change their minds when they see more helmets lighting up.
Installation Tip: It was secured additionally with 3M yellow contact glue. Plastic body filler caulked the edges for a stronger and smoother mounting transition of my full-face helmet.
High gloss, black, pliable, bumper spray paint was used on the On/Off buttons and high gloss, black, epoxy spray enamel on both the Signalfly housing and body of the helmet.”
From “T.R.”: “I love it, works great, it’s durable, looks good, it is highly visible and it does make me feel like I have done everything I can to be seen. I had tried a helmet light made by another company it broke pretty quickly and burnt batteries way too fast.
I agree with you about the shape and connection system. I have a X-large helmet and really couldn’t fit it the way it was designed.
I added some double sided tape and then hot glued it all the way around to be sure it would stay attached. The other light I tried had an attachment system where you glued a slide on base on two helmets so you could swap it around.
I ride every day so it hasn’t been sitting in a closet anywhere and hardly being used, j ust to tell you that so far no problems with the lights, material, of functioning of the device.
I also us the 3-M Tailbrites on my 2001 Concours, extra LEDs, a tag light (license plate light) and replacement LED for the brake lights.
Also, I have a windbreaker made of Illuminate which glows 100% white when headlights hits it. I love riding and want to stay safe.”