Comagination “Visipath” Motorcycle Headlight Modulator Review
Products that help improve motorcycle visibility are becoming popular, which is “a good thing” as our friend Martha Stewart would say.
webBikeWorld has provided more technical articles on selecting and installing products related to motorcycle visibility than just about any other subject (see “Additional Reading” above).
And we receive many emails related to this topic, which tells me that there is a lot of interest in becoming more visible.
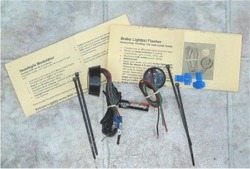
So we were very pleased to review this Comagination VisiPath Headlight Modulator and also the VisiStop Brake Light Flasher by Comagination.
Both products offer some features that set them apart from competitors.
The Comagination VisiPath headlight modulator was very easy to install on our test Triumph Thunderbird Sport.
The neat surprise with this modulator is that it can be configured to work on either low or high beam simply by swapping two wires.
Also, the light sensor that Comagination provides with the unit (and is required by law with all headlight modulators in the U.S.A. and Canada) is very small and should be easy to hide on any bike’s dash, handlebar or instrument cluster.
U.S. and Canadian laws require that a sensor is provided with every headlight modulator, and must be present to stop the modulation when the ambient light levels drop.
It’s important to note that there are a couple of schools of thought regarding headlight modulators and whether the low or the high beam should be modulated.
Although the Hurt Study (the wBW Motorcycle Safety Page has a copy of the study summary) mentioned motorcycle visibility (or lack thereof) as one of the prime causal factors in motorcycle/vehicle accidents, especially from oncoming vehicles turning left in front of the motorcycle.
Note that there aren’t any “scientific” studies that we are aware of that definitively prove that headlight modulators reduce accidents, but both the U.S. and Canadian governments must have been convinced of the efficacy of modulators when they passed legislation permitting them.
But it would be nice to know if, how or how much headlight modulators actually do improve visibility to oncoming vehicles.
Regarding the issue of whether to modulate the low beam or the high beam, note that Comagination and most other modulator manufacturers recommend modulating the high beam for several reasons.
The claim is that the modulator will be most visible when combined with high beams. Also, since the high beam covers a wider projection than the low beam (which cuts off light to the left hand side in the U.S.A.), the wider projection has the potential of creating better visibility to oncoming, left-hand turning traffic — one of the most serious threats to motorcyclists.
Where to Buy Comagination Headlight Modulator
Check Reviews & Prices on AmazonAlso Shop for: LED Lights and Bulbs, Auxiliary Driving Lights, Motorcycle LED Headlights
Using a Motorcycle Headlight Modulator
I agree with this logic. However, I had a modulator installed on my previous bike that I used on and off (pun intended!) for many years; that modulator worked only on high beam. But I felt that the high beam was annoying to oncoming traffic — many vehicles would flash their lights at me, as if they were attempting to get me to dip the beam.
Also, it wasn’t always easy to remember to dip the beam, therefore shutting off the modulator, in heavy or stop-and-go traffic. I’ve been followed by a high-beam modulating motorcycle when traveling in my car, and I can tell you that it is annoying.
“So what?”, some of you might say — the end result is that you will be noticed. But I also wondered if other vehicles might be paying just a little bit too much attention to the modulator, and maybe not enough to my directionals, hand signals or head and eye movements. So I’m personally just not 100% sure what the best setup is. I sure hope someone does a scientific study on this someday soon.
I corresponded with Phil Walters, Comagination’s Director, regarding this subject. Phil recommends high beam modulation; his response to my logic is this:
“Rick, since the high beam is modulated only during the daytime, blinding oncoming traffic is not an issue. Spreading out the beam higher and wider gives greater safety protection from some of the greatest dangers – like oncoming traffic making a left turn in front of you. Alerting vehicles who might pull out in front of you from a driveway or different traffic lane. Head-on into anything is the worst tragedy.”
Using the Hi-beam during the daytime usually will not “hide” the bike’s directional signals. We have never seen that or had someone report it. I have used a headlight modulator for 3 years now and never felt that my directionals were not visible.
(However), there are a few others who feel the same way you do and want to modulate the Lo-beam for various reasons. It’s a personal choice. A flashing Lo or Hi-beam is better than none at all.”
Well, hats off to Phil and his Comagination crew for at least offering us the choice! I ended up installing the VisiPath to run on low beam, and I’ll evaluate both low and high beam over the next several months to see which choice I like better.
Where to Buy Comagination Headlight Modulator
Check Reviews & Prices on AmazonAlso Shop for: LED Lights and Bulbs, Auxiliary Driving Lights, Motorcycle LED Headlights
Installing the Comagination Headlight Modulator
As you will see, installing the VisiPath is very easy to do; so let’s take it step by step and you’ll see what I mean
Here’s one of the reasons unfaired “standard” bikes are so popular: you can actually work on the various bits without having to first spend an hour stripping bolts whilst tearing off pieces of fairing!
The T-Bird shown in these photos is a very good stand-in for basically any “naked” type motorcycle.
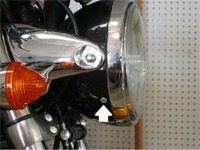
Yours may be different, but on the T-Bird, first thing you need to do is remove the headlight. To do this, remove the two screws, one on each side, illustrated by the white arrow in Photo 1.
As with most any part on a motorcycle, be careful, take your time, and don’t force fasteners either in or out — most metal is aluminum, and it’s very easy to strip or cross-thread. Also, make sure the motorcycle’s power is off.
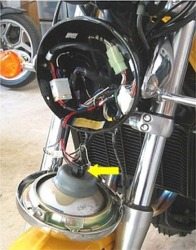
Here’s what the inside of the headlight shell on the T-Bird looks like.
You really shouldn’t let the headlight hang like this by its wires — do as I say, not as I do! Be smarter than me — put a couple of towels or something on the fender to protect both the headlight and the fender!
The T-Bird has a three-wire female connector (yellow arrow, Photo 2) for its H4 bulb.
The VisiPath will work with either an H4 or H7 bulb; the unit comes with three wires, only two of which are needed for an H4, but Comagination’s directions step you through the process for each type.
It’s really simple: the VisiPath unit has a three-wire connector and three separate wires coming out of its electronic package.
The VisiPath’s three-wire connector replaces the bike’s connector , and the three wires from the VisiPath are inserted into the bike’s original connector. That’s all there is to it!
To remove the bike’s original three-wire connector, gently pull it from the back of the bulb.
Be careful, it may have been a while since this was installed, so it could be tight. Try rocking it back and forth a bit as you slowly and gently pull it back to remove it.
The VisiPath’s green ground wire comes with a removable diode attached. Remember that the green VisiPath wire is ground!
The unit should be installed to the bike’s headlight first using the diode, so that if the connections are wrong, the unit won’t be harmed. The directions are fairly explicit about how to perform this test.
On my T-Bird (and yours may be different, it’s happened before!), the ground wire is on the right side of the plug wthe black/yellow wire feeding into it.
The high beam is on the left side, and the low beam on top. Insert the diode, attached to the VisiPath’s green ground wire, into the bike’s ground plug, then the VisiPath’s red wire into the bike’s high beam.
Finally, insert the VisiPath’s black wire into the remaining plug of the three-wire connector. For H7-equipped bikes, the last wire isn’t used — cover the end with electrical tape.
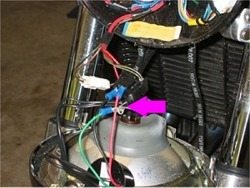
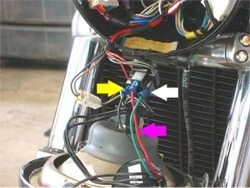
If everything is working fine, photo 4 illustrates how your T-Bird should look with the VisiPath installed. Turn off the ignition (don’t keep the ignition on for more than a couple of seconds) and remove the diode, then re-insert the VisiPath’s green ground wire into the bike’s ground plug.
The three arrows in photo 4 show: White arrow – the VisiPath’s green ground wire in the bike’s ground plug; Pink arrow – the VisiPath’s red (modulating) wire inserted into the T-Bird’s low beam plug; Yellow arrow – the VisiPath’s black wire inserted into the T-Bird’s high beam plug.
One more step is necessary to modulate the T-Bird’s high beam instead of the low beam. The high and low beam wires must be swapped; these are the wires in the VisiPath connector that plugs into the back of the headlight bulb.
To modulate the high beam rather than the low beam, swap only the VisiPath’s red and black wires in the connector shown in Photo 4 above, making sure to keep the VisiPath’s green ground wire inserted in the bike’s ground plug.
There is one more wire coming out of the VisiPath unit. This is the black wire with the strange-looking teeny “electric eye”, or sensor. The sensor must be mounted somewhere on the bike, pointing straight up, where it has as clear of a view of the sky as possible (I’ll show you where I mounted it on the T-Bird later).
The sensor watches the sky for you, and when it gets too dark to modulate, such as dusk, or in a dark tunnel, it will tell the modulator to stop doing its stuff, and to go back to a steady beam.
Once you have everything looking good, turn on your ignition switch to see if the high (or low) beam is modulating. Make sure the sensor is pointing up at something bright; if you’re working in your garage, you’ll need to point it towards a light source. It actually is very sensitive, and it’s very accurate in determining whether or not to modulate the headlight. Just make sure it’s installed correctly.
What you’re doing is splicing the VisiPath in between the bike’s electrics and the headlight. Basically, whatever goes in to the VisiPath’s red wire goes round and round and comes out modulated on the VisiPath’s black wire.
To install the sensor, feed the sensor’s wire out through the back of the headlight shell. On the T-Bird, I was surprised to find that there is no grommet on the back of the shell, which might provide a modicum of weather-proofing to the headlight internals.
The wires come out of a hole in the back of the shell, and it seems to me that it would be easy to collect some moisture in the headlight shell itself. Maybe Triumph made everything waterproof? At least the VisiPath’s electronics are waterproof!
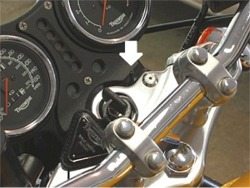
I tried a couple of spots, but settled on mounting the sensor as shown (white arrow, bottom photo). It’s that tiny little thing poking up! I mounted it to the bracket that holds the instruments, using a black cable tie. Don’t over-tighten it — use just enough pressure to keep it upright.
This seems to be a nice position for the sensor on the T-Bird; notice the way my key chain hangs — the right hand side isn’t affected. You don’t want it mounted in a location where something (like your key chain!) could cover the sensor.
I really like this modulator and its ability to work with either high or low beams. The price is very reasonable compared to other modulators, and it’s easy to install and its small size should allow it to fit in the smallest of headlight housings. Comagination has done a great job with both products!
Where to Buy Comagination Headlight Modulator
Check Reviews & Prices on AmazonAlso Shop for: LED Lights and Bulbs, Auxiliary Driving Lights, Motorcycle LED Headlights
Addendum: Using a Flash-to-Pass Function With the Modulator
Comagination’s instructions advise on using the “flash-to-pass” (FP) function. FP will not damage the modulator when correctly connected. FP must be wired to the modulator input (modulator’s male wire), not the output.
Assuming the FP is operating the hi-beam then the following should occur:
- Modulator installed to modulate the hi-beam then the FP function will have no effect day or night while hi-beam switch is on. When the bike’s light switch is set to lo-beam and the FP function is engaged the hi-beam will flash after a slight delay to allow the mod electronics to begin operating.
- Modulator installed to modulate the lo-beam then the FP function will operate as normal with the hi-beam.
You should not install the modulator with the FP positive wire connected to the modulator’s output; this could damage the modulator. The installation instructions warn to avoid this situation.
Next: The VisiStop Brake Light Flasher
| wBW Review: Comagination Visipath Headlight Modulator | |
|---|---|
| Manufacturer: Comagination | List Price (2001): $58.95 |
| Colors: N/A | Made In: U.S.A. |
| Review Date: 2001 (?) | |
Where to Buy Comagination Headlight Modulator
Check Reviews & Prices on AmazonAlso Shop for: LED Lights and Bulbs, Auxiliary Driving Lights, Motorcycle LED Headlights
Owner Comments and Feedback
See details on submitting comments.
From “D.K.” (December 2014): “I’ve bought 3 of these units, all have work flawlessly, now I’ve bought a 4th with PayPal, no unit yet no response from email thru PayPal, so I have to assume the company is out of business or is into some kind of fraud operation. So new buyers beware of Comagination LLC. Lost my money with these folks, went on to purchase from Kisan (Pathfinder), more money but at least there’s a real company there.”

From “S.S.” (October 2014): “I purchased a Visipath Modulator from Comagination. I was interested in finding out which wire to interrupt with a switch to have manual control over modulator operation.
I tried calling them for three days and all I got was an answering machine. I left a message each time and they never returned my call. Then I e-mailed them and they didn’t respond to my e-mail. As far as I’m concerned, Comagination has not just bad, but no customer service. We finally ended up putting the fairing back on my HD FLHTC without the ability to have a manual cutout for the unit.
Instead of the flexibility that I wanted, the only way to disable the modulator now is by switching from low to high beam. If anyone has a way to switch enable a Visipath, I would be interested in hearing from you.”
From “P.H.” (August 2012): “Thanks for reviewing and posting user comments. I recently bought my 17 year old son a motorcycle. The brightness of his low beam is “significantly” less than his high beam. It is dim enough during the day that in my judgment it isn’t very effective for increasing visibility. So, he keeps his light on high beam during the day and has never had anyone flash their light for him to dim.
My low beam headlight, however, is bright enough during the day that it does have good visibility and the high beam might annoy other drivers. So, we want to modulate his high beam and my low beam.
I’ll be buying the Comagination Headlight Modulator; because, it provides flexibility to use which ever beam the user decides is best – and allows the user to change their mind. AND, should we replace a headlight bulb in the future that has different brightness levels than our current bulbs, we can rewire the modulator as needed.”
From “S” (October 2011): “Thanks for the well written review, and also for publishing the frank comments from folks that have purchased it. It goes a long way in making me feel more confident buying such a unit from a small on-line business, as opposed to a huge on-line retailer.”
From “B.P.” (09/10): “I just purchased the Comagination Headlight and Brake light modulators based on your review.
After first fitting the headlight modulator (to the low beam- per your sensible opinion) to my CAN-bus equipped 2009 BMW F650GS twin, I was disappointed to discover a random flashing dashboard warning light and LCD “lamp” fail message when the modulator was operating, despite no warning on Comagination selection page. (Their bike selector implies compatibility with my bike.)
An email to Comagination produced (and I quote verbatim) the following rather off-hand response: “Maybe putting a 10k+ ohm resistor in parallel with the bulb will make the computer think all is OK. You may have to experiment with different resistor values to see. Even try 5k.”
Following this suggestion, I applied a range of resistors from 10k down to 1k across the lamp, but to no avail. And plainly, even if this HAD fooled the CAN-bus, I was never going to get a real lamp fail warning thereafter with this solution.
So evidently this product has not been sorted for the BMW CAN-bus. I’ve pulled it out, and wont even bother with the stop light kit as I suspect it will have similar consequences. I will pass on the Comagination kit to a mate for his Suzuki V-Strom.
I think if Comagination was really “on the ball”, I would have had a much better-informed response or an admission of “unsuitability”.
I thought you might consider adding a note to your review page for your BMW readers, to save them the pain and expense. I consider your web site one of the best resources on the Web. Thank you!”
From D.M.: “I had been looking into a headlight and taillight modulator and your review, coupled with the reasonable price, sold me on the Visipath units. Your comment about the brake light modulation pattern made perfect sense – This helps prevent distracting flashing in stop and go traffic. I preferred this to a constant flashing modulator which, as you said, seems like it would quickly be ignored if always the same, and I didn’t like the look of the constant flashing models.
The headlight installation took me less than 5 mins to install. You remove the two screws holding on the headlight; It plugs directly into the headlight socket and then separately into the existing headlight. I then ran light sensor out the back of the headlight assembly (there already was a large opening) and wire tied it to the existing cable bundle. Couldn’t be easier, and truly can’t be noticed except when operating. I can vouch for the visibility – you do get noticed!
One thing to note is that the headlight modulator is actually larger than it seems in any of the pictures. I had to place it exactly right in my Honda’s 5 ¾ inch headlight housing to fit. If you have an eight inch light this shouldn’t be an issue.
Thanks again for the review/recommendation.”
From T.U.: “I … ordered the Visipath headlight modulator from Comagination. It works as promised and is easy enough to install. However, I previously purchased a Kisan Pathblazer modulator for another motorcycle and although it was more expensive, I feel that it was made better.
The connector is straight forward, plugging directly into the 3 prong H4 lamp and harness. The Visipath has loose wires with individual spade connectors that plug into the cycle’s harness. I did not feel confident that they would stay plugged in so I taped it up afterwards. And the unit itself is left dangling to be tucked away somewhere.
The Kisan unit is much more compact and very secure. Neither has given me any trouble, but if I had to choose again, I would go with the Kisan…”
Editor’s Reply: Just for the record, we do have an review of the Kisan unit on webBikeWorld. I haven’t had any problems with the Comagination unit’s connectors coming loose, although I did tape mine up. The problem with the Kisan unit (besides its cost!) is that there isn’t always room to directly plug it in to the headlight — many headlight shells are very small or have a very tight fit.
So the benefit of having the length of wires for the Comagination modulator is that you can locate the modulator off to the side or in a spot where there’s more room. That’s what I had to do on my Triumph Thunderbird Sport — I don’t believe there would have been room to mount a Kisan modulator directly on the back of the headlight unit.
Also, since the Kisan unit plugs directly into the back of the bulb, it gets very hot, and I’m not sure what effect this can have for the electronics over the long term. Finally, the Comagination modulator can be used on either low or high beam, which I believe is a distinct advantage.
From V.A.: “After reading the review of the Comagination VisiPath Headlight Modulator on webbikeworld.com, I purchased one. The installation was as easy as described in your article, once I identified which wires in the headlight connector are for the ground, low, and high beam.
I used Velcro to mount the sensor to the instrument cluster on my 2000 Kawasaki W650. I decided to modulate the high beam. On my first ride with the modulator installed, I could see car drivers visibly staring at me as I passed them, and I have seen several drivers (at perpendicular intersections to the road I am on) do a double-take when they would normally just give a casual glance for traffic.
I also, after reading your article, purchased a Signal Dynamics 6″ LED brake light bar and modulator. I spliced a wire into the existing brake light wire, and placed the modulator only on the LED light. The incandescent tail light illuminates normally when the brake is applied, and the LED bar flashes.”
From T.W.: “Rick, I bought two of these things, one for my bike and one for the wife’s bike. Very easy installation and they work great! I am planning to buy one for each of my daughter’s bikes as well as a Brake Light flasher for each of the bikes. Having survived a motorcycle accident where a SUV ran a stop sign I figured these would be a good way to help prevent that sort of thing from happening again.”