
Many of us do a lot of our own motorcycle maintenance and repair.
The motivations for this are varied, but cost savings is probably the number one reason.
I know it is for me!
I’ve been an Automotive Technician for more years than I wish to remember, and it pains me to pay anyone to perform a service or repair I should be able to do myself.
If I hadn’t been doing my own service and repairs I’m not sure I would have been able to afford the “Fine Piece of German Engineering” I have been riding for the past 130,000 miles.
It’s the little things that we do ourselves that can really add up in cost savings. One of those tasks is mounting and balancing our own tires.
When I returned to riding I was shocked at how quickly those ZR-series skins wore out. I was used to getting 40-50,000 miles on a set of tires on my car, but only 6,000 on a set of motorcycle tires? OUCH!
Being the frugal person that I am, I bought my first set of replacement tires over the Internet.
I took them along with the rims and the old tires I had removed from the bike to my local dealer, who proceeded to charge me $30.00 per tire to mount and balance. Wow, that’s $60.00 a set!
This was a two-to-three hour procedure just to travel to and from the shop, and it was only possible during their normal hours of operation, obviously. I needed to come up with a better plan.
After some experimentation, I found I could do the dismounting and mounting where I work on one of the automotive tire machines.
Two riding buddies and I split the cost on a balancer for home, and this paid for itself — or my share anyway — with the first set of tires.
But wouldn’t it be great if I could do everything at home whenever I needed to and not pay someone to scratch my rims?
No more driving the cage to work on a beautiful day or riding around with the tire and rim from my son’s Gixxer strapped onto the back seat of my K1200LT. Thus the plan to purchase a tire mounting machine for home was hatched.
Choosing the No-Mar Motorcycle Tire Changer
A search on the Internet for motorcycle tire changers resulted in several hits for both manual and automatic/power assisted changers.
A powered automatic unit, commonly found in a professional shop, was out of the question due to its high cost.
This left me with a few products that all seemed to work in the same manner via a long bar for removing and installing the tire bead from the rim.
But my bike has painted alloy rims which can be easily scratched if clamped improperly or with jaws that have no protective treatment/covering.
When using the machines at work I would always wrap the clamps that held the rim to the turntable with duct tape to prevent damage, which was a nuisance.
Although there were cheaper brands, I found only one motorcycle tire changer that mentioned that their clamping system and bead bar were designed specifically not to mar any wheel, and hence their name, No-Mar.
The creation of the No-Mar motorcycle tire changer was developed out of frustration by a motorcycle enthusiast tired of paying someone a bunch of money only to end up with scratched rims.
No-Mar’s goal is to manufacture an affordable motorcycle tire changer that’s fast, easy to use and safe on ALL types of rims, including carbon fiber (see their video for special handling procedures).
They claim to continuously refine their products to make them efficient and easy to use without harming any type of rim.
And the No-Mar motorcycle tire changer is made right here in the U.S.A.
No-Mar has several motorcycle tire changer models available, including “heavy duty” models for the more demanding environments such as a professional repair shop that replace numerous tires on a daily basis.
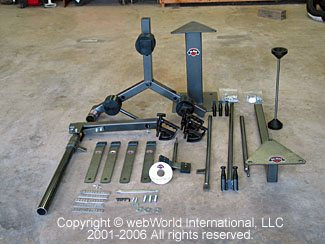
I chose to go with their “Classic” model bundled in their “Ultimate II” package which includes:
- The Classic unit; a mount/dismount bar with replaceable plastic tips.
- A mounting base (with the necessary hardware to fasten it to the floor).
- 4 No-Mar spoon bars.
- 3 “helping hands”.
- One metal spoon bar.
- Two types of tire lube (spray and cream).
- Several strips of wheel weights.
- A tire valve stem core remover/installer/reamer/tap.
- A wheel balancer with a pair of large cones for hub-less wheels.
- And an instructional CD-ROM.
One of the things I appreciated, as a prospective buyer, was the fact that No-Mar provides online videos that demonstrate the use and operation of all of their equipment.
Changing Tires the No-Mar Way
There is a separate video for each step of the mounting, dismounting, balancing procedures and other videos covering some special situations such as stiff sidewall tires, etc.
This was extremely helpful in understanding the dimensions of the tire changer, exactly how everything worked and whether it was something I thought was worth having at home.
With two cars, two bikes, a bike lift and other assorted toys and implements in the garage, I was concerned as to just where in the heck I was going to mount this thing since they show it being bolted to the floor.
So when I came across their hitch adaptor, which allows the unit to be attached to any 2″ trailer hitch receiver, I figured this was the solution.
When needed, I could slide the tire changer into the receiver on my truck, do my tire changing and then store it out of harm’s way, or maybe even hoist it overhead in the garage. Of course, it’s also possible to bolt the tire changer to the floor.
If this is the case, the tire changer can be stored by removing the lag bolts, leaving the anchors in place, and moving it into storage.
Since I already had a balancer, the fine people at No-Mar swapped out the balancer for the hitch adaptor. Some day maybe I’ll look into bolting it down…
Prior to purchasing the No-Mar tire changer I wondered if I could just mount it to a wood pallet with a piece of plywood nailed top. But after using the tire changer for the first time I’m glad I didn’t rely on that method.
I discovered that it really needs to be securely fastened to something more stable.
Upon receiving and inspecting all of the components I was impressed with the quality and finish. All of the metal parts are finished in a “7 step Silver Vein Powder Coat Finish”.
All of the components of the motorcycle tire changer come with a one-year warranty for wear and breakage (with the exception of abuse) and a lifetime warranty on all of the plastic parts to the original owner (which is where most of the wear will be). Sounds like a good deal to me.
Assembly of the changer was simply a matter of bolting a few pieces together with the included hardware, which was easy since I was not going to be bolting the tire changer to the floor; my plans were to use it solely on the hitch mount.
That’s it — I was ready to tackle my first tire change. It just so happened that “The Enterprise” (my ’99 BMW K1200LT) was in need of both front and rear tires — perfect timing!
Bead Breaker Attachment for the No-Mar tire changer.Where to Buy No-Mar Motorcycle Tire Changer
Check Reviews & Prices on AmazonSee More: Motorcycle Accessories, Motorcycle Tire, Motorcycle Helmets
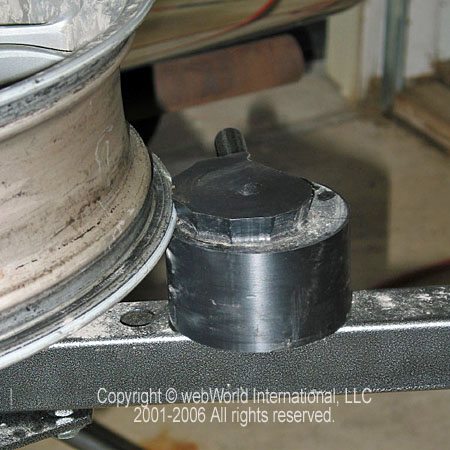
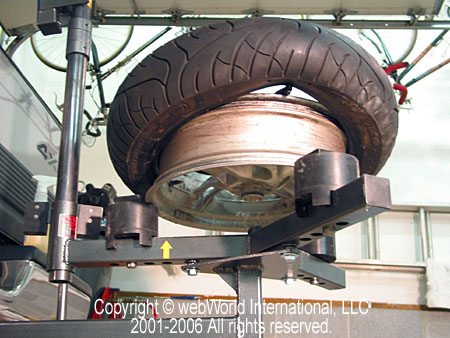
With the motorcycle’s tires and wheels removed and deflated, breaking the bead is the first step in the replacement procedure.
With the No-Mar tire changer, this is a simple matter of placing the rim on top of the polyethylene “dog block” closest to the rear post where the breaker lever is attached (see photo below).
Using the lever action bead breaker by pulling down on the bar forces the plastic faced wedge onto the tire right at the edge of the rim and thus “breaking the bead” of the tire away from the wheel.
It’s not uncommon to have to break the bead at multiple points along the circumference of the rim.
I know, from experience, that this can require great force to accomplish, but the No-Mar unit succeeded with only a moderate amount of effort.
If necessary, you could slip a piece a pipe over the bar for more leverage on a stubborn tire.
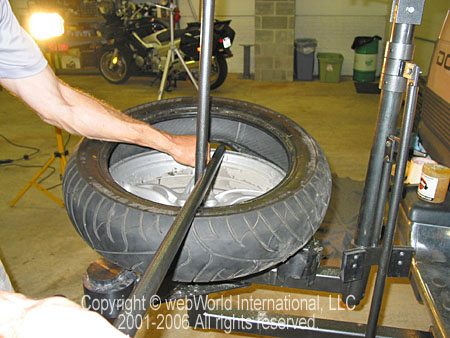
The three “helping hands” are indeed a big help in holding the bead, once broken, away from the rim edge until the rim was flipped over and locked in place.
These “helping hands” are of a semi-soft flexible nature and are a great aid when working on the stiffer sidewall tires. It’s like having four hands without the other person getting in the way.
Once the bead breaking is complete, it’s easy to swing it to either side, out of the way until the next time it’s needed.
Next is getting the wheel locked onto the changer stand via the No-Mar “patented wheel lock system” with three polyethylene “dog blocks”.
These can be moved along the length of the three arms of the table to accommodate any size rim from 10″ to 21″ (see photo above).
This also means that it can be used for other types of wheels and tires (e.g., lawnmowers, trailers, etc.) which may make it easier to convince your SO that you need one!
Two locks can be fine-tuned for each rim size by lifting and rotating to use a different size edge notch.
The third is the rotating locking dog that has a spiral notch which, when rotated, exerts more pressure on the rim edge and “locks” the rim from rotating. A simple but effective action.
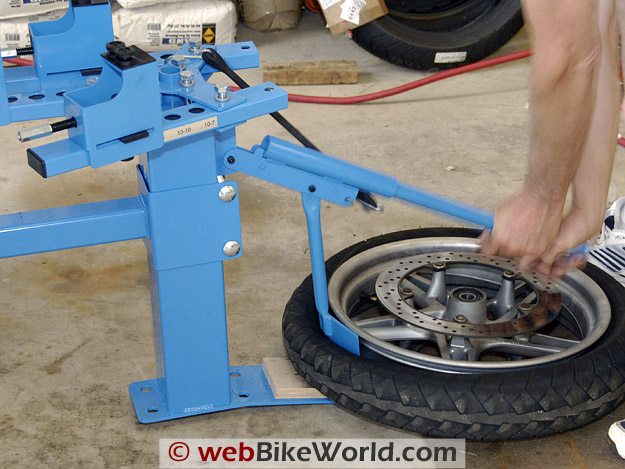
After the bead is broken, it must be lubricated with the supplied spray tire lube. It’s now time to get the top bead over the rim. This is done with the 39 ½” (105mm) length plastic tipped mounting/dismounting bar.
The single tip end is inserted between the rim and the top bead until the tip catches the underside of the tire bead, then turned 90 degrees to “lock the tip” and then levered up over the edge.
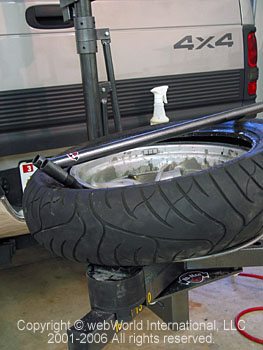
After lowering the overhead brace and aligning the centering bar it’s just a matter of using the center bar as your fulcrum.You then pull the mount bar around the rim thus rolling the bead over the edge of the wheel. This process is repeated for the bottom bead (see photo below).
After cleaning the rim of any build-up inside the rim or along the sealing area (this is also a great time to give the rim a coat of wax) and installing a new valve stem (don’t forget those!) I was ready to tackle the installation of my new tires.
Why a new valve stem? After experiencing a complete loss of tire pressure (luckily while the bike was stationary) due to a split valve stem, I replace them on a regular basis and keep one on the bike incase of emergency.
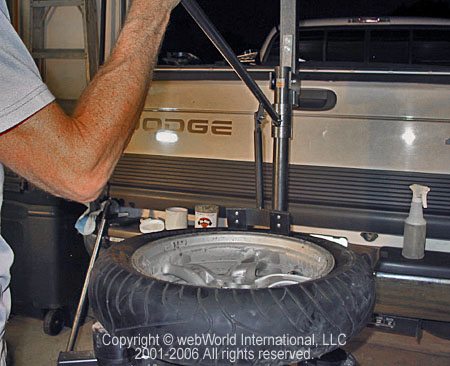
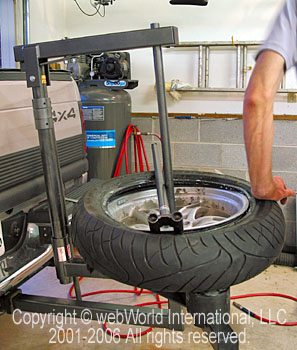
After lubing the tire bead and rim edges with the supplied paste lubricant the first/bottom bead can be forced over the edge of the rim by hand, simply by rotating the tire while pressing down on the tire at the same time.
This could require more or less effort depending on the size and stiffness of the tire. The final step is getting the other bead over the rim edge.
This was fairly easy on the front tire using the opposite end of the mounting/dismounting bar in a similar method to removal except for tip placement.
With the rear tire being reinforced because of the high weight of the LT (nearly 900 pounds), it was necessary to spoon the top bead on using their “No-Mar Spoons” in the same procedure they show for mounting a GoldWing rear tire.
This took more effort, but like anything, practice makes perfect and from personal experience, changing tires is in the technique. The size and length of the spoons provided great leverage during this step with nary a mark on the rim.
Of course you’re going to need compressed air to inflate and “seat” the beads on the rims which is often both very loud and sudden (Hearing and eye protection are advised during this step).
Cost – Savings Equation
The No-Mar “Ultimate Package II With Large Coneset and SpoonBars” motorcycle tire changer shown here costs $895.00 + $80.00 shipping.
We exchanged the wheel balancer ($99.00 list), which we didn’t need, for the hitch mount ($89.00 list) and saved $10.00. The shipping cost was $79.68 for a total of $964.68.
This means that the No-Mar motorcycle tire changer will pay for itself in 16 tire changes (front and rear).
While that may seem like a lot, Chris has 135,000 miles on his BMW K1200LT. If the average set of tires last, say, 8,000 miles, that’s 16 changes right there during the life of the bike.
And Chris has two other bikes, I have 3…so the savings adds up pretty quickly. Not to mention that the convenience factor — we can change tires when we want to and when we need to with no waiting, and we know the job is done right.
And since the nearest motorcycle shop is about 15 miles away, add some savings from driving back and forth; four trips, to go there, leave the tire and rim, then go back and pick it up in a couple of days.
No-Mar says that many groups, clubs or friends have split the cost of the changer, which can reduce the payback period dramatically.
If the cost was split four ways, for example, each joint owner could theoretically pay back the investment after 4 front/rear changes.
Conclusion
Overall I am very pleased with the No-Mar Classic tire changer. The components are made of heavy gauge steel and are nicely finished.
The vital parts that do come in contact with the rim are all plastic and, when used properly, make it nearly impossible to mar the rims.
Despite never having used a manual changer, removing and reinstalling the old rear tire several times for practice, I found no new marks to either rim.
As I said, it does take practice and technique, but nothing the average rider shouldn’t be able to accomplish. Also, the times I called No-Mar with questions they were both friendly and very helpful.
This might be one of those tools you could go in on with some riding buddies to help spread out the cost.
| wBW Review: No-Mar Motorcycle Tire Changer | |
|---|---|
| Manufacturer: No-Mar Enterprises, LLC | List Price (2006): $500.00-$895.00 |
| Colors: Gray | Made In: U.S.A. |
| Review Date: August 2006 | |
Owner Comments and Feedback
See details on submitting comments.
From “B.W.” (October 2012): “This tire changer can work. But with my bike, the hard sidewall is a big issue. On my Gold Wing, the Dunlop Elite III is a very stiff tire and almost too tough to handle, so I still end up taking the tire to the shop.
On my Harley the same problem; it’s first trying to get the grips right to hold the tire and with the tire on the rim you have to push and stand on the tire to get the grippers to be able to get into position.
For the money and effort a more expensive piece of equipment would have been better for me. It is a hard job to use this changer.”