
Solution for buffeting on a BMW K75 or K100 motorcycle with the original equipment windscreen.
See Also:
▪ BMW Windscreen Spacer Installation Instructions
▪ BMW K75 “S” Windscreen Adjustment
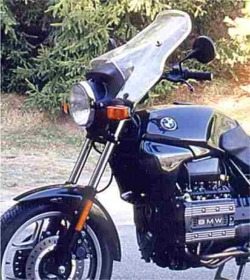
Do you own a BMW K100 or K75 motorcycle with the standard windscreen (BMW part number 46 63 2 303 245)?
Then you know about the incredible amount of buffeting and noise that you get from the air pouring off that screen and right onto your helmet.
I tried every solution I could think of, including replacement windscreens from other vendors, but nothing seemed to work.
I kept thinking that if only the windscreen was about 2″ higher and pushed a bit forward, it would be perfect.
I was seriously ready to trade in my BMW on something else, when I came across the idea of making a set of spacers that would screw onto the existing upper support brackets and would push the windscreen forward and up.
I spent a lot of time and money on figuring out the ideal solution, and it works!
NOTE: If you are over about 6′ tall, these may not work for you!
One user is 6’4″ and moving the windscreen forward made the buffeting worse for him. I am 5’10” tall; I estimate that the spacers moved the buffeting from around my ears to the top of my helmet, about 2″.
So if you are taller than about 6′, you may still have buffeting problems, and I’m afraid there is probably no cure if you are a K75 or K100 standard owner. 8-(
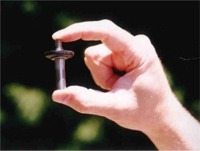
These spacers are CNC precision machined from 304 stainless steel to my specifications. It is a very simple, 5-minute job to unscrew the nuts on your upper windscreen attachments and screw in these spacers.
The Results
Measured from the top front edge of the gas tank filler cap, these spacers move the top of the windscreen from 18-1/4″ high to 20″ high.
They push out the windscreen from 14-1/2″ from the outer edge of my helmet visor to 18-1/4″.
On my bike, it completely removes the buffeting and gives me a nice pocket of still air to ride in. I can even ride with my helmet visor fully open with very little noise!
I’m 5’10” tall, and I can very easily see over the top of the screen. This has completely changed my opinion of the bike from “ready to trade” to “this is a great bike”!
I’m not claiming that this fix has completely eliminated buffeting and noise. But I estimate that 80-85% of the buffeting has been eliminated. I honestly hated the original windscreen — I had to do something or sell the bike.
I always wear Moldex PuraFit 6800 earplugs, inserted properly, but the noise in the original configuration was punishing.
I really like the way the bike works now — I can hear sweet engine noises I never knew where there. Now I know why they call it a whiner!
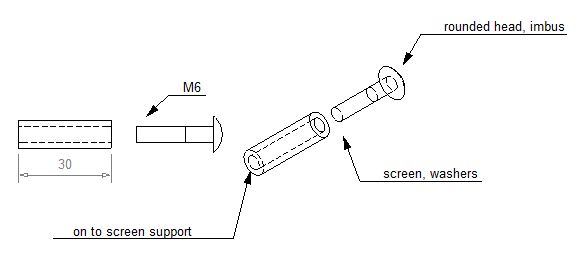
 Here’s a copy of the drawing. If you’d like to get them made for yourself; it should cost between $35 and $50 to have them made at your local machine shop. More in the comments section below.
More Information:
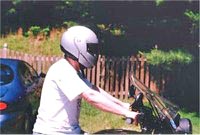
- Here are before/after photos of the windscreen with me on the bike.
- More tips below from webBikeWorld visitors on how to fix BMW windscreen buffeting.
- See Also: BMW Windscreen Spacer Installation Instructions
See Also: BMW Windscreen Spacer Installation Instructions
Do these spacers work? Here’s some unsolicited feedback:
“Rick, you should market, box and sell your spacers. I used them today and I must tell you, as you already know, they are amazing.
It was incredible to actually ride and not suffer from so much buffeting and wind noise.
I love being able to hear my engine, exhaust tunes and most of my surroundings. I really enjoyed my ride in and out of work today. It was truly amazing….”
“After reviewing your article I installed windscreen spacers and I gotta agree they work great!…(In our state) we can ride without helmets. So I can really tell the sound reduction…
AND as a benefit the bugs are airlifted right over my head (usually!).”
“Found your great advice on the web. I’d put over 140,000 miles on my ’84 K100, and added the fairing last year but I was so disappointed that I took it off. Took your drawing to a local machine shop.
Estimate was $50 for all the metric work, but if I changed the top threads to standard he dropped it to $30. Money well spent, I’d say. Put them on, and I’m loving my fairing now. What a magnificent difference.
Thank you so much for the drawings. I’d have never been able to do this without them. This is what the web was made for.”
[NOTE: This visitor adapted the design (see “more tips“)]:“Not quite as nice as the machined SS design you have on the website. Nor quite as long, but it works.
My wife, who is 5′ 6″, immediately saw a difference in wind buffeting and has since ridden out to Vegas and back to Philadelphia with her K75. Another happy camper. Thanks for the great idea on the adapter though!!!!”
“Thank You Rick, The spacers are working awesome on my K75, you’re an ear saver, it’s just as quiet now without my ear plugs in, can’t imagine how quiet it will be with them in now that I don’t have the wind buffeting in my helmet. I was charged 40 bucks, and met a great machinist.”
I just came back from my first test ride. You were absolutely right: it works! It doesn’t remove the buffeting totally but it helps a lot.
Before I have the spacers cut (they asking me $60 CAD around here) I made a test with couplings and bolts — metric hardware is easy to find in Canada.
Cost me two bucks! Because I am a 6 foot tall rider, I had a little doubt it would work, but it does! It is not as quiet as being behind a real big fairing but it will save my ears… Thank you again.
By Monday I will be at the machine shop to order. That gave me the opportunity to meet a great bike-fanatic guy ! So long and ride safely. Long live the K75!
Owner Comments and Feedback
See details on submitting comments.
From “W.T.” (October 2011): “I live in Michigan and bought a K100 about a month ago. After a short ride on a cool day (55 degrees F.) I was ready to put it away for the year.
A cool breeze on a hot day is one thing, but the cold wind hitting my chest and the noise rattling my helmet were a little much to take.
After finding this on line I figured “what the heck?”. I’m 6’1″ and have a long torso and it still works great.
Spent $30 at a tool shop to have them machined in Bad Axe, Michigan. Best $30 I’ve spent on a bike. I’ll be riding to work today. 🙂 Thanks for a great idea.”
From “R.H.” (6/10): “A very cheap solution for a more upright position of the OEM screen is using a round connector nut, M6 of 30 mm long.
Use two bolts (SS imbus) from the outside of the screen, and use all the original washers. Costs: 2 euro.”
From “P.T.”: “”After reviewing your article I installed windscreen spacers and I gotta agree they work great! But not having the machine shop handy, I made a quick and easy version that suffers a little on looks be is functionally the same.
All you need to do is cut a 30mm section of 3/8″ alum round stock and through tap it to M6 x 1.0.
Then replace the stock nuts with a simple hex or Allen head 6M x 1.0. A quick coat of black paint and install.
Since the standard Sears 6 mm x 1.0 tap isn’t long enough I had to tap both ends into the center instead of the simpler through tap but it worked fine. The only tools you need are a drill, tap and a bench vise.
I did find that the 30 mm could be pushed a little.
You need to replace the lower mounts with an insert made of 3/8″ rubber gas line tubing (the fat kind is better) cut the tubing twice as wide as the windscreen itself and sandwich it between two flat washers; tighten them last.
The washers compress the rubber and it expands to provide a flexible mount that allows a little more play. But I didn’t need more than the 30mm.
It worked great for me.. (In our state) we can ride without helmets. So I can really tell the sound reduction… AND as a benefit the bugs are airlifted right over my head (usually!).”
From Jeff Munn: “Found your great advice on the web. I’d put over 140,000 miles on my ’84 K100, and added the fairing last year but I was so disappointed that I took it off.
Took your drawing to a local machine shop. Estimate was $50 for all the metric work, but if I changed the top threads to standard he dropped it to $30. Money well spent, I’d say.
Put them on, and I’m loving my fairing now. What a magnificent difference.
Thank you so much for the drawings. I’d have never been able to do this without them. This is what the web was made for.
Jeff then purchased some black plastic “acorn” nuts in standard thread to attach the bolts to the outside of the windscreen.
Editor’s Note: Jeff’s got a neat website also: If you are interested in European touring or collecting toy BMW motorcycles, visit Jeff’s website!
From “E.H.”: “My wife bought and had me install a BMW windscreen. But she hated the buffeting. So I saw your adapter suggestion and wanted to try them out.
I attempted to get a local machine shop to make these adapters and they wanted $112 each!!
Buy two 1/4-20 steel coupling nuts (Good luck finding these in SS) about 1-1/8″ long. But they have the wrong thread to match the BMW mounts.
Then buy a 6 mm tap and re-thread one end to 6mm. Yes, sloppy I know, but there is little tensile load here as the wind tends to push the shield into the coupling nut. Add some Loctite 242 for comfort.
Then buy two SS 1/4-20 x 1.25 Long screws, Pan Head (Phillips head is what I found) along with a couple of SS Washers and replace the goofy BMW black plastic cap nut with the new 1/4-20 SS screws and some washers.
Reuse all the rubber stuff. Cover the coupling nut with black 3M 33 tape (or 88 if you prefer).
Black heat shrink would be a more permanent covering. Both for looks and protection from weathering. Or paint if you like. (I was in a hurry).
If you already have the 6 mm tap, then you spend about $2.50 in hardware. Can even afford some extras in case you screw up (pun intended).
Not quite as nice as the machined SS design you have on the website. Nor quite as long, but it works.
My wife, who is 5′ 6″, immediately saw a difference in wind buffeting and has since ridden out to Vegas and back to Philadelphia with her K75.
Another happy camper. Thanks for the great idea on the adapter though!!!!
Just an alternative for the cheapskates amongst us. (like me)”