


Introduction
No matter if we ride alone or ride together, one of the best, and most popular accessories used by motorcyclists as well as those participating in other powered and non-powered outdoor activities is a video camera or cameras.
And no matter where the camera or cameras are mounted – on the rider, motorcycle or detached/deployable for the airborne view, these devices can provide a virtual 24/7 and depending on the equipment and configuration, a 360-degree view of what is happening, all captured in real time for storage or streaming.
Some motorcyclists utilize a single or dual channel (or other multi-channel configurations) for singular use as a road user/traffic safety tool, enabling the rider to have stored video evidence in the event of an incident or accident; whereas others utilize these systems for concurrent applications – traffic monitoring, travelogue use, etc., for even more return on the investment.
Many motorcyclists utilize multiple devices to capture multiple or all views possible and one only needs to look at some of the amazing riding and long-term travel related videos posted by users to understand the capabilities and possibilities provided by video capture products.
Two more multi-channel camera systems are sitting here in the review queue and at least two more expected – one is a product update and one is a new offering; all good in helping keep one occupied over the cooler months of the year (no mention of the ‘w…..’ word here) that often results in less riding time…
And all of them will need to be installed on the machines residing in the home fleet garage, activities that are all part of the approach to minimize the cabin-fever aspect of life; which virtually all of us are experiencing to various degrees in our COVID-19 world; hang in there.
But while waiting for some pre-release camera products to arrive for early testing, a new(er) product offering, from VIOFO, the MT1 Motorcycle Dash Camera was offered up as a review opportunity and gratefully accepted.
Founded in 2011, VIOFO identifies itself as one of the top manufacturers of dashcam systems featuring quality high resolution systems with unique designs and premium functionality.
Since its founding, VIOFO has continued to evolve its products in response to consumer demands using technology-based innovations, including video enhancements from full HD to Quad-HD and now 4K UHD, with dual channel recording, GPS, WiFi and/or Bluetooth in most of their systems.
Many VIOFO systems are designed for the larger four-wheel plus platforms, although one or two others, like the F1 4K WiFi Action Camera should have good applicability for outdoor activities, powered platforms or otherwise.
An evolving product line includes six Dash Cam systems, the VIOFO P800 1080P HD Webcam and three listed Action Camera systems. The newer MT1 (Dual Channel) Motorcycle Dash Cam is listed separately and given its obvious motorcycling focus it should be a good overall powersports product as well…possibly the first in a new product category?
VIOFO products are available on-line and through a variety of resellers and representatives depending on the global market area, continent or country, with Amazon being the most common marketing entity identified.
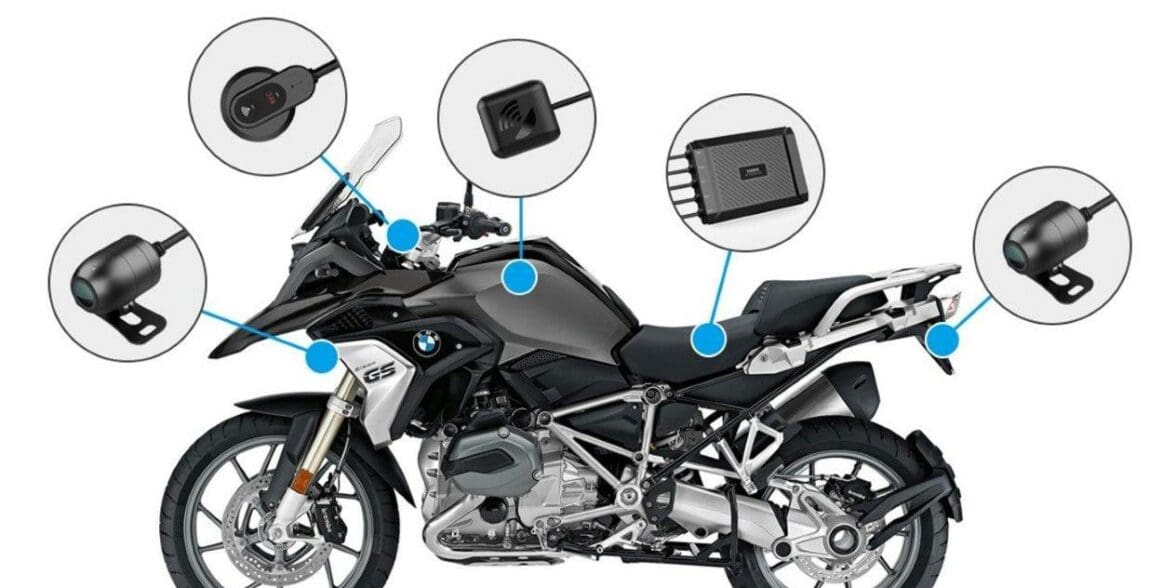
The VIOFO MT1 System
The VIOFO MT1 Motorcycle Dash Camera is a dual channel or camera recording system featuring two round lens or camera modules that record still or video at 1080p (1920×1080 pixels) or full HD resolution at 30fps, a GNSS (GPS) module, handlebar or body-mounted two-button Remote Control and 12V DC power supply harness with ignition (switched) sensing.
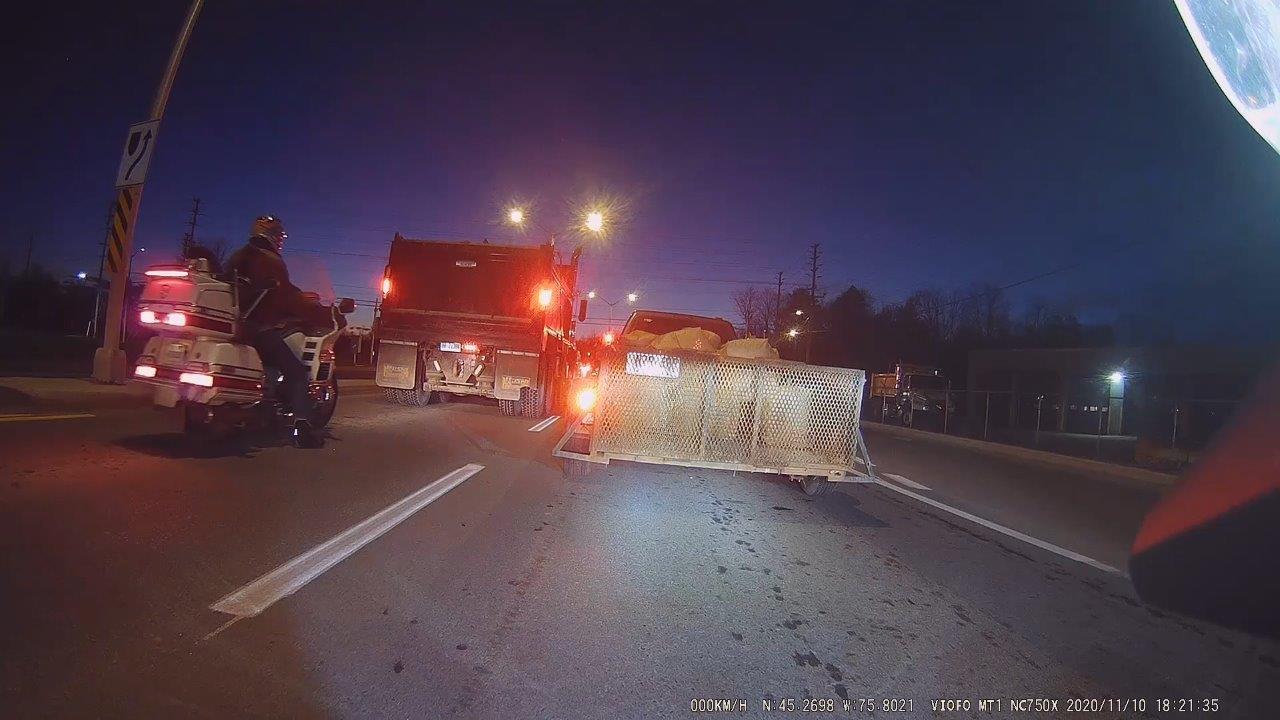
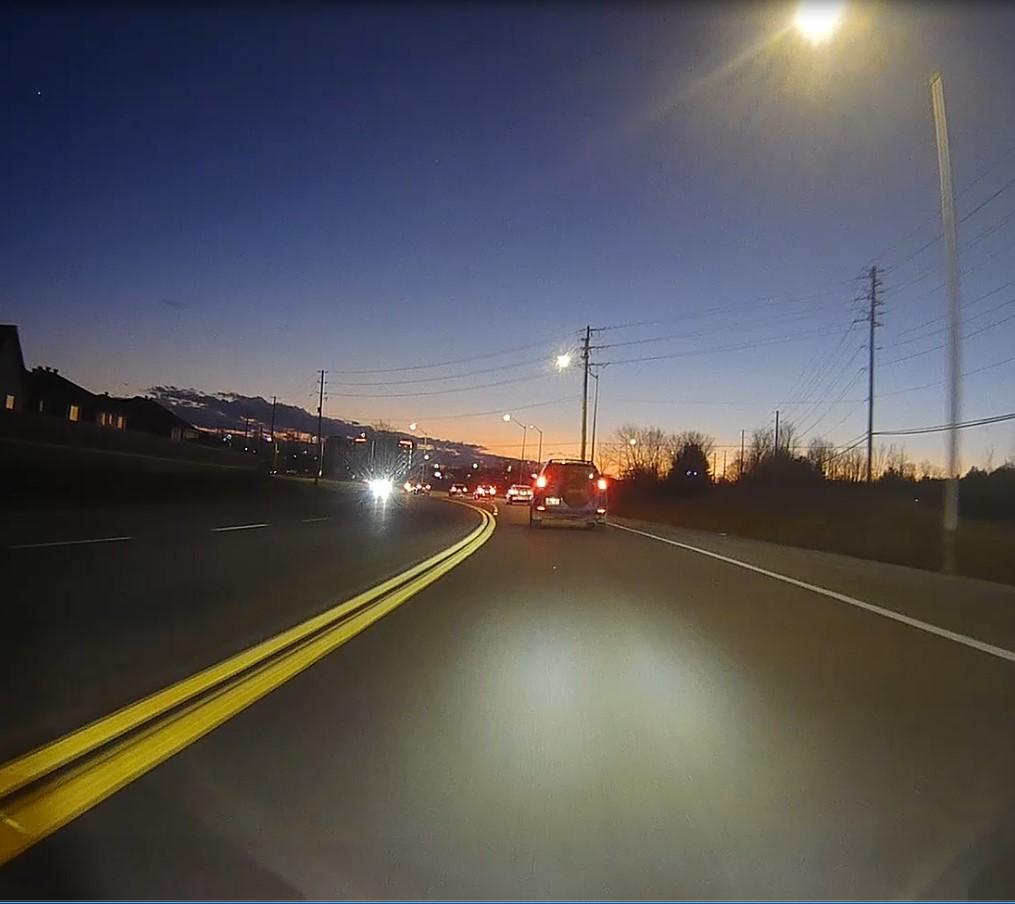
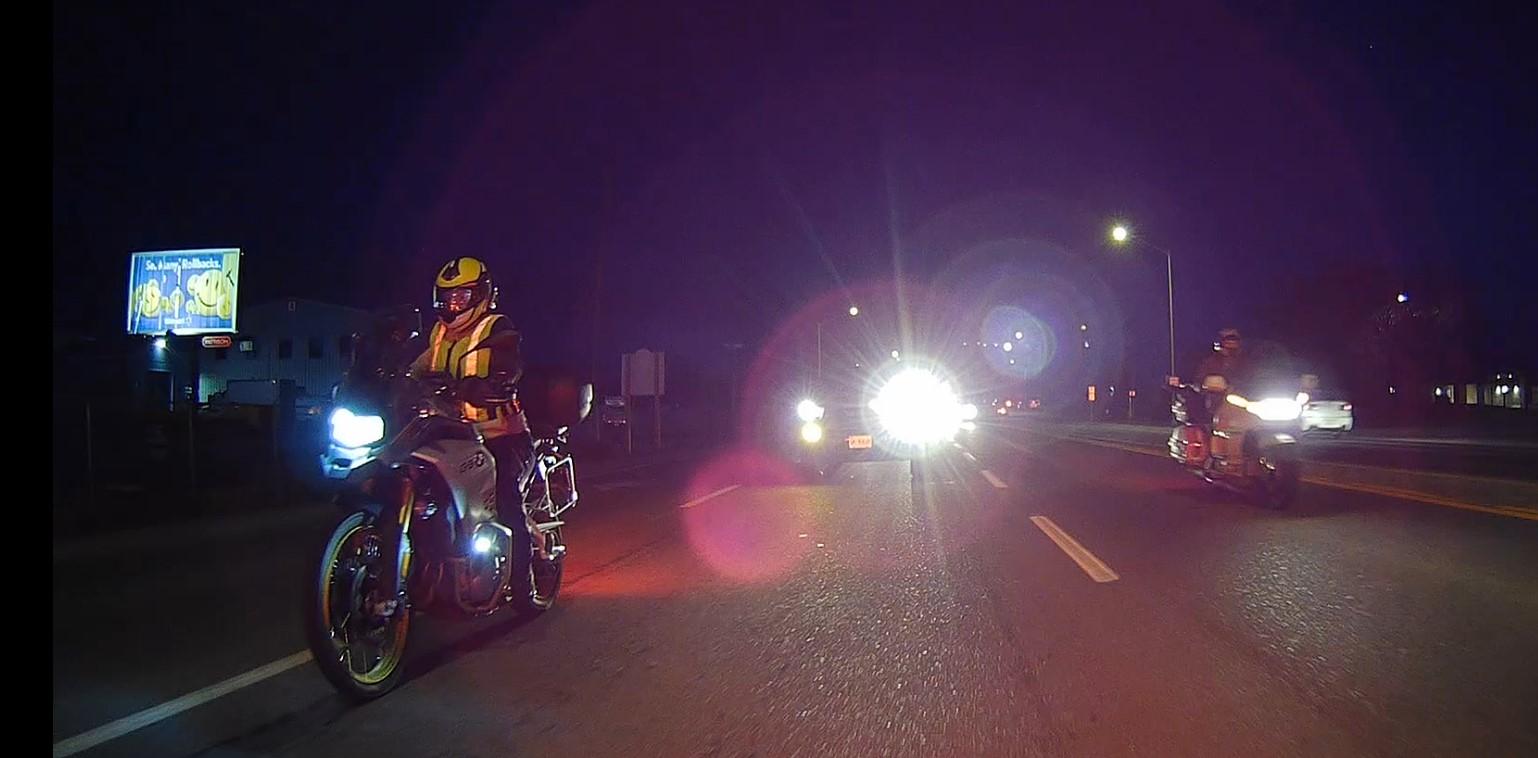
Both lens or cameras are equipped with Sony Exmor R Starvis Image Sensors that record brighter cleared images even in low light or nighttime conditions – an important feature for an always-on recording system so that neither ‘high-lights’ nor ‘low-lights’ are missed.
And the 170-degree wide angle lens view from both cameras ensures that not much is missed, no matter whether the cameras are oriented front and rear or otherwise.
With Global Positioning Support or GPS activated under the system settings using VIOFO App, the MT1 records position, speed, and timing data (synchronized with GPS time) along with the still or motion data. Navigation data can be handed off separately for other use or displayed as part of an encompassing environment playback when using software such as DashCam viewer.
The Remote Control provides the ability to control the (local) WiFi connection between the MT1 and network compatible device such as a smart phone while also allowing user or manual intervention of video recording for emergency purposes.
Small pinhole microphones, one on the DVR module and one on the Remote Control allow audio to be recorded, if the feature is enabled under the VIOFO App.
Video recording is done based on timed, loop, manual or emergency conditions, with manual or emergency activation resulting in images or video being saved off to a separate folder on the storage card; this folder is not overwritten and provides a record of any event if needed.
The VIOFO App for iOS and Android devices is the sole UI (user-interface) for the MT1 system. With the iOS or Android version app downloaded, installed, and launched and with the MT1 WiFi connection made, the user can configure and manage the system.
Once connected via the VIOFO App, the Live View screen can be used for aiming, monitoring the way ahead or behind, playing back recorded media and, looking at GPS track data.
Identified Video Recording Modes
Loop Recording – this is the default mode when the camera is activated, with the LED showing a solid Red. Loop time frames of one (default), two, three, five and 10 minutes are selectable using the VIOFO App. When space is needed on the microSD card, the oldest files are automatically overwritten, one at a time, as stored in the default cont_rec folder.
Manual Recording – a short press on the REC button (Red LED) on the remote control enters manual recording mode indicated by the LED going to a rapid Red flashing.
When this mode is activated the system saves the last and the current files (extended by an additional 20 seconds to the default loop time frame for some overlap) to the manual_rec folder. After the manual recording time-period ends and those files saved off, the MT1 automatically switches back to loop recording mode.
Emergency Recording – when the G-sensor in the DVR module detects an impact or collision within the defined (Low, Medium or High) sensitivity setting parameters the current (ongoing) recording is locked automatically to prevent being overwritten and is stored in the Event-rec folder.
Neither the manual_rec or Event_rec folders can be overwritten by loop recordings and are only removable by the user so to provide a lasting record of an event for emergency or police services, insurance, or other purposes.
MT1 Features & Specifications
The features and specifications listed below are compiled from VIOFO media and information collected during this review.
- Dual channel, front and rear cameras, 1080p, 170- degree wide angle view
- Cameras feature 2.13 MP Sony Exmor R STARVIS Sensor
- Video Resolution, Front and Rear: 1920 x 1080P 30FPS
- Video Format: MP4
- Video Compression: H.264
- Super Night Vision – STARVIS Sensor and F1.4 aperture lens
- DVR module and Remote-Control pinhole microphone pick-ups
- WiFi Support (local connection only) for MT1 and host smart phone/device
- Sensors: G-Sensor & Motion Detection Supported
- GPS Logger with date, time, speed, and location
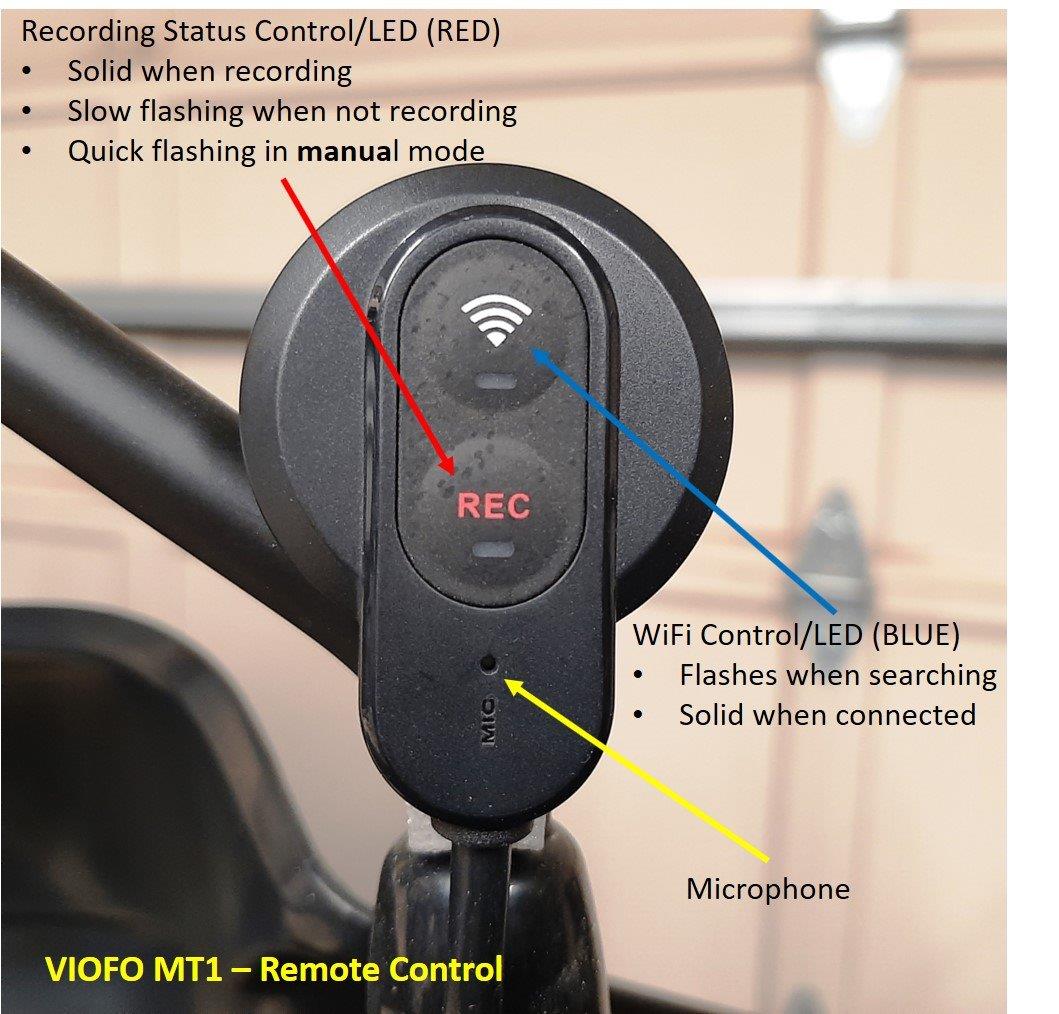
- Remote Control – WiFi connectivity (Blue LED) and Recording status/intervention (Red LED)
- Automatic start-up and shutdown of recording
- Battery Charging: super capacitor provides excellent fail-safe recording
- Built-in G-sensor for movement detection, low to high sensitivity options
- Supports micro-SD storage media up to 256GB, UHS-U1/U3+ rated recommended
- VIOFO 32GB SD card included, formatted for FAT32
- Water Resistant – IP66 (dust and water protection) rated
- Operating Temperature: -10C to 60c (14F to 140F)
- Storage Temperature: -20C to 70C (-4F to 158F)
- Input: 12VDC
- Warranty: one year
Component Cable Lengths
- Front and Rear Camera Cables: 144cm or 56.6in
- GPS Cable: 161.5cm or 63.9in
- Remote Control Cable: 152.5cm or 60in
- Power Harness: 78cm or 30.7in
DVR Module Cable Lengths
- Front/Rear (Yellow) – 63cm or 24.8in
- GPS (Black) – 42cm or 16.5in
- Remote Control (Dark Blue) – 52cm or 20.4in
- Power (Red) – 32cm or 12.5in
MT1 System Components and Description
If one is familiar with single or dual channel point-of-view (PoV) action camera systems, then the MT1 will be familiar. But if this is a first foray into mounting a system such as this on a motorcycle, or any other vehicle, then it’s good to understand the ‘what’, ‘how’, ‘why’ and ‘when’ of it all; so we’ll start first with a component run-through…
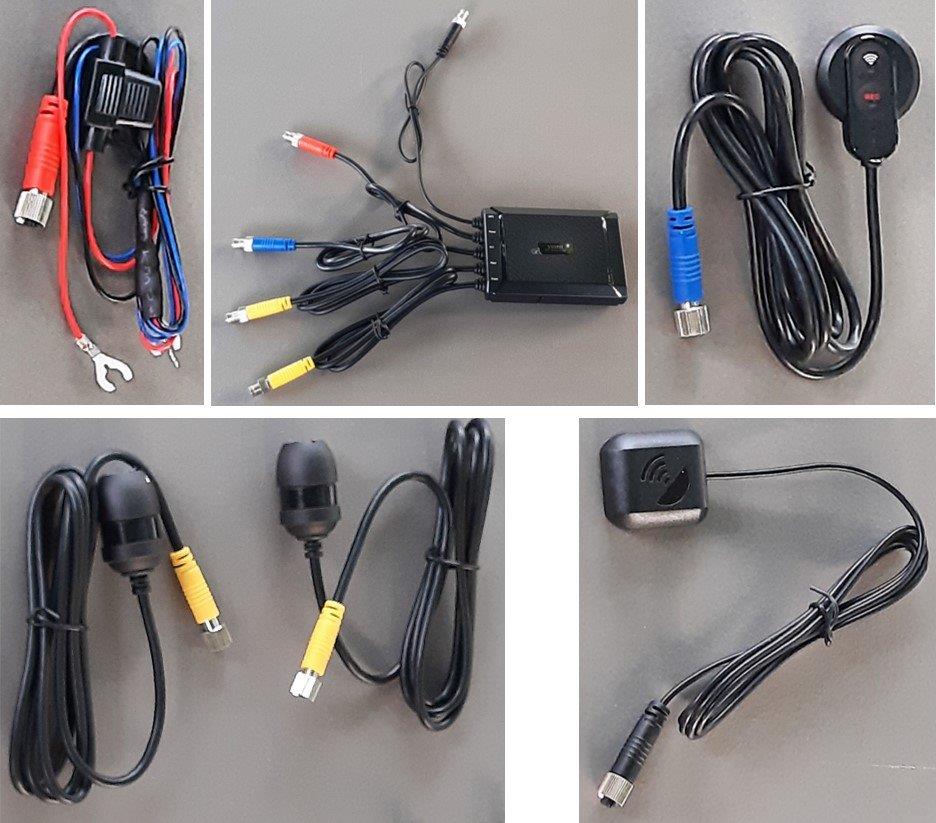
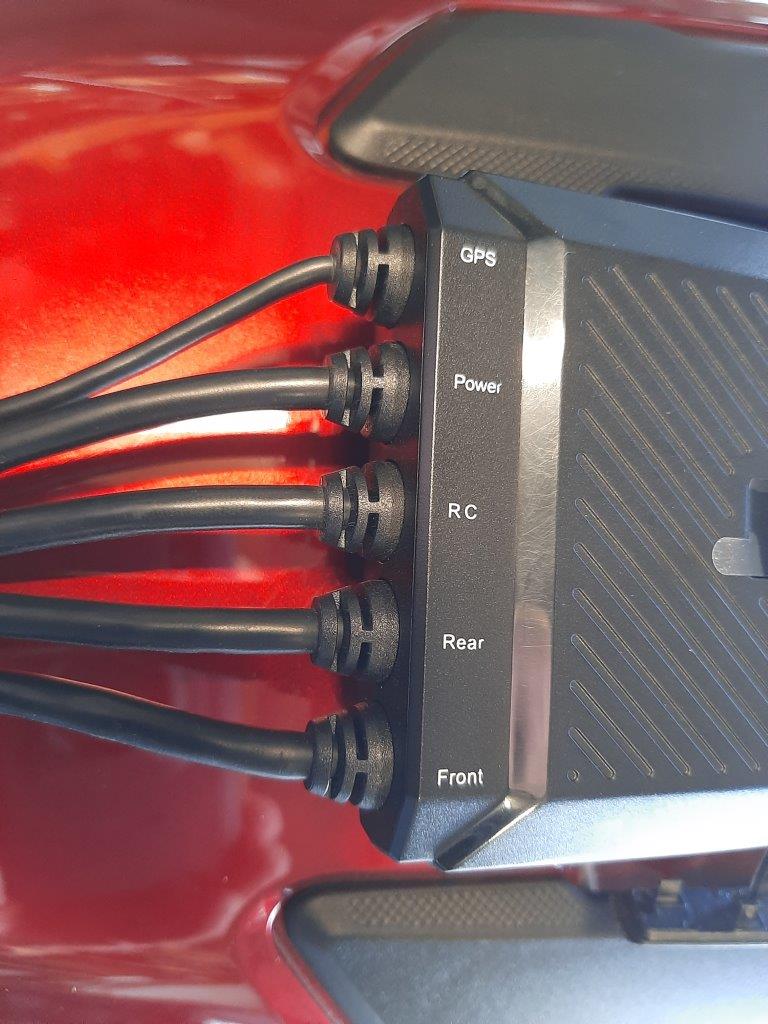
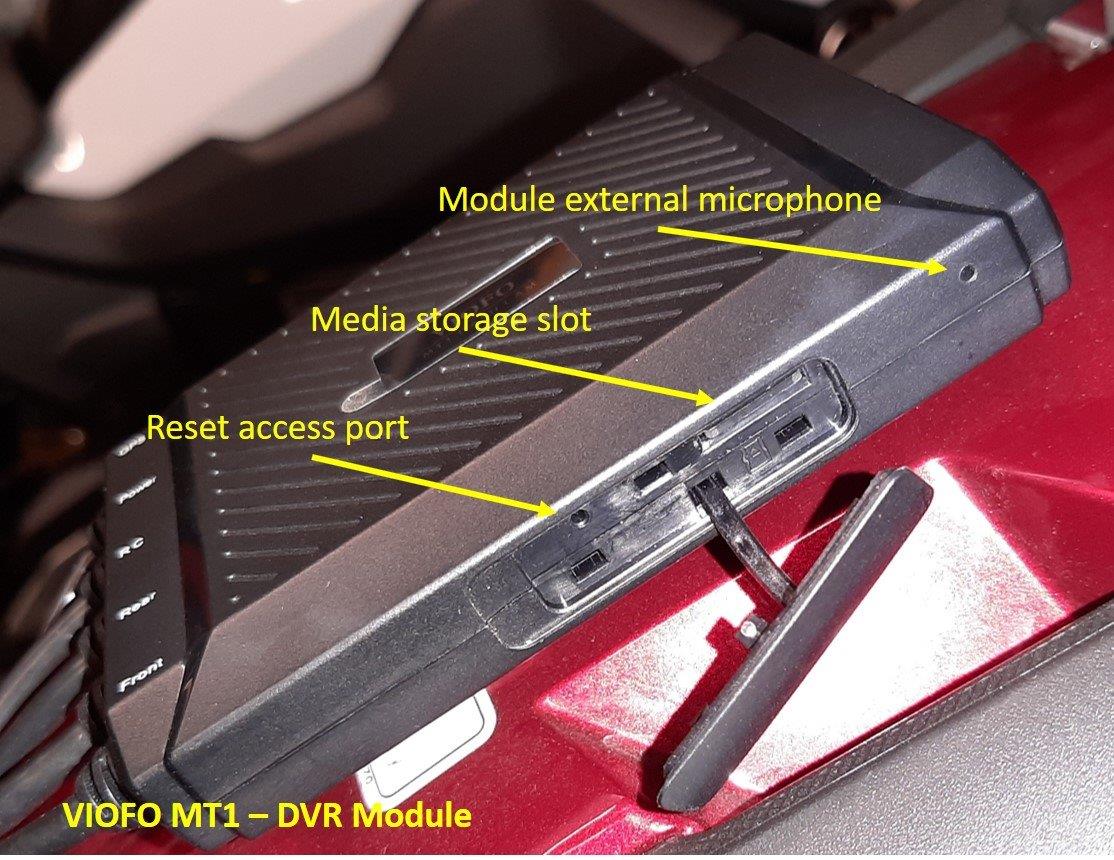
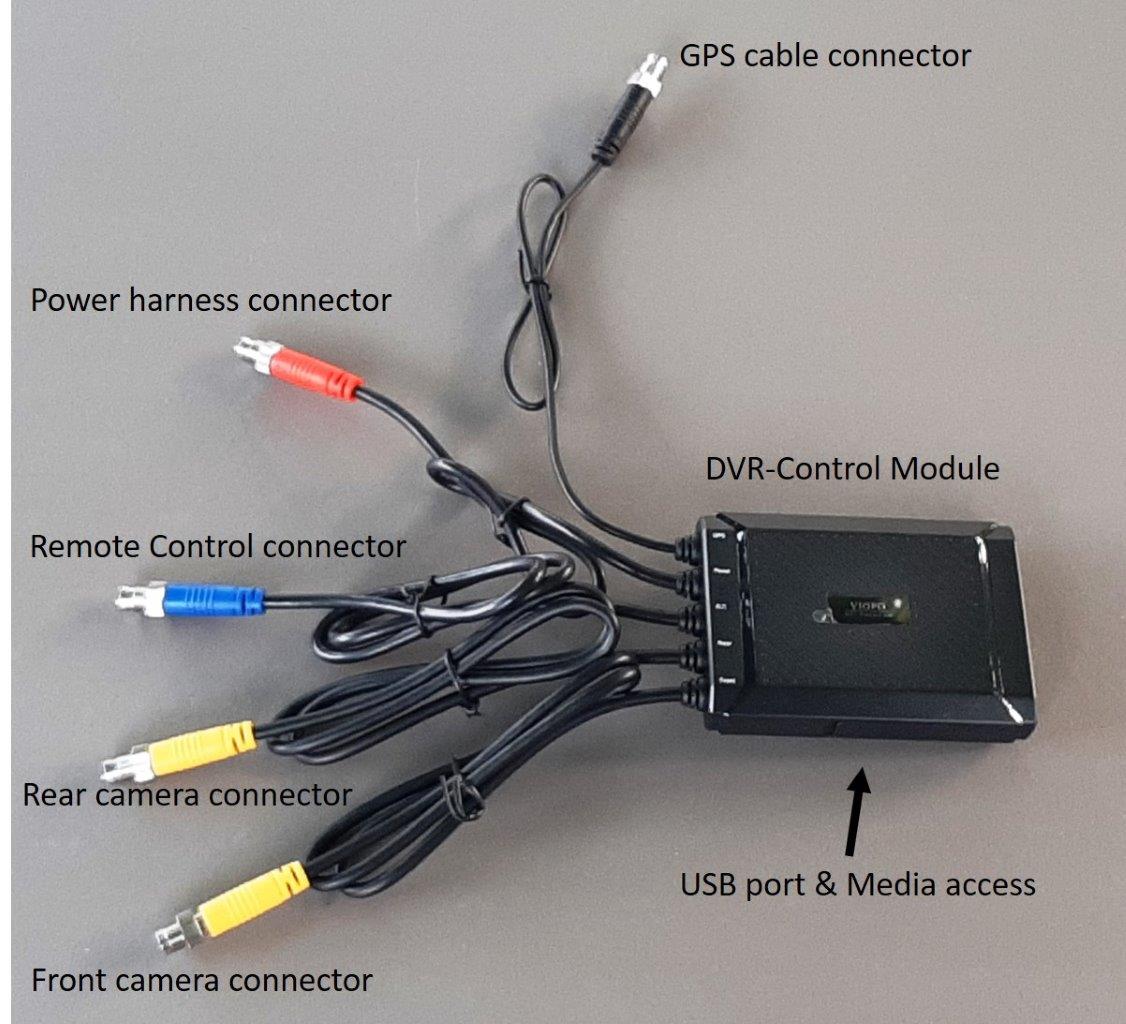
Main DVR module – measures 104 x 75 x 22mm (L x W x H/T) or 4.09 x 2.95 x 0.86in overall. With the VIOFO MT1 Dashcam logo oriented for reading, the left end houses five colour-coded connection cables with miniature screw-style waterproof connectors (bottom to top listing): Front & Rear Lens (Yellow); Remote Control (Blue); Power (Red); and GPS Module (Black).
Residing under the plastic pressure-fitted cover (tethered) on the lower side of the module is the pinhole access to the Reset switch and the SD storage media slot. A small pinhole microphone pickup resides to the right of the outer cover.
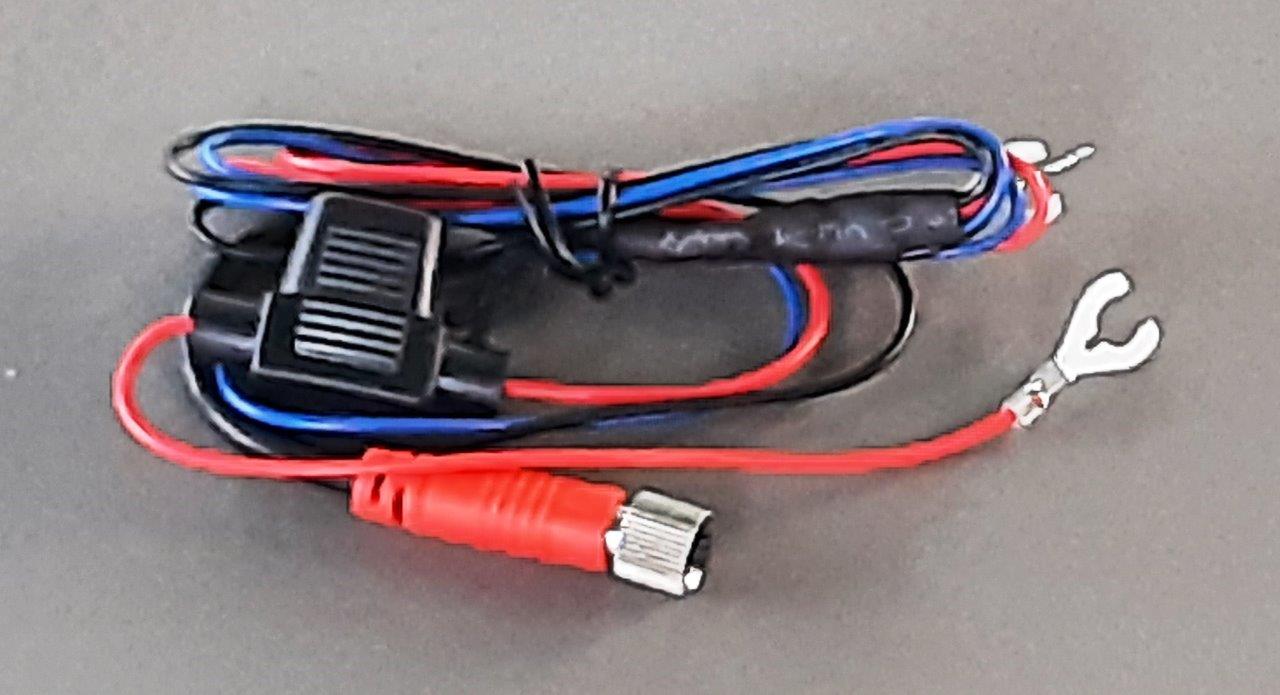
Power Supply – has a battery connection terminal set with the Positive lead featuring an in-line ATC fuse. In addition to the Red and Black battery leads, a Blue wire provides an ‘ACC’ connection to a 12V DC ignition switched source and acts as a relay so the system only draws power when the ignition/accessory circuit is turned on – this connection should be used.
With the ignition turned on, the MT1 turns on and once a system check is done loop recording starts automatically, and continues recording until such time as there is a manual intervention event or the motorcycle is turned off, which then has the MT1 doing a (delayed) shut down to make sure the active recording is saved off.
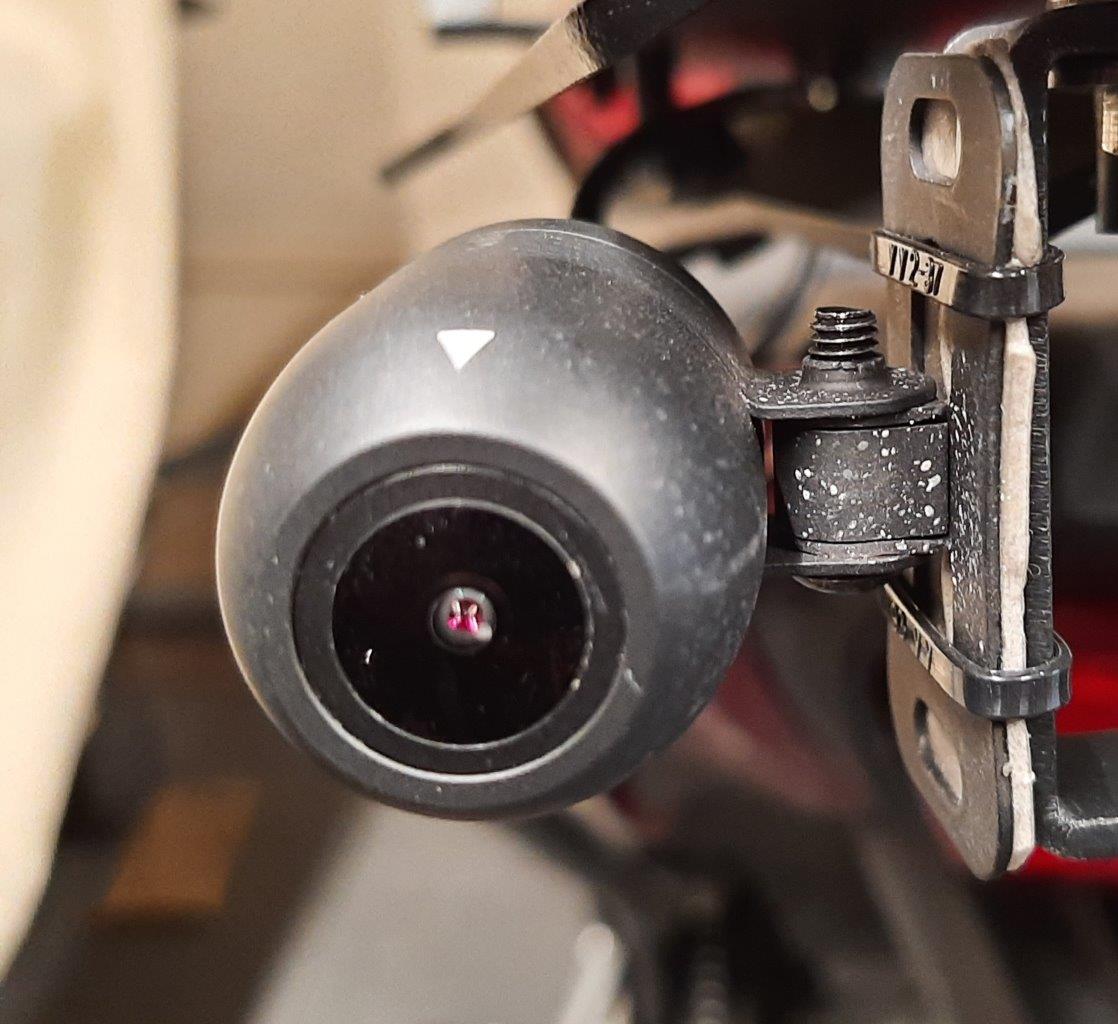
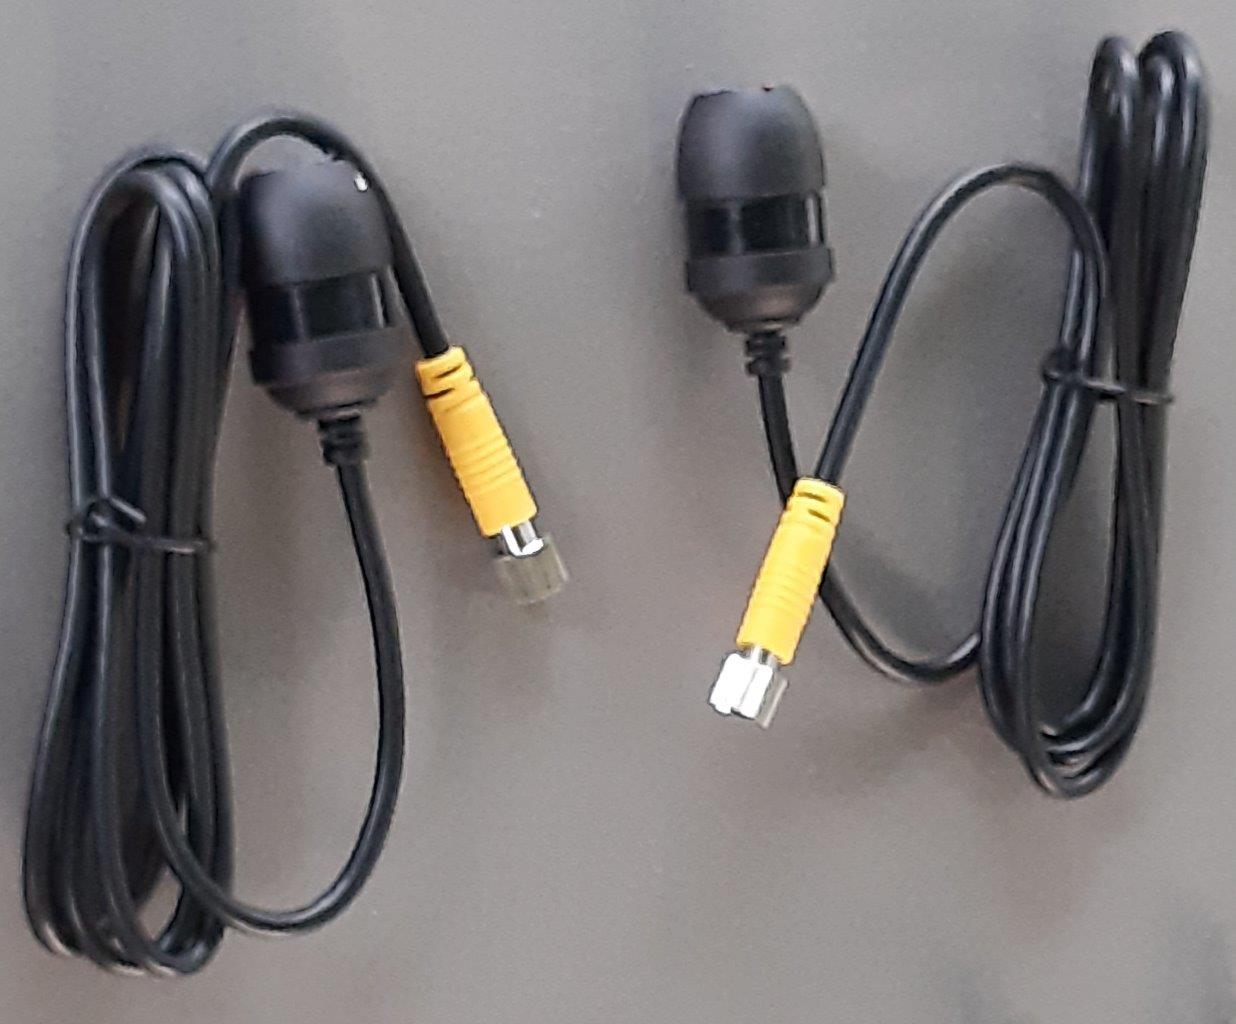
Front/Rear Lens (cameras) – sealed tubular housings, 26mm in diameter and 43mm in length have integrated sealed cables with Yellow coloured waterproof connectors.
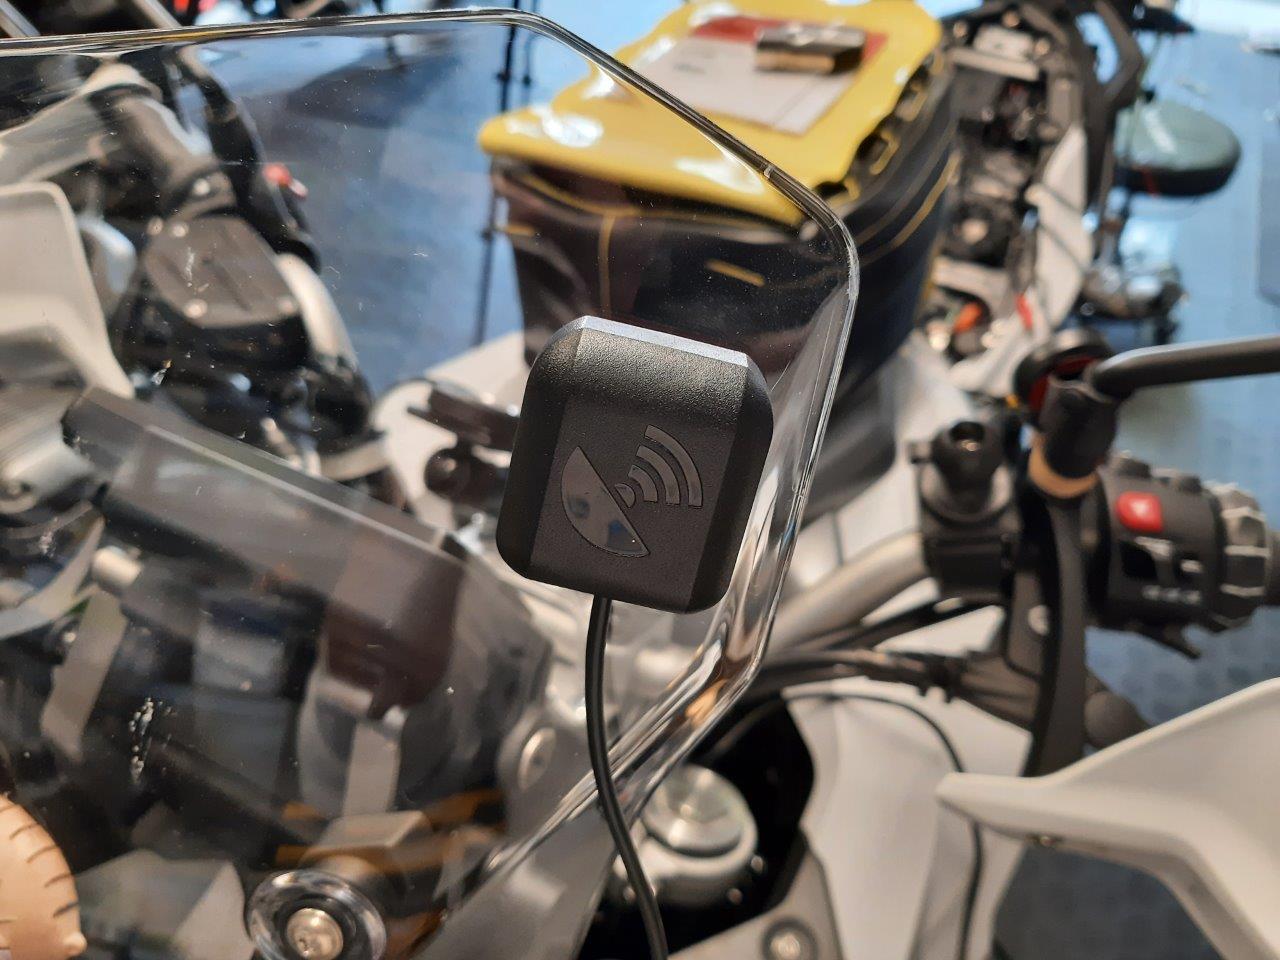
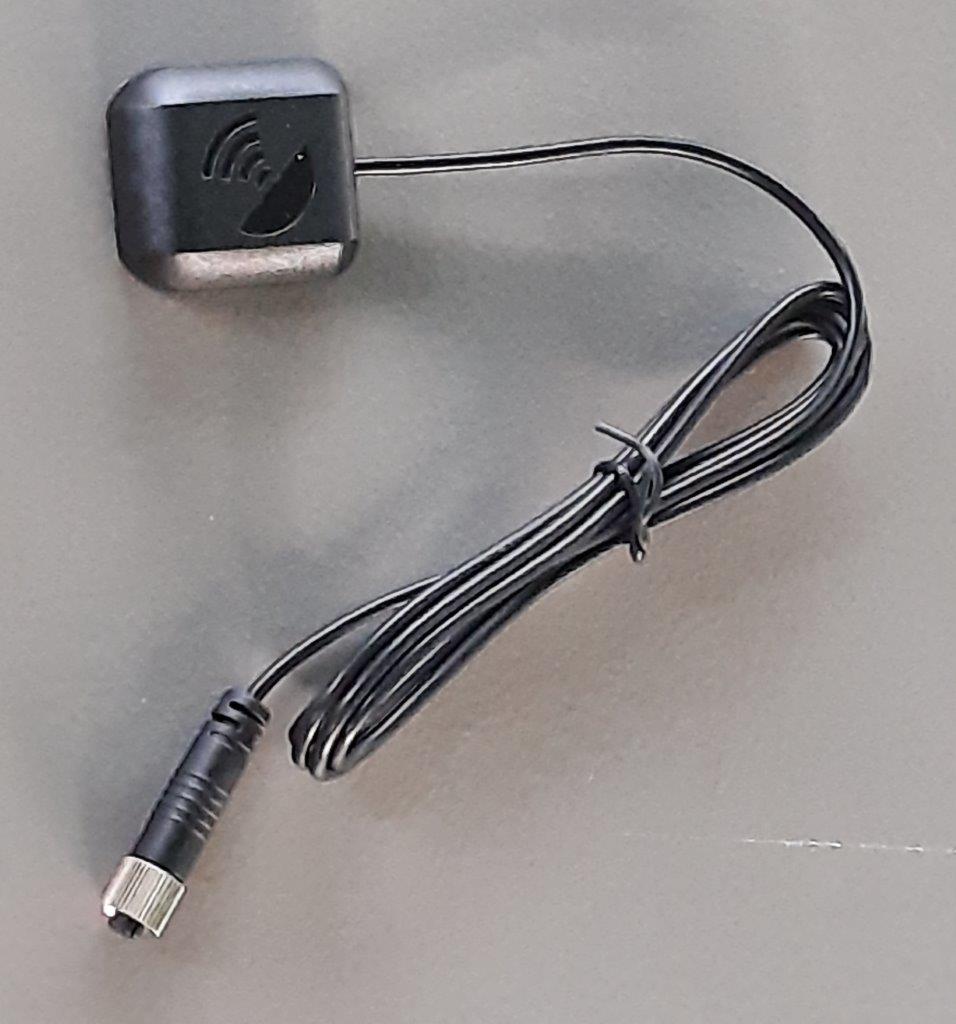
GPS module – a 40 x 37 x 14mm (1.5 x 1.45 x 0.55in) plastic housing with an adhesive backing and integrated cable with Black coloured connector. The VIOFO media identifies that GPS services are provided, so it is presumed (not assumed) that any Global Navigation Satellite System or GNSS capability is usable.
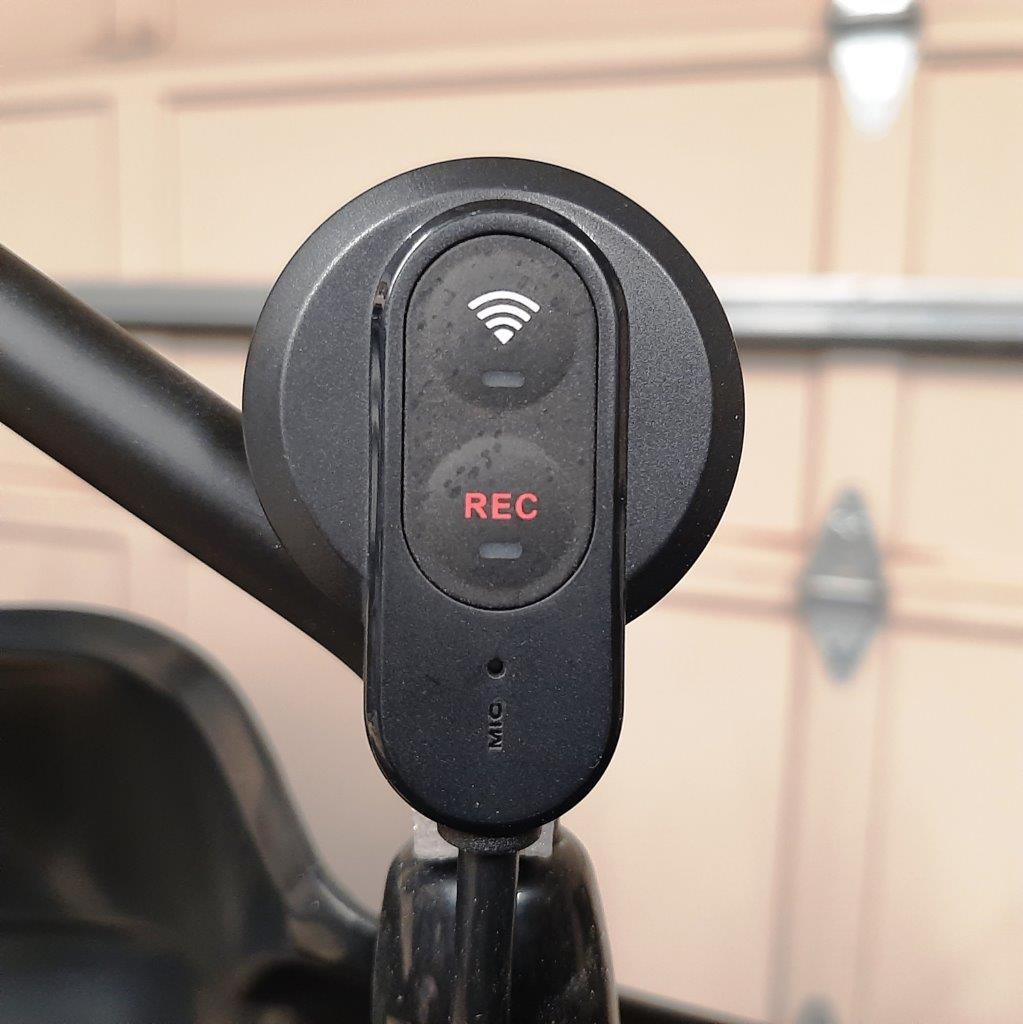
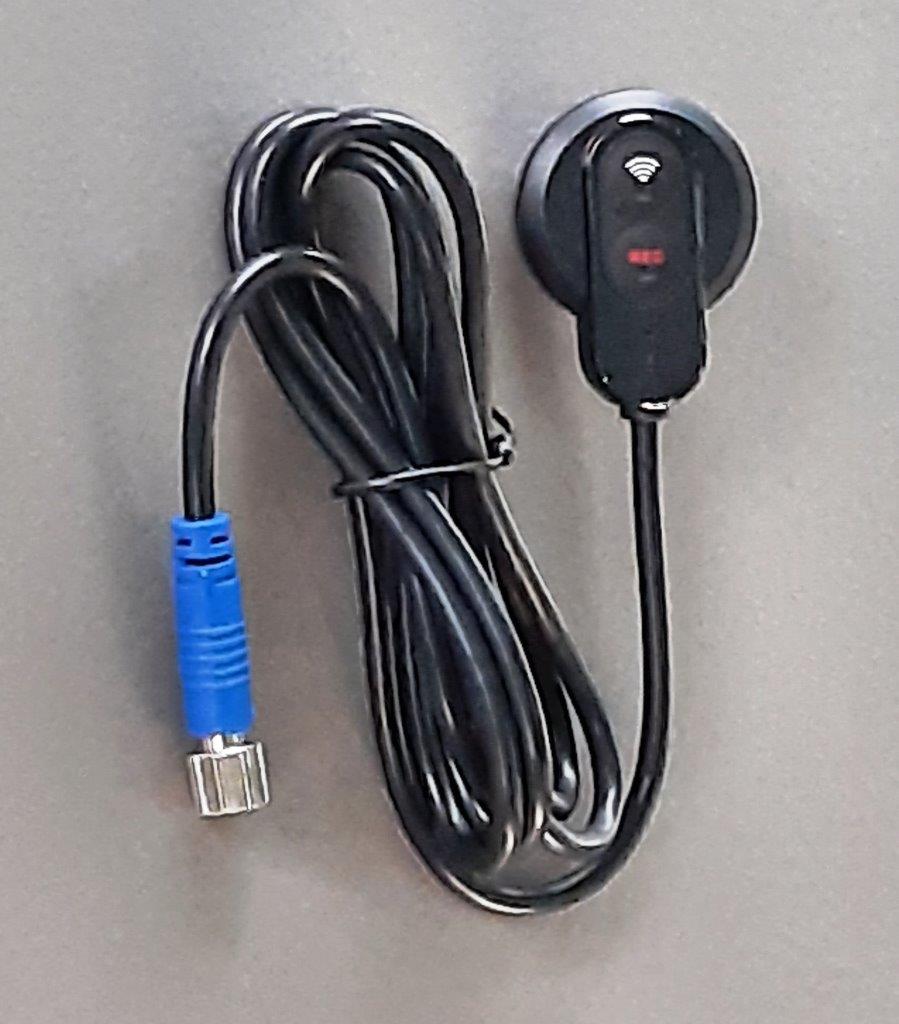
Remote control – distinctively-shaped housing with integrated cable and Blue colour coded connector. The upper control/LED (Blue) is the WiFi connection control while the lower button/LED (Red) allows the user to activate Manual Mode, useful in an emergency or situation where visual evidence is needed – the files are saved to a folder that cannot be overwritten by loop recordings.
A small opening on the lower front is another pinhole microphone. An adhesive round attached to the back provides surface mounting although for many motorcycles the module is better positioned for safe quick access and viewing mounted on or near the left handlebar nacelle or the left mirror housing.
Camera Mounts – two different mount sets are included. The first set is light metal with a compression ring for the lens, a pivot block insert, the hinged-style bracket, and a small sheet screw. The lightweight thin metal base could be shaped slightly if needed.
The second mounting set is plastic and somewhat heavier duty with a plastic compression ring used, but the ring and bracket use a slot engagement pivot mount with a single Mx screw and cap nut. Both types of brackets use 3M adhesive pads for surface mounting.
VIOFO App – provides real time video preview, download and playback of video, viewing of GPS track data, management of all settings (more features are pending)
MT1 Installation
In the Box
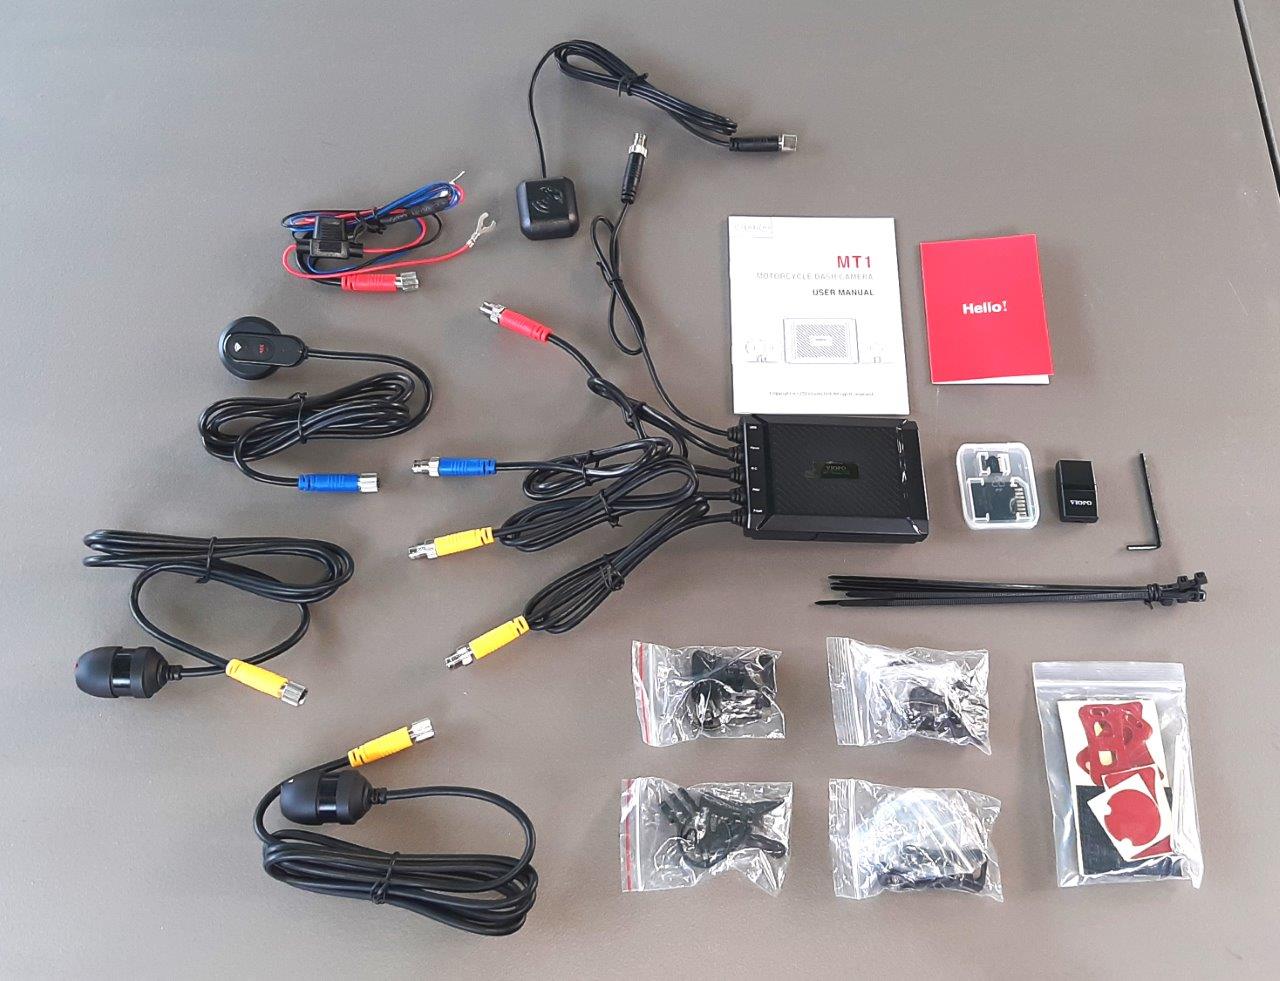
Carefully packed inside the double layer box is found the following:
- Main unit (DVR module) with five integrated leads and side port with weather cover
- Front and Rear Lens (camera) modules, 43mm length x 26mm diameter
- Remote Control with two buttons – WiFi and recording intervention
- GPS Module
- 1 Set of Metal Camera mounts – lightweight brackets with lens clamps and pivot mounts
- 1 Set of Plastic Camera mounts -heavier brackets with lens clamps and slot mounts
- Power cable harness with in-line mini fuse
- Card Reader Adapter (USB-A plug-in/SD card slot) – a small useful accessory
- VIOFO 32GB microSD Card – appreciated for initial use
- 3M VHB adhesive pads for camera mounts
- Velcro pads for module mounting
- Allen tool and six zip ties
- Pocket-sized MT1 User Manual and “Hello” brochure
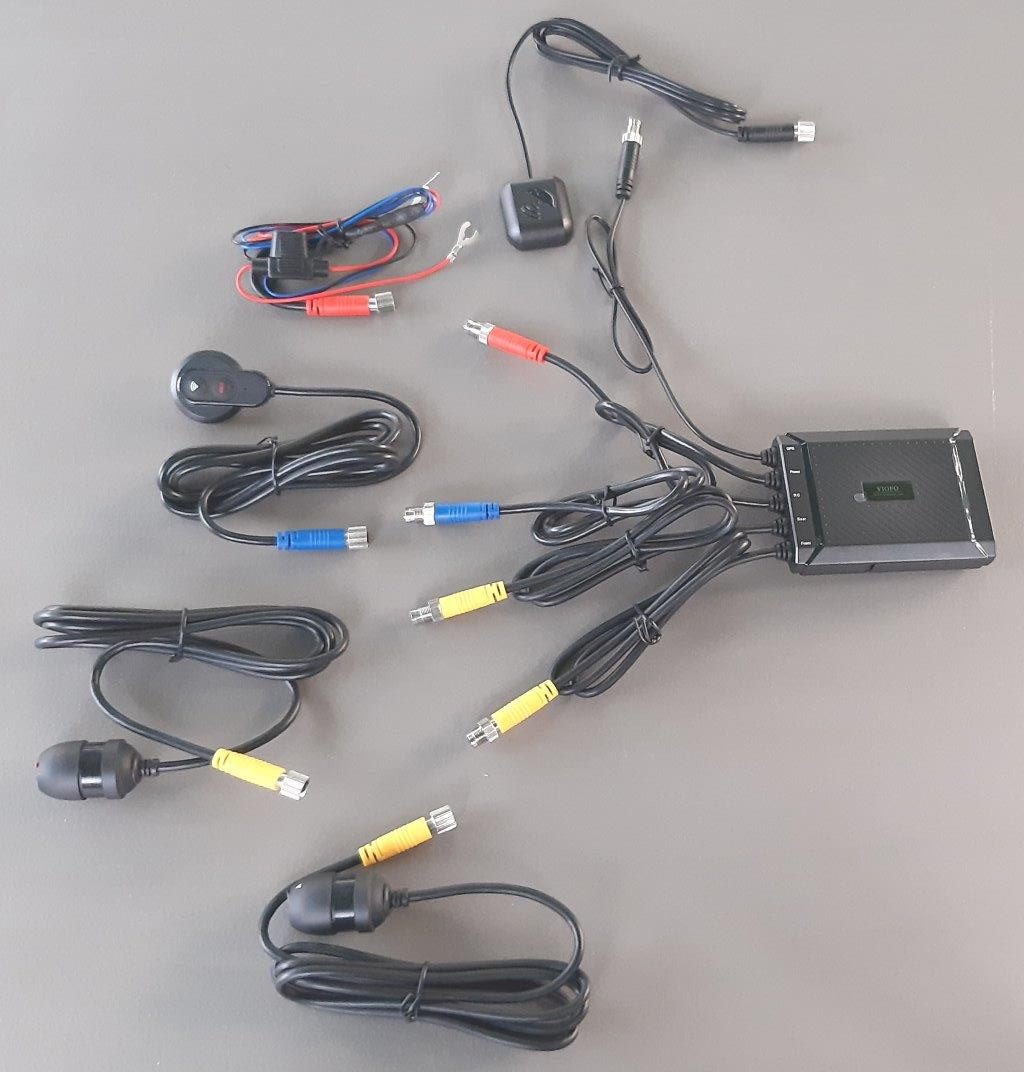
Pre-Installation Bench Layout – with all the components laid out on the workbench and the colour-coded keyed connections between the component cables and counterpart flying leads on the DVR module made and a 12V DC power supply and switched accessory source at hand, the system layout is ready for first activation – always done before installation.
With the Red & Black leads connected to the 12V DC power supply and the ACC ‘ignition’ supply on to activate the switched power sensing, the MT1 is activated, although there is no indication of anything for a few seconds until the Red and the Blue LEDs on the Remote Control (RC) start flashing, as there are no other visual or audio indicators for the system.
The first functional observation identified during this initial bench test involved the local VIFO MT1 WiFi connection – it can be cranky and is (typically) unwilling to activate, especially when other networks are within range.
Turning off any other accessible/connectable networks, like the home-based one, on the host device works better, as does being distanced from close strong WiFi networks, lets the MT1 WiFi feature identify itself on the host device and get connected. More on this later…
Short Term Host – 2020 BMW F 900 XR
Before being traded the 2020 BMW F 900 XR hosted the MT1 for initial layout scoping, connectivity testing and two short road runs, all providing valuable insight regarding how difficult some accessory installations were going to be on the tightly packed trim F 900 XR chassis, as well as validating how well the VIOFO components come together as a system.
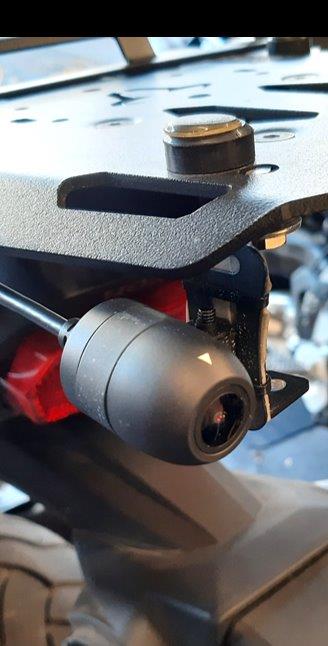
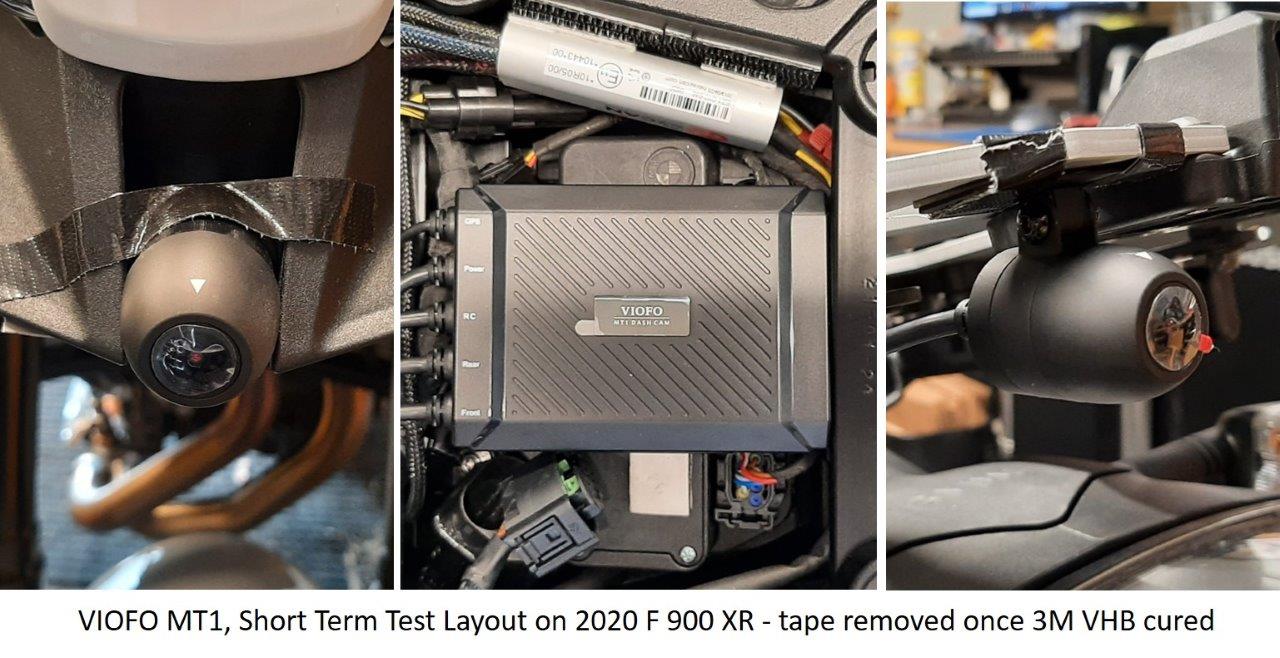
Front & Back Lens/Cameras – the nose section of the upper fairing features a cut-out for air intake/dynamics and this feature makes a good mounting point for the small round front camera, while still allowing air flow. One of the small metal brackets from the kit is used.
Small 3M VHB pieces were used to mount the upper sides of the bracket base to the underside of the OE plastic nose section. After overnight VHB curing and the temporary Gorilla tape strip removed the lens assembly proved to be very secure and would likely be a solid functional mounting point for the front camera over the longer term.
The rear lens mounting on the left underside of the SHAD TERRA aluminum rack, using the second metal bracket in a drop-mount orientation with the mount’s adhesive section used (both surfaces are slightly heated before application for faster curing). If a hardware-based solution is desired, small holes drilled through the rack and M4 or M5 hardware would work.
DVR Module – the plastic tool tray fitted in place at the back of the under-seat area on the motorcycle is easily popped out creating some much needed space for small accessory components – like the HEX ezCAN Gen II, an INNOVV ThirdEYE power supply and of course the VIOFO MT1 DVR module.
Harness Layout & Connectivity – wasn’t an issue with this short-term installation with the component cables secured temporarily along the edges of the side and upper fairing panels. The long cables facilitate routing while the mated connections are solid and waterproof. Only the size of the connectors needs appreciating depending on how they will be routed.
For a more permanent installation, removing the left and/or right main side and smaller front side pieces would let all the component leads be cleanly routed out of the way and out of sight including the module secured under the seat.
The Longer Term Host
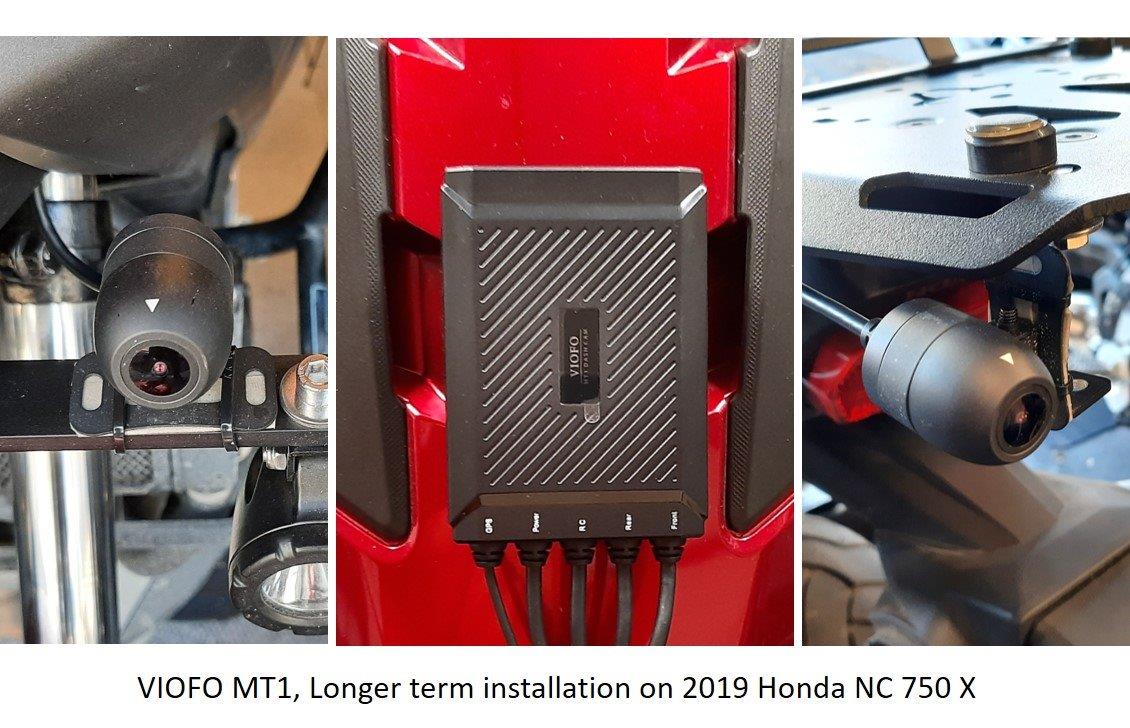
The 2019 Honda NC 750 X DCT, on loan from a friend for some pending test fitments of new SHAD TERRA Top and Side Master kits (pending wBW review) is the current longer term host for the MT1 system – at least while it is sharing garage space and being used along with an older 1975 Honda CB400F sibling and three Beemers of varying ages.
And as the DCT is likely to be residing here for the winter it is accessible for other product test mule duties as well. Besides, it’s a fun motorcycle to ride and it gets exercised regularly – DCT has a way of spoiling riders…
In having done some previous accessory installation work, removing the top left trim and upper left side panel (minimal hardware, lots of pressure-fit points) provides good access to the left side, including frame/sub-frame, for routing wiring and cables – space between the left wall of the storage compartment and outer panels provides room to place and connect accessories.
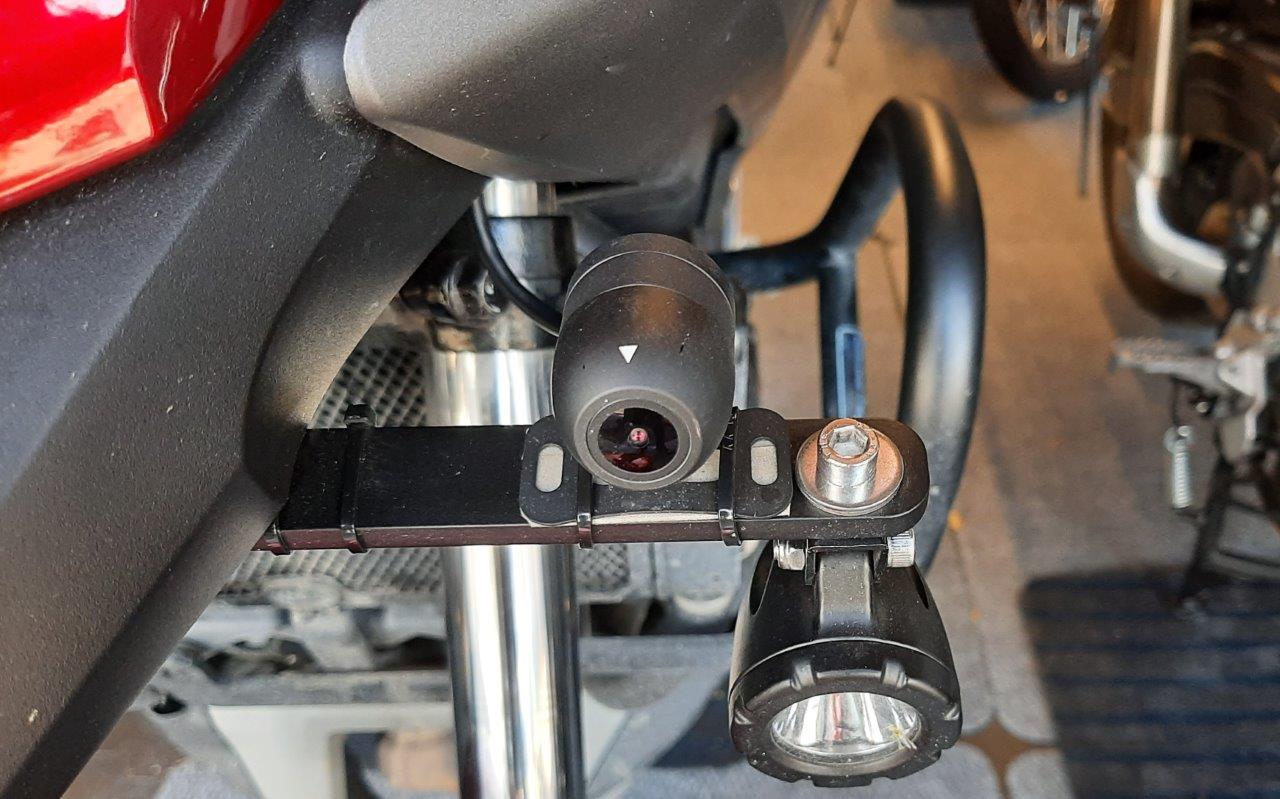
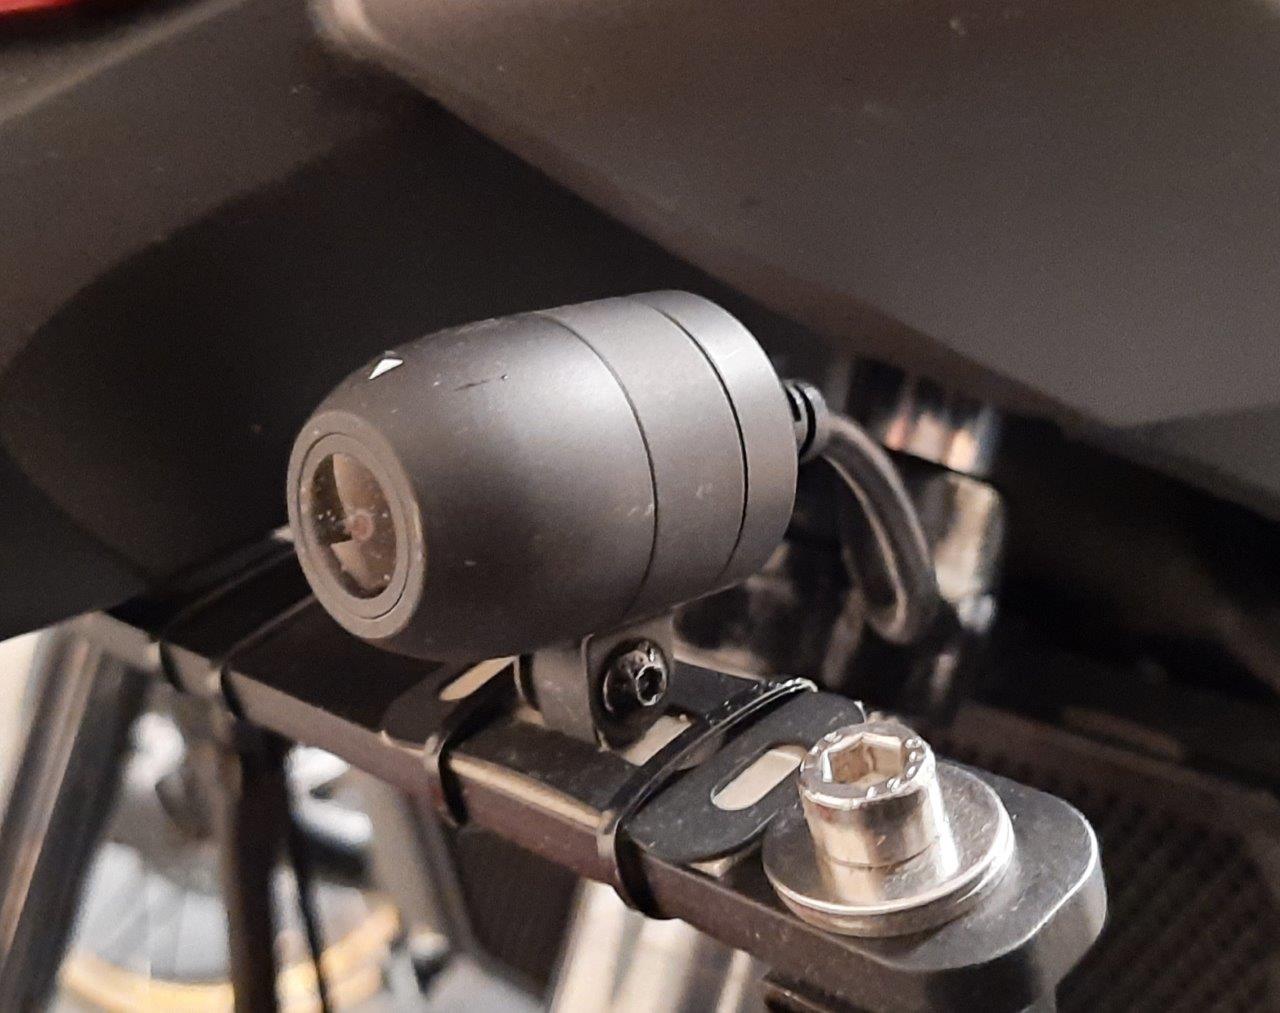
Front Camera – a flat steel Denali Light Bar hosting small round LEDs configured for primary use as ‘always-on’ daytime running lights (DRLs), along with auxiliary lighting as needed, provides a good stable mounting point for the front camera.
One of the small lightweight metal bracket kits is used – it has a lens mounting ring, small mounting block or spacer, and a screw to hold the assembly together. The compression ring sits in a détente around the lens housing (for a smooth finished look) and this combination is then fitted into the bracket with the mounting block and the pieces secured with the screw.
Before tightening up the compression assembly the camera body is rotated so the small White triangle is centred on top for initial orientation purposes. The compression ring and sheet screw assembly seems a bit on the light-side regarding strength, but after over two months of use nothing has moved or loosened off with on-road and frequent loose surface road travel.
The long connection cable or lead is looped and secured to the light bar then run over to the left side subframe and routed back to the left side of the main storage compartment housing where some OE electrical components reside and it makes a good common meeting point for accessory wiring, etc.
Rear Camera – the second lightweight metal bracket is used with the bracket hung vertically and its adhesive backed base secured to a small home-stock hanger bracket, itself mounted to the underside of the SW-MOTECH Adventure Rack with 6mm hardware, courtesy of a perfectly-placed threaded hole on the rack.
The cable is run, for now, underneath the SW-MOTECH Adventure Rack, along the outer left side of the plastic up to the left front of the seat with some strategically placed zip ties keeping it in place at convenient attachment points.
GPS Module and Remote Control – the GPS module is mounted to the upper left of the windscreen, providing a good line of sight point, with its lead run down along the left side windscreen mount and down to the left subframe.
The Remote Control is positioned on the left mirror stalk, for easy access and its cable runs down along the left side OE bundle, around the left side of the steering head and then over to the subframe, joining up with the GPS module and front camera cables.
DVR Module – for initial onboard testing, the DVR module is placed inside the (large) centre storage compartment with direct access to the battery provided when the OE plastic cover on the front interior wall is removed (two screws). A previously installed 12V DC ignition switched lead for other accessory use is also accessed from here.
But in deciding to keep the MT1 system on the Honda for the rest of the riding season (up here) and better evaluate just how rugged and weatherproof the whole system is, the DVR module is moved to the centre back of the storage compartment hatch, oriented so the five connection leads face the rider.
Sections of 3M Dual Lock are used for mounting the module to the plastic of the outer hatch, although the hook-n-loop pads provided in the kit would work nicely as well.
Harness Connectivity – this layout is a bit ad-hoc for now, with the power, front camera, GPS and remote-control components leads exiting from under the plastic (just below where the seat sits) to meet up with the rear camera lead.
The flying leads from the DVR module are long enough to run under the front of the seat for routing. And thanks to the shaping of the seat base, three of the connectors are tucked into the space between the front of the seat and the back of the storage compartment. The other two connections are partially visible, sitting tucked between overlapping plastic panels.
When the hatch is opened the cable bundle flexes slightly, but a bit of planned excess in the installation layout keeps stress to a minimum and the flat five-lead bundle well secured with continued hatch use.
If the VIOFO MT1 were to remain on the Honda, another half hour or so would have all the cables moved under the plastic and the DVR moved back to the left inner wall of the storage compartment and oriented to maintain easy access to the media storage slot.
VIOFO App – MT1 Feature Settings & Functionality
The MT1 can be used as a ‘set-n-forget’ dual channel video system for traffic or travel camera use and user interaction can indeed be minimal. But installing and launching the VIOFO App that is the user interface for the system is recommended, especially for initial configuration and if/when changes to systems settings need to be made.
In working through all the MT1 features during bench testing and lots of subsequent road use, one feature seems to be performing poorly (if at all), while another, both identified in the User Manual seems to be missing completely. But whether these features haven’t (yet) been enabled or just don’t work for some reason isn’t known – more information is provided below.
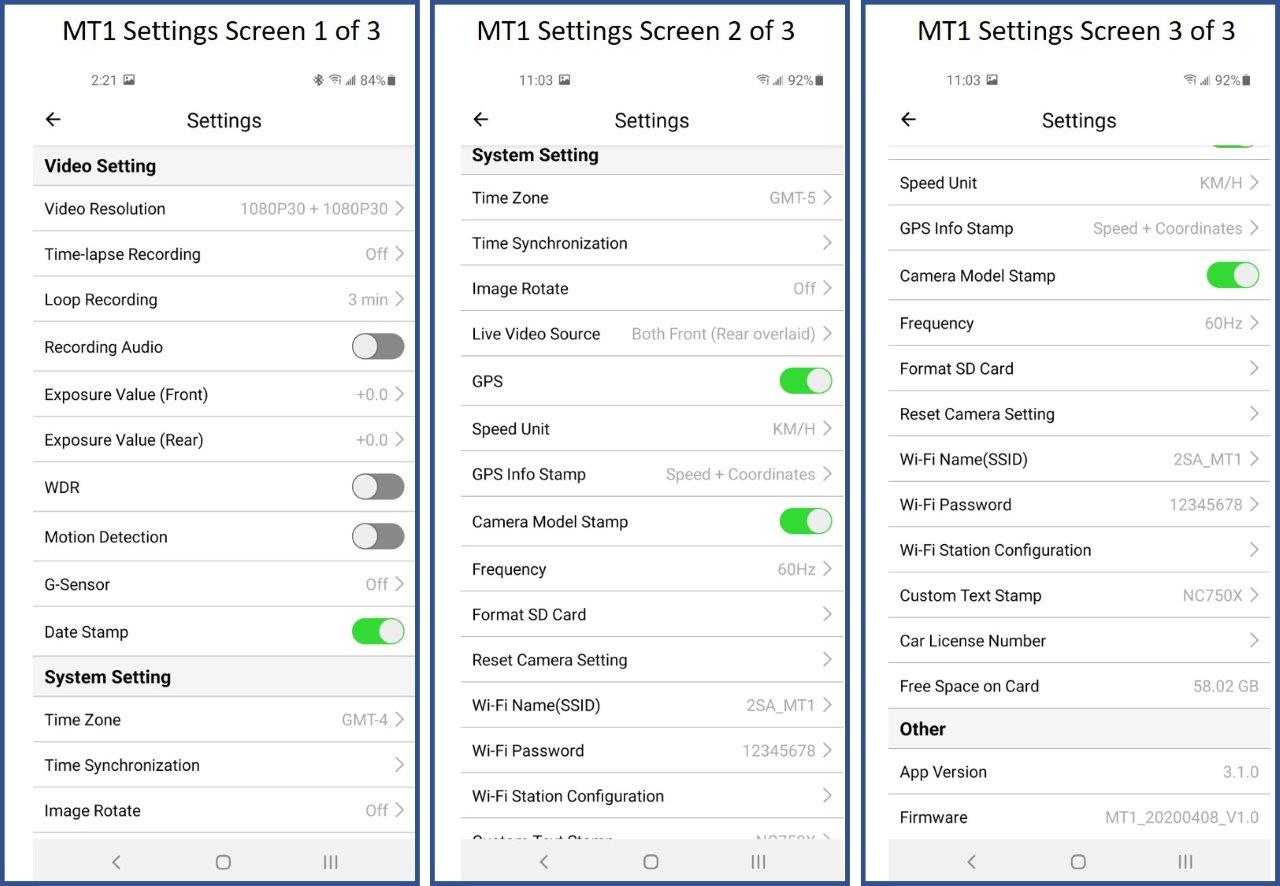
With video resolution of both cameras fixed at 1080p at 30fps there are no options available from the App. The fixed camera settings may be seen as a limitation compared to other systems with multiple recording modes, but for basic traffic camera or ride capture activities, the resultant video and photos are just fine and, one less thing to manage…
Time Lapse Recording (Screen 1 below Vid Res) – this ON or OFF setting provides either continuous video recording (default) or the ability to capture frames at 1, 2, 3, 5 and 10 second intervals, reducing the memory needed for storage and time needed to review media.
But it also increases the chances of not capturing a (specific) short-duration event…like a fall or accident.
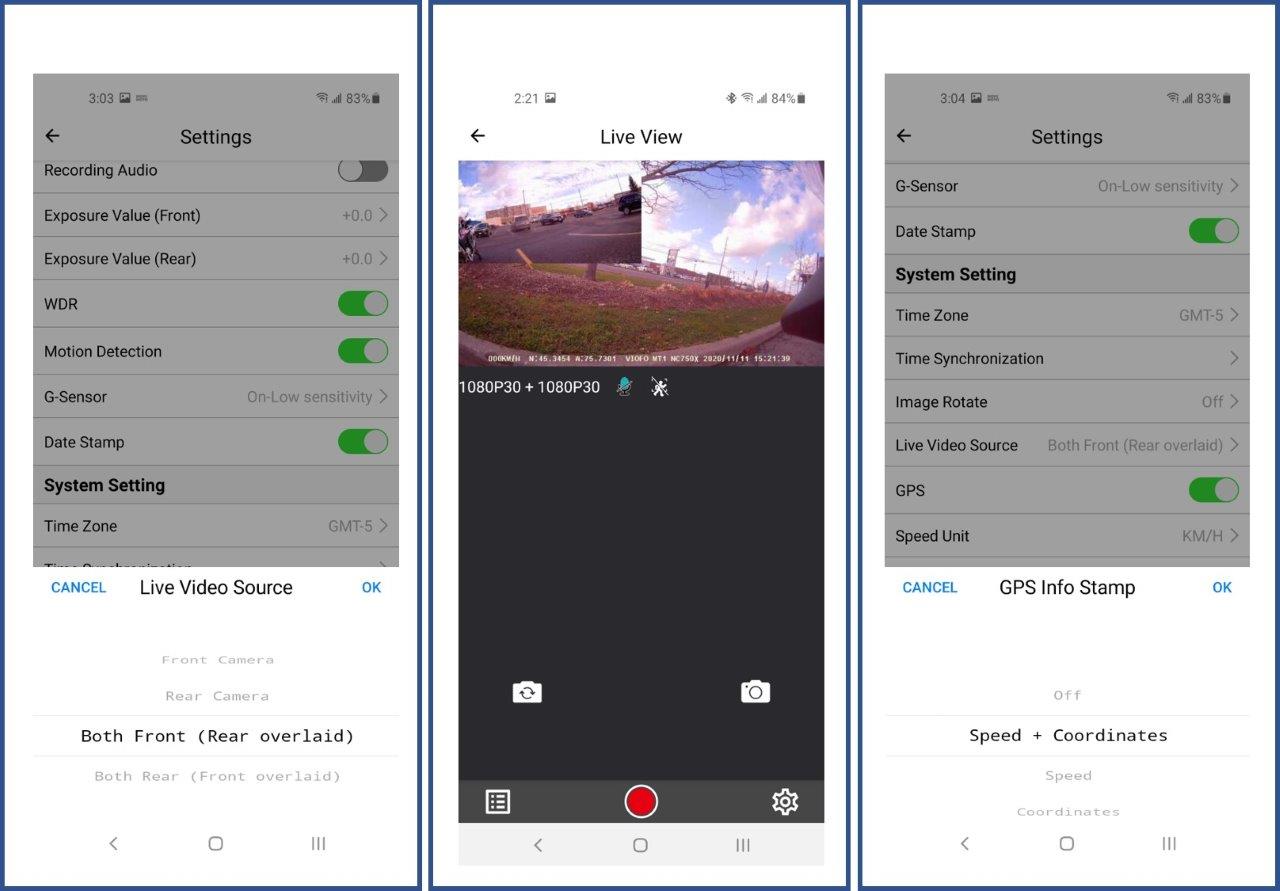
Live Video Source – this setting allows the user to tailor the ‘Live View’ or real-time display on the connected device for front or rear camera only, or a picture-in-picture (PIP) view with either the front view primary (PIP mode 1) or the rear view primary (PIP mode 2); in both latter instances the secondary camera view sits in the upper left corner.
Loop Recording – default recording mode, with selectable loop time frames of one (default), two, three, five and 10 minutes – these setting options work out quite well. One and three, minute loop settings get used for test video or when riding over a variety of surfaces, with longer loop options for the half or full day rides used – the choice is yours…
When space is needed on the microSD storage card the loop recording function automatically overwrites the oldest files (one at a time), stored in the default cont_rec folder, but the Manual Recording (manual_rec) and Emergency Recording (Event-rec) mode folders are not overwritten by the loop recording function.
Recording Audio – OFF or ON. If you don’t want audio from the DVR module or Remote-Control pinhole microphones to be recorded, keep this toggled OFF. But if audio from the cockpit or riders or surrounding environment is desired then this can be toggled ON.
As with many other similar systems, the audio recording feature can be hit or miss in its capabilities; the VIOFO is closer to hit than miss, but not by much. The microphones pick up lots of motorcycle, cockpit and (rider/riders) audio but also lots of ambient ‘noise’ as well.
In quieter riding environments the pin-hole microphones on the externally mounted DVR module (rear section of compartment hatch) and the Remote Control (left mirror stalk) do work to provide decent audio, but its not anywhere near travelogue quality, especially with a full-face or modular helmet worn.
If wanting better audio, especially for ride/travel purposes, a separate connectable remote microphone would be a good option (hint, hint) – one that can be positioned close to or worn by the rider/passenger. Two other brand systems on hand provide external microphones that can be clipped to the collar or under/inside the helmet and are quite effective.
This adds a wired connection to consider in getting on and off the motorcycle, but for direct audio recording purposes it can be hard to beat, unless one has the ability to record audio directly to an onboard or helmet mounted camera system wirelessly using a BT interface…
Exposure Value (EV) Front and Rear – adjusting EV values separately for the front and rear cameras can create better footage under different lighting conditions, e.g. – bright conditions to the front but darker to the rear.
Riding conditions experienced this time of year (late fall) in the northern latitudes provide a good example – the sun is lower on the horizon so its quite common to have very good exposure levels to the front or rear, but not both, depending on the direction of travel and terrain.
In general, if you want a brighter ‘image’, then the EV can be increased and for a darker ‘image’, the EV can be lowered. The default for the front and back cameras is 0.0, with both having ranges from -2.0 to +2.0.
WDR or Wide Dynamic Range – if one thinks of moving into and out of a tunnel or heavily shaded area then WDR is the means to cope with this. If WDR is ON, the system handles sudden lighting transitions by averaging (providing a median) when moving through a variety of conditions (comparative to HDR) with far less impact seen on recorded video.
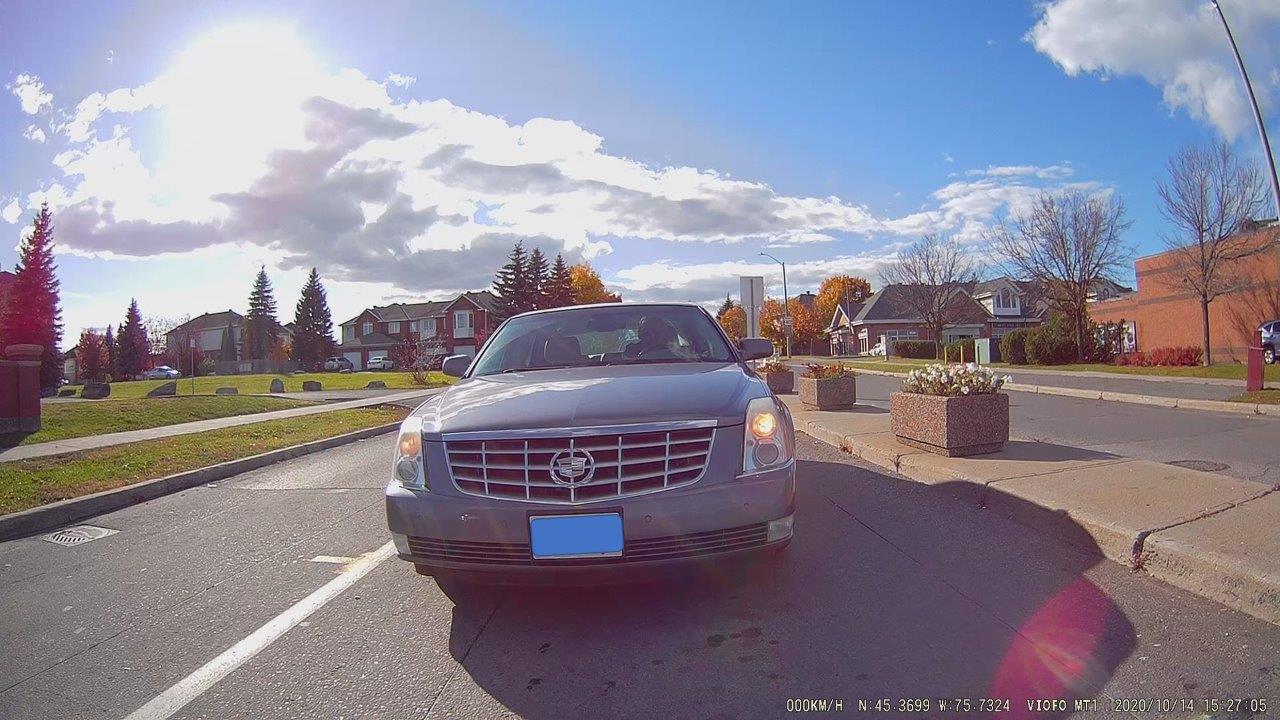
Another advantage gained with WDR activated is that it provides a clearer focused view of small details – license plates or signs in very brightly lit conditions or when transitioning low to high to low light areas so often experienced in moving through built-up or urban areas.
Motion Detection – the ‘missing’ feature, at least on this MT1. According to the User Manual, if this slider control is set to ON (activated) and movement is detected in (front) of the camera, video is recorded for xx seconds to the Event-rec folder. If no further movement is detected for 60 seconds, the systems returns to (standby).
This feature is prevalent in most modern single and dual channel systems including other VIOFO products. But unless it is a ‘hidden’ feature that (yet) needs to be activated, ‘motion detection’, with or without the G-sensor activated, has not been a testable feature.
G-Sensor – kind of another ‘is it there or not’ feature. The MT1 is identified as having a G-sensor mounted inside the DVR module, and if activated under the VIOFO App, it should sense and measure impact forces.
Under the VIOFO App, the MT1 ‘feature’ is enabled by selecting OFF or either the ‘Low’, ‘Medium’ or ‘High’ sensitivity setting. According to the User Manual and other posted media, if an impact or force (falling within the parameters of the set sensitivity) occurs while the system is in use, ongoing video is supposed to be locked and saved in the Event-rec folder.
And VIOFO recommends the ‘Low’ setting be used (as a start point at least) so that sudden falls or impacts are detected, but minor bumps or movement are not, minimizing unintended Emergency Mode activations.
But whether on the bench or on the motorcycles none of the activation settings for the G-Sensor (and no matter the Motion Sensor setting) resulted in any impact/forces being detected (with the system on) and Emergency Mode activated with files stored under Event-rec.
And believe me, significant impacts/forces were induced for static testing and even more severe bumps or shocks were encountered on some rides; comparatively, these same forces triggered the same features on two other camera systems mounted on accompanying motorcycles.
User Selectable Data – virtually all camera systems record pro-forma or selectable information as data sets along with the video/photo media captured. There is no doubt that any or all recorded information can be both positive and negative in nature depending on any subsequent review or use; it’s truly a personal choice as there is or may be consequences…
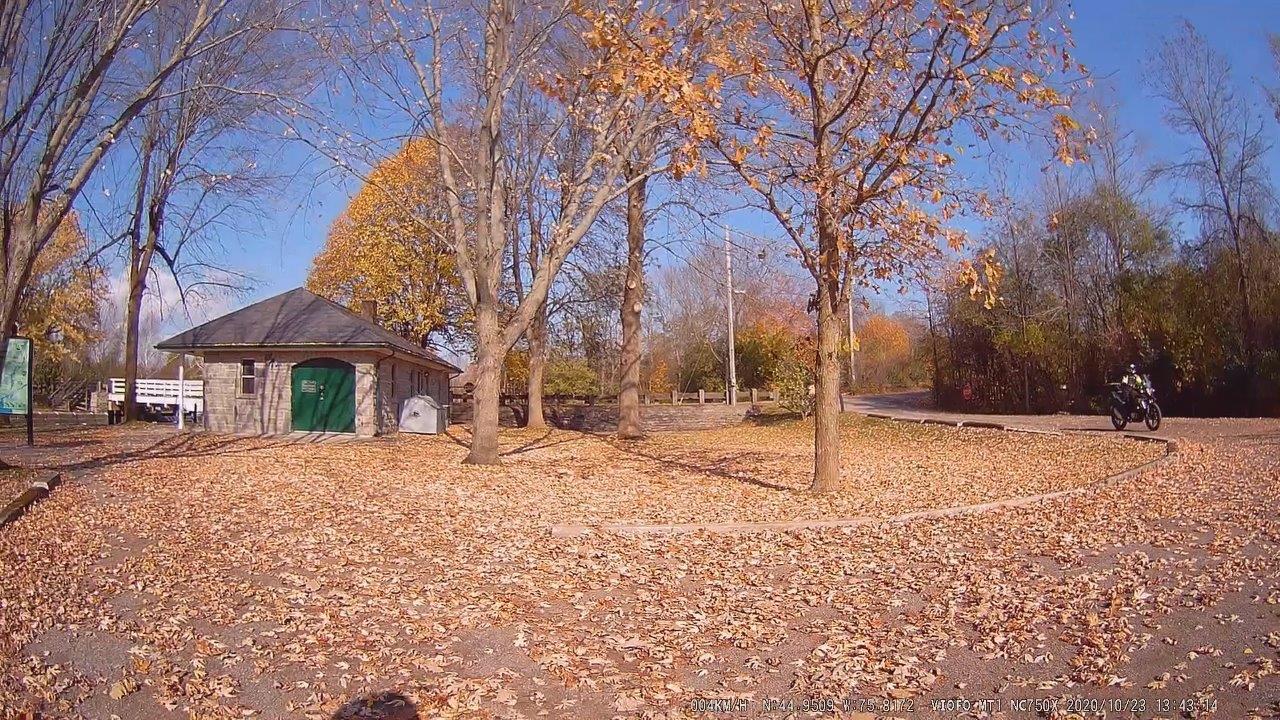
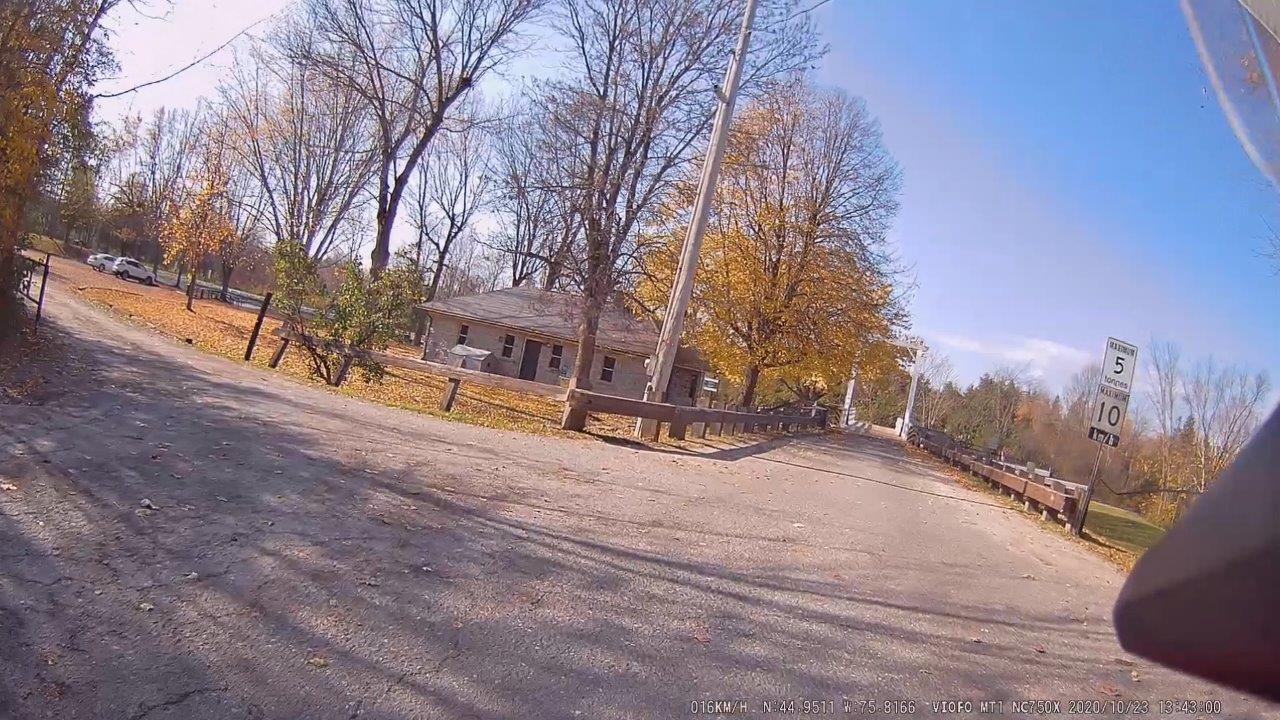
Date & Time Stamp – for this user, this setting is always ‘ON’ so that date and time is recorded along with the video. In many situations, video proof become critical evidence; having the essential elements of information on the playback media is key.
GPS Info Stamp – this information records speed (km/h or mph) and coordinates displayed as latitude and longitude data.
Customizable Stamp Information – the Camera Model Stamp, if turned ON, automatically fills in the applicable data for the model (MT1), while the Custom Text Stamp can be used to specify the platform, entered as ‘NC750X’. The Car License Number information block is not used.
Other Settings
- Time Synchronization – can be set using the smart phone or device in use, with the default being the standard (detected) time zone based on the GPS feature if turned on
- Image Rotation – another ON or OFF setting, if 180-degree rotation of the video is desired, even though the individual front and rear camera units are easily adjusted as well
- Frequency – either 50Hz or 60Hz, so the user can select the best setting to deal with different types of lighting used on vehicles, overhead lighting, or signage, etc.
- Format SD Card – to clear media, after a camera firmware update or reset or if new media is used, it is a good idea to use this setting to let the system format the storage for a clean start
- Reset Camera Settings – restores the MT1 to the factory settings
- WiFi Name (SSID) and Password – the default name is ‘VIOFO_MT1_XXX and the default Password is ‘12345678’, both easily remembered defaults that should be changed to something a bit more challenging
- Wi-Fi Station Configuration – another selectable feature under the VIOFO App that does not seem to be enabled for the MT1, but one that would be nice to have. This feature could provide connectivity to a (home) network so media could be browsed and downloaded to other than the mobile device (phone) and (perhaps) enabling live view streaming as well.
MT1 Functional Notes
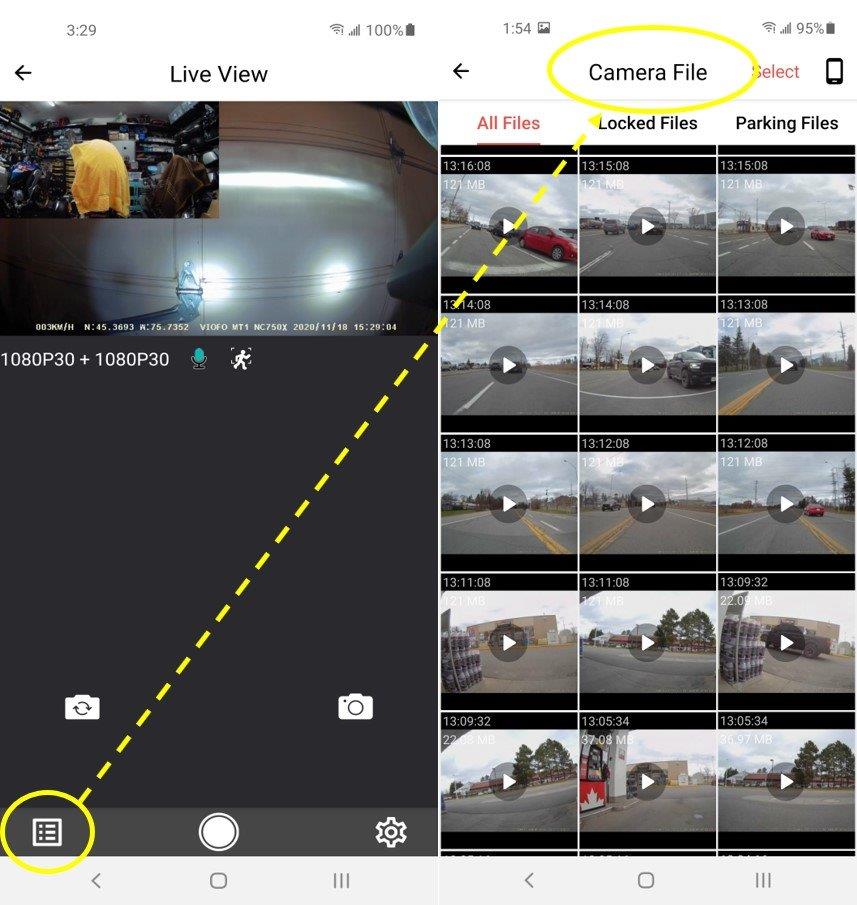
User Interaction – about the only intervention required is when the user wants to change settings or manage recorded media – something that can be done by downloading individual media files via the Files List (the file-box icon on the lower left of the Live View screen) or by removing the media card.
Storage Media Access – open the pressure-fitted cover and use a fingernail or thin non-metallic object to push in the storage card slightly, activating the spring-loaded release that pops the card out enough for it to be grasped by its beveled edge and removed. The small USB-A interface SD-media reader provided in the kit is perfect for holding/securing the media.
WiFi Connectivity – since the initial bench testing, some of the connectivity issues encountered have been sorted out and a defined, usually successful process used, including making sure the home network cannot connect, done by turning auto-connect or default connectivity off and if applicable, turning off any Mobile Data connection.
Device-wise, the iPAD Mini 4 and iPhones 6 and 8 had no issues in recognizing and connecting to the VIOFO WiFi on the first pass – data connection or other network connections existing or not; so the reluctance to do networking seems pretty much Android related…
But no matter the device, the (usually) successful routine is to turn the ignition on and once the VIOFO Remote Control springs to life, press and hold the WiFi button for 5 to 10 seconds, release it, then give it a quick push as way of activation visually confirmed by the Blue LED flashing and then turn on the smart device’s WiFi service on.
In 5 to 10 seconds the MT1 network appears on the phone’s WiFi listing and the connection is usually made on the first pass. With the VIOFO App launched and the camera connected the user interface is live – this procedure works about 80% of the time…
Alternatively, once out of the neighbourhood and after pulling off at a convenient spot to initiate the WiFi connection, access to the MT1 via the App works about 95% of the time and once the connection is made while on the road it remains reliable even if the ignition is turned off and subsequently turned back on; all good, until arriving back home that is…
For comparison purposes, there are five other WiFi (and BT) enabled camera systems here in use or under test and all of them work just fine with iOS and Android devices – in the garage, the driveway or on the road; all of them finding and connecting to their specific network without fuss.
Camera Mount Stability – the lightweight metal mounts are holding up well and between stable mounting points and some dampening provided by the sponge adhesive of the 3M VHB pieces, camera stability and resultant video capture is good, although the back camera mount is not as stable as the front as indicated by recorded video – something for follow-up work.
Or, if the MT1 is moved, as planned, over to a more off-road oriented motorcycle for the spring, some different mounting approaches will be used and it will be interesting to see how the system performs with some off-road rough-terrain use.
Firmware Updating – in identifying a couple of early issues to the VIOFO Support Team, I was advised to update the MT1 firmware to V1.0 (20200408) that is accessible from the link.
Updating involves downloading the FWMT1A.bin file that should be accessible from the lower part of the link page. With the file downloaded, remove the MT1 memory card from the camera and connect it to the computer using a media reader, then copy the file over to the Root Folder of the memory card.
Reinstall the memory card in the MT1 and turn on the ignition to activate the camera. When the system is booted up, the firmware update begins automatically – the Red LED on the Remote Control will go into multiple rapid pulse sequences as the firmware update is applied. The system will reboot itself and the firmware file automatically deleted.
To make sure the firmware update is good, connect the WiFi, launch the VIOFO App and check the settings – nothing should have changed. Scroll down to the bottom of the Settings Screen to the ‘Other’ section to check that the latest firmware is listed.
MT1 Video Performance
Nothing in the way of glitches or failures over almost three months of use on two motorcycles has occurred despite some minor bangs and harder (test) impacts to the camera pieces and the DVR module in attempting to activate and test the G-Sensor and Motion Detection features…to no avail.
Storage Media – part way through the review the provided 32GB media got swapped out for a spare 64GB card adding more space and time of course. Although storage media can be formatted outside of the camera, its often best to insert the media into the camera and utilize the ‘Format SD Card’ setting under the Settings.
Photos – photos can be done from the Live View screen. Stop the video recording first by pressing the bottom centre button- it goes from Red to White, then take a picture by pressing the camera icon on the right side – it captures a front and back frame automatically. The photos are stored under the DCIM/Photo folder and can be managed as with video files.
Video Playback – the MT1 provides two basic options for playback of recorded media. One is to connect the camera and smart device using the MT1 WiFi connection and access the stored media from the Video Lists icon (lower left of the Live View screen) for playback or downloading of selected files to the phone itself.
The second option takes a bit more physical effort (kind of) – remove the storage media, put it into a PC-connected reader, like the one supplied, access the main DCIM folder and ‘cont_rec’ folder.
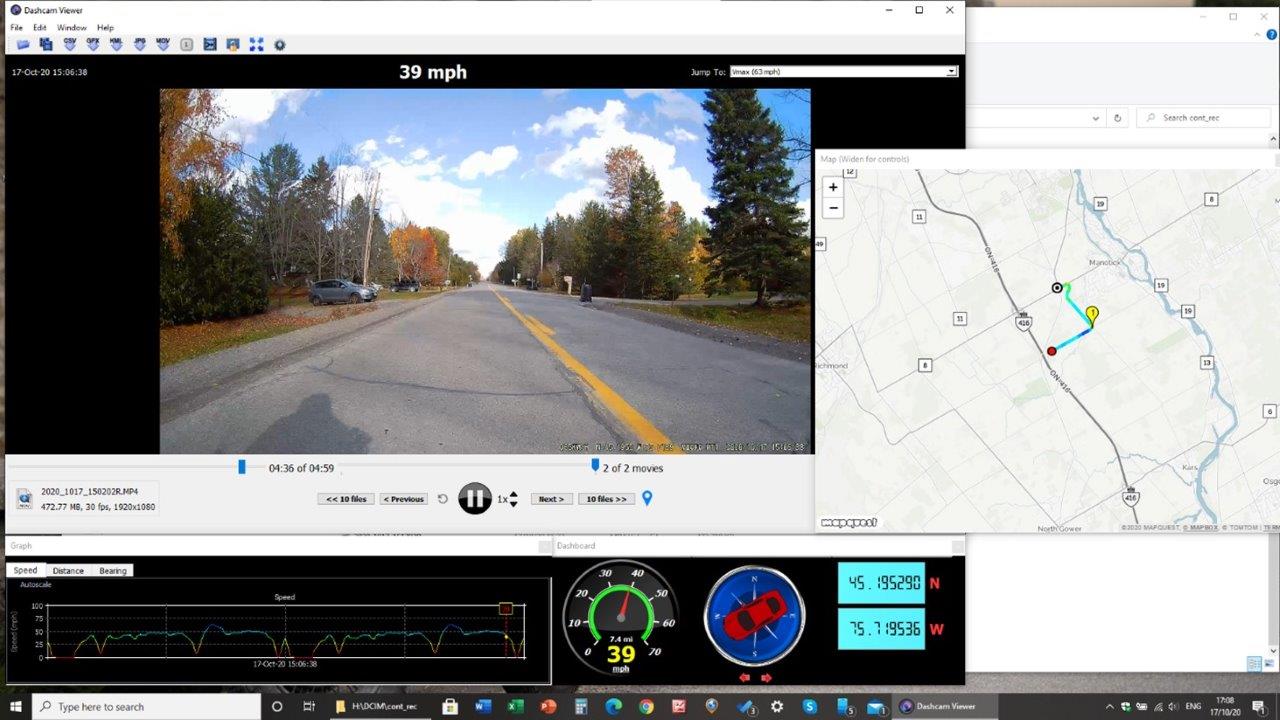
And speaking of playback…everyone has their favourite or favourites, but the favourite application for both single or dual channel media playback that is encoded with other data is Dashcam Viewer. The application is available in Free, Standard and Pro versions.
Dashcam Viewer provides the ability to view one or both channel streams concurrently while also displaying position, speed, heading, distance, and other captured data. The screen captures of VIOFO video playback and related encoded data were done using Dashcam Viewer and the MS Screen Snippet App.
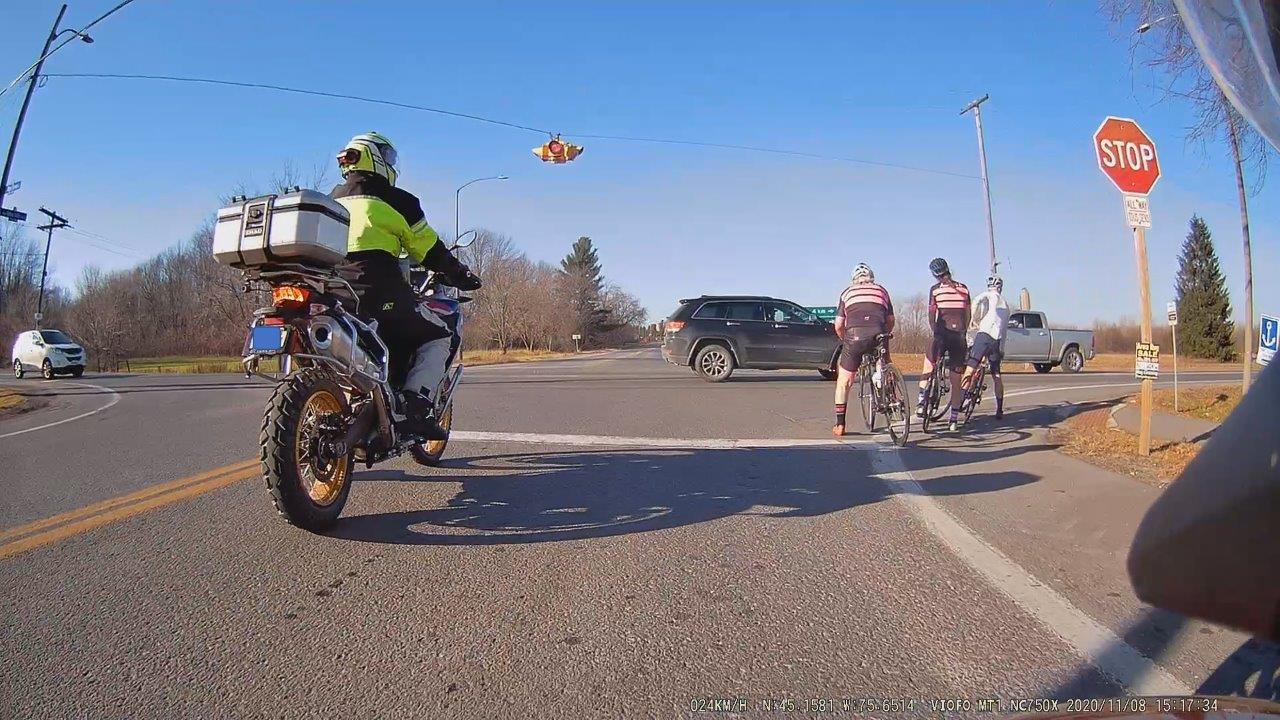
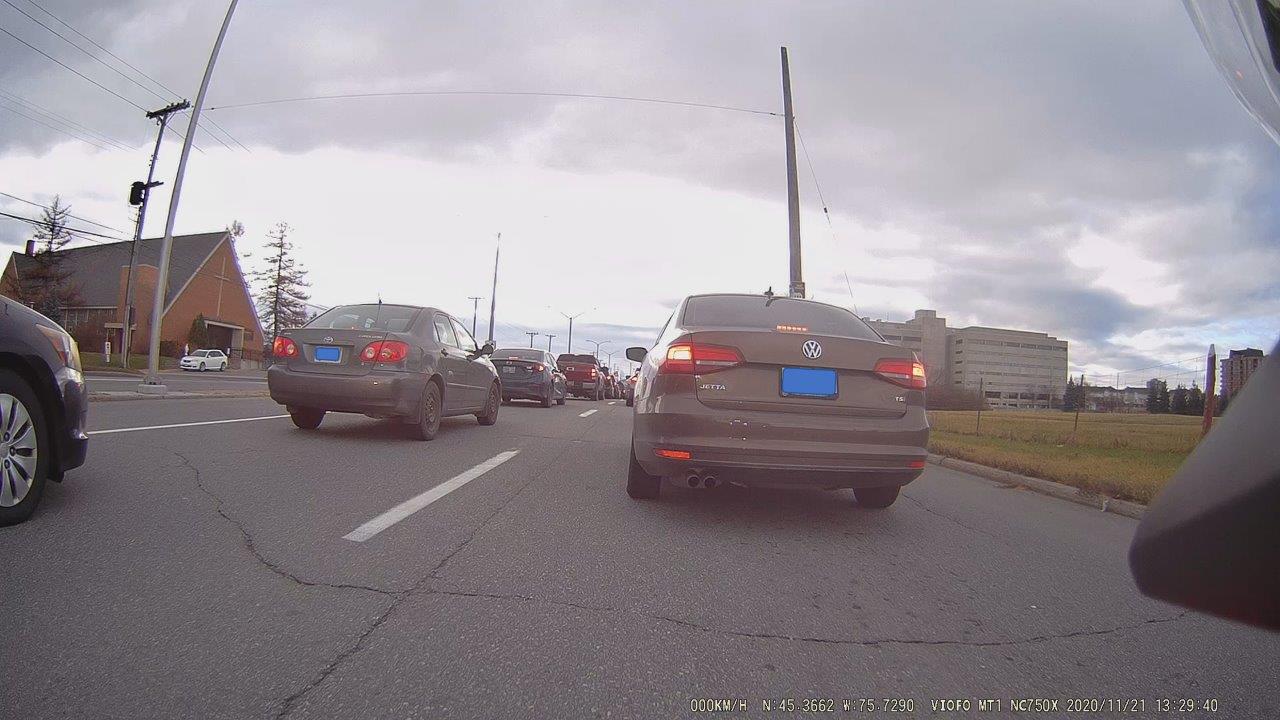
Video Quality – the fixed resolution of 1080p @ 30fps (HD) is a good default capture resolution for most applications or many needs including if a combination of traffic monitoring and travelogue is an objective where near to far focus capabilities are or can be key.
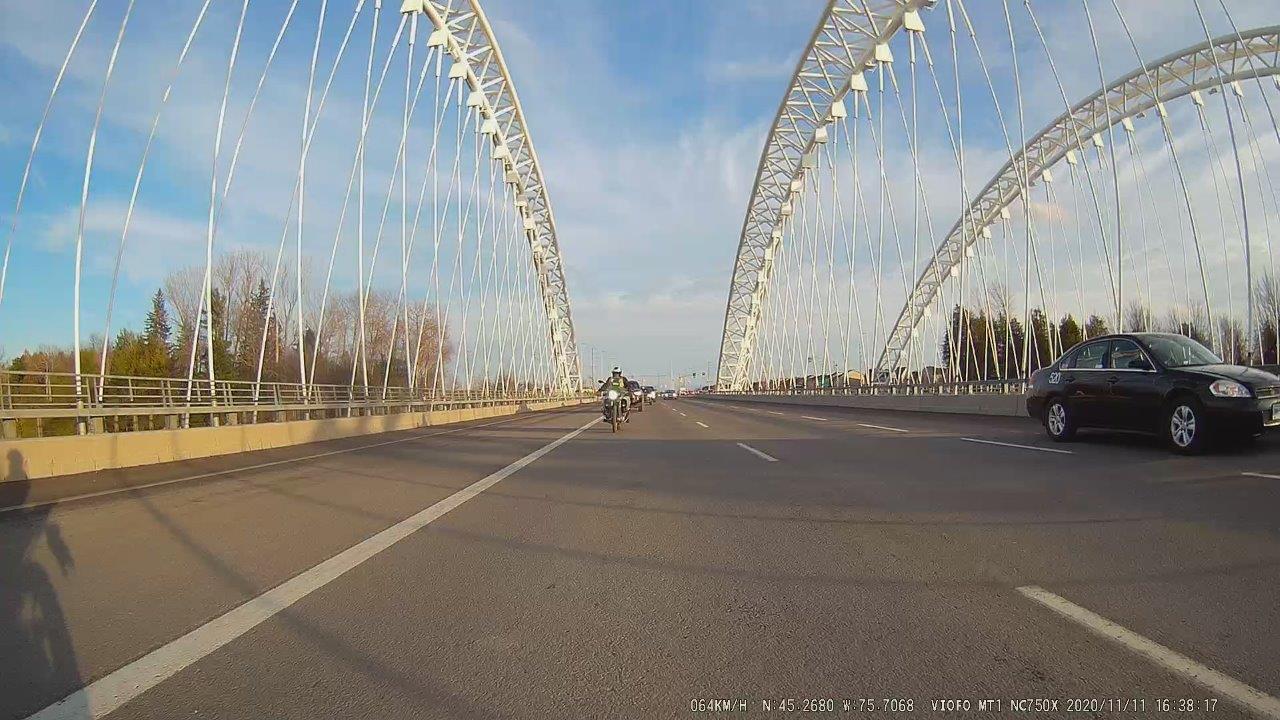
The 170-degree lenses do introduce distortion, most noticeable in video from built-up areas with lots of infrastructure or when covering ground over or through densely covered terrain, whereas the long wide deeper view reveals little distortion on playback. Close-up focus, highly desirable for near objects (road users) is excellent.
Lighting levels are good and obviously facilitated by the WDR feature when enabled and as may be adjusted through the plus/minus EV settings, something that can make a big difference depending on the direction of travel and respective camera views.
Colouring or colour fidelity is another positive attribute of the VIOFO video (clearly) seen on playback of video and viewing of still photos – deep rich tones and accurate colouration.
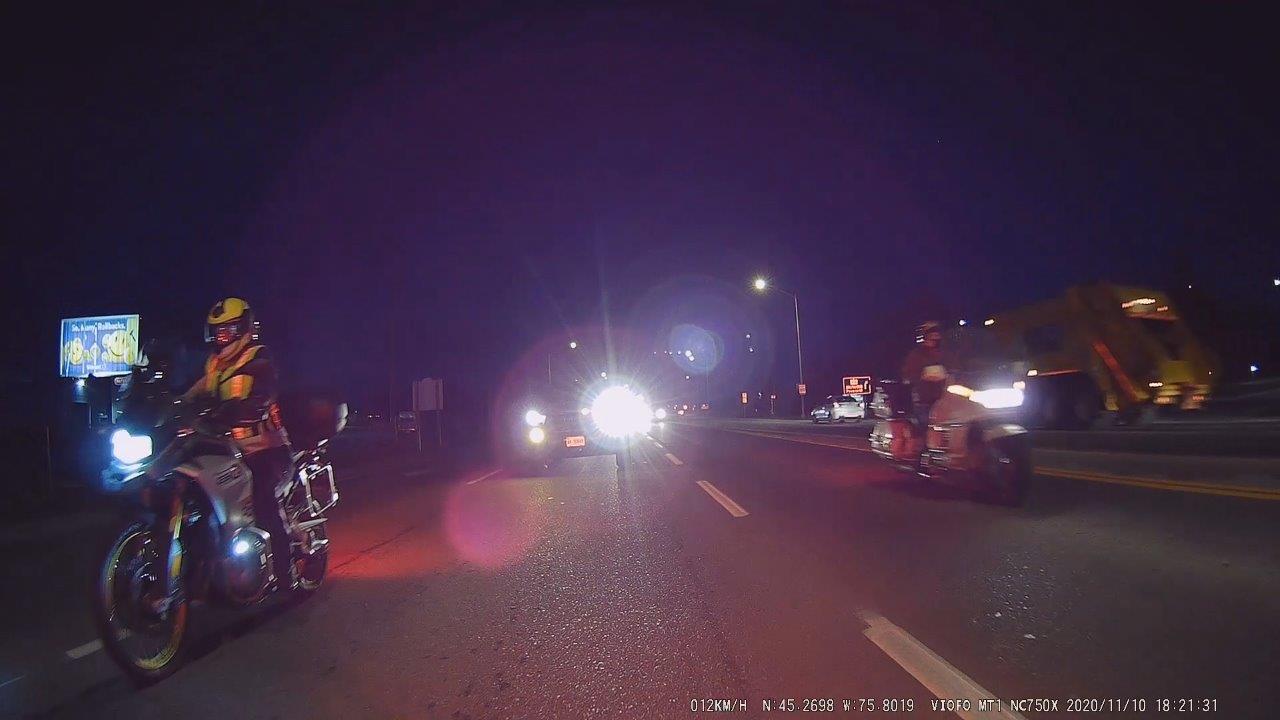
The MT1 does stumble a little bit in the motion range. At lower speeds with stable lighting conditions playback of captured video shows great clarity and no obvious collection or processing impacts. But at higher speeds and depending on surroundings, captured video can show some artifacts with ‘dithering’ or blurring.
But overall, between the camera lens, image capture and processing with the configurable settings (including WDR and EV compensation) and appreciating there is no identified image stabilization, stored video from the MT1 – daytime to low-light into night-time is very (very) good.
Conclusion
Until some in-depth follow-on testing confirmed the suspicions about the Motion Detection and G-Sensor features and their performance, or non-performance, the MT1 hadn’t caused any hiccups in any other way; it is an extremely well made and easy to use system.
So whether we just got a bad one or in thinking that implementation of these features is ‘pending’, the optimistic view is being maintained. But, in not getting any answers or feedback to our questions and observations from the VIOFO team, the end-state is kind of fuzzy.
This is unfortunate – the marketing company that got the opportunity put in place has been very good in relaying correspondence but the only response received about anything was that a posted (but not previously identified) firmware update for the MT1 would be a good thing to have installed – that simple query and response turned out to be a big positive.
So it is hoped that information regarding the issues will be provided or perhaps resolution of the issues seen through subsequent firmware updates; activities that will clear the negative side of the slate regarding the MT1.
And the MT1 is not going to be put aside, quite the opposite in fact. The Honda NC750X is a great platform for the MT1, but in wanting to see how the system performs on a more off-road oriented motorcycle, migration is planned for the winter, along with a memory upgrade from its current 64GB to 128GB or 256GB capacity; it should be as easy for us humans!
The Bottom Line – the VIOFO MT1 is a two-camera system with the demonstrated potential to be a great front & rear video capture accessory for motorcycles, as well as being suited for a multitude of other powersport applications. Video performance is (very) good bordering on excellent based on day, low-light and night-time use. The MT1 is well-designed, well made, weatherproof and reliable. However, the discovered issues, not yet resolved, keep the MT1 from getting an ‘excellent’ new product rating. It still deserves a close look from perspective users though, just be aware that it has a couple of rough edges…or at least the unit here does. We will update this review as needed.
Pros
- Well made, well-detailed, easy to install and easy to use overall
- 1080p at 30fps for true HD video and photo capture
- 170-degree wide angle lens provides minimal distortion over great field of view
- Great lens/camera performance close in or over the distance
- IP66 (dust and moisture) rated, sturdy with ruggedization features
- Sturdy water-proof connectors are easy to use and colour coded to simplify installation
- Wide Dynamic Range (WDR) copes with sudden light transitions
- Exposure Value settings valuable in dealing with front/back lighting variables
- VIOFO App provides an encompassing easy to use interface
Cons
- Fixed 1080p resolution at 30fps could be viewed as a limitation
- Quirky WiFi feature with Android devices although good using iOS
- No onboard image stabilization features
- Motion Detection and G-Sensor features missing in action or pending
- WiFi Station Configuration identified but seems not to be working either
- Priced higher than some other dual-channel systems…
wBW Specs:
- Manufacturer: VIOFO
- Pricing: $299.90 USD, may be found for less due to seasonal pricing opportunities
- Made In: (China)
- Warranty: One-year warranty
- Review Period/Date: 5 September to 10 November 2020
- Submission Date: 27 November 2020