
Our article entitled “Using a Tablet as a Motorcycle GPS” has been very popular with webBikeWorld readers.
It details how you can use a smartphone or a relatively inexpensive tablet as a widescreen GPS device on your motorcycle, saving hundreds of dollars off the cost of a dedicated Garmin or TomTom GPS.
In fact, the movement from dedicated GPS units to smartphone- or tablet-based GPS is picking up steam, although where it will all end is still to be determined.
The good news is that you can have a GPS system on your smartphone for free, or hack together a tablet-based widescreen system for as little as $125.00.
You’ll need a smartphone, of course, or an inexpensive tablet with GPS, the handlebar mount (see below) and the GPS mapping software, which is free.
This article can be considered as Part 2 of the original story.
It focuses on the Nokia HERE system, which is a well-kept secret gem when it comes to maps. It also has two significant features missing in many other mapping systems: free downloadable maps for off-line use and route planning.
Nokia HERE
This review is focused on the free Nokia HERE map software, because while it may not be as well-known as the ubiquitous Google Maps but is a very interesting and worthy competitor, perfect for using on a smartphone or tablet as a GPS on a motorcycle.
HERE currently has maps for many countries and the software has a simple and clean interface.
One of the main benefits of using HERE is that stand-alone HERE maps can be downloaded for free, which allow off-line use on most smartphones and tablets with GPS. This is crucial when you don’t have an active cell connection, as can often happen when you’re on a long ride.
The ability to use off-line maps is key to saving a lot of data charges and you can tell the HERE system to go off-line and use the maps you have downloaded while you ride.
All you have to do is download the HERE map app, mount the phone or tablet on your bike and you’re ready to go.
It’s cheap, there aren’t many compromises and GPS systems like this should only get better in the future.
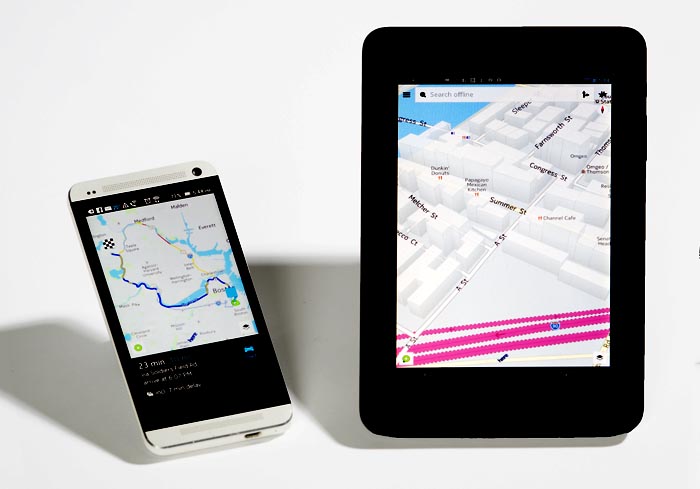
HTC One phone (L) and Hisense Pro tablet.I had been looking for an intuitive and accurate GPS system that can work offline without the expense of a dedicated GPS unit. I also wanted to be able to leverage touch screen technology to quickly use the maps on the limited real estate a PDA offers.
I think the Nokia HERE Maps system is the solution because it works well and local maps can be downloaded and used off-line.
Background
A little background: My riding technique entails getting lost and eventually trying to find out where I am. I always carry paper maps, but I use GPS to determine my location and then I use the paper maps for the broader overview.
I also love the back roads but I am incapable of remembering more than one or two roads ahead; that’s where the “lost” part comes in. The Nokia HERE map system has worked well for me.
There are other GPS/mapping systems available for free also and I have tried a couple, includingNavmii Navfree and Back Country Navigator; more about them later.
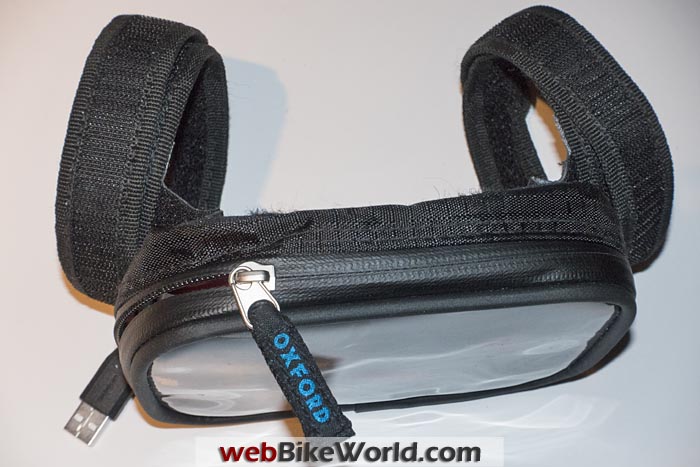
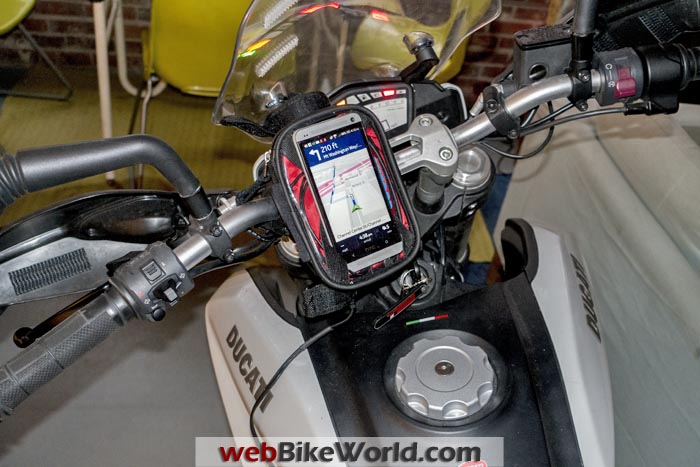
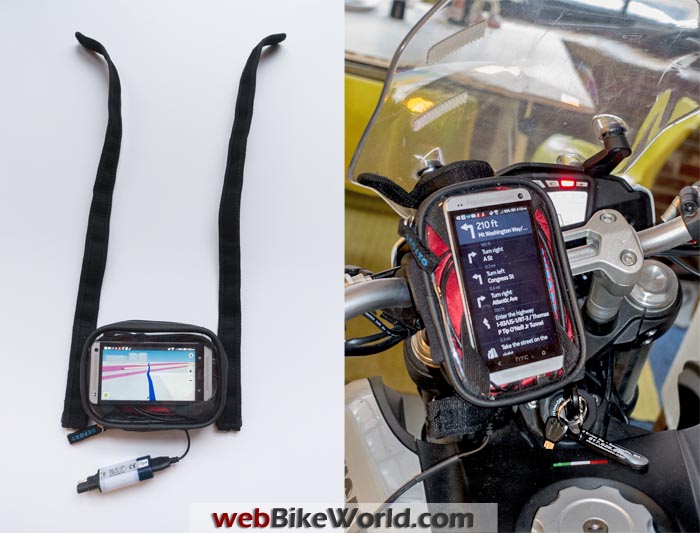
The Oxford Strap-Nav smartphone mount holds an HTC One or other devices. HTC One phone mounted on handlebar with Oxford Strap-Nav.Mounting a Smartphone
I’ve been using the Nokia HERE system with a car recently because it’s currently winter in New England with two feet of snow.
But it’s never too late to prepare for spring, so I purchased an Oxford Strap-Nav Handlebar Mount GPS Holder ($29.95 at Amazon.com) or the Oxford Strap-Nav GPS holder at RevZilla ($29.95) and wired it from a DIN port used to connect an Optimate Universal USB Charger to the bike.
I chose the Strap-Nav because it’s water resistant, it can be strapped on in a couple of orientations, and I feel this design transmits fewer vibrations than a hard mount. Plus, it fits my HTC One phone.
The Strap-Nav measures 145 mm tall by 95 mm wide by 30 mm deep (5.7″ x 3.7″ x 1.2″), which fits most smartphone sizes.
The Strap-Nav has two components: The holder, which has long hook-and-loop straps and a padded case with cross straps to hold the phone tight to the plastic window; and a separate waterproof “goggle” or clear cover that attaches to the holder with hook-and-loop.
It isn’t what you’d call elegant, but it seems sturdy and the touch-sensitive features of the phone work through the plastic. It is just large enough for the HTC One phone if I use a 90% micro-USB charger cable.
The hook-and-loop straps are 20″ long and heavy-duty; long enough to strap the phone to my arm. I might try this at some point, but for now I strapped it to the riser and the windshield brace; it’s vertical and out of the way of the instruments.
The zipper on the Strap-Nav appears to be sturdy and water-resistant. The goggle or clear cover part seems cumbersome and interferes with the touch screen.
If the weather gets bad when using it, I’ll probably just put the phone in a Ziplock bag inside the holder.
Handlebar Tablet Mounts
There are many other mounting systems for tablets and smartphones, with more appearing every day. Here’s a link to a variety of motorcycle handlebar tablet mounts with prices starting as low as around $20.00.
Don’t Forget Power
The Optimate USB charger ($29.60) has served me well. I’ll probably upgrade to the waterproof version and if I could find the 2100mA version for sale somewhere (what’s up with that?), I’d probably get that one.
The 1000mA version doesn’t have the juice to charge the tablet while it’s using the GPS, although it can charge it if the GPS is inactive.
GPS Smartphones and Tablets
The mobile gear I’m using is an HTC One phone and a Hisense Sero 7 Pro tablet (which can be difficult to find); both are Android devices. Other brands of inexpensive tablets can be used, as long as they have built-in GPS.
Here’s a listing of tablets with GPS, starting around $90.00.
The Hisense Pro is interesting, because it has an excellent 7″ IPS screen, a microSD card slot and GPS. My main computer is a Mac running Mavericks.
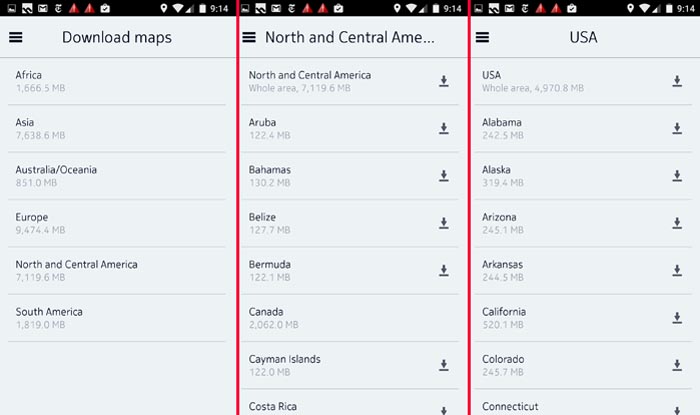
Nokia HERE Screens: (L) Download world maps. (C) North and Central America. (R) Individual U.S. states.Nokia HERE: Background
The Nokia HERE map app is free and I suggest downloading it and playing with it along with this review. It’s listed as beta for Android devices and it is available here on the Google Play Store..
Windows mobile users already have HERE on their Windows phone but may have overlooked it or dismissed it as bloatware. Believe me, it’s not.
Also, to many people, Nokia is a company that disappeared after the recent Microsoft purchase. It’s actually alive and very well, focusing on profitable data networks, a massive patent portfolio, and software of which HERE maps is the jewel in the crown.
For example, Nokia HERE provides Geographic Information System (GIS) services for governments and other mapping providers and HERE is the engine behind Bing and Yahoo! Maps.
Nokia also provides HERE services for Android, the Sailfish OS and FirefoxOS operating systems. More information on HERE can also be found, well, here (Wikipedia).
That article states that “HERE has maps in nearly 200 countries, offers voice guided navigation in 94 countries, provides live traffic information in 33 countries and has indoor maps available for about 49,000 unique buildings in 45 countries.”
I mention this because they have a lot invested in their mapping service, so support isn’t an issue and whatever shortcomings it has will, very likely, be dealt with.
HERE is now available for iOS (see B.P.’s comment below), and the mapping site can be accessed via any browser and it is a very good alternative to Google Maps.
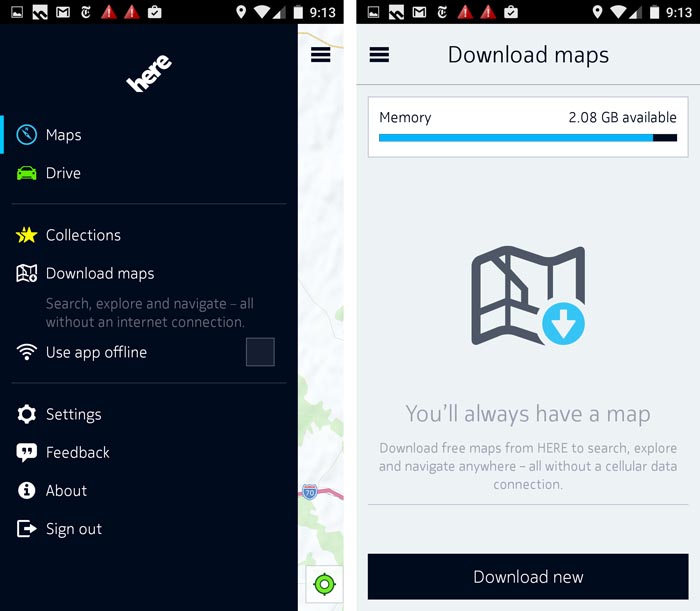
(L) Nokia HERE menu choices (under the 3 bars). (R) Download maps, shows remaining memory in device.Using HERE
To get started, you have to install the HERE app and download the maps for the region you’re interested in. I live in the U.S., so I chose to download the entire North and Central America map database.
This comes as one big package and is 7.1 GB of information.
I like this as opposed to downloading each state or region separately, but it does take time and space. You can also download just the U.S.A. map database or the individual state maps, which are anywhere from about 250 MB to 600 MB in size.
There are three map overlays: a basic map which is nicely detailed and exhibits route numbers; a transportation map, which shows public transport in your area; and a satellite view, which is very detailed.
Additionally, you get a lot of information about services, restaurants and even real-time traffic information in any given area . I tested it by searching for a local “dive” — very local and very dive-y. HERE came up with the phone and address.
Much of the mapping info is crowdsourced, so if something isn’t available you can send info and it will be added when confirmed (click on “Feedback” at the bottom of the HERE map).
You may have to register for a free HERE account first (you can log in with a Facebook account also).
Most of this information is available offline and this is the key point here: If you’re lost somewhere and need a gas station but you have no data connection, this info is now in your device, always.
If you want to lay out a route you can do it in the comfort of your snow cave in Patagonia. Satellite of Love indeed…
(L) Route planning. (C) Map. (R) Directions.HERE Map App Interface
The HERE interface is cleanly arranged and most features are available within two taps. Turn on your device (e.g., smartphone or tablet) and open the HERE app and it finds your location quickly.
A narrowing green circle shows the increasing precision as GPS satellites are accessed.
I’m a big fan of touch screens and the main HERE map is easily manipulated with various gestures. Tap with one finger to enlarge and with two fingers to shrink. Or use a pinch/expand gesture to do the same.
Use two fingers to rotate the map or two fingers together to nudge it into a foreshortened (3D) view. This map doesn’t auto rotate, all the other map views do.
You can also scroll over terrain using one finger. It’s nicely weighted so you can push things along, and it’s sort of a 3D flyover effect. The map is shaded to give some sense of the topography but it is by no means a topo map.
It’s interesting to note that if you go to the GPS guidance screen (see below) you can modify the map to include 3D building views and landmarks. This is a curious place to put global settings that aren’t available elsewhere.
The landmarks are very nicely rendered.
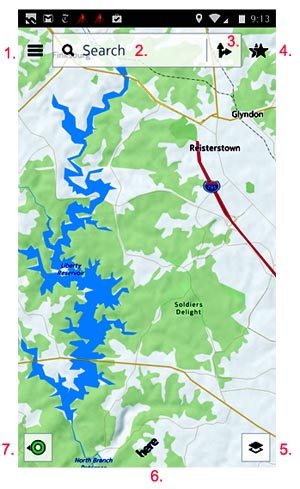
Map Interface Icons
Starting at the upper left and moving clockwise (see numbered image at left), the HERE map interface icons include the following (red numbers added to indicate the positions):
Three Horizontal Bars: Touch to open the global menu. You can select and download maps, go offline, choose where to store your maps if you have an SD card slot and access other functions.
Many are also accessible contextually so there’s no need to dig much deeper here. It does allow you to to go directly to the drive menu, select a location via search or history, and get on your way.
Search Box: You can type in a location, or if you tap it, a window comes up with a menu that allows you to select a destination based on specific services like restaurants or gas stations. Your history is also displayed.
Search works in both on- and off-line modes, but online will give you more choices.
For example: “gas station” came up empty offline, but if I type in “exxon”, a list is displayed, including distance from location, but the local one wasn’t there. Online, it was very detailed.
This is one of a number of ways to select a location.
Arrow Icon: This brings you to the route planning page (more detail below).
Double Stars: This brings up your favorites list/to do list/ and neighborhood list. Places to store information. New lists can be created. This info is automatically synched between your devices.
Compass Icon (Not Shown): You can orient the map any way you’d like using two fingers to rotate. At this point the compass icon appears and you can tap it to return to a north/south orientation. It then discreetly disappears.
“Layer” Icon: Press this to select a map layer. There are 3 choices: road map, satellite view, and transportation view. All are clear and detailed.
HERE Logo: Lets you know you’re using the HERE app.
Green Circle: Takes you back to your location.
The Route Creation Process
One of the unique features of HERE is the ability to do route planning. There are many ways to select a destination in the HERE map. You can enter a search for a specific place, address or destination or tap a location.
The tap may have haptic feedback on your device and a blue flag marks the location. The address and arrow icon appear at the bottom of the screen You can immediately tap the arrow icon and you will go to the route selection window.
You can also access your favorites lists and select one. A yellow flag will appear and you can then tap the arrow icon for the route page.
Or, go directly to the route page (tap the arrow icon next to the search window, or tap drive in the main menu ) and select a destination from your history, or do a search there.
You can also tap the search bar and search using specific service lists or history.
Finally, you can enter GPS coordinates in the search window. I copied and pasted from an app I have called “GPS Status” (Google Play), which requires a coordinate in decimal format.
While HERE can do this, it doesn’t seem to be a preferred method. It would be nice to be able to download waypoints from Adventure Rider and create a route, but they use a different format. This is Back Country Nav territory.
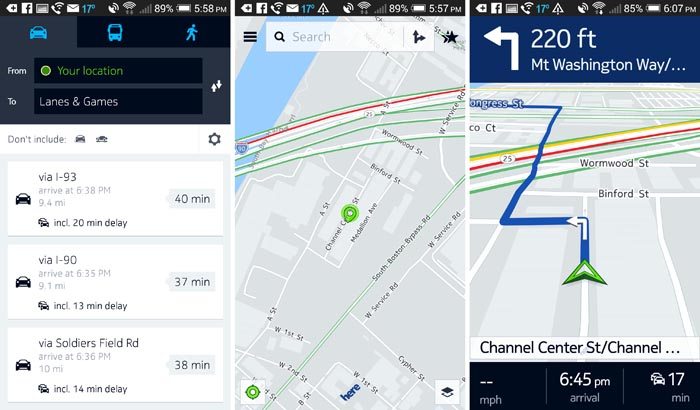
(L) Nokia HERE map screen. (R) Turn-by-Turn text instructions.The Route Planning Window
After tapping the arrow icon, you’ll come to a route planning page. Across the top you can select your mode of transportation. Below that is your from/to, and next to that is a reverse path icon.
To get back to your origin just tap it for the return journey.
Simple, but I could never find out how to do this with Navfree — never. Below you’ll see a gear icon. Tap it and you can choose what kind of roads you want to included in the route.
This is also available in the global settings but it’s much more useful here. Below that are your possible routes. No need to make a choice yet – just tap one and you go to the route map window.
Route Map Window
In this window you’ll see a route map. At the bottom there’s a blue area with route information. If you are online, it will include traffic info, otherwise not.
If this isn’t the route you wanted, have no fear. If you swipe this blue area sideways you can scroll the different routes offered. When you pull it up you reveal concise driving directions.
Tap any direction on that list and it will show a close-up map of that section. Hit the back arrow to return to a full view.
It’s pretty sweet and simple. Unfortunately, you can’t alter a given route directly on the screen as you can on the website. This map will auto rotate and is open to touch screen manipulation (magnification, orientation etc.).
Also, a large ± button is added for gloved hands. Once you have the route you want, tap the start icon and the GPS guidance screen comes up.
Oxford Strap-Nav and another view of the mounted smartphone.Before You Go Offline
Once you download the offline maps in HERE, you may want to select the “Use map offline” box in the HERE main menu. This will save a lot of data and unexpected roaming charges, so be sure to remember to tick this box before setting out on a journey.
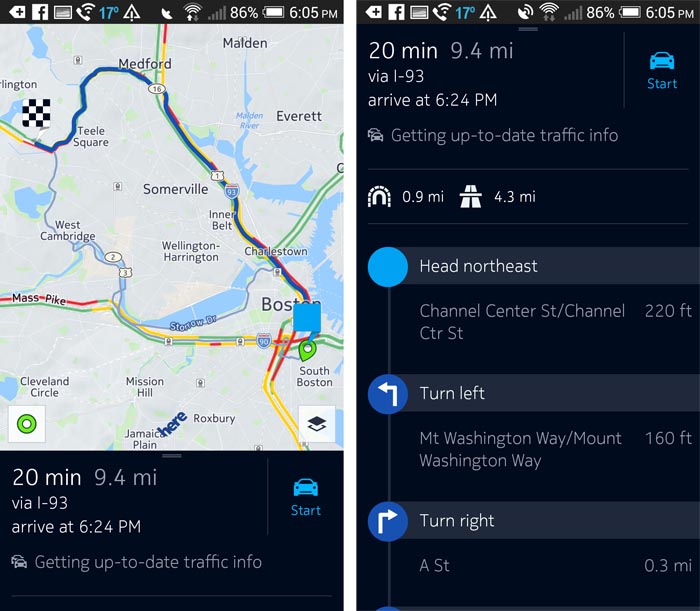
GPS Guidance Screen
The GPS guidance screen three sections.
The top has the travel icon and the present location. Pull down and you will get the travel directions list. Tapping them doesn’t bring up close-up maps as in the route map window; pull down again and you’re back to the original view.
The guidance map is customizable to show 3D buildings and landmarks. It is also responsive to touch gestures. If you want to travel the route you can change magnification and scroll around using one finger.
Once you start scrolling the map fills the whole screen. A tap brings the information sections back, as well as returning you to your location.
At the bottom is MPH, time, ETA and estimated time of travel. If you want to change the displayed information, or map settings, pull up on this section and a number of options present themselves:
Customize
Settings
These are map options, including changing things like day-night 3D; 3D buildings; route options; types of roads to include; traffic notification toggle; units (US, UK, metric) and voice (language and male/female).Some of these are global settings. For example, if you choose 3D buildings, these will show up on all the maps. This can only be changed from this menu. Others — though acting globally — can be accessed contextually.
Alternate Routes
So how well does it guide? Very well, thank you very much. I don’t usually use GPS while driving but I ran some tests.
These included going places via routes I’d never used before, and if you’re familiar with Boston, you know they included rotaries and multi branching roads that met by chance 200 years ago.
I didn’t use the map while driving ( I prefer not killing people), relying on voice and the upper icon for guidance. The upper icon changed as the road changed and gave me a clear idea, at a glance, of which lane to be in, which exit off the rotaries I had to take, and what was coming up.
The guide voice I have is that of a fairly stern British woman. She speaks concisely with a human cadence.
When you approach an exit or turn, a scintilla of excitement and urgency enters her voice — thrilling.
You can download other voices and other languages, but I’m sticking to this disciplinarian for now (don’t get me started)…
As with other GPS guidance, it sometimes had trouble when reaching the destination. I found this also with Google Maps and Navfree. But it always got me there, and took some routes I hadn’t used for years.
I also tested whether it could compensate for deviating from the chosen route and adjust on the fly; it could, and did it without a glitch. If alternate routes were available it switched to them (and some were pretty obscure). If none were, it strongly recommended a U-turn.
Nokia HERE real time traffic report. Note “Feedback” screen open at lower right; this is where you can report a map issue or new/updated/incorrect address.Sharing Information
The HERE app leverages social networking and device synching. This can be useful for meeting other riders and letting people know where you are. It can also help you recall special places on the route.
Let’s go back to where you chose your destination. If you tap the marker, a pop up offering you to “collect” or “share” appears.
Collect
This let’s you add it to an existing collection or to create a new one. I’m using this on two Android devices and my history, favorites, etc. are shared automatically between the devices.
Additionally, my online account on my main computer (a Mac), is also synched. Not sure if this done automatically with my Google account or it’s a function of the Nokia HERE system, but I’m guessing Nokia.
Share Using…
TThis lets you send the marker info via any social apps you have, or to any relevant storage apps like Dropbox or note-taking apps. It also can share via Bluetooth when offline.
Example: I sent myself an email and I received a URL that took me to the HERE website and showed my location on the map. If you’re planning to have a friend meet you, this would be very handy, as they can now plan a route from their location.
Share Using lympse
Glympse is an interesting app. From their website: “Glympse is a fast, free, and simple way to share your location in real time with the people you trust. Send a Glympse to your friends to let them know you’re on your way.
Request a Glympse of your friend who is always running late. Create a group for your family reunion.”

I clicked on it and sent a text to myself. The text had a URL that took me to a map with my location. At this point the map will track you in real time — leaving a “breadcrumb” type trail — and give ETA info.
You can set how long this map will be viewable by the recipient, with a maximum time of 4 hours. You can see how this could be useful either in letting others see where you are, or, if you’re meeting someone and they have Glympse, you can track each other.
I can see my friends yelling at the tracker: “Turn right you dork, not left, RIGHT…”. But no one said it would be pretty. It isn’t necessary for the recipient to have the app; in fact, the capability must be embedded in HERE because I don’t have the Glympse app installed separately.
Important: when not in use, it does not track you, it only activates when you activate it.
Sharing From the Computer
I haven’t been able to to share routes from the computer to PDAs. This would be great since the maps are more malleable on the computer. The computer based account has “share to car” with Volvo and Mercedes listed, so it seems reasonable that this functionality will be expanded in the future.Just as Favorites are synched between PDAs and your computer-based HERE account, Favorites added on the computer will also synch to your PDAs. I think this kind of networking is part of what makes the app special.
Conclusion
I have found Nokia HERE to be an excellent app. What it does is essentially pretty basic — GPS guidance — but all the moving parts are in one place and they all work well; in this aspect it is unique.
The ability to create routes offline is great and not possible with all offline apps. The maps are detailed, accurate and pretty much cover the entire earth. The interface, with minor caveats, is well thought out and intuitive; it is a pleasure to use.
It can synch and share. It isn’t sandboxed so it takes full advantage of the OS, and apps that you’re familiar with.
To be honest, most of the features I’ve noted I would never have found if I wasn’t writing a review. When testing, I typed a location, chose a route, tapped drive, stuck my phone in a cup holder and away we went.
I hit the reverse arrows and drove home. It’s as simple and reliable as that. The rest is there if you need it, or want it.
Nokia takes HERE very seriously. According to their website, they employ about 6,000 people on the project, and crowd source to about 80,000 people. In fact, they have a map creator section on the website that would enable you to contribute.
According to the site, they make exactly 2.7 million updates daily — that’s a lot — but I’m sure it doesn’t include holidays. They just signed a contract with Samsung to supply HERE to their devices.
In short: It is well supported and I’m guessing it will continue to be. I’d like to hear user experiences from riders who are using it on a regular basis.
Other Off-Line GPS Apps
This article is about using a tablet for GPS instructions while riding a motorcycle and that means off-line GPS. Other map software that can be used off-line includes:
Google Maps: Google maps can be saved offline (here are the instructions), but there are some issues with using the maps this way.
Navmii Navfree: It’s free and open source (two things I love) and it works, but it’s clumsy, it doesn’t leverage touchscreen technology or social networks. Its icon-based menu is frustrating to use.
I found it discouraged curiosity, so it might have functionality I don’t know about but when basic things like “search” are difficult; you just stop caring.
It also exhibits local road names over route numbers until you zoom in, but since zooming is a “tap-tap-tap” affair, it all becomes time consuming. As far as I can tell, you can’t create routes off-line.
But once you get it going, it works well and has helped me out of some jams. The maps (by Mapquest) are good and are updated regularly.
Back Country Navigator: This is another kettle of fish. It’s very sophisticated and has numerous possible map overlays including BLM and topographical maps. The free default is the same used by Navfree and it is good (Mapquest).
It has the capability creating GPS tracking maps. For the right person it would be an valuable tool.
It is not free and certain maps cost extra, but as you get further into the boonies on extended trips, I’ll bet it’s worth the price of entry (about $10.00). I have it on my PDAs and as I venture deeper into the GPS world I can see using it in conjunction with HERE.
MapFactor Naviagator Free: Another off-line map app based on the open source “OpenStreetMaps” project. This provides turn-by-turn GPS navigation for Windows, Windows Mobile devices and Android devices.
Sygic:– Claims to be the most downloaded off-line map app of all time. Works primarily with off-line maps. Downside is that it’s not free; a license must be purchased (currently $34-$70 plus more for extras) but then you get free map updates for life.
Versions for Android, Apple and Windows phones. Aldo does route planning.
Copilot: Paid app, costs $9.99 and extras cost more (traffic alerts, etc.). For Android, Apple and Windows devices. Has routing features. Does not have text-to-speech.
Publication Date: January 2015
Owner Comments and Feedback
See details on submitting comments.
From “B.P.” (August 2015): “Just a minor update to “Using a Tablet as a GPS: Part 2.” Peter Harris wrote that “HERE isn’t available for iOS at the moment, although the mapping site can be accessed via any browser and it is a very good alternative to Google Maps.”
I’m sure Mr. Harris anticipated this, and for anyone interested: now, a year and a half since that excellent article was published, HERE is available as an iOS app.
I don’t know when it was officially released for iOS, but it certainly is alive and well now — I’ve recently ditched an ancient Garmin that I used to use on the bike in favor of HERE on my iPhone 6.”
From “J.S.” (April 2015): “After reading you Part II article, I decided to give this option a go. I have been using an automotive type Garmin for the last five years but was ready for an upgrade. Especially wanted a unit that would accept GPX file uploads.
The flexibility and cost of the tablet option was the main reason for going that route.
I bought a factory refurbished Hisense Pro and the Ram X finger mount. Total investment so far is about $150. I tried the HERE software first and while it is an excellent option it did not have the functionality that I was wanting.
All my trips are normally planned ahead of time turn by turn and I was not able to do that with the HERE software.
Next I tried the MapFactor Navigator which has been exactly what I was looking for. Did a fair amount of web forum surfing but sorted out how to load GPX files directly to the tablet into the MapFactor software.
This is what really sealed the deal for me with this software.
In short, I can plan my trips as such: use Google Maps on the computer to plan the route, export the route as a KML/KMZ file, import into software like Garmin Basecamp to convert this file to a GPX file, use a free MapFactor converter to import the GPX file into the MapFactor software.
And then hit the road without needing any data plan up to this point and all free software.
My wife and I recently rode our newly purchased 2014 Ducati Multistrada (report) from Florida to Illinois, a 1,200 mi trip, using the tablet and MapFactor. Worked great…and you can’t beat the price and functionality.
Still working out a few of the kinks like where to mount the tablet now that I have a tank bag installed since there is no room on the handle bar without interfering with the bag. Laying it flat made it unreadable due to glare.
Ended up mounting a Ram ball directly to the top of the tank bag so I could tilt the screen enough to get rid of the glare.
I rarely buy anything without checking your site first for a review first. Thanks for all the info you provide and keep it up! I am a big fan!”
From “F.K.” (January 2015): “I’ve been looking at the use of a phone (tablet) as a GPS for a couple months now. Right now, I’m using a Samsung Galaxy 5 Active paired with Sygic GPS/Routing application.
The phone is waterproof and dustproof (IP67), and will replace my Zumo 550. Though the phone is (allegedly) waterproof, but I am debating further waterproofing via a Otterbox type case or a zippered case as you show.
The Galaxy 5 has one of the brightest screens available — a reason for choosing it.
The Sygic app was chosen primarily because maps can be downloaded and not require a data link. The subscription is a once paid, lifetime license. Here’s a blog entry about adding custom routes from other applications to Sygic.
There are some groups working on making routes from applications such as Google, Michelin and others. The app and maps are based on TomTom mapping.
Overall, it is pretty workable, but does have its own quirks. I have not decided whether these quirks are a deal-breaker, yet. Large phone, phablet, and phone are the wave of the future.
Getting these devices mounted and keeping them dry is going to be the trick.
Applications and interfaces are almost there, and with the GPS language translators, planning route on a large screen computer and moving the routes to the portable devices is getting to be almost easy.”
From “J.J.” (January 2015): “I’m glad I came across your article on using a tablet as a GPS. I’ve been doing this with my Nexus 10 since last summer. I find that it works very well. I started off withSygic and have tried Copilot as well.
The most frustrating part I’ve found so far is a lack of tools to do significant route planning. I’d love to be able to do more turn by turn setups if it were available. Please do publish another article if you find something that will do this. I’d love to hear about it.”
Editor’s Reply: The Nokia HERE map system does route planning, as described in the article above.