
Changing the front tire on a Triumph Thunderbird Sport motorcycle is a fairly straightforward process, but there are a couple of issues that need to be resolved to successfully complete the task.
The first problem to be solved is figuring out a way to get the bike up off the ground. I haven’t owned a motorcycle without a center stand in a long, long time, so I was a bit baffled at how to lift the front of the bike up to get the front tire off safely. I’m sure there are many ways to do this, but I opted for the tools I had on hand.
Another slight problem I ran into was the availability of a 12 mm hex tool on a 3/8″ or 1/2″ drive socket to remove and replace the front axle. You really can’t remove the axle bolt with an “L” shaped hand-held hex key, because you’ll need to torque the front axle nut to 70NM when reinstalling it.
You definitely want to make sure you have the correct torque on this bolt, and you don’t want to overdo it by using a “cheater” pipe over a hex key, as I believe the nut is made of aluminum or some type of lightweight metal that can easily be stripped. The problem arises in finding a 12 mm hex tool in socket form — we’ll take a look at a good substitute.
At this point in time, this is still a work in progress. As we’ll see, after installation of the new tire, I’ve been experiencing some “bouncing” of the front wheel. There may be a couple of reasons for this — I haven’t quite got it worked out yet. We’ll take a look at some of the possible causes, and I’ll report back as I make progress on solving this kind of weird problem. (NOTE: Problem solved! See below)
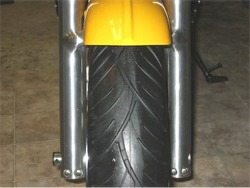
 When I purchased the bike, the front Avon AV27 tire (size 120/70-ZR17) was worn down almost to the wear bars, and was moderately cupped (photo, below).
I didn’t think it would pass inspection, which is necessary in my state to get a new set of license plates, so I opted to replace the tire.
I searched around and found that the AV27 was being replaced by the Avon AV45, so I purchased a tire, tube and rim strip from the Motorcycle Mart.
This company seems like a nice place to deal with; the tire wasn’t in stock, but they found one and shipped in when he said they would, sent me a UPS tracking number via email, and followed up when I had some questions.
I borrowed a friend’s rear swingarm stand (I’ve since acquired one of my own; see the wBW review of the Steel Horse swingarm stand, which works great on the Thunderbird Sport). Unless the bike has a center stand, a rear stand will probably be necessary to lift the bike for routine maintenance.
I tried to balance the bike by using just the rear wheel stand and by lifting underneath the engine with a hydraulic floor jack. But the bike seems to have a very sensitive point of balance, and the whole setup was too precarious to work on the front wheel without tipping over.
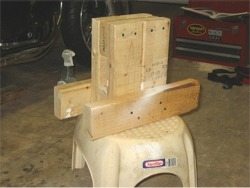
I pondered this for a while and came up with the idea of using a couple of 2×4’s to make up an auxiliary stand that, along with the hydraulic floor jack, would keep the bike more stable while I worked on it.
This photo (above) is the result — something I whacked together in short order.
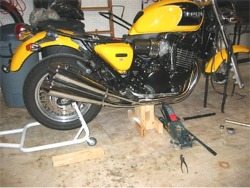
Next is a photo of the bike on the rear swingarm stand (in this case a Lockhart Phillips model; see the wBW Review of the Steel Horse swingarm stand, which works great on the TBird); the hydraulic floor jack (purchased at Wal-Mart) and the cobbed together wooden stand.
The wooden stand really helps to stabilize everything — it’s definitely not super-secure, but stabilizes the bike enough to allow removal of the front wheel with some security.
I used a 2×4 placed perpendicular to the bike’s centerline and between the hydraulic jack and the engine to help lift the bike on the jack. You’ll have to be very careful to find the exact balance spot — it took me several tries before I found it.
I slowly jacked up the bike, while holding on to the right handlebar, until the front end lifted off the ground. Then I slid the homemade wooden stand underneath the rear of the engine and slowly released some pressure on the jack until the bike was resting on both the wooden stand and the jack. The stand definitely gives the bike more stability than just the jack itself.
Note that both the wooden stand and the hydraulic jack are used together to hold the bike. This helps to share the load, making the bike stable enough to allow me to safely work on the front end.
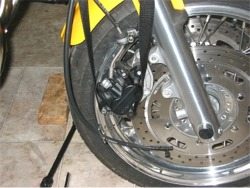
After the bike is secure, the next step is to remove the front wheel. I had these two nylon tie-down straps with a friction buckle that I got at Wal Mart.
They’re pretty much useless for holding anything down, but work good at holding brake calipers up to take any stress off of the brake lines. You don’t really want the calipers dangling in the air with all the weight on the brake lines!
The speedometer cable is held in place with a Phillips head screw and is easily removed.
To remove the front axle, you’ll need to unscrew the 12 mm hex bolt on the left-hand side of the bike.
This bolt takes 60NM of torque to reinstall, so a torque wrench should be used for this application. A hex key with a cheater bar could do it, but this will run the risk of stripping the threads or failing to apply the correct amount of torque on this critical bolt.
Sears doesn’t carry a 3/8″ or 1/2″ hex socket, so I bought a Sears Craftsman 12 mm hex key and used my Dremel tool cutoff blade to cut off a length of about 1.5″.
A 3/8″ drive, 12 mm, 6-point socket fit perfectly over this hex key stub, and allowed me to use the 3/8″ drive torque wrench to apply the correct torque when I reinstalled it. By the way, I don’t believe that Loctite should be applied to this bolt — my feeling is that it’s at the limit of how much torque it will take, and the increased effort resulting from an application of Loctite might result in stripped hex flats on the bolt.
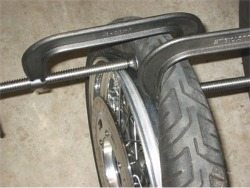
Once you get the tire off, there are numerous ways to break the bead and remove it (See the wBW Motorcycle Tires page for information on tires, tire removal, balancing and more).
I usually just take a long (about 6 foot) 2×4, wedge it underneath my car, and place a smaller (about 10″) section of 2×4 over the bead. The amount of leverage I get breaks any bead very easily. Here’s a wBW article on the fastest, easiest and cheapest motorcycle tire bead breaker I’ve found!
In this case, I had a couple of C-clamps laying around, and decided to see how easy it would be to break the bead with them. This is not a good solution — I couldn’t get the bead to break on the other side of the tire, and ended up using the 2×4 method.
I’ll stick with 2×4’s from now on, because it’s so easy to do and works so well. Just remember to lay the wheel over a couple of pieces of wood to keep the disk from hitting the ground while you do this.
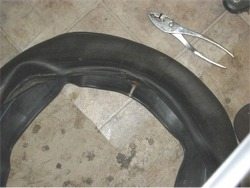
Here’s problem #1; an issue I’m still trying to resolve (See below). The tube that came out of the bike (original equipment, I presume) was labeled “Avon 120/70-17”. It’s laying on top of the new tube in this photo, with the valve showing.
The tube that was sent with the new tire was an IRC multi-sized tube. It supposedly fits any 17″ tire, from a width of 4.00 to 5.10 or 110/90-17 to 130-80-17. When I laid the tubes down, one over the other, I realized that the new tube was much wider than the original tube.
Before I did anything else, I searched the Internet and local bike shops to see if anyone had a 120/70-17 tube. Unfortunately, this is a very rare tube size. The Triumph dealer can get one for $42.00, which is beyond outrageous for a tube, especially since the IRC cost $6.99!
After talking to a couple of shops, and some emails to a couple of motorcycle lists, everyone assured me that the multi-sized IRC tube would work.
So I installed it in the new tire with reservations. The tube really doesn’t feel like it fits properly — it’s hard to get it placed correctly and it feels like there is too much extra tube being stuffed under the tire and that it will fold over and not fit inside the tire.
I’ll get a bit ahead of myself here by saying that after installing the IRC tube and balancing the tire, I took the bike out and found that it has a repetitive bouncing feeling coming from the front end. Starting at about 35 mph, the front end feels like it will start about a 6-7 part bounce, then stop, then 6-7 bounces, then stop, then bounce…… it goes on and on. Once you get up to around 60 mph it kind of smoothes out, but only because the bounces are coming with such frequency that they sort of disappear into the background chassis feel
At this time, I’m not really sure where this is coming from — I didn’t ride the bike enough with the original tire to be able to compare, because I didn’t have it licensed because it wouldn’t pass inspection with the old tire (sort of a “Catch-22”). But I’m assuming this bouncing is something that has just started with the installation of the new tire.
I’ve tried every suspension setting, front and rear, that I can think of, and nothing
takes out the bounce. So my feeling is it’s got to be coming from the front end, and I suspect the tube is bound up in there or somehow has too much rubber and is causing the problem at speed. I took the front wheel off 3 times to check the balance, which was fine, but the bouncing continues.
I then conducted an exhaustive search to try and find a 120/70-17 tube, but without success. Cannondale’s new S440 Super Motard bike uses this tube and it’s listed as Cannondale part number 5002508, but I haven’t been able to find either a dealer or a tube (Note: Since this article was written, Cannondale’s motorcycle manufacturing unit is no longer in business, so the part is no longer available).
I suppose I should have simply ordered the $42.00 Triumph replacement, but I guess I’m stubborn — and I want to see if there’s a cheaper alternative for the benefit of the TBS riders out there! The answer is… YES1 I have since found that a 4.00-4.50 size tube is almost identical to the original 120/70-17 and works fine! Kenda makes a tube of this size, and it can be ordered by almost any motorcycle dealer in the U.S. through Parts Unlimited. It only costs about $7.00 too…see below)
So after some discussions with the local Triumph dealer, we ordered a Kenda 4.00-4.50 butyl tube. I’ve heard that the butyl tubes don’t last as long and leak more air than the rubber ones, but we’ll see if this works. It’s supposed to come in this week, and I’ll have to remove the wheel yet again and replace the tube. I’m keeping my fingers crossed……. (see below for Part II of this saga).
Also — see below for more information on finding a 160/70-17 motorcycle tube for the rear tire of a Triumph Thunderbird Sport.
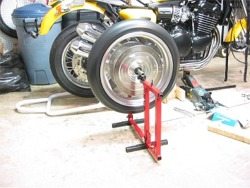
Meanwhile, back at the ranch, I balanced the tire/wheel assembly using Rod Neff’s excellent tire balancing stand (see the wBW review of Rod’s balancing stand for more information).
I ended up only needing about 15 grams of weight to balance the tire, which is pretty good for a tubed tire.
The Triumph dealer also sells Yamaha, and he talked me into buying a can of this Yamaha Tire Mount Lube. It’s meant to be sprayed on the tire prior to mounting on the wheel. It’s pretty slippery stuff, but it’s very messy and gets all over everything. It gets sticky after a few minutes of exposure to air.
The tire went on the rim with relatively little force, but since I haven’t tried mounting this tire using anything else, I’m not sure if this product helped it to go on easier or harder than, for example, a simple solution of water and dishwashing soap.
The bottom line is that I don’t recommend this stuff — it’s very messy to use.
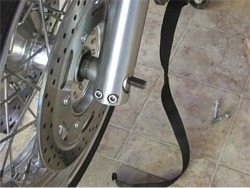
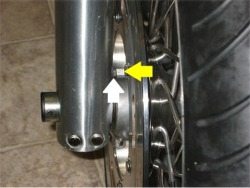
One thing I forgot to do was to correctly line up the boss on the speedometer housing with the boss on the front axle prior to installing the front axle when re-mounting the wheel.
I ended up getting everything back together, then having to take both brake calipers and the wheel off again to get the speedometer installed correctly. Don’t make my mistake!
This photo shows the correct installation. The speedometer boss (yellow arrow, photo left) must be located behind the boss on the front fork (white arrow) to help prevent it from rotating when in motion.
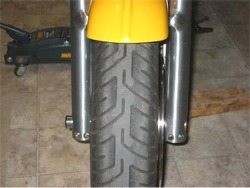
The finished product — a brand-new Avon AV45, mounted on the TBS. I will report back when I’ve solved the front end bouncing problem…
Meantime, this is a great handling front tire! I feel more confident with this tire leaned way over than I do on other bikes when I’m going straight!
Balancing/Front End Bouncing Problems, Part II
I took the front tire off for the 4th time and replaced the oversize front tube with a 4.00-4.50 Kenda tube. This is definitely a much better size, and is almost identical in size to the original 120/70-17. It cost $6.99 and should be available at any motorcycle dealer — they can order it through Parts Unlimited or one of the other distributors.
That’s the good part. The bad part is that it doesn’t do anything to solve my front suspension problems. It definitely feels different, and has helped me realize that I think what’s happening is that the front suspension damping — the rebound and compression damping — are not working as they should. It just doesn’t seem like the settings make any difference, and they certainly don’t solve the problem.
So I guess the next step is to pull the front forks and check/change the fork oil. I may bring the forks in to the local dealer to give them a once-over and check the bushings. If it’s not the fork oil or the forks, then I’m completely stumped, and there must be something weird with the chassis of this bike. It’s getting very frustrating……
NOTE: I think I’ve solved the problem! Believe it or not, the bike only had 1/2 of the amount of fork oil that is required! Since the original owner didn’t change the fork oil, the bike must have come this way from the factory. I wrote up the details in “Changing the Fork Oil – Triumph Thunderbird Sport“.
Rear Tire – 160/70-17 Motorcycle Tire Tube: Since the Supermotard craze, tubes for radial tires have become a bit easier to find. The Motorcycle Pro Shop in the U.S. has tons o’ tubes: they carry a Metzeler 160/70-190-50-17 tube (their part number 110-6613) for about $23.00.
In the U.K., you can get a 160/70-17 Pirelli tube for the rear tire at Haines & Co. for about £9.00.