We’ve published enough paint protector articles to last a lifetime and a half, so this one will be brief.
I guess you think we’re obsessed with paint protection, but hey — motorcycles are expensive, the paint gets dinged and scratched by nature and who knows what else (including zippers, buttons and leg-overs) and, well, it just seems like the right thing to do.
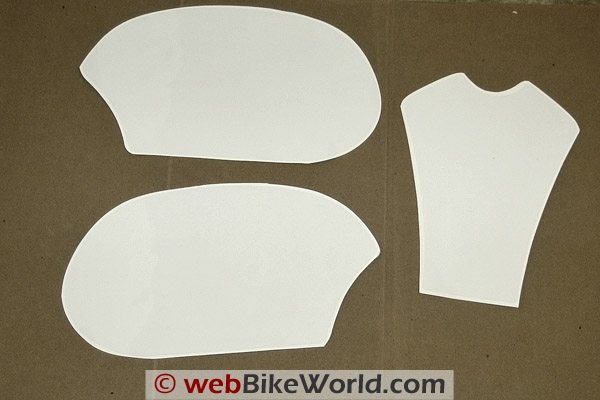
Chris covered, if you’ll pardon the pun, the Tankslapper paint protection kit for his FJR1300 a while back, and I’ve had a GT1000 kit banging around for some time, so I decided to take a whack at it.
We’ve been using 3M and other types of clear vinyl paint protection film for some time; I think it was back in 2000 or so when we got hold of some 8 mil 3M Scotchcal and laid it on a volunteer’s BMW R1150RT. That stuff worked (and still does), but it was thick and fussy and it took lots of elbow grease, water spritzing and swearing to get it right.
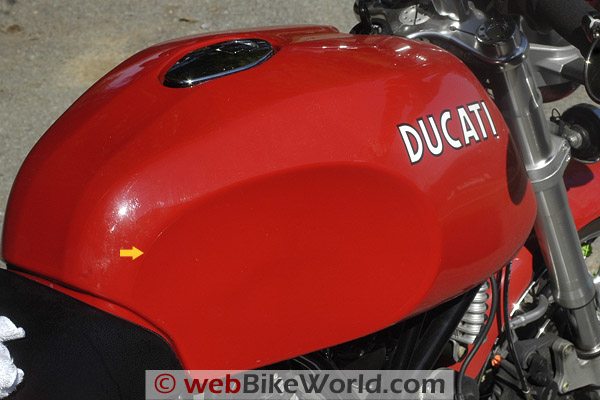
Ducati GT1000 Paint Protection Ki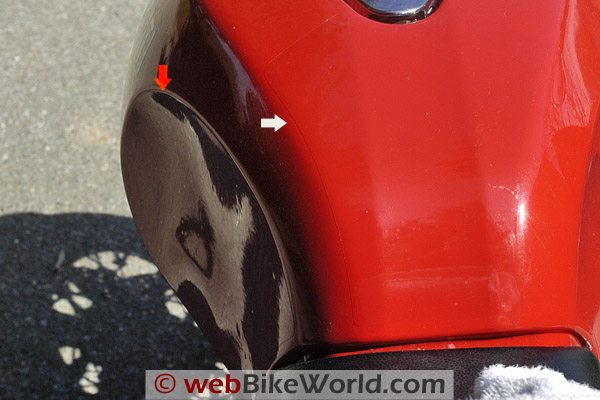 White and red arrows indicate the barely visible edges of the clear vinyl paint protector. The yellow arrow indicates the barely visible edge of the clear paint protector vinyl. Those are our grubby fingerprints and leftover spray, but you can see the edge of the clear vinyl.
But you don’t have to roll your own — Tankslapper makes precision-cut kits for many bikes, which takes a good chunk of the anxiety out of the job (remember the time I cut the pieces backwards and had to throw away about 40 bucks’ worth?), and the stuff is nice and pliable, making it easy for just about anyone to get it right.
They do sell the 3M clear vinyl paint protection if you still want it. The 3M vinyl has a type of glue on it to help it stick, but the regular ol’ Tankslapper brand seems to work just fine. In fact, I didn’t realize that the Tankslapper brand didn’t have glue on it until I went to buy another kit for the Multistrada last week and discovered there were options at checkout time.
By the way, they also sell clear, pre-cut headlight protection vinyl, and I bought one of those for the Multistrada and will report on it when it arrives (we covered this also in this article).
The same cautions that we have described in all the other articles apply to the Tankslapper product. I first use pure rubbing alcohol on a soft rag to wipe off the surface and clean the old wax off the surface. Get it nice and clean and dry; any dust or dirt underneath may show through.
Then use an old spray bottle and mix up some water, a couple of drops of dishwashing liquid and, oh, I don’t know — a tablespoon or so of rubbing alcohol and you’re all set.
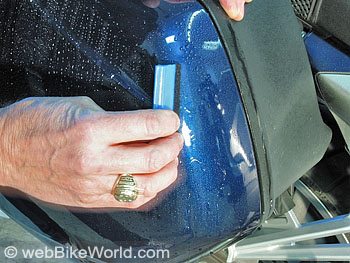
Spray everything until it’s nice and wet — including both sides of the vinyl. Slide it on and start squeegeeing (is that a word?) out the air bubbles and liquid, working from the center out. I use my wet fingertips and press lightly, working most of the bubbles out before I use the “professional” squeegee (that is a word!) that you can buy from Tankslapper or at your local auto parts store. Or you can use an old credit card or piece of stiff cardboard.
Don’t overdo it, and we think the key is to press lightly rather than trying to wring the life out of it. Don’t worry about a few tiny bubbles here and there; most of them will disappear by the next day.
After everything looks good, let it sit overnight and it should bond very nicely. It can be peeled off if necessary, like when you go to sell the bike and the paint looks brand-new because it is.
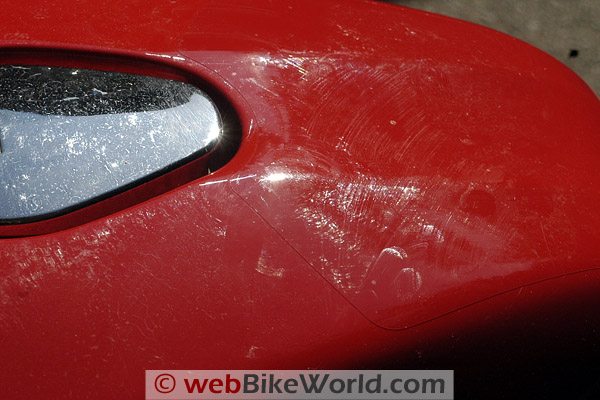
In 2000 we didn’t have video technology like we do today, so Burn and I created a short video to show you how it works. The GT1000 looks great — it really was starting to get scratched up from my legs and gut rubbing all over the tank during spirited riding — so it was none too soon for some paint protection. It’s cheap, it’s easy, now you have a video to show you how…what more do you want? Get out there and do it before it’s too late!
| Product Review: Tankslapper Motorcycle Paint Protection | |
| Available From: Pacific Auto Trim | Suggested Retail Price: Tank kits starting at $15.95; Total protection kits from $44.95. |
| Colors: Clear | Made in: U.S.A. |
| Product Comments: Patience required! Review Date: April 2008 | |
Note: For informational use only. All material and photographs are Copyright © webWorld International, LLC – 2000-2011. All rights reserved. See the webBikeWorld® Site Info page. NOTE: Product specifications, features and details may change or differ from our descriptions. Always check before purchasing. Read the Terms and Conditions!
Owner Comments and Feedback
Not all comments will be published (details). Comments may be edited for clarity prior to publication.
From “D.M.”: “I had the Tankslapper kit professionally applied to a BMW R1200S and must report that it was a waste of money. Being thinner it likely should be easier to apply than the 3M product but the installer had a very difficult time. The next time the bike was in for service, I was told that their complementary hand wash had torn the product and it had shifted from the water hose elsewhere. I ended up giving up on the product and ripped what remained off the bike. It was upsetting as my brand new black BMW would show a scratch just looking at it so I wanted to protect my investment.
I must tell you that the people at Tankslapper were great to deal with and I only wished the product had worked. I don’t know if I am an isolated case (I hope so) but that was my experience.”
From “D.W.”: “Once it is properly installed, does it accept the same polish as the unprotected parts of the tank and shine as brightly as the paint?”
Editor’s Reply: Good question, and I guess I took it for granted on this. The film does stay relatively shiny, and it seems to accept polish (which accumulates as white powder around the edges so I run my finger around the outline to clean it) and although it looks pretty close to the original finish, it’s definitely not as smooth or shiny as paint.
The film is soft, so it will become scratched, but that’s the idea, it’s a sort of sacrificial element that gives up its life to protect the paint. If it gets bad enough – and I’ve never had that happen after using it on several bikes – it can be peeled off and a new one installed.
The film will accept most motorcycle polishes, but in our experience, polishing the surface of the film doesn’t really do anything, so I usually don’t bother.