Suzuki DR650 Center Stand and Lowered Foot Pegs
The SW-Motech center stand is well designed, fairly easy to install and provides a very solid platform.
The lowered foot pegs were installed at the same time and they provide a slightly more comfortable riding position, albeit with more vibration felt by the rider.
I have probably owned more motorcycles without a center stand than with, but I do know that a center stand is a very handy accessory.
I’ve lived without one on the Ducati Multistrada 620 (blog) for several years, but I decided that a center stand was needed for the DR650…probably because the DR650’s side stand seems a bit clumsy.
Actually, it’s more difficult to install a center stand on the Multistrada because of its “frameless” lower end, so I never really considered it (although I believe there are center stand kits available for that bike).
But when I found the SW-Motech center stand kit on the Pro Cycle website, I figured “Why not?”
I’ve been pleased with all of the SW-Motech accessories we have installed on various bikes over the years, so there was a certain amount of trust in the brand.
Many of the SW-Motech products, including the DR650 center stand, are designed in Germany and made in Europe.
They are also TüV (Wikipedia) certified, which also lends a certain level of trust that the product will perform as expected and not interfere with or damage other parts or performance of the bike.
For example, the excellent and robust bash plate installed on our DR650 “Budget Adventure Tourer” is also an SW-Motech part.
One expects both a quality product and an exact fitment when buying an SW-Motech accessory…and that’s worth a premium in my book.
Ask anyone who has been around motorcycles for a few decades and they’ll tell you that it wasn’t always that way.
Back in “the good ol’ days”, cobbling together bits and pieces to get a part to fit was considered the norm.
You’d buy a center stand kit, for example, and get a bag of parts with questionable quality; a sack of generic fasteners (half of which were missing and the other half of the wrong size) and — if you were lucky — an instruction sheet printed in Sumerian cuneiform.
Or some other language just as difficult to decipher…
But the SW-Motech stuff fits (at least so far in my experience), comes with high-quality hardware and it works. And, you get a printed instruction sheet in the language of choice.
Faults?
Well, the instructions are usually minimalist and done in the universal language “exploded” diagram format.
So if you’re slightly dyslexic (like me) or have trouble bringing 2D spatial relationships into the real world, it will take some study to figure it all out.
DR650 Lowered Foot Pegs
PPro Cycle sells both the SW-Motech center stand and a lowered foot peg kit for the DR650.
They sort of hint that it’s a good idea to install both at the same time or, rather, that if you’re installing one, you might as well install the other.
Since the foot peg/seat position relationship is the only nit I have to pick with the DR650, once again, I figured “What the heck” and broke out the old credit card. Good thing about those credit cards…
My complaint about the stock pegs on the DR650 is that they seem too far forward for me, although the vertical positioning isn’t bad for my 30″ inseam.
But I’m constantly feeling like I want to move my feet back a couple of inches or so.
The Pro Cycle “Lowered Footpegs DR650SE ’96-’12” kit is pretty expensive at $139.95, but the foot pegs seem very nicely made and they look much more business-like than the stock Suzuki pegs.
The Pro Cycle foot pegs have doubled-up cross pieces and a thicker gauge metal. They sort of make the stock foot pegs looks like something that came off a kid’s bike in comparison.
Pro Cycle just recently added the “Pivot Pegz Mk3” foot pegs to their product mix and you can now buy their lowered foot peg kit with the Pivot Pegz installed instead of the standard lowered foot pegs I used.
But I like the black lowered foot pegs just fine, and adding the Pivot Pegz adds another 150 bucks to the bill! Yikes!
The standard lowered foot pegs are wider and, of course, lower than the stock pegs and yes, they do stick out a bit more, adding some width to the bike.
The dimensions of the stock pegs are about 40 mm (~1.96″) front-to-back and they’re 73 mm (2.88″) long (wide).
The Pro Cycle lowered foot pegs are 49 mm (~1.94″) front-to-back, 81 mm (~3.19″) long (wide).
The lowered foot pegs are about 40 mm lower (~1.75″) than the stock pegs and they stick out about 16 cm (~6.4″) wide on either side, which is about 25 mm (1″) wider per side than the stock pegs.
The mounting bracket that holds the lowered foot pegs appears to be heavier and thicker than that used on the stock foot pegs, although the lowered pegs do seem to bounce around more loosely on the rotating spring-loaded mechanism more than the stock pegs.
It’s also important to note that the lowered foot pegs do not have the rubber vibration isolators found on the stock foot peg mounting bracket.
I’m not sure why they didn’t or couldn’t add these, but the lowered foot pegs do transmit more vibration to the rider.
It’s more noticeable when wearing some types of motorcycle boots and/or at lower revs, but so far it hasn’t bothered me, although I haven’t taken a longer trip yet with the new lowered foot pegs installed.
Here are a few photos of the lowered foot pegs:
Where to Buy SW-Motech Lowered Foot Pegs
Check Reviews & Prices on AmazonSee More: Motorcycle Accessories, Motorcycle Tire, Motorcycle Helmets
 Height difference between the lowered foot pegs (right) and the stock Suzuki pegs.
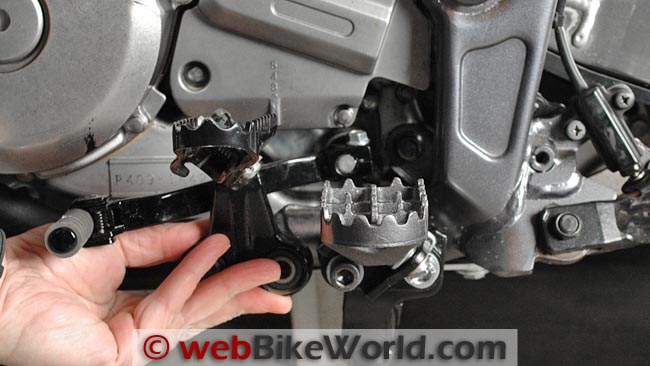 Another view of the height difference between the Suzuki foot pegs (left) and the lowered foot pegs.
 Close-up of the “teeth” on the lowered foot pegs.
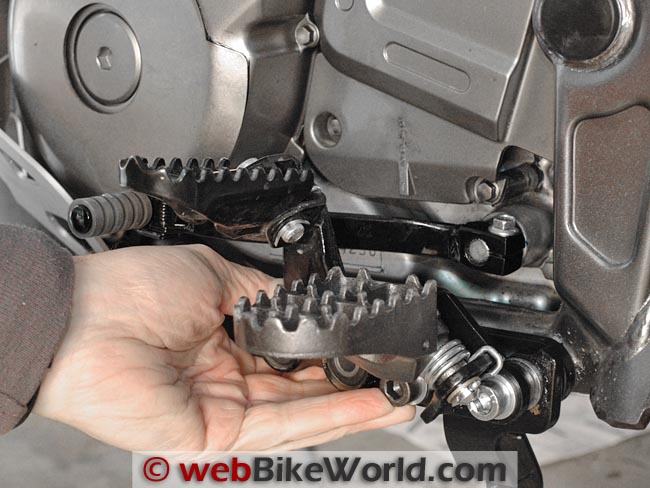
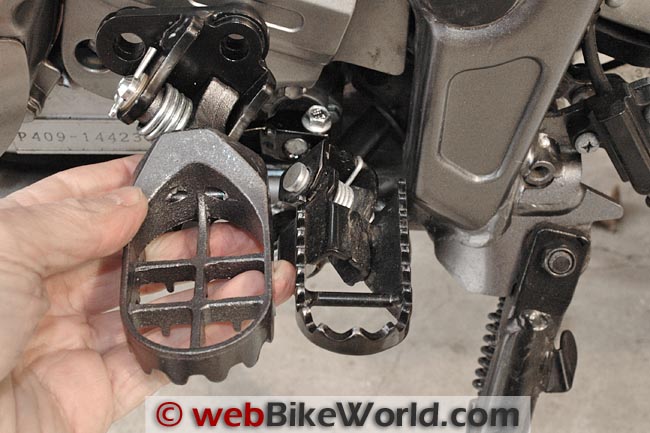 Width different of the stock vs. lowered foot peg (held upside-down here to get them side-by-side).
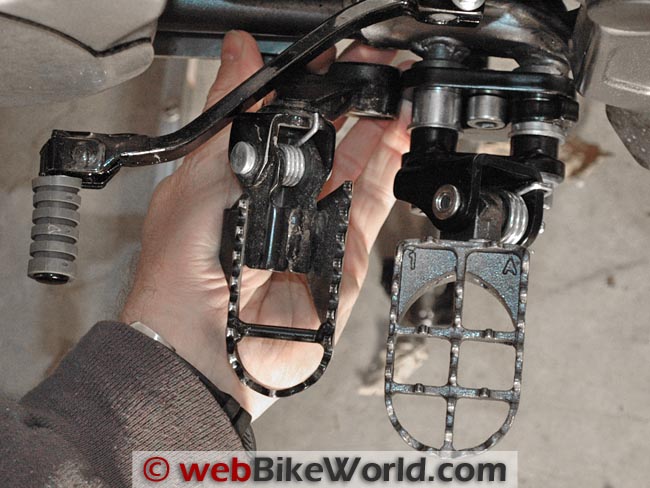 Width difference between the stock Suzuki foot pegs on the left and the lowered foot pegs on the right.
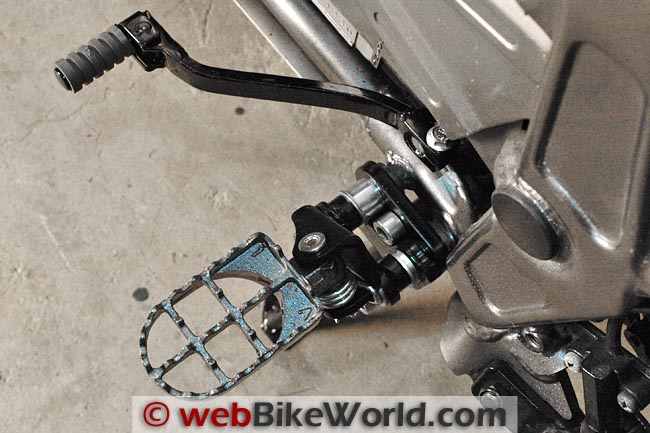 Illustration of the relationship between the Moose shift lever (review) and the lowered foot peg.
Installation
I installed the DR650 center stand along with the lowered foot pegs over a couple of evenings. It was dark (and cold) in the garage so I didn’t get as many photos as I would have liked.
And, I’m not going to repeat the entire assembly instructions here, because it’s pretty well documented in the SW-Motech kit and the lowered foot peg kit from Pro Cycle.
But I can say that the job is fairly straightforward, as these things go.
The SW-Motech kit comes with a good set of instructions and another nice feature of SW-Motech gear is that they always (usually) provide a listing with images of all the included nuts, bolts, washers and assorted hardware.
It always pays to first lay out all the hardware and make sure you identify it according to their illustration.
If you’re not familiar with metric hardware, be sure to have a metric scale (ruler) handy to measure the bits, because sometimes it can be confusing.
But it’s really important to identify all the parts, first to make sure you have everything you’ll need (I was missing some washers) but also because the “exploded” assembly diagram takes serious study to figure out — at least it does for me.
They number each piece of hardware, and the numbers are used as a guide to show you what goes where. Study the illustration and then identify each part and lay it out and you’ll save a lot of time and frustration in the end.
And it’s especially important when installing the center stand, because there’s a very specific sequence of washers and varying thickness spacers that must be installed in the correct order to get everything to fit.
Once I had it figured out, it was cake, but it did take some studying to get it wired.
Another quirk of assembling the lowered foot pegs with the center stand is that you’ll need two of the longer bolts from Pro Cycle, which add another $11.90 ($5.95 each!) to the total.
You could probably source them at a local hardware store, but metric hardware is pretty expensive around here so once more, it was “What the heck”.
The longer bolts are only needed for installing the center stand with the lowered foot pegs from Pro Cycle, otherwise, you should have enough hardware in the SW-Motech kit.
Then, it’s a matter of removing the original equipment foot pegs and reassembling with the new lowered foot pegs with the center stand “underneath” the new foot peg mounts
Where to Buy Suzuki DR650 Center Stand
Check Reviews & Prices on AmazonSee More: Motorcycle Accessories, Motorcycle Tire, Motorcycle Helmets
Right Side Tricks
Once everything is installed, torqued to spec (you did Loctite those bolts, right?) and inspected, there are two tricks, both implemented on the right (brake) side assembly.
First, the center stand kit comes with two heavy springs, which are installed to connect a rotating “C” shaped metal stamping to the center stand foot on the right side.
One spring slides inside the other, then both have to be hooked over the “C” at one end and the center stand foot on the bottom end.
But these are very hefty springs, and it was beyond my puny strength to pull them with enough force to get the one end hooked correctly over the bottom of the center stand leg.
So, I enlisted Chris to help me out. I made a loop out of a large cable tie and looped it around the “hook” on the springs.
I sat down next to the bike on the right side (the bike was on the center stand and the front brake was engaged with another cable tie) and put my left foot on the right lowered leg of the center stand for leverage.
Then I pulled towards the rear of the bike to stretch the spring. Chris used a big Phillips head screwdriver to lever the hooks of the springs over and into the hole on the center stand leg and…presto!
Just be careful, because you’re putting a lot of rearward torque on the bike and you don’t want it to come off the side stand as you’re doing this.
The next “trick” isn’t really a trick, just that you’ll probably find that there isn’t enough brake lever clearance on the right-hand side.
When the brake lever is depressed, it will hit the top of the “C” that rotates to hold the springs that snap the center stand up into its raised position.
(By the way, remember that you’ll have to re-align both the shift lever on the left and the brake lever on the right to account for the new lowered foot pegs).
But if you lower the adjustment screw at the bottom of the master cylinder for the rear brake pedal, you run out of room in the adjuster that activates the master cylinder and thus the rear brake.
You don’t want to mess around here — make sure there’s enough clearance because you don’t want to suddenly find that the rear brakes aren’t working.
Chris and I put the brake pedal in a heavy vice and bent it slightly downwards, then I ground off about 2 mm along the bottom or “belly” of the brake pedal and everything works fine, with room to spare.
This is all described in the Pro Cycle instructions for the lowered foot pegs.
Here are some more photos:
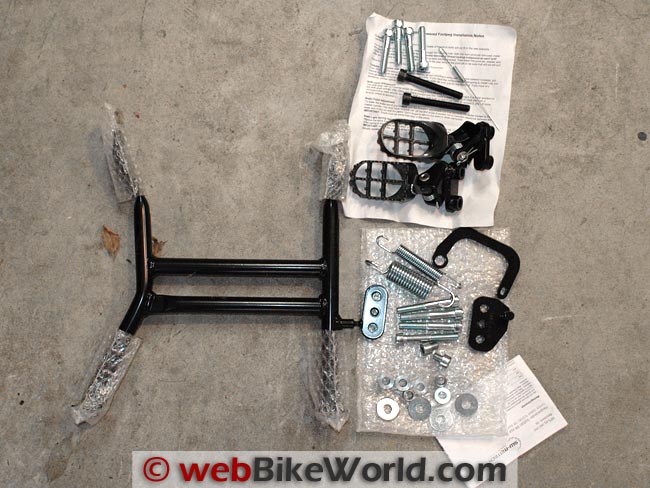 The SW-Motech centerstand kit (below) and the Pro Cycle lowered foot peg kit (upper right).
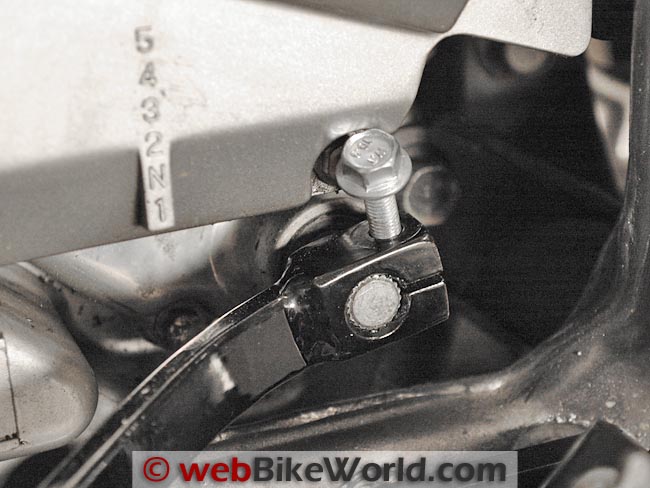 You’ll have to remove the side cover again to access the shift lever (here’s the story on that).
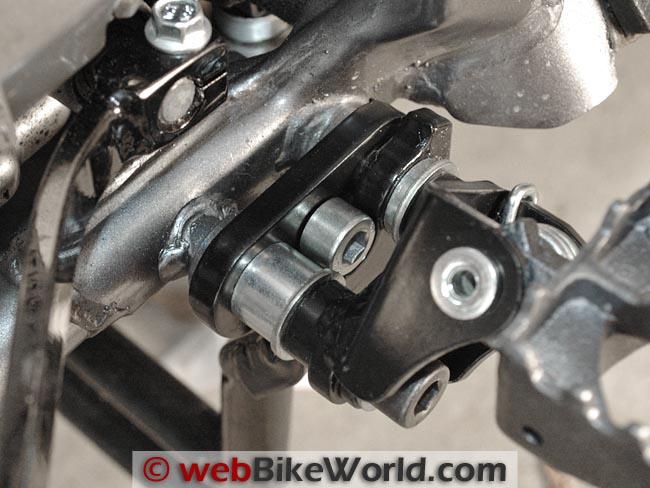 Close-up of the left side mounting bracket, washers and spacers for the lowered foot pegs over the center stand.
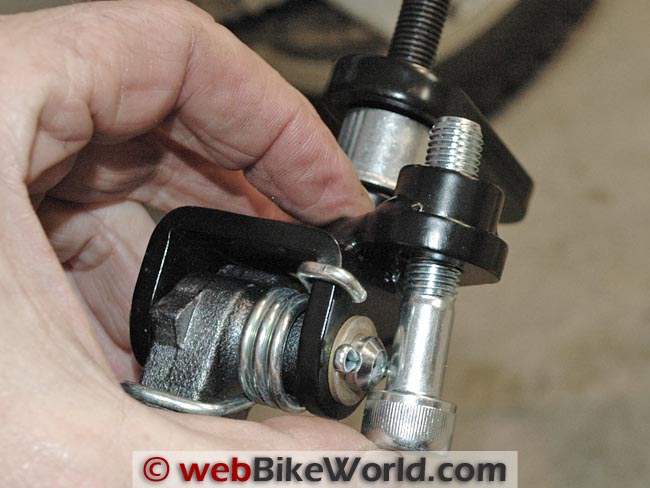 The mounting bolts for the foot pegs don’t fit until you remove the rotating pin on the foot pegs.
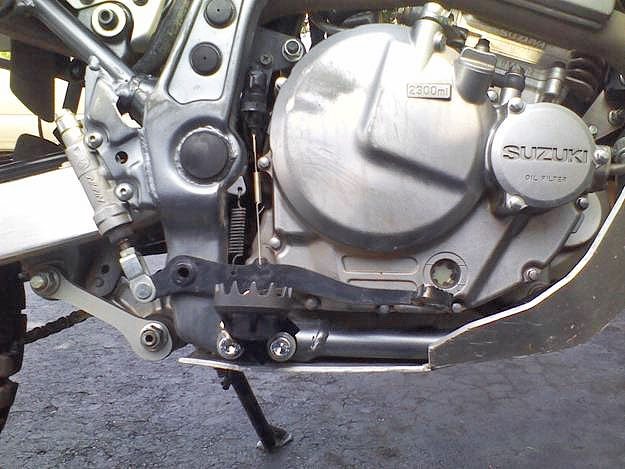
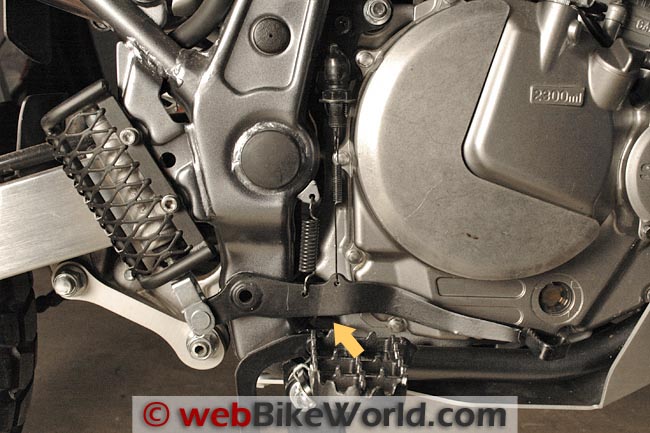 I ground away about 2 mm from the bottom of the brake lever, under the lever springs.
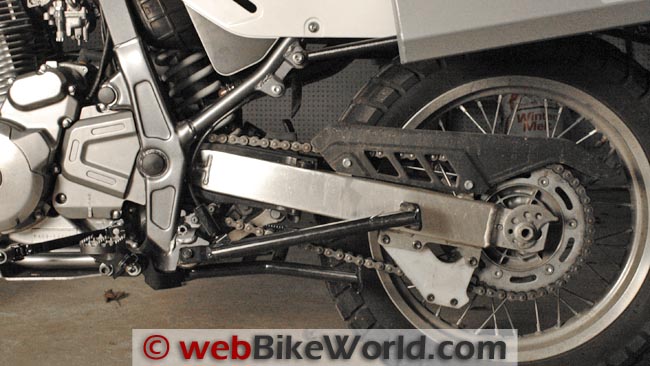 Center stand in the up position, left side.
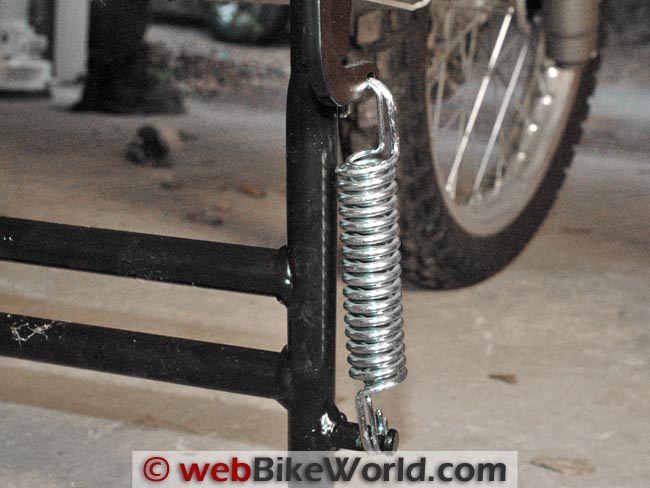 Heavy return springs on the right side.
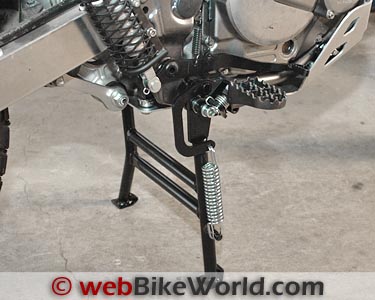
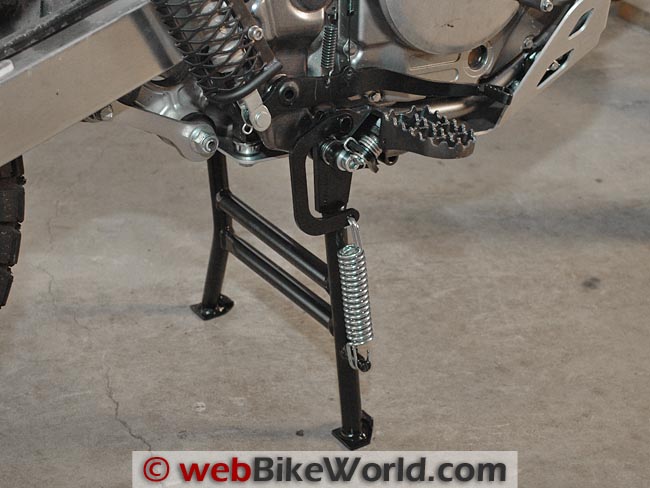 Right side view of the center stand and lowered foot pegs.
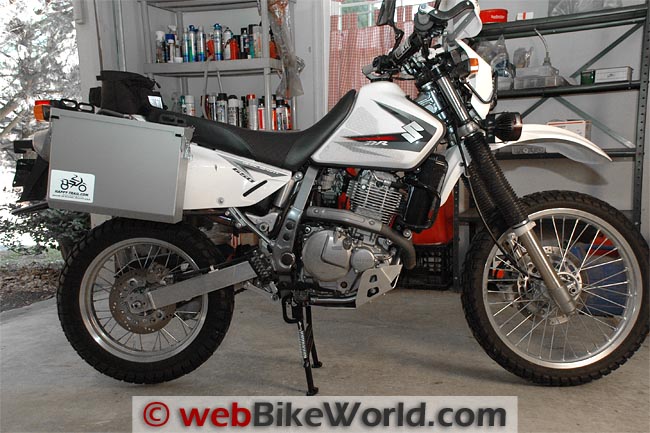 The SW-Motech center stand provides a very solid mounting for the DR650.
How Does It Work?
The DR650 doesn’t have a fold-away hand lever to help pull the bike up on to the center stand, although SW-Motech lists this part but I’m not sure if they have one for the DR650.
Getting the bike up on to the center stand requires a fairly hefty push.
I use the lower mounting bracket for the excellent Happy Trail Imnaha Panniers (review) to lift the bike as I pull back on the left hand grip and sort of give a push with my right thigh on the left bag.
The bike can also be pulled up on to the center stand by holding the left hand grip with the left hand and the rear passenger hand-hold with the right hand. In either case, you have to hold the canted arm of the center stand with your toe.
Use the bike’s momentum as much as possible and it works. It takes some practice and I haven’t quite got the hang of it yet, but I’m getting better at it.
Once the bike is up on the center stand, it’s rock-solid, as you can see in the video where the bike is bounced around to demonstrate.
The center stand has plenty of clearance over the chain and absolutely does not get in the way when riding.
Reports of dragging the center stand in the corners can’t be right, as you’d have to be leaned over so far that you’d be scraping an elbow. If you want to do that, buy a sportbike!
Conclusion
The SW-Motech center stand provides a very solid platform for the DR650. I’m surprised actually at how well everything works and fits.
I’m not quite as thrilled with the lowered foot pegs; they’re fine, and I’m glad I installed them, but to be honest, there isn’t that much of a difference and there’s a tradeoff in more vibration getting through because the lowered foot pegs aren’t rubber mounted.
And, they’re pretty expensive.
So if you have to choose between the two, I’d suggest getting the center stand for sure, then you can always install the lowered foot pegs later.
The only problem with that approach is you’ll have to do the center stand installation twice…
More: DR650 Moose Shift Lever Installation | Pivot Pegz Review | wBW DR650 Blog
| wBW Review: SW-Motech Center Stand and Pro Cycle Lowered Foot Pegs | |
|---|---|
| Manufacturer (Center Stand): SW-Motech (Lowered Foot Pegs): Pro Cycle |
List Price: $159.95 (center stand). $139.95 (lowered foot pegs). $5.95 each for the longer front mounting bolt. |
| Colors: Black. | Made In: Center stand made in EC. Foot pegs? Unknown. |
| Review Date: January 2012 | |
Where to Buy SW-Motech Lowered Foot Pegs
Check Reviews & Prices on AmazonSee More: Motorcycle Accessories, Motorcycle Tire, Motorcycle Helmets
Owner Comments and Feedback
See details on submitting comments.
From “J.H.” (October 2015): “Wanting more leg room, I opted for the Acme Zoom foot peg lowering kit. These lower the OEM pegs down 1” and back 1”.
The extra inch downward is nice. The downside is this hardware hangs below the frame.
ProCycle makes some lower foot peg brackets which lower the peg by 1.75”, but with a size 11 boot, I really enjoy the 1” back provided by the Acme Zoom hardware.
If you can find and write about other DR650 foot peg lowering products, I would certainly like to read about them.”
From “M.D.” (September 2013): “I believe there have been a few updates to the lowered foot pegs from Pro-Cycle you reviewed some time ago.
I installed a new set today and noticed a few things that seem to have changed since your review and/or do not apply when the center stand is not installed.
First you mentioned that the foot pegs stick out more than the stockers.
I believe you said 1” on each side. Installed without the center stand, my new pegs are actually a fraction of an inch narrower then the stock foot pegs due to the smaller than stock mounting bracket.
The pegs and bracket still are made from the heavy gauge metal you mentioned in your review, but apparently now come with a much stiffer spring and no longer “bounce around more loosely” The foot pegs themselves are slightly different too.
They now have taller, more pointed grips than the ones shown in your pictures. These provide excellent grip but I question the idea of using taller grips on a kit for lowering foot pegs.
After a 50 (mile) ride today I noticed slightly more vibration. If stock was a 5 on the scale of 1-10 than the new pegs are a 5.5 or a 6.
Noticeable, but not bothersome. The only increase I noticed was between 3500 and 4000 rpm under heavy load.
Due to my lower gearing (14-44) I spend very little time under these circumstances. For someone with stock or taller than stock gearing this may be more bothersome.
I did not find it necessary to remove the sprocket cover to remove or install the shifter pinch bolt.
Simply lift up on the end of the shift rod and there is plenty of clearance. The kit is still expensive (actually up $10 since your review) but at 6’7″ I needed the extra clearance and did not want the reduced ground clearance the inexpensive relocating brackets caused.
Another point I feel should be mentioned is that the brake lever cannot be adjusted lower than the foot peg without modification.
The lever has been lowered in the attached picture until the adjusting rod is contacting the lever.
In order to adjust the brake lever any lower either the adjusting rod or brake lever would have to be cut for clearance.”
Rick’s Reply: Thanks for the update. Products change and I’ve noticed some of the suppliers at Pro Cycle seem to change fairly often, so perhaps the newest foot pegs are different, updated, etc.
Regarding the shift lever, I have played with a couple of different shift levers now and always have to remove the side cover to get to the bolt.
Not a big deal, but this may be a design quirk on certain year DR650’s or something…
Also, I did mention the need to modify the brake lever to fit with the centerstand and lowered foot pegs, this is noted in the review and in the photos above.
From “J.C.” (September 2013): “I was just reading your center stand installation article on the DR 650 and thought I would pass along a tip for installing return springs.
If the spring is hooked over a horizontal lug as on the center stand, go out and buy an automotive brake spring tool (drum brakes). It’s made for this operation and the spring just slides right on.
These tools are cheap and available in any parts store.
I am a retired automotive tech and have used mine several times. No more skinned knuckles! Maybe you already know this trick but thought I would share. Thanks.
Other WebBikeWorld Accessories Posts