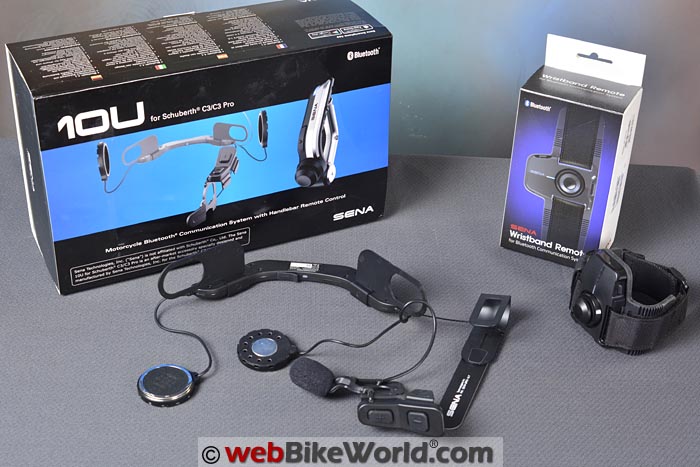

The Sena 10U deconstructs the physical design of a typical motorcycle Bluetooth intercom system.
It’s designed to allow you to hide the various parts inside selected helmets for a sleeker installation.
This gives you “bespoke” style system that looks like it was designed by the helmet manufacturer.
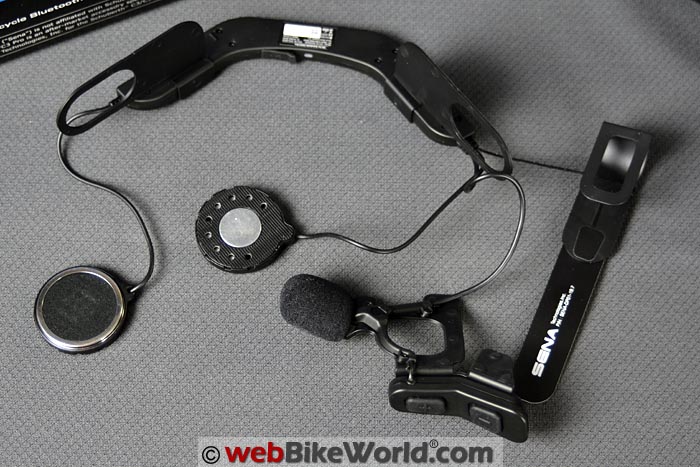
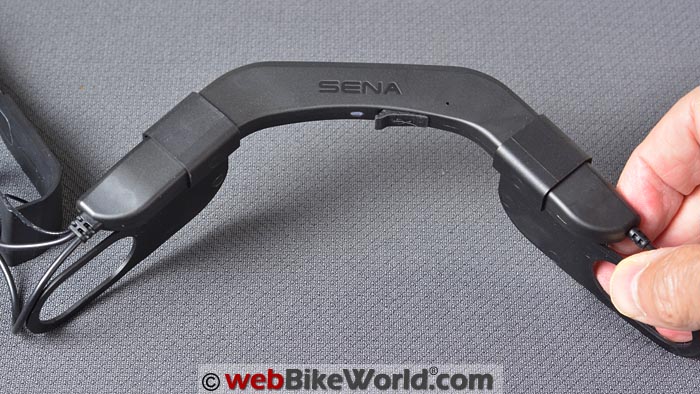
The battery and CPU module locates at the lower rear of the helmet shell.
An integrated microphone and two-button control tucks behind the left cheek pad.
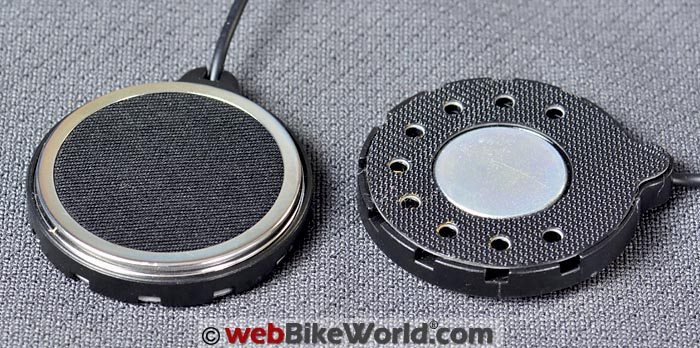
The Sena 20S (review) style speakers fit in the helmet’s ear cavities.
All of the intercom functions are controlled from the included handlebar remote or a unique wrist remote that can also attach to the fuel tank.
The parts have a quality feel and the 10U includes the latest technology and firmware from Sena.
The Sena 10U currently comes in helmet-specific kits to fit the Shoei GT-Air (review); the Shoei Neotec (review); the Shoei J-Cruise (review) and Arai helmets.
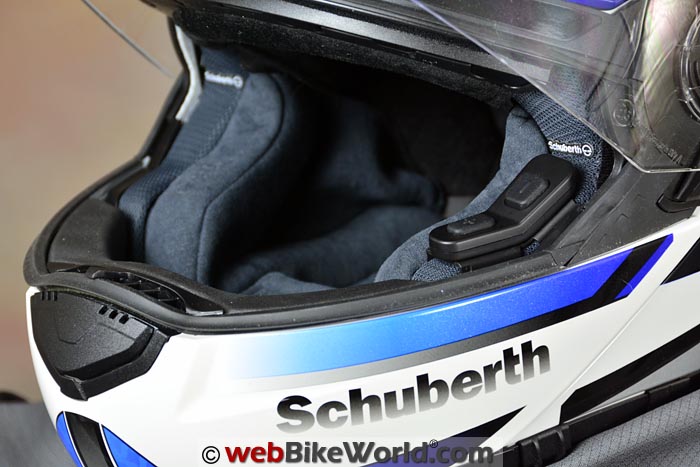
In fact, Sena beat SCHUBERTH at their own game with a 10U for the SCHUBERTH C3 (review) and theSCHUBERTH C3 Pro (review), which we employed for this 10U review.
The 10U system for the SCHUBERTH has less of a “footprint” than the SCHUBERTH SRC. The 10U battery/CPU module fits under the SCHUBERTH neck roll, where it completely disappears.
The 10U has all of the bells-and-whistles of the higher-end Sena systems and firmware updates are planned to add even more capability.
The 10U seems like a cross between the Sena 20S and Sena SMH10R (review) in the Korean company’s ever-growing lineup of Bluetooth products.
Background
The Sena 10U was announced exactly one year ago this week, during the webBikeWorld live coverage of the 2014 AIMExpo show (report) in Orlando, Florida.
At this year’s AIMExpo, starting this week (stay tuned for live webBikeWorld coverage), Sena will announce the Sena 10R, which will eventually replace the Sena SMH10R.
Also coming is the Sena 10S, to replace the super-popular Sena SMH10 (review), which was a breakthrough design in motorcycle intercom systems.
The Sena 10U is the first of the new systems to receive the updated technology, which utilizes Bluetooth 4.1.

The Sena 10U
webBikeWorld has been reviewing motorcycle intercoms since the very first Bluetooth intercom system was released, back around 2005.
If you want to have some fun, read the “Motorcycle Bluetooth Intercoms” page and be sure to study the comments from webBikeWorld readers.
Bluetooth was so new at that time, we attempted to explain it and many readers had what now seem like quaint comments and questions.
But in a note of prescience, in that 2006 report, we wished for — and apparently foresaw — a futuristic motorcycle Bluetooth intercom system:
“We can imagine a standardized Bluetooth control system implemented as part of the motorcycle’s instrumentation, with handlebar controls.
An LCD panel could display the functions for the rider to select, while the music, GPS instructions, telephone conversation and yes — actual conversation with a pillion (!) is streamed to the microphone and speaker headset, with a tiny receiver built in.”
Well, here we are — 9 years later in 2015 — and our wish has come true!
The Sena 10U system “deconstructs” the motorcycle Bluetooth intercom, separating the controls from the intercom to more fully utilize Bluetooth.
We’re still missing our “LCD panel”, but the 10U’s handlebar remote and/or wrist remote control almost all of the functions of the intercom, so we’re on the right track.
Like many new electronics systems, however — and like the other high-end motorcycle Bluetooth intercom systems — there’s a bit of a learning curve you’ll have to climb.
For the 10U, this means learning not only a new set of button pushes, but also button-pushing sequences and “hold times”. We’ll get into that in this review.
One of the interesting design features of the 10U is the decision to make it helmet-specific.
Sena 10U systems are currently available to fit the SCHUBERTH C3 and C3 Pro, several Shoei helmets and most Arai helmets. More are on the way — possibly even a “generic” 10U system.
Sena 10U Details
The Sena 10U has most of the higher-end Sena intercom functions, wrapped in the new physical shape and with the latest Sena updated electronics and firmware.
This includes:
- FM Radio: A separate antenna and FM radio with RDS AF (Radio Data System Alternate Frequencies), 10 preset station memory and an automatic scan function.
- Battery: The 600mA lithium polymer battery has a charging time of approximately 3 hours and claimed talk time of 10 hours.
- Bluetooth: Headset Profile (HSP), Hands-Free Profile (HFP), Advanced Audio Distribution Profile (A2DP), Audio Video Remote Control Profile (AVRCP).
- Built-in SBC Codec Advanced Noise Control Wide volume control.
- Sena claims the 10U has an “extended working distance” of approximately 0.8 to 1.6 km (0.5-1.0 miles). We’ll confirm the range in an upcoming report.
- Bluetooth pairing for mobile phones (can connect dual mobile phones).
- Voice prompts.
- Firmware upgradeable.
- Two-year warranty.
In the Box
- The 10U system (battery/CPU, speakers, mic/button assembly).
- Handlebar remote. (Wristband remote is an optional accessory).
- Handlebar remote rubber bands for friction (if needed).
- Various foam pads for mic, speakers and speaker attachment.
- Micro-USB power and data cable.
If you have a Sena or even any other type of modern Bluetooth motorcycle intercom, you’ll pretty much know everything about how the 10U operates.
Other than the difference in button pushes (see below), the 10U is similar to the SMH10R in operation and feature set.
And that standardization is actually remarkable and a big change from when we first started reviewing intercoms, where every new device was completely different.
Beside the standard intercom functions, cell phone/smartphone pairing and the FM radio, the 10U has the Sena “Four-way Universal Intercom” function.
This allows users to connect with up to four other intercoms (of any brand) in one of these configurations:
- Three 10U intercoms and one non-Sena Bluetooth intercom;
- Two 10U intercoms and two non-Sena Bluetooth intercoms;
- One 10U and one non-Sena Bluetooth intercom;
- One 10U with another 10U.
This is all described in section 10.4 of the Sena 10U User Guide (the full .pdf version referenced above).
The only major difference with the 10U from other Sena intercoms is the button pushing sequences, and that’s discussed in a section below.
Sena 10U Features
The 10U has most of the features found in other Sena top-of-the-line intercom systems, such as the SMH10, 20S and SMH10R.
- For example, the 10U allows music sharing while you’re having an intercom conversation with a partner.
- Pair with a GPS for spoken instructions, which will take precedence during an intercom conversation. The intercom connection will resume after the GPS instructions end.
- The 10U works with the Sena SR10 (review) to connect an FRS/GMRS type radio. The sound from the two-way radio is heard in the background during an intercom conversation so you can hear others in your riding group.
- Speed dialing is available for up to three numbers. Also, the 10U has last number redial.
- A second mobile phone can be paired to the 10U. (Does anyone actually pair 2 cell phones with an intercom?)
- The 10U is compatible with the Sena Device Manager for firmware updates and the Sena Smartphone App (Android and iPhone) for settings.
- The red LED in the headset and the handlebar remote flashes during startup to indicate the battery level: 4 flashes = High, 70~100%. 3 flashes = Medium, 30~70%. 2 flashes = Low, 0~30%.
Installing the Sena 10U: SCHUBERTH Quirks
The 10U comes with a “Quick Start Guide”, along with a sheet that has the “Headset Control Button Operation” on one side and the “Handlebar Remote Button Operation” list on the other.
The Handlebar Remote comes with its own Quick Start Guide also.
You’ll definitely need the more detailed Sena 10U User Guide, however, which is available as a .pdf download from the Sena 10U product page.
We ordered the 10U for the SCHUBERTH C3 Pro (review), only because that helmet was available for this review.
Installing the 10U in the SCHUBERTH was more difficult than it appeared to be in the Quick Start Guide; definitely download the full User Guide first (although it’s still lacking in details).
It took two calls to Sena support to get the SCHUBERTH installation figured out, but that’s because the SCHUBERTH is a bit of a strange beast, so installing the 10U in other helmets is probably easier.
[UPDATE: Here’s a Sena YouTube video illustrating a 10U installation in a SCHUBERTH C3/C3 Pro.]Along the way, we broke the pin in the SCHUBERTH neck roll, but discovered an easy fix. See theSCHUBERTH Neck Roll Broken Pin Fix article for more information on that.
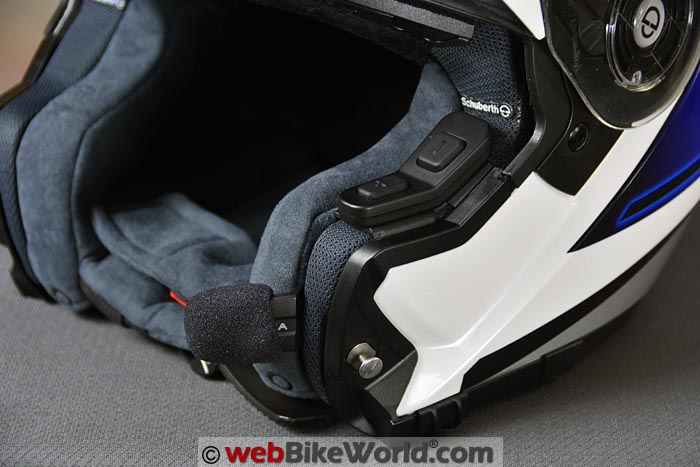
The real trick with the SCHUBERTH installation is trying to stretch the mic/button assembly wire to fit under the left cheek pad. It can be done — even on the C3 Pro in size XL shown here.
But it will try your patience! Not sure why Sena didn’t add another 25 mm or so to the connecting wire, which would make it easier to install on the Schuberth.
Also, it’s not clear where the radio antenna should go and it doesn’t appear to fit in the location indicated in the Sena guide, so we pushed it up behind the cheek pad, between the shell and the liner.
After quite some time — and after a lot of effort in making sure that the cheek pad and helmet liner plastic pins were correctly snapped into place on the C3 Pro, the 10U was installed.
On the SCHUBERTH helmets, the 10U battery/CPU module fits under the external snap-in SCHUBERTH neck roll, if you’re using it. That conveniently hides the 10U’s brains and you’ll end up with a very slick installation, as you can see from the photos.
On other helmets…we just don’t know. But surely, installing the 10U will be less difficult, again due to the difference in the SCHUBERTH C3 and C3 Pro helmet design.
Using the 10U
The 10U turns on and off by simultaneously pressing the “+” and “-” buttons on the headset mic/button assembly. Those are the only buttons on the 10U cheek pad control for Shoei and SCHUBERTH helmets.
On Arai helmets, the buttons are on a small stick-on that you place along the bottom left of the helmet shell.
Once the 10U is turned on, the only reason you’ll have to use the headset buttons again is to turn it off. Every other menu choice can be accessed by using one of the remotes.
Note that the headset control buttons can be used to operate the 10U if, for example, you forgot to bring the remote, lost the remote or if the batteries in the remote need charging.
All you have to do is follow the Quick Reference for the “Headset Control Button Operation”; you’ll probably want to keep a copy of that in your smartphone or a paper copy on the bike, just in case.
But you’ll be much better off learning to use the remote as the primary interface for the 10U.
Before using the 10U, you’ll have to give the battery in the headset and in the remote a full charge. The 10U kit doesn’t come with a wall charger, so you’ll have to use the USB cable attached to either a live USB port or one of your USB device chargers.
The remote charges via its own USB port and once charged, it seems to last longer than a 10U battery charge.
Which brings us to the remotes…
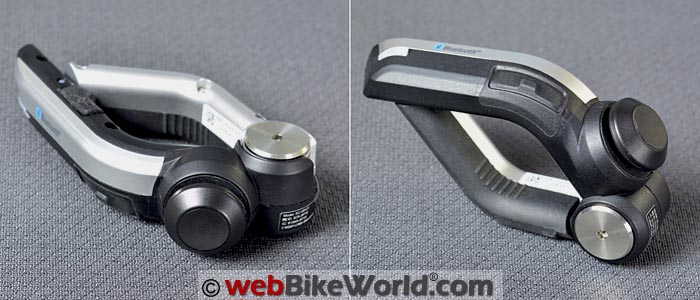
Sena 10U Remote Control Notes
The 10U comes with the handlebar remote that we first reported on at the 2014 AIMExpo dealer show.
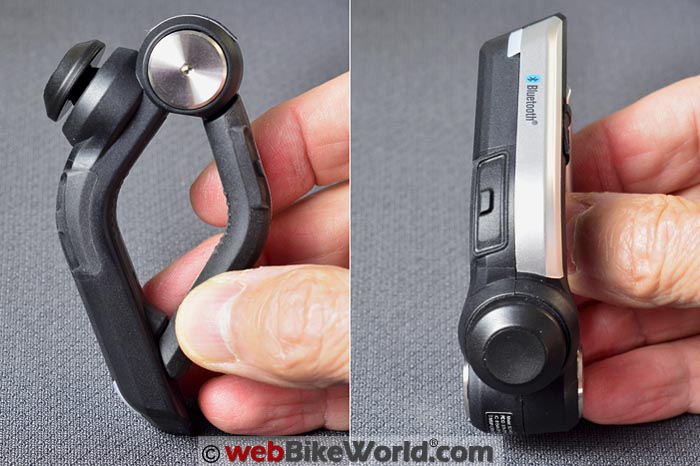
It’s a curious device; kind of a bent “U” shape. It has a strong spring and you pry open the remote and place it on the left hand grip.
Be sure to orient the remote so that the opening in front allows room for the clutch lever! That’s important and not stressed enough in the Sena installation notes.
After using the handlebar remote on and off over the last couple of weeks, we haven’t quite been able to feel 100% comfortable with it.
It has a single front and single rear button and both nearly flush. We find them difficult to locate and use when wearing gloves.
The third button is the joystick on the front, which works well.
 Be sure to orient the handlebar remote so that it does not interfere with clutch lever travel.
The Wrist Remote
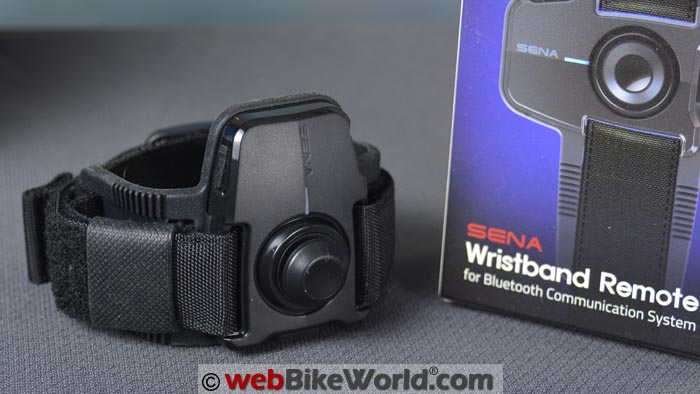
We also have the optional wrist remote. It’s a wide and flat device with two larger buttons and a joystick and it is on a thick and fully padded wrist strap that can be placed over your left or right arm.
But the trick is that it comes with a couple of hook-and-loop pads that you can stick on your fuel tank or other handy location.
We find it easier to use the wrist remote buttons, but if it’s on your left wrist, you’ll have to take your right hand off the throttle to press the buttons.
You could wear the remote on the right wrist (not recommended), but then the buttons are “upside down” and you’ll have to take your left hand off the grip to use the remote.
With the wrist remote installed on the fuel tank, you’ll still have to remove your left hand from the grip, but it’s less cumbersome and unusual than moving your left hand to your right.
But don’t forget: using the buttons on a helmet mounted intercom requires taking your left hand off the grip also.
In the end, for most uses, the 10U handlebar remote is probably the way to go.
But we wonder if they’re couldn’t be a different design; perhaps some type of vertical “box” that has a circular clamp-type attachment that would allow the control to stand up from the left hand grip, or something similar (like the Vertix Raptor-i intercom (review) remote control shown in the photo in the comments section below).
[UPDATE: Sena told us that the Wristband Remote was originally designed for a passenger but it can be used as we noted by the rider on the left or right wrist or attached to the fuel tank using the included hook-and-loop pads.]At the very least, we’d like to see larger buttons on the handlebar remote, to make them easier to locate and find when wearing gloves.
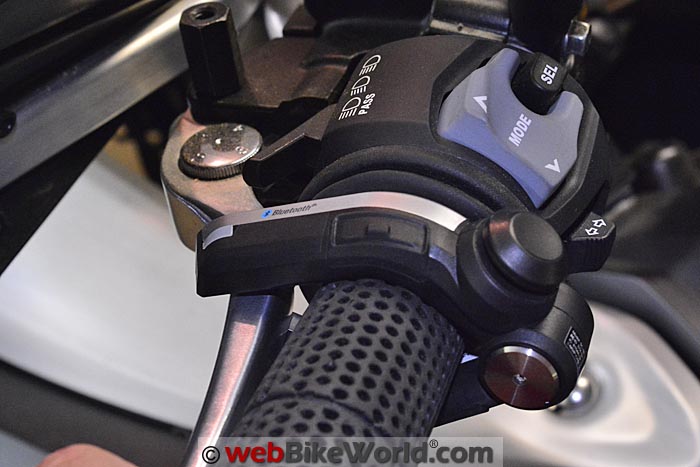
The 10U installation in the SCHUBERTH C3 is nearly invisible.Button Pushing…
The 10U is not a bare-bones Sena 3S (review), with its simple and intuitive control system (but equally simple features).
There’s no getting around it: you’re going to have to do some serious button studying time to learn the 10U system.
That’s because the higher-end features and capabilities mean lots of menu choices.
So you not only have front button pushes, rear button pushes and joystick pushes; you have joystick movements also, and then certain buttons must be either tapped, pressed for 1 second, pressed for 5 seconds or even up to 12 seconds (to access the configuration menu).
Of course, once you do learn the system, you’ll probably be using the same features, which helps in both learning and using the 10U.
Another issue is that the button placement and labeling is inconsistent.
The wrist remote has “Top” and “Side” buttons, while the handlebar remote has “Front” and “Rear” buttons. Neither the handlebar remote nor the wrist remote buttons are labeled as “+” or “-“, which confused us at first.
If you switch between remotes, you’ll have to first study the “Wristband Remote Button Matching” chart to map side to front and rear to top so that you can refer back to the “Handlebar Remote Button Operation” chart and know which buttons to press on the wrist remote to get the desired results.
The Sena 10U optional wrist remote.Pairing the Remotes
Our handlebar remote was paired with the 10U right out of the box, but we’re not sure if that’s standard procedure from the factory when you buy a new 10U kit or not.
We did have to pair the wrist remote, and unfortunately there’s no instructions on how to do that in the “Wristband Remote Quick Start Guide”, which is the only printed guide that comes with the wrist remote.
The guide doesn’t actually tell you that you have to pair the remote, nor does it tell you the most important part:
To pair either remote, you have to enter the 10U configuration menu, accessed by pressing the front button on the remote for 12 seconds.
But, there’s a Catch 22 here. You can’t press the front button on the remote to enter the configuration menu if the remote isn’t paired.
So you’ll have to press the front “+” button on the headset (cheek pad) control to get to the configuration menu. But you don’t press it for 12 seconds; it’s pressed for 10 seconds!
Ignore the various beeps you’ll hear along the way as you hold the button for 10 seconds and you’ll eventually get there.
This lack of consistency in button placement, button naming, button labeling and button operation is the most frustrating thing about the 10U in our opinion.
And by the way, apparently you can only pair one remote at a time with the 10U. So if you pair the wrist remote, the handlebar remote will not work until you go back into the configuration menu and re-pair it.
10U Sound quality
Sena told us that the 10U uses the speakers from the 20S, and that’s a good thing. The sound quality seems excellent to use, with good bass response.
Unfortunately, once the speakers are placed behind the thick liner in the Schuberth, they lose a lot of volume.
We do wish Sena could pump up the max volume by, oh, about 50% more than it is. The speakers are non-replaceable, unless you want to try an off-warranty splicing job.
The microphone is in a fixed position, attached to the headset button unit. This is true for all of the current 10U systems.
But — especially in the SCHUBERTH helmet — we had no problems using the mic and callers on the phone were unanimously shocked that we were talking to them from a motorcycle.
That may be different in some of the Shoei or Arai fitments, especially if there’s a lot of air flowing up under the chin bar, as happens in the Arai helmets with the vestigial chin “curtain” still used by Arai.
There’s no way to tell how the mic will work on your helmet/motorcycle/windscreen combination.
But, the 10U does have Sena’s latest “Advanced Noise Control” system, which we assume helps. Bottom line: we had no problems hearing or talking to anyone on the phone or intercom (connected only to other Sena intercoms, not another 10U).
We do wish the volume could be cranked about another 50% though…
Sena 10U intercom speakers.Conclusion
The Sena 10U is a very interesting new design for motorcycle Blueooth intercoms. It fits beautifully in the SCHUBERTH C3 and C3 Pro (once you figure out how to install it).
It also works smoothly and the sound quality is excellent, although it needs more volume.
There is a learning curve for new owners, to learn the button pressing sequences and the differences between buttons and button locations on the remotes.
But if you’re like us, you’ll probably find that the same functions and features are used consistently, and like anything else, after a while the button presses are second nature. For most of the frequently used functions, anyway.
The Sena 10U lists for $299.99, while the SCHUBERTH SRC Bluetooth intercom system has a current list price of $429.00, a notable difference.
Note that unlike a “standard” Bluetooth intercom system like the SMH10, for example, the 10U can’t be switched between different helmet models.
Overall, we really like the idea of the Sena 10U and this is an excellent first implementation of the Bluetooth system we dreamed about those 9 years ago!
Also: Sena 10R Review
Owner Comments and Feedback
See details on submitting comments.
From “N.C.” (May 2017): “Your information on the Sena headset is very informative.
I purchased the Sena SC10U for my SCHUBERTH C3 from a supplier who firstly didn’t mention that it didn’t come with the handlebar remote. I paid €250 for head set.
Looking at Sena website they gave instructions on how to fit stating a time of around ten minutes installation time.
I would class myself as being technically minded and to my surprise an hour later and I was still installing and fighting with poppers on helmet.
Once it was fitted, it came the time to pair to my phone and sat nav.
Once again as you state on the article, after numerous attempts and failures, either because I held buttons down for too long or too short and again double taps etc., came the moment of truth and everything was paired!!!
Fantastic. I pre-set radio stations and off I went for a spin.
The radio kept dropping out of stations and as the control buttons are inside my visor it was really awkward to turn off unless I stopped.
The phone connection was good but as soon as the sat nav kicked in with information, the volume was deafening. I tried to adjust but the sat nav said that any adjustments had to be done on headset.
If i set the volume low for sat nav, now I couldn’t hear phone.
I ordered a handlebar remote at a further cost of €120. Took the helmet and Sena headset with me to pick up remote and thought that I would get them to configure everything.

An hour and a half later they gave up. He was muttering how **** complicated it was.
They said that they would get somebody from Sena to contact me to talk me through the various stages, but yes you guessed the outcome, nobody called.
(Editor’s Note: My guess would be that the dealer never followed up on this once you walked out of the shop.)
Now I have managed to link the remote to headset. This remote is different to the one that you show, as mine has no toggle switch but a + and – button and two push buttons which I defy anybody to master their use.
If you try to turn down volume with the – button and hold it for a split second longer than it takes, it either tries to communicate with other devices or changes station or switches off, etc. etc. The same with phone calls.
Radio signal is brutal, even though it is set to correct tuning setting (nothing worse than a radio crackling and hissing in your ear).
In all, this whole kit is going to be the cause of me crashing the 1200RT, as I spend so much time messing about with buttons etc.
Frustrating is too mild a word to use!!!
I have looked up forums to see other peoples’ experiences with same, but information doesn’t seem to be available.
In Summation: The Buttons on the remote are tiny, it has no way of charging and comes with a battery which will need changing.
Also, the LED indicator on the remote is so weak that its hardly visible.
The amount of functions that one has to learn off between single tapping double tapping holding various buttons down for one second, five seconds, etc., not to mention having to press two simultaneously and all this to be done while doing 100KM/H.
Why cant they have a remote with a phone button, radio button and volume buttons?
All other functions could be set through the phone app, which also gives me access to changing and setting functions on headset. This app comes with a 3 star rating which again speaks for itself.
In hindsight and after a month of playing with this and still having not mastered its operation, I would have not chosen the SC10U. It’s not cheap!”
From “H.S.” (February 2016): “My 10U sounds awful at highway speeds over 50. My favorite songs are barely distinguishable. Little base and treble is out of control by the time you use enough volume to hear anything.
I may have a bad unit and I’m working with Sena on on the issue. Question is, if the unit is deemed ok and is what it is can I splice in a set of Torx speakers (review)? One problem is that the Sena reset and led indicator is in the left speaker.
Please give me your thoughts. I very disappointed with my 10U installed in my Shoei Neotec (review).”
Editor’s Reply: To be honest, once you get up to highway/interstate speeds, it’s difficult to hear most intercoms, the wind noise in a helmet can overwhelm even powerful speakers.
One of the key factors is to make sure the speakers are as close to your ears as possible. You may have to add some padding or spacers behind the speakers to do this.
Also, the helmet must fit properly and match your head shape. And if you have a motorcycle with a windscreen that directs air on the helmet and causes noise and turbulence, the noise levels will increase.
So adding more volume or larger speakers isn’t necessarily a cure, it’s more like a Band-Aid approach. I would suggest trying all of the above first.
I’m not sure if an accessory set of speakers can be spliced to the 10U and even if you could, there’s no guarantee that it would solve your problem. I don’t think it would, because the Sena OE speakers are pretty good as is. Also, the sound distortion you are experiencing may originate in the 10U itself, not the speakers.
Getting the speakers close to your ears can make a huge difference, it’s geometric or orders of magnitude or similar.
You can easily demonstrate this: Before you install the intercom system in your helmet, start some music playing and then hold the speakers about 10-15 mm away from your ears. Then hold them right next to your ears. The difference is amazing.
Also, intercom speakers generally aren’t very good, even the expensive accessory speakers. Some intercom electronics can overpower the speakers and cause problems with distortion. So you may have to find the maximum volume where this doesn’t happen.
Again, you can try various volume settings and combinations between your connected device and the intercom volume, before you install the system.
By the way, that’s another thing — sometimes the distortion comes from the connected device, like a phone or music player or GPS, not the intercom.
You have to experiment with volume settings on the device and then on the intercom to find the best balance.
For example, my Lumia 640 phone likes to have its volume set at 25 out of 30, then I control the rest of the volume with the intercom. Other systems may be different.
From “R.C.” (October 2015): “Enjoyed your article on the Sena 10U. I have enjoyed using other Sena products and purchased this unit the moment I learned that was available. I use it with a Shoei NEOTEC Helmet on a BMW R1200 ST.
I like the idea of a streamlined product and the remote. However, my opinion the remote could use refinement.
I have tried to use it in three orientations to achieve a safe ride. Your article shows the remote in a reverse-C configuration where the opening is towards the front wheel.
The problem with this orientation is clutch lever, if it shifts during the ride it will interfere with operation of the clutch lever.
I have attempted to use it in a inverted U configuration, where the opening points downward.
To achieve this, I had to adjust the engagement point of my clutch lever. However, this is the positions of the buttons on the remote where they are unreachable.
I currently use it in the U configuration, where the opening points upwards. I find this this operation works very well for me with “BMW exception”. It makes it difficult to reach around the remote to press the horn button and the left turn signal.
Due to the design of the remote, it limits my ability to safely use the product.
I really hope that Sena makes a second pass at the design of the remote based on customers’ on-bike experiences. If they did, I am likely to buy one the moment its available.”
Rick’s Reply: Note that in our photos and the text, it is mentioned that the remote must be oriented so that the opening allows the clutch lever to travel into the handlebar. This is the only safe way to use the remote.
The opening formed by the two arms must be positioned so the clutch lever can pass between the two arms.
From “J.M.” (October 2015): “Enjoyed your article on the new Sena 10U. I got one of the very first updated SCHUBERTH SRC System-Pro Bluetooth communications systems in the USA 2-3 months ago. Very disappointing, to put it mildly.
I posted a rather lengthy review on RevZilla. It was so buggy/anti-iPhone Siri that SCHUBERTH actually set up a return/refund.
I’m back to my personal favorite, Sena SMH-10R. I have several of them and love them, especially after I discovered how easy it is to remove the very small battery from the external holder and safely place it inside of the helmet without causing any kind of discomfort.
I also have a Sena SMH-10 and a 20s, and while they both work very well, something about putting “potato” on the side of beautiful Arai/Shoei/SCHUBERTH helmet just doesn’t appeal to me.
I tried the 10U handlebar control on my friend’s bike, but I really hate to give up the “real estate” on the left grip. The new wrist remote (Velcro-ed to my tank bag) might just be the answer.
Okay, “short story long,” I’ve read various complaints on the Sena 10U mic quality being very poor for those listening on the other end. Have you experienced this, or should I say, have your listeners experienced this?
Also, I use custom molded earphones. Does the 10U have a jack for earphones/earbuds. I may have missed that on your product review.
When I was young and stupid, I didn’t take care of my hearing (guns, motorcycles with no helmet/ear protection, working in a body shop with all pneumatic tools, flying without ear protection and the list goes on and on) and I’m paying the price now.
I simply can’t seem to make helmet speakers work when I wear foam earplugs (even in my quiet SCHUBERTH C3 Pro).
Thanks again Rick for the GREAT job you do for all of us in the motorcycle community!”
Rick’s Reply: Thanks for the feedback and the kudos! The 10U mic seems very good, at least in the C3 Pro. No problems at all talking to people and everyone couldn’t believe I/we were on a motorcycle.
Regarding the speakers, it was mentioned in the review, they’re not removable, so no way to attach different speakers unfortunately.
The 10U system seems to work pretty good with Cortana on my Windows phone (Lumia 640) when I ask Cortana to call someone, or if I have the phone set to read me texts as they come in (and I can reply also via Cortana).
But music playing doesn’t work very well with the standard XBox player in the Windows phone, the 10U will only make it move to the next song folder/artist, not the next song in the folder, which is an issue. Not sure if it’s the fault of the phone, the music playing software or the 10U.
From “H.B.C.” (October 2015): “Regarding the remote, as one poster noted, I think something closer to the Vertix Raptor-i intercom (review) remote, pictured below from the review I did, would work as well or better.
Placed as close to the handgrip (as it can be), the Vertix main button is a very sensitive and accurate rocker control and a couple of buttons/controls on the outer surfaces allow full functionality/control of the system.
I use the Vertix Raptor from time to time and the remote is mounted on the F800GS, just over the top of the handgrip — clear of everything, easy to access and operate and safe.”
From “M.H.” (October 2015): “I think I would prefer to have the remote back on the helmet rather than on the already fairly busy LH grip.
I envision it in the shape of a large 20S rotary dial, and with two large buttons. It could be 3M’d on the rotary point of the visor.
That is about the most flat section on any helmet, does not interfere with any graphics, and would actually look ok (at least to me).
Then one doesn’t need the in helmet control, and could replace that with maybe an ambient mike/control. And an earbud connector would have been nice.
I agree a suitable solution is difficult, the easiest to me looks like a dongle with female mini connector simply extending below the neck roll behind ones left or right ear.”