The Cameleon PLUS motorcycle chain oiler is the newest version of this low-profile system.
“PLUS” in this case means “Smart”, because the Cameleon PLUS adds some very useful features.
It now senses the ambient temperature and adjusts the oil flow automatically.
It also has a user-activated Trek Mode for rainy conditions.
It automatically senses off-road riding and changes the oil flow accordingly.
And the sensor also stops the oil flow when the bike isn’t moving but still running.
But first and foremost, the Cameleon PLUS is easy to install compared to other automatic chain oilers.
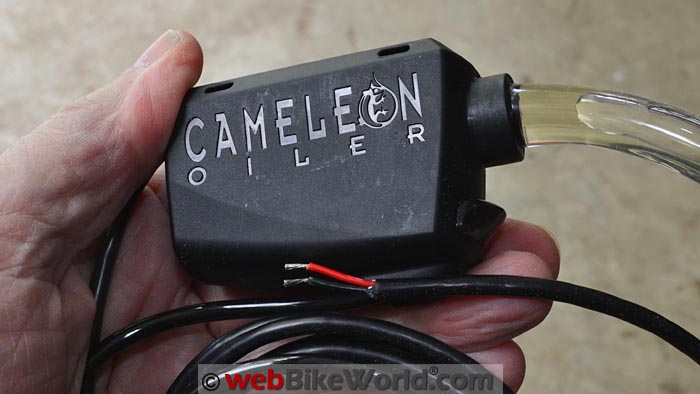
The control unit isn’t much larger than the clear vinyl hose that serves as the oil reservoir.
Snake the hose up under the seat or fuel tank and you have a hidden supply of chain lube.
With no large reservoir container, this means that the Cameleon PLUS can be easily installed on smaller bikes.
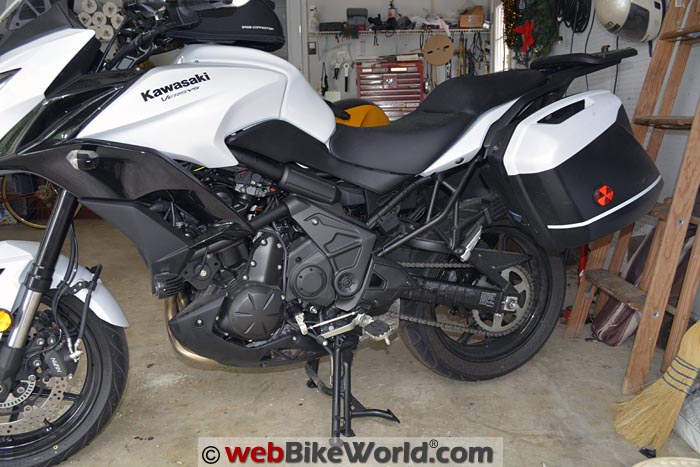
That includes motorcycles like our 2015 Kawasaki Versys 650 LT Project Bike (Blog) and smaller.
The Cameleon PLUS controller uses a switched electrical connection to open a valve in the CPU, which drips oil on to the chain.
The new system is much easier to program than previous Cameleon chain oilers.
Then once every 3 minutes and 20 seconds, the valve will automatically open and check the temperature and other conditions, then it will decide how many seconds to hold the valve open.
Since the viscosity of the oil changes with temperature, the system varies the oil flow to remain relatively constant.
All you need to do is to occasionally check the visible oil level in the clear hose (it lasts up to thousands of miles).
And as always, remember that more isn’t necessarily better when it comes to chain oiling. A drop or two will do. If you can see oil on the chain, you’re probably using too much.
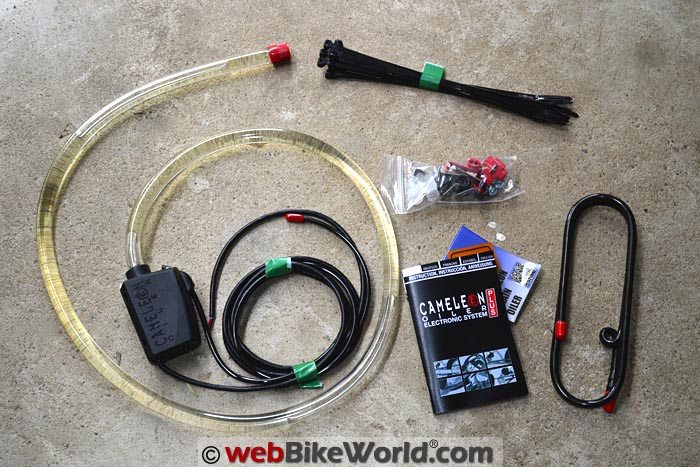
Cameleon PLUS motorcycle chain oiler kit contents.Introduction
We first reviewed the Cameleon Chain Oiler in 2008. That was followed by a review of the Cameleon Chain Oiler Version 2 in 2014.
The first Cameleon was installed on the Ducati Multistrada 620 (Blog), while the 2014 Cameleon was installed on the 2014 Suzuki V-Strom 1000 ABS (Blog).
This newest 2016 version of the Cameleon PLUS version was installed on the current webBikeWorld Project Bike, the 2015 Kawasaki Versys 650 LT (Blog).
We’re completely sold on the Cameleon system for several reasons. First of all, it’s much easier than using messy chain lubes. Also, it keeps the chain continuously lubricated and now with the Cameleon PLUS, it’s even more precise.
Why Cameleon?
The Cameleon system is different from other motorcycle automatic chain lubrication systems because it doesn’t use a big cylindrical reservoir that can be difficult to install on anything but the largest bikes.
The Cameleon works on motorcycles large and small because the low-profile system fits just about anywhere.
Familiar-looking Cameleon PLUS chain oiler CPU isn’t much larger than the reservoir hose.In the Kit
The Cameleon PLUS kit comes with the CPU or controller with the attached oil reservoir hose and the sheathed black/red wiring pair. A separate thin vinyl hose connects the controller to the oil drip tube.
Also included is the oil drip tube, an instruction booklet and various installation hardware bits.
The Cameleon CPU “Brain”
The Cameleon PLUS consists of the familiar-looking Cameleon CPU or controller with a permanently attached clear PVC reservoir tube or hose. The hose has an outside diameter of about 12 mm and it’s 1 meter long.
The controller has a nylon body and it is completely sealed in epoxy to make it waterproof.
It requires a connection to a switched power source on the bike, which is easy to do with some goodies from the webBikeWorld Posi-Lock sale page.
The unit requires just 300mA maximum and it has its own internal fuse that automatically resets if necessary. Use a Posi-Tap to tap the red wire into a switched power source on the bike and ground the black wire and you’re ready to go.
Securing the Drip Tube to the Swingarm
The most difficult part of installing any automatic motorcycle chain oiler is securing the oil drip tube to the swingarm.
We’ve had good success using high-quality cable ties and this time we used 5 to very tightly secure the drip tube to the Versys’ swingarm.
Two screw-in clamps for the oil drip tube are provided in the kit and you may be able to install those on a plastic swingarm splash guard to help secure the drip tube.
We did that when we installed the original Cameleon chain oiler on the Multistrada 620 (review). You can see the photos in that review.
Cameleon gives you a bunch of very nice, very high quality (and very expensive) Panduit “Dome Top” 644-BT2S-M0 flexible and infinitely adjustable cable ties in the kit. These are the best cable ties we have ever used by far.
Only issue is that the provided cable ties are 8″ long and they didn’t fit around the square section swingarm on the Versys. So depending on your swingarm width and height, you may have to double up on the cable ties to fit.
Oil Reservoir
The reservoir tube in the kit is filled with the special Cameleon PolyAlphaOlifin 190 oil and yes, this is special oil and it is different.
When you use the special Cameleon oil, you have a lifetime warranty on the Cameleon system.
The oil looks different and feels different. Cameleon says it has a “special tack plastifier formula that penetrates the chain links, improving protection from dust and road grime”.
It also has an anti-wear additive and it’s very “tacky” or sticky. Cameleon said it only takes about one drop every 5-6 miles to keep the chain lubricated.
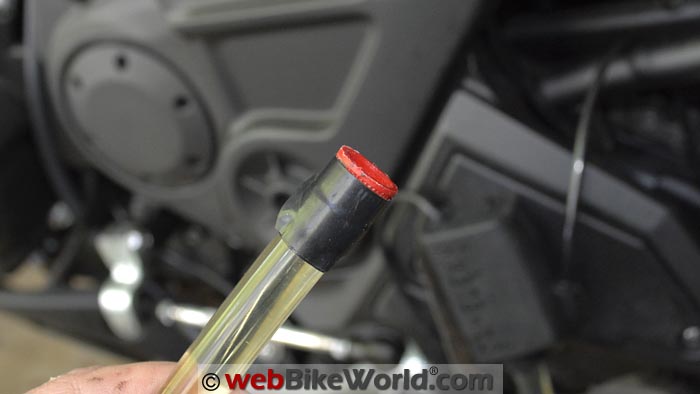
The kit also contains a couple of end caps for the hose reservoir. You need to switch out the red sealing cap with one of the clear caps, which has a hole in it to equalize the air pressure and allow the oil in the hose to flow.
Wiring the CPU
We suggest using a Posi-Tap (buy ’em here) and Posi-Lock (for sale here) instead of the crimp taps supplied in the kit.
On the Versys, Kawasaki has kindly left several accessory switched power wires in the front and under the seat, so it’s very easy to connect the red power wire on the Cameleon PLUS with a simple mini Posi-Lock.
Otherwise, use a Posi-Tap to tap into a switched (it must be switched!) power source on the bike and a ground, or ground to a frame bolt.
[UPDATE: See the wiring tips from “E.W.” in the Owner Comments section below for more information!]Since we’ve covered the Cameleon a couple of times already, let’s run through some photos and a video showing the differences for the 2015-2016 Kawasaki Versys 650 installation:
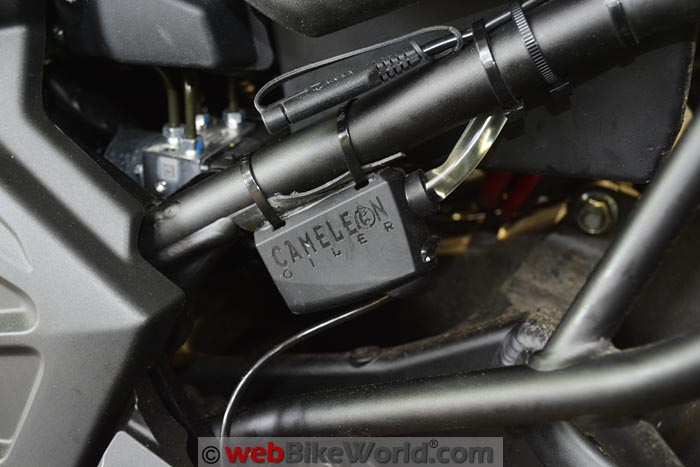
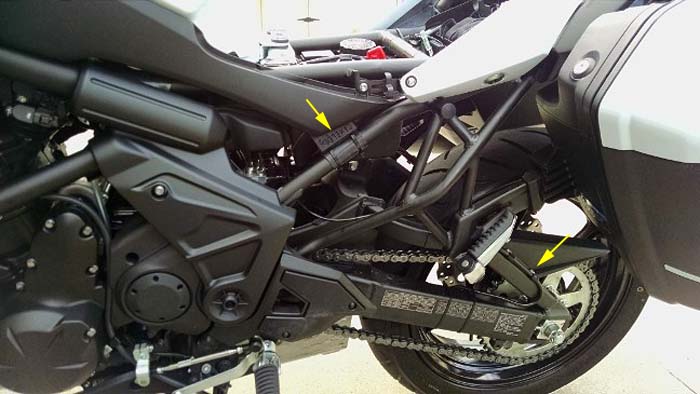
Here’s the Cameleon PLUS CPU installed on the left side of the 2015 Kawasaki Versys 650 LT.Installation Notes
A Cameleon PLUS installation consists of 4 basic steps: attaching the CPU to the motorcycle; securing the oil drip tube; securing the oil reservoir hose and connecting the CPU to the bike’s power and ground.
A good tip is to first lay out the entire system on the motorcycle, considering all the possibilities for your particular motorcycle while looking at all of the various options for where to fit and mount the different parts.
Mount the CPU and Reservoir
We started by loosely mounting the CPU on the frame tube, which then allowed us to figure out how and where to connect the reservoir hose and the drip tube.
This took several tries on the Versys because there isn’t a lot of room on the bike; it’s rather compact and the under-seat storage area is smaller than the big V-Strom 1000.
It’s much easier to install an automatic chain lube system on larger bikes because there is more space to mount various devices.
In fact, as often happens, it took the two of us longer to figure out where to mount everything than it did to actually get the system installed and running.
Don’t Forget Gravity
Since the Cameleon system works on gravity, the oil reservoir hose should be on a fairly constant slope so the oil runs from the top of the reservoir hose down to the CPU and then down through the drip tube.
The special Cameleon oil is pretty sticky, so once the flow starts, the oil at the bottom “pulls” the oil down from the top.
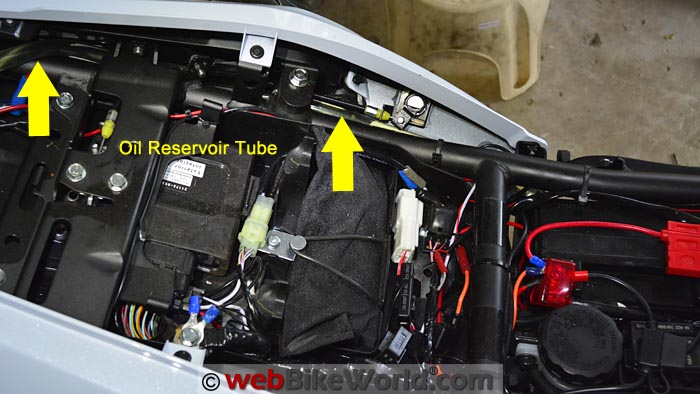
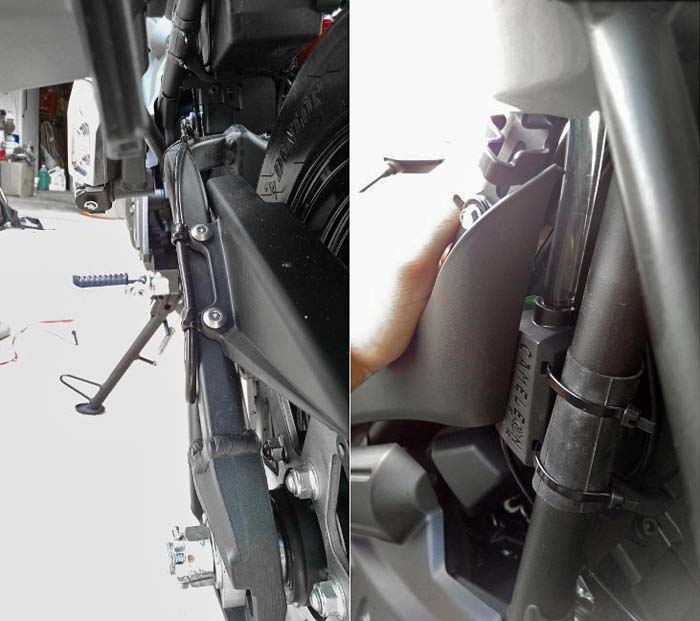
There’s a nice location to hide the reservoir hose on the Versys, under the left side body part under the seat. We threaded the hose up through the back of the bike and secured it under the post that holds the rear seat snap with a loose cable tie.
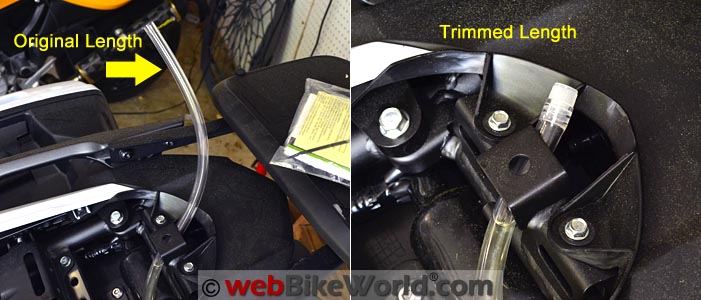
This keeps the reservoir hose at the highest point. We did have to drain about 60 ml of oil from the hose to cut about 200 mm off the end of the hose to fit under the short seat of the Versys.
We did not have to cut the hose on either the Multistrada or the V-Strom because there was enough room for the hose on those bikes.
Hiding the oil reservoir hose in the 2015 Versys 650. TIP: tape the stopper before snaking the reservoir hose up through the bike! TIP: Route the connection hose from the CPU to the drip tube on the outside of the swingarm. Also be sure to leave some slack to account for swingarm movement. We trimmed the reservoir hose to fit. Be sure to replace the red stopper with the clear cap.Installing the Oil Drip Tube
Installing the drip tube is pretty much standard for any automatic motorcycle chain lube system and it’s probably the clumsiest part of the installation.
To be honest, no one has yet come up with the “perfect” method to secure the drip tube to the swingarm.
Someone needs to design a drip tube with a square section, or a more flexible drip tube or something, along with some nice, clever wraps that go around the swingarm to secure the drip tube.
The problem is, every bike is different, making an “all-in-one” generic solution difficult.
In any case, the drip tube is a stiff tube that has a special insert inside that guides the oil down to the end. You’ll have to unfold and straighten the tube that comes with the Cameleon PLUS, then locate along the swingarm.
The drip tube could be installed on the inside of the swingarm or with a lot of time and patience, certainly someone could figure out a “cleaner” installation than ours.
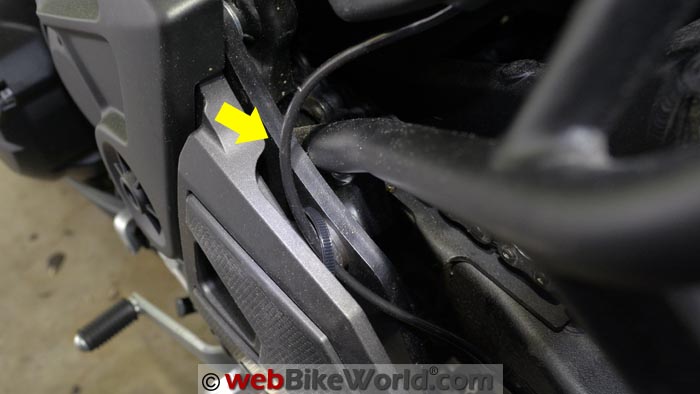
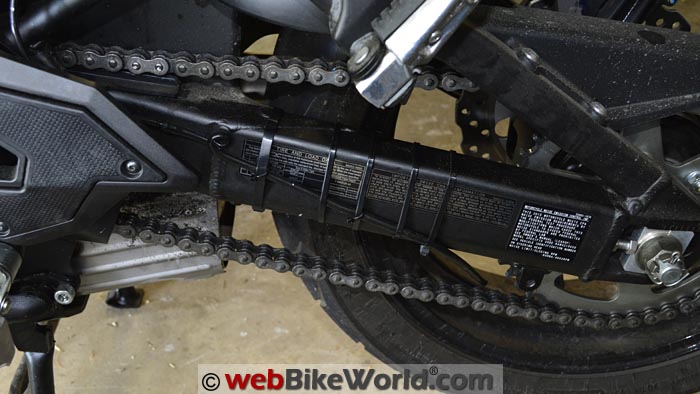
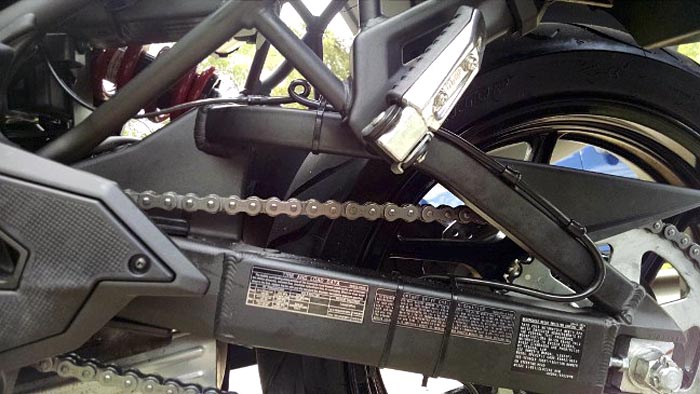
We ended up locating the drip tube along the outside of the swingarm and then securing it with 5 cable ties. It isn’t the best-looking installation but when you’re standing next to the bike, you’d never notice unless you were looking for it.
One thing’s for sure: those cable ties hold the drip tube very securely, as you can see in our video.
Positioning the Oil Drip Tube
Also remember that the tip of the drip tube has to end about 25 mm above the chain and about the same distance from the rear sprocket.
You can bend the drip tube to get the last final adjustments to place the tip in the correct location. By the way, spare drip tubes are available for sale.
Then when everything is set, connect the vinyl oil hose that runs from the CPU to the oil drip tube, leaving room for the movement of the swingarm and making sure the tube won’t become pinched or caught on any bike part.
And also remember to replace the red stopper with the clear cap. The clear cap has a small hole to equalize air pressure to allow the oil to flow.
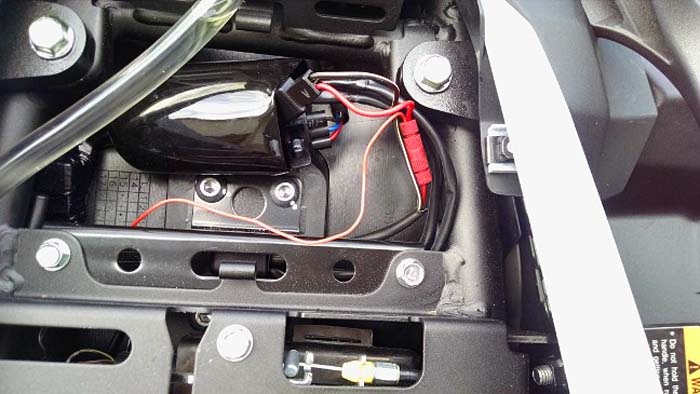
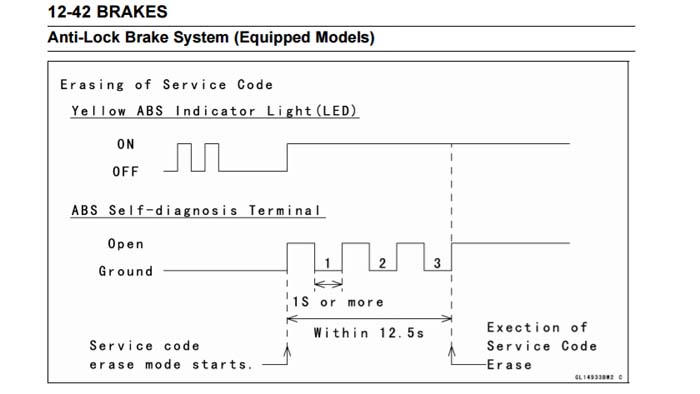
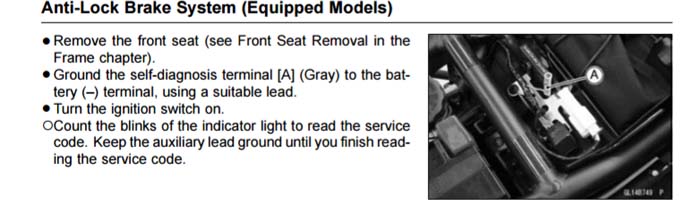
UPDATE: Don’t use the gray wire! It works, but it’s an intermittent test wire for the ABS. See E.W.’s comments below.Oil Reservoir Notes
The oil reservoir hose comes with a full charge of the special Cameleon oil. A full hose contains about 100 ml (3-4 ounces) of oil.
At a level 3 setting (the average setting; see description below), a full hose will yield about 3,500 miles (5,600 km) more or less.
For example, lots of stop-and-go city riding will make the oil last longer because of the automatic cut-off system when the bike is stopped.
On the other hand, if you ride off road, the system will automatically increase the oiling by about 10%. Or, if you set the Trek Mode to double or triple the oil flow for rainy conditions, more oil will obviously be used.
Oil drip tube securely mounted with cable ties.Wiring the CPU
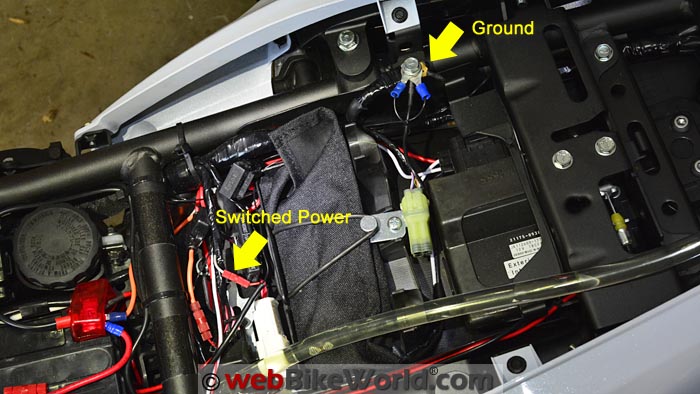
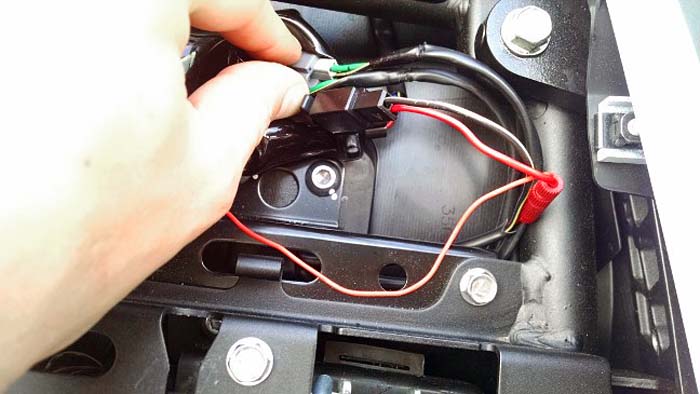
The final step is wiring the Cameleon PLUS CPU to the bike. This is very easy on the new Versys 650 because Kawasaki left several switched power wires for the owner to use.
[UPDATE: I switched the powered wire connection to the rear license plate wire on the Versys, see photos in the Owner Comments section below.]We clipped off the connector, stripped the wire and used a Posi-Lock 20-26 gauge Mini connector to connect the red wire from the Cameleon PLUS CPU to the bike’s power.
You could use a Posi-Tap to tap into a ground for the black wire on the CPU, but we have several grounds from various accessories terminating under a bolt on the frame (see photo).
This works pretty nicely because it makes it easy to access all the grounds in one location if necessary.
Programming the Cameleon PLUS
One of the big changes on the Cameleon PLUS is the programming routine, which is now much easier than before.
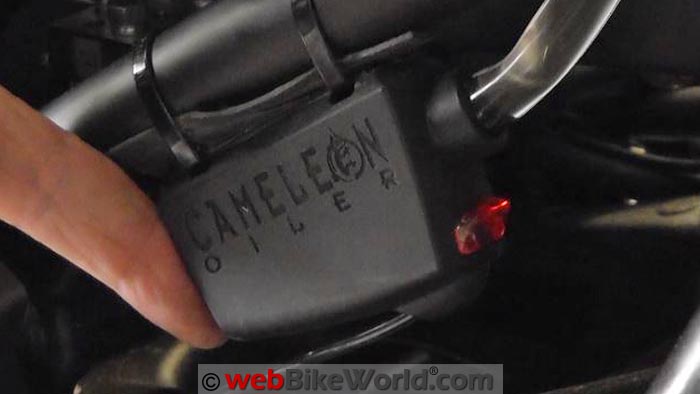
Once everything is installed, turn on the ignition key and within 3 seconds, press and hold the button on the front of the Cameleon PLUS CPU. A red light at the rear of the CPU will start to flash.
Choose a setting between 1 flash to 7. The 1 setting is the minimum oil flow and 7 is the maximum. That’s it — nothing more to it.
The red light only flashes in the setting mode.
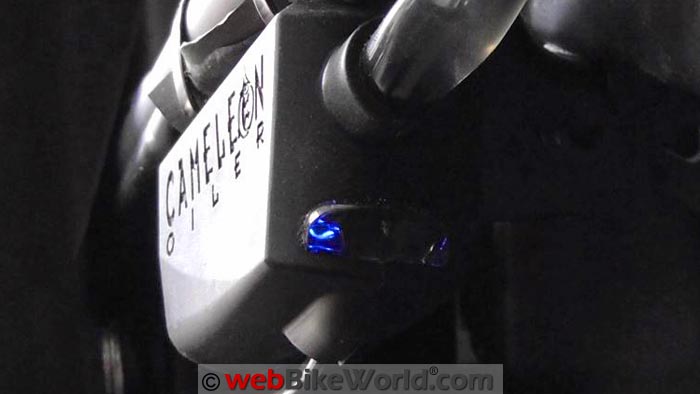
Then, every time the bike is started, the light will flash blue to indicate your selection. Example: if you chose 4, the blue light will flash 4 times, pause, flash 4 times, pause, etc. (see our video).
When the valve is open, the light will stay solid blue and waiting time is green, but you’ll probably never see that if you’re riding the bike.
Actually, you don’t have to do anything if you don’t want, because the Cameleon PLUS is set at the 3 level from the factory and 3 is a pretty good choice.
Remember also that the oil flow will change automatically as the CPU senses the ambient temperature and whether the bike is stopped.
Trek Mode
The Cameleon PLUS also has a new “Trek Mode” setting that can be used to deliver more oil if you’re riding in the rain.
To set Trek Mode, push and hold the button for 10 seconds. The oil flow will be doubled and you’ll see 2 flashes every 5 seconds.
If you push the button again, the oil flow will be tripled and you’ll see 3 flashes every 5 seconds.
This is all described in the owner’s manual.
To deactivate Trek Mode, push and hold the button 10 seconds or turn off the bike and the Cameleon PLUS will return automatically to the previous normal settings.
Red light for setting the Cameleon PLUS (see video). Blue light flashes to indicate settings (see video). You don’t really notice the Cameleon PLUS oiler unless you’re looking for it.Conclusion
The Cameleon PLUS chain oiler is even easier to install and it has the same Cameleon advantages: it’s simple, has very few moving parts and the oil is stored in the hose, which can be easily concealed.
The new system is much easier to program and it automatically adjusts for ambient temperatures.
This makes it a “set and forget” system — you’ll never have to worry about messy chain lubes again.
You will have to check the chain occasionally to make sure it’s adjusted properly and to keep it clean.
Also, most automatic chain oiling systems don’t lubricate the outside of the chain plates, so you may have to occasionally use a paper towel to swipe some oil or lube on the outside of the chain if the bike sits for a long time.
We’re big fans of the Cameleon system. There are other automatic chain oiling systems available but the Cameleon system’s low profile makes it easy to install on just about any type of chain-driven motorcycle and it works like a charm.
Even better, the price has actually dropped by about $10.00 since 2008! It’s currently $169.99 with free shipping.
Owner Comments and Feedback
See details on submitting comments.
From “E.W.” (July 2016): “That gray wire you trapped into for Cameleon power on the Versys is the ABS diagnostic wire. I have heard that it probably shouldn’t be used for powering accessories because it is a sensor wire.
I attempted to use it anyways and It does not power my Cameleon Plus correctly: can’t activate Trek mode-unit gets stuck in a steady, continuous flashing until I power off then on and re-program the default “3”, very dim flashing.
I specifically used the pigtail and not the factory harness as to not damage the factory harness. Pigtails are easy to make and replace.
I figured it was the safest source to tap into because if the Cameleon shorts out I can live without a license plate light, but brake lights/FI/headlights/running lights/other bike functions are critical to safety.
I’d usually use an add-a-fuse, but motorcycle fuse boxes seem pretty tight.
I plan on using this tap in the future on a relay for a fuse block eventually. I grounded to the same grounding bolt you did since it was readily available.
When I am sure this is the permanent setup, I will apply die-electric grease to the connections (or get the more weather-resistant posi-lock connections) to prevent moisture damage.
But anyways, I hope this helps you out. I have been following your blog leading up to purchasing my Versys.
PS. I’m a designer (engineering), home contractor (designer/builder) with some firefighting on the side if you couldn’t tell by the over-thinking, safety and general overdoing of everything.
If you see where my drip tube is, if you can get a tight bend, and don’t mind it being like 1/2″ from the sprocket, you can get away with no zipties showing except on that lower threaded hole on the bottom of the swingarm.
Feel free to re-word anything to add it to your blog if you were planning on making a note.”
Rick’s Reply: Excellent tip, thanks, I switched the Cameleon Plus power wire on mine to the license plate light and it makes a big difference, the colored light on the Cameleon Plus is now much brighter!
From “E.K.” (May 2016): “I just discovered this product on your website (long time reader but not for awhile). Excellent review and details on the installation.
One thing — after reading it, I went to their website and then to Amazon and…the price has DROPPED to $139.99 with free shipping. You might want to update that on your website.
Also, you might want to add the following:
Replacement semi-rigid tube: a very reasonable $15.99 on Amazon; Cameleon’s Synthetic Chain Oil, 250ml: also reasonable at $12.99 on Amazon.
Considering that, from your review (though, oddly, not on their website) that the full-length hose holds 100 ml of oil (included with the unit purchase), and that’s good for about 3,500 miles of riding (or spraying the chain 12 times with spray lube…if one is really diligent about that), then 250 ml is good for 8,750 miles of riding!
Or, just 0.0014 cents per mile! Not sure how many chain lubes you get from, say a 12 oz. can of quality chain lube, but that sounds like a really good deal, plus it leaves the warranty intact. Just my 17 cents (in today’s dollars).”
Editor’s Note: The original Cameleon Chain Oiler we reviewed is currently selling for $139.99, they may be clearing out the old stock. The new Cameleon Plus reviewed here is currently selling for $169.99.