Adjusting the Triumph Tiger Chain
It’s time for some basic maintenance on our 1998 Triumph Tiger project bike.
So we thought it might be a good idea to record some of the work for the benefit of others.
We’re also trying a slightly revised page format for a planned series of articles covering some basic motorcycle maintenance and repair projects.
webBikeWorld is known for its product reviews, but perhaps not as well for its many maintenance and repair articles, but that’s quickly changing.
We’ve always been surprised at the number of motorcycle owners who don’t perform their own maintenance.
But, with today’s busy schedules, not everyone has the time, and that’s fine.
But for those of you who would like to try your hand at some basic maintenance but need a bit of encouragement, we hope this information is useful. In general, it really doesn’t matter if your bike is different than the one shown here.
Most of the information can be applied to any similar motorcycle.
And by the way, if you’re interested in writing a maintenance, repair or other article for publication on webBikeWorld, drop us a line — we’re always looking for high-quality content.
Adjusting Drive Chain Slack on a 1998 Triumph Tiger
No matter which brand or model motorcycle you own, always refer to the owner’s manual for more information on the correct procedure for adjusting the chain.
If you plan on doing your own basic maintenance tasks such as changing the oil, adjusting the chain or checking the spark plugs, you may want to purchase an official shop manual and/or a third-party maintenance and repair manual from Haynes or others.
The official Triumph shop manual calls for a maximum slack (vertical movement) of 35 to 40 mm for the Tiger’s chain.
The manual is vague on the details of exactly how the slack is measured; in fact, they call for the bike to be on “either the side or centre stand”.
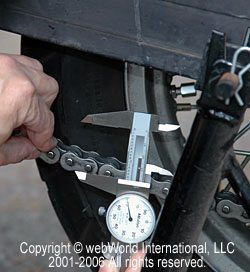
We measure slack using a set of Vernier calipers; obviously, the calipers are overkill for this application, but they’re handy for spreading apart to the maximum width (40mm shown here) to check the slack.
Most manuals call for rotating the wheel until the tightest part of the chain is hanging underneath.
Some will recommend hanging a specified weight on the chain to measure the slack. We usually pull the chain downwards and upwards to measure the distance.
Here the calipers are set to 40 mm and the chain is just about at the maximum range.
Note that we are measuring from the same point; i.e., the bottom of the link to the bottom of the same link.
It doesn’t matter if the point is at the top or the bottom of the link, as long as it’s measured to the same point:
Where to Buy Triumph Tiger Chain
Check Reviews & Prices on AmazonSee More: Motorcycle Accessories, Motorcycle Tire, Motorcycle Helmets
Center Stand vs. Side Stand
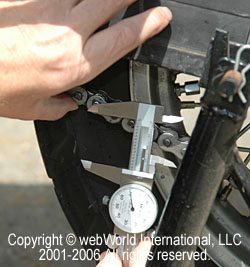
We’ve found that there may be considerable difference in the slack measurement if measured with the bike on a side stand, a built-in center stand or a rear wheel stand.
The slack measurement can be affected by how much load is on the swingarm. A center stand takes most or all of the weight off the swingarm, sometimes causing the highest slack measurement.
Since we don’t have a center stand on our Tiger, we used a Steel Horse swingarm stand.
A swingarm stand does tend to load the swingarm, causing a difference in the amount of slack when the bike is lowered back down on its side stand.
The bottom line is — try to follow the manufacturer’s directions as closely as possible! This is a good rule no matter which maintenance or repair task you’re tackling — and it goes double for oil recommendations.
Don’t try to second guess the manufacturer’s engineers!
It’s interesting to note that Triumph recommends first checking the wheel alignment beforeadjusting the chain.
This can get complicated for beginners, and to be honest, unless the rear wheel is way out of alignment, it’s probably very hard to tell the difference.
Checking wheel alignment is difficult and — ssshhhhh! — I’ve never done it in 40+ years of motorcycle riding.
Triumph Tiger Eccentric Chain Adjustment System
The Tiger uses an eccentric chain adjustment system. All chain driven bikes should have one, but alas, they don’t (for many different reasons).
The eccentric cam makes it (relatively) easy to both align the rear wheel and adjust the chain.
The Triumph Thunderbird Sport does not have an eccentric cam and instead relies on a less accurate bolt that simply pushes the axle rearwards to adjust the chain. This makes rear wheel alignment more difficult.
Triumph recommends checking the reference marks machined in to the bottom of the eccentric cam. Here’s a photo:
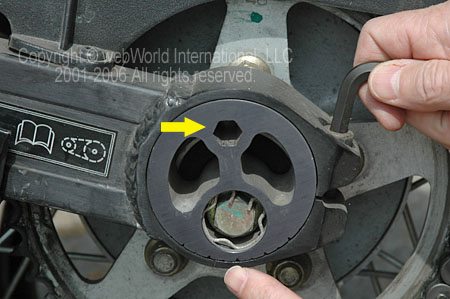
There are 3 things to note in this photo. The finger at the bottom of the photo is pointing to the reference marks machined into the eccentric cam chain adjuster.
The adjuster rotates around the axle, which is located under the large circular cutout just above the finger. Before you can rotate the adjuster, the pinch bolts must be loosened.
In this photo, the hand at the top right is holding a hex wrench on the pinch bolt.
The pinch bolt should only be loosened enough to move the adjuster; too loose and there’s a chance that the adjuster will move too much or that one side will move as you’re adjusting the other side.
Once the pinch bolts on both sides of the rear wheel are loose, use the 12mm hex wrench in the bike’s toolkit to move the eccentric adjuster. The yellow arrow points to where the hex wrench is inserted.
It doesn’t take much movement to adjust the chain; a slight tap is all that was needed on this bike. Here’s an animated .gif photo showing the very slight movement:

Don’t tighten the chain up more than the lowest number of the specification; in this case, 35 mm is the bottom limit.
That’s only 5mm of adjustment range and it doesn’t take much movement of the eccentric to tighten up the chain that much. Too tight is as bad as too loose (or maybe worse!).
It’s now a matter of moving the eccentric, checking the chain slack, rotating the wheel around to check the slack in a couple of spots, etc.
Don’t forget to try and get the notches on the adjuster so that they are exactly in the same spot on both sides of the axle (to keep the rear wheel in alignment).
Once everything looks good, tighten up the pinch bolts.
Check your owner’s manual or shop manual for the correct torque settings for the pinch bolts — this is very important. You don’t want to lose a pinch bolt during a ride!
Here’s a webBikeWorld review of the Precision Instruments Split Beam torque wrench, our favorite.
In this application, Triumph calls for 36Nm — note that’s Newton-meters, NOT foot-pounds. How many times I have mixed them up! Triumph adds a note in their shop manual that reads “Apply copper grease to threads.”
Having never seen “copper grease”, we use “Never Seize”. Probably the point of the grease is to prevent the pinch bolt from getting rusted and to keep the threads in good shape without corrosion.
After the pinch bolts are torqued to specifications, check the chain slack one more time.
That’s all there is to it — it probably took longer to write and read this than it does to actually perform this essential maintenance task.
If you have any comments or suggested improvements to this article, please forward them to editor@webbikeworld.com
Where to Buy Triumph Tiger Chain
Check Reviews & Prices on AmazonSee More: Motorcycle Accessories, Motorcycle Tire, Motorcycle Helmets
Owner Comments and Feedback
See details on submitting comments.
From “D.P.”: “I was reading one of your articles on eccentric chain adjusters. The article was specifically talking about the 1998 Triumph Tiger. In the article it stated the following:
Triumph adds a note in their shop manual that reads “Apply copper grease to threads.”
Having never seen “copper grease”, we use “Never Seize”. Probably the point of the grease is to prevent the pinch bolt from getting rusted and to keep the threads in good shape without corrosion.
(Here is a) link to Loctite’s website and their copper based anti-seize (copper grease). I use this stuff a lot and let me tell you it’s excellent stuff. Hope this information is helpful.”
Other WebBikeWorld Chain Lube Posts