
Installing stainless steel braided brake lines on the BMW K75 is actually a much easier task than I first imagined.
There really isn’t much to it, and it’s my belief that anyone with a modicum of wrenching ability can finish this job in short order.
That’s the good news.
The bad news is … the installation of the braided lines didn’t do much that I could notice.
I wasn’t too pleased with the “wooden” feeling original equipment brakes, especially the front brakes, on the K75.
It seems to me that the bike had but one stopping level, and the harder you squeeze…well, you just don’t seem to stop any harder.
And there’s not much feeling from the front brakes that might let you know what’s happening up there.
This is in stark contrast to my ’86 R65 with one solid front rotor (and one stainless steel braided line).
It has a great amount of front-end “feel”, so that you can precisely tell what’s going on as you’re braking, and the brakes feel very progressive — the more you squeeze, the more you stop.
I have no idea why this is, but my assumption was that the K75’s original equipment brake lines were expanding under braking, and some of the hydraulic power wasn’t being directed to the brake pistons.
After all, the two front discs on the K75 should be stopping the bike better than the one disc on the R65, right?
And the R had the braided line, so therefore the K needed braided lines also. At least that’s the way my logic went…
So I purchased a set of custom-made stainless steel braided lines and went to work.
The dealer didn’t have a set in stock for a 1994 K75 with the “C” bars installed, but they custom ordered a set from their supplier for no extra charge, and sent them to me.
I have no idea how they knew what length to send, as I didn’t supply them with any dimensions, but they are right on the money and appear to be nicely made and of high quality.
Installing the Stainless Steel Brake Lines
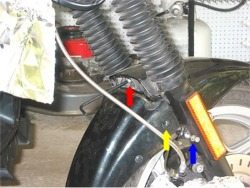
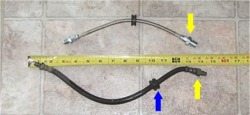
One thing that I noticed before I even started the project is that the rear brake line was definitely different than the original.
The original was a one piece “rubber” hose that first screwed into the rear master cylinder.
Then it connected into the rear caliper via a type of banjo fitting.
The rubber grommet you see on the line in Photo 1 (blue arrow, Photo 1) snaps into a “U” shaped holder cast into the rear swingarm.
But the new hose was much shorter and one of its fittings was completely different.
It wasn’t the same style banjo type fitting.
The yellow arrows in the photo on the left indicate the two different style fittings.
The new rear line came with a short piece of about 1/8″ tubing (see photo left).
It connected from the new style fitting to the rear caliper.
When I lined things up in the rear, it appeared that there was no way that the new braided line was going to fit.
Mostly because I couldn’t figure out a way to locate the grommet — it just didn’t seem like it was going to work.
So I took a ride down to Bob’s again (about 1 hour each way!) and after some discussion with a mechanic, he realized that they had given me the wrong grommet with the new line.
So the bottom line here is to make sure you get the correct grommet — it has a larger inside diameter that fits around the barrel-type fitting you see on the stainless steel braided line indicated by the yellow arrow in Photo 1.
Once I got the correct fitting, everything looked like it would line up correctly. Don’t ask me why they went with the metal tube design with the braided line; I imagine there’s some reason for it.
Anyway, let’s not get ahead of ourselves here. I started with the front brake line.
Installing the Front Brake Line
Here’s a tip: whenever I work on the brakes, I always take some aluminum foil and cover anything that might be exposed to the brake fluid in case it spills.
Any time you’re going to take off the top of the reservoir, make sure you first have aluminum foil covering the tank and/or fenders or any other painted (or non-painted) areas.
I’ve heard horror stories about spilled brake fluid instantly eating into paint, but even though I’ve dumped plenty of it, I think as long as you clean it off fairly quickly you’ll be ok.
I always keep a spray bottle of Glass Plus and some paper towels around to clean up and small spills.
First, I drained the brake fluid from the front master cylinder reservoir using an automotive “turkey baster”, the kind used to fill batteries.
Any type of suction device would work; use your old turkey baster from the kitchen, but I suggest you don’t use it for turkeys after you’re done sucking out DOT 4!
You could also use some paper towels to absorb the fluid, but you then run a big risk of dumping out the fluid if you stick the towels in there too far.
It’s messy; they drip all over the place; and then you’d have to dispose of yucky paper towels soaked in fluid.
By the way, I always keep an empty plastic soda bottle around to hold the used fluid; you can then cap it and dispose of it properly.
You should have an old pan around also to catch the fluid from the old brake lines when you take them off — I use the vinyl pan that I have for changing the crankcase oil.
After you’ve drained everything you can out of the reservoir, get your drain pan located and then remove the lower brake hose banjo bolt that attaches to the front caliper and quickly hold it over the pan.
Again, make sure you have some aluminum foil covering the brake rotor and anything else you don’t want to get wet, because fluid will surely leak from this area once you loosen the bolt.
If you have some time, let the brake line drain for a while before you unbolt it from the banjo fitting under the master cylinder.
If not, just make sure you have everything covered, because it will probably leak when you loosen the fitting.

K75 Quirks
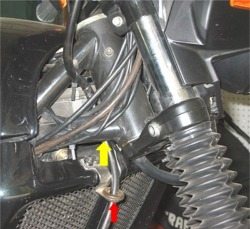
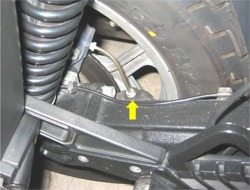
The hardest part of this whole job is caused by this little devil in the photo on the left.
This is the brake line guide that is located on the right side of the front fender on this bike (see the yellow arrow in the photo above).
You can’t simply pull this bugger out — you have to disassemble the fender to remove it.
To do this, you first have to remove the Allen bolt on the rear fender as shown by the red arrow in the photo above.
This loosens the fender and allows you to remove it.
But first, you must remove the fender bolts, one on each side of the fender, illustrated by the blue arrow in photo above.
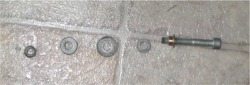
Be careful when removing these fender bolts — there are several washers involved.
And the whole thing must be reinstalled in a certain order.
Each washer goes between the fender and the fork in a certain sequence.
This photo (left) shows the sequence of the washers from front to back.
I’m not sure why BMW chose to go with such a complicated system (hey, it’s a BMW, what else did you expect??).
But I suppose the washers protect the fender from rubbing or wearing.
Anyway, this photo should help you get everything lined back up in case you drop a washer.
While we’re at it, for reference, here is a photo of the way the original brake line was routed behind the forks and through the frame tubes.
The yellow arrow points to the location where the two cable ties where located — I cut them off before I took this photo, unfortunately.
They are located in an “X” fashion to hold the brake line in place.
The red arrow points to the grommet that locates the brake line. The metal bracket that the grommet fits in to is open on the far side.
All you have to do is push the grommet and the brake line through and it will pop out. You can use a bit of soapy water if you need to.
Don’t forget to put this rubber grommet back on the new line! I forgot to do this, and had to take everything apart again to get it back in there.
Thank goodness I hadn’t buttoned up the fender yet, or I’d have to go through the hassle of undoing that all over again!
Once you get everything loose, and you remove the brake line guide from the fender, you’re set to go.
You’ve already unbolted the old brake line from the front caliper and drained it out, right?
Now simply unbolt the other end of the brake line from underneath the master cylinder on the handlebars.
Snake everything down through the frame, taking another look at how everything is routed and you’re all set.
You may want to hold a paper towel or something over the open end of the line so that you don’t drip any old brake fluid on anything.
To install the new line, remember to first slide the grommet (red arrow, photo above) over the new line. Then it’s simply a matter of re-bolting everything up.
Make sure you route the new line correctly through the frame tubes!
You should always use new washers when you’re installing a new line. You’ll need 4 copper or aluminum crush washers; two for each end, one on each side of the fittings.
Installing the Rear Brake Line
Next comes the rear line. This one’s pretty easy.
First, drain the fluid from the rear master cylinder with your turkey baster.
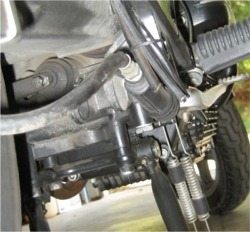
Next, place your vinyl pan underneath the fitting shown in the photo left and unbolt it. You’ll get a bunch of fluid leaking out, so it’s best to let it drain for a while.
You may want to cover your rear disk with aluminum foil so that you don’t get any brake fluid on the important parts.
The old rubber line has only two attachment points; at the one end shown in the photo directly above, and the other end at the caliper.
Push the rubber grommet off of the swingarm (yellow arrow in the second photo on this page) and the whole line should come right off.
Don’t forget that the new line is different — the stainless steel braided part only goes from the fitting to the U-shaped casting on the swingarm that holds the correct size rubber grommet.
Then there’s a metal tube that runs from the fitting on the new line to the caliper. Loosely assemble everything and locate the parts.
Installing the new one is simply a matter of reversing the procedure: install the end underneath the bike (photo above) first, then slide the correct size rubber grommet over the end of the line and place it in the grommet holder on the swingarm.
Screw in the end of the metal tube to the caliper, then tighten everything up.
Don’t over tighten — the fitting shown in the photo above is a tapered fitting; make it snug but don’t overdo it.
I unfortunately didn’t take enough photos of the entire rear brake line assembly with the new line, so I hope you can understand the directions for installing the rear brake line.
It’s really rather straightforward — the only problem I had was because I didn’t have the correct size rubber grommet. It needs to fit over the stainless steel “barrel” part of the one end of the new rear line.
Conclusion
All you need to do next is bleed the brake lines. See the wBW article on bleeding brakes using an Actron vacuum pump to learn how to do this.
I highly recommend spending the money to purchase this pump; it makes bleeding the brakes so much easier, and it will pay for itself in one or two brake bleeding jobs.
You’ll be the envy of your neighborhood!
Publication Date: 2003?
Master Listing of All wBW Motorcycle Product Reviews
Owner Comments and Feedback
See details on submitting comments.