Installing a Signal Dynamics LED Brake Light Bar: Triumph Thunderbird
Sport
Information about the Signal Dynamics LED Brake Light Bar was covered in a previous webBikeWorld article “Improving Brake Light Visibility on a BMW K75“. This article addresses the installation of that same unit on a Triumph Thunderbird Sport. There were a few tricks to this installation, but it fits very well on the T-Bird’s license plate and hopefully it will help improve safety.
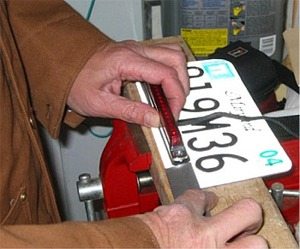
First thing I needed to do was drill new holes in my brand-new license plate!
Maryland plates have holes 3.75″ on center, and it seems that every motorcycle I’ve owned has mounting holes that are much wider apart than that. So every plate I get has to be custom drilled to fit….go figure!
The T-Bird has horizontal slots on either side of the license plate bracket, which make it easier to fit the plate, as you can be off a bit to either side and it won’t make much difference.
The T-Bird’s license plate slots stretch from a minimum of 4.125″ to 6.0″. I drilled two pilot holes with a 1/32″ drill, then 1/4″ holes at 5.5″ on center. These holes match the mounting hole width in the Signal Dynamics LED Brake Light Bar.
Signal Dynamics provides two nice stainless steel pan head bolts and castellated locking nuts with the unit, and I used these to mount the plate, rather than the standard 1/4″-20 bolts.
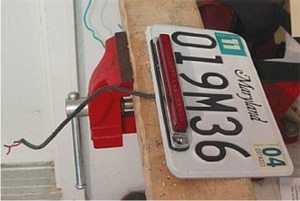
The Signal Dynamics LED also has a wiring harness coming out of the back of the unit at the center. I drilled another 1/4″ hole right in the middle of the plate, and pushed the wiring harness through.
There are numerous ways to attach the harness to your bike’s brake light wiring. Some bikes are better off with a top-mounted LED that is located closer to the brake light, but I didn’t have that choice with the T-Bird.
Triumph is kind enough to pre-drill a couple of holes near the bottom of the 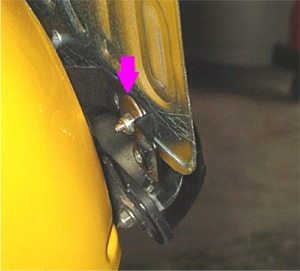 fender, under the license plate bracket. I’m not sure what they’re for, possibly some other country’s license plate style, but the hole on the left worked great as a pass-through for the LED’s wiring harness.
This photo was taken at a low angle, but when you’re standing up next to the bike, you really don’t notice the wiring harness, as it kind of disappears under the angle of the plate.
I then fed the wiring harness up along the existing Triumph harness that powers the license plate light and the brake lights. You can feed the LED’s harness up onto the wiring harness holder clips that Triumph has placed under the fender.
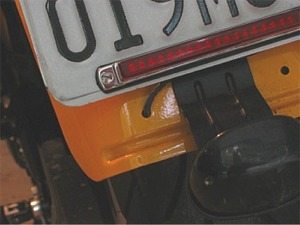
This is a photo looking towards the back of the bike, at the back of the license plate.
The pink arrow is pointing to a fender washer — I bought a couple of these at the local hardware store to back up the through-bolt from the LED that also holds the plate to the mounting bracket.
The washers that came with the LED were kind of small, and I wanted a good backing to make sure the nuts didn’t pull through.
I also found some rubber washers and put a couple of those on for good measure. It makes for a pretty solid installation, even though the bolts shown here are only about 1/8″, rather than the typical 1/4″-20’s used for mounting license plates. I could have used the larger bolts, but that would have meant drilling out the Triumph’s mounting bracket, and I didn’t want to do that.
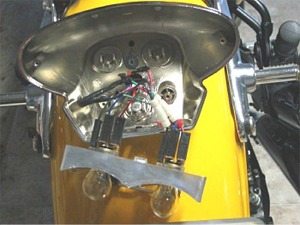
Unscrew the two Phillips head screws that hold the T-Bird’s red brake light lens on to the tail light assembly.
Then unscrew the 3 Phillips head screws that hold the light bulb assembly on to the tail light housing. Be careful with all these parts, as they are plastic and can break and/or strip fairly easily
Next comes the tricky part: the wiring. The Signal Dynamics LED has a black wire that is the ground; a white wire that powers the running light feature of the LED; and a red wire that powers the brake light feature of the LED.
The T-Bird uses a 3-prong connector that looks like an H4 headlight bulb connector. The bike’s black wire is ground; the red wire is the running light filament of the 21/5W (2397’s on this bike) bulb; and the blue wire lights up the brake light bulb filament.
The object is to splice the LED’s ground with the bike’s ground; the LED’s white wire with the bike’s red wire, and the LED’s red wire with the bike’s blue wire.
The only problem I ran into was that Triumph was pretty cheap on the wiring — there wasn’t much slack wire to use. So I ended up having to splice an extra length of wire (about 3″) on each wire coming out of the back of the tail light assembly from the bike’s wiring harness.
I ended up soldering those on because they’ll be permanent. I then used Posi-Lock connectors to splice the rest of the wires from the LED to the 3 wires (as described above) coming out of the back of the right-hand brake light bulb. See the wBW review of Posi-Lock connectors for more information on this product.
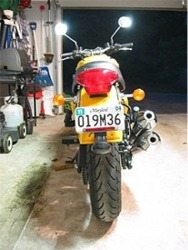
Here’s the finished product. The LED looks pretty good (if I must say so myself!) attached to the bottom of the T-Bird’s license plate.
I also installed the Comagination VisiStop Brake Light Flasher to flash the LED. It all works out to be a nice combination that is pretty subtle and doesn’t ruin any of the T-Bird’s beautiful lines.
The wBW review and installation of the VisiStop has more information and also a link to a short QuickTime movie that shows the blinking LED in action.
Note: For informational use only. All material and photographs are Copyright © webWorld International, LLC – 2000-2011. All rights reserved. See the webBikeWorld® Site Info page. NOTE: Product specifications, features and details may change or differ from our descriptions. Always check before purchasing. Read the Terms and Conditions
Other WebBikeWorld Motorcycle Lighting Reviews