
Installing Fork Gaiters on a 1994 BMW K75
Fork gaiters are a curious motorcycle accessory. Somehow, the accordion-shaped tubes made a motorcycle look instantly old-fashioned to me. Compared to the old Earle’s forks, which look like they could hold up the front end on a tank, the spindly tubes on the later /2 model BMW’s of the late 60’s look downright weird when covered in their collapsible rubber gaiters.
About 30-odd years later, I became convinced that gaiters might be a good thing by a couple of friends who swore by them. The claim is that they protect the bare metal of the front fork tubes from damage by stones, bugs, dust and other debris. This, in turn, helps protect the all-important fork seals. When I saw a pair installed on a K75 identical in every other way to mine, I liked the look – the black gaiters covered the shiny chrome upper fork tubes and helped to blend in the blacked-out look of the rest of the charcoal black bike. So, there was now an overwhelming argument to install a set! Style and performance!
I had a bit of difficulty finding the correct set of gaiters. I was told (but haven’t confirmed) that BMW no longer carries them for a K75 or K100, so you have to find them in the aftermarket. I finally found a pair of unlabeled but substantial looking (and feeling) gaiters for about $30.00 the pair at Bob’s BMW. I was told there used to be special black clamps available to hold them on top and bottom, but they were no longer available, so Bob threw four black plastic cable ties in the bag and said they would work fine.
I finally got up the energy one Saturday to do a front-end teardown and install them. I looked over the bike and pulled out the Clymer’s to study the situation – it looked like a fairly straightforward job to me. There are a few tricks though, and hopefully you can learn from my mistakes.
The job consists of four basic steps: you need to pull off the front brake calipers, disassemble the front fender assembly (which is a two-part affair on the ’94 K75), take off the lower fork brace, loosen the forks and pull them out. Although I had taken the front calipers off once to change the front tire, I never had the front forks all the way out, but it really isn’t too hard of a job at all.
Where to Buy BMW Fork Gaiters
Check Reviews & Prices on AmazonSee More: Motorcycle Accessories, Motorcycle Tire, Motorcycle Helmets
What You’ll Need
- 5, 6 and 8 mm Allen wrenches (I use a nice set of 3/8″ drive Craftsman metric Allen sockets);
- 3/8″ drive Ratchet wrench;
- Torque wrench;
- 10 mm box wrench;
- Pliers;
- I needed a longer 3/8″ drive breaker bar to loosen the bigger (8 mm) Allen bolts;
WD-40 or equivalent; - Loctite (or equivalent) thread sealer.
- Optional: black silicone RTV; hydraulic scissor jack.
Time
I worked slowly and methodically (which doesn’t necessarily help me get the job done any better!) and took several breaks and it took me about 3 hours total.
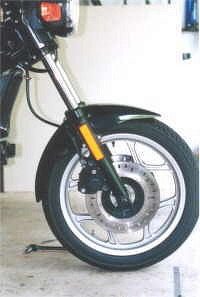
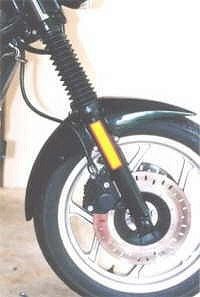
| Before | After |
|
|
|
Reference
I have the Clymer “K-Series 1985-1995 Service, Repair and Maintenance” guide, Second edition, 3rd printing, April 1999. Published by Intertec Publishing, ISBN 0-89287-648-4. The chapters to refer to are:
- Chapter 10, “Front Suspension and Steering”. Pages 354 – 357 cover removal and installation of the front wheel, including removal of the front brake calipers; and pages 375 – 378 cover removal and installation of the front forks;
- Chapter 13, “Frame, Body and Frame Repainting” cover the removal of the front fender on pages 496 – 498.
The Job
I set a hydraulic scissor jack under the engine with a piece of 2×4 between the jack and the bottom of the engine and lifted the bike up just enough to take some weight off the front end. I feel that this stabilizes the bike a bit whenever I’m going to remove the front tire; I’m not sure I trust the center stand 100%. I find this makes it a bit easier to slide the front wheel out when working on the front end, but it probably isn’t really necessary. If you do this, make sure you don’t lift the bike off the center stand – just a tiny bit of lift to help ensure the bike won’t fall forward is all you need.
Also, before you start, you should measure the length of the forks; I measured mine from a point on the bottom of the lower fork bridge to the bottom of the fork. There is a nice, flat area on the very bottom of the fork on which you can lay a straightedge ruler to measure to. This measurement will be used as a check when you are reinstalling the forks to make sure they are the same length as when you took them out (see step #9).
1. Remove the Brake Calipers
First thing to do is to remove the front brake calipers. This is pretty straightforward and covered nicely in Clymer’s. You remove the two 8 mm caliper mounting bolts and slide the caliper off up and to the rear. There are two cautions here: once you take the calipers off, do not touch the front brake, or the pistons may be forced out of the cylinders leading to potential problems.
I didn’t do this, but Clymer’s recommends you fit a piece of wood or plastic in between the brake pads to hold them in case someone touches the front brake. I used caution and it worked well for me. You’ll find that you have to swing the front end back and forth a bit during this job, so make sure you don’t reach up without looking and squeeze the front brake by accident while the brake calipers are unsupported!
 The other thing to remember is that you will need to use something to hold up the brake calipers – you don’t want to let them hang by the brake lines. I have two thin nylon luggage straps that I use specifically for this purpose – I wrap them up around the handlebars, then feed the strap up into the caliper between the brake pads, and adjust the straps so that they take the weight off the hanging calipers. I purchased them in Wal Mart for about $2.00 each; they are in the auto section near the bungee cords. They work great for this single purpose.
2. Remove the Front Axle
Next, remove the front axle. This involves loosening (no need to completely remove) the 6 mm front axle clamping bolts (2 on each side) from under the axle. Then remove the 8 mm bolt that holds the axle on the left hand side of the bike. Insert a drift or an Allen wrench into the hole in the axle on the right hand side of the bike and slowly pull the axle out while rotating it.
3. Remove the Front Wheel
Once you have the axle out, you can slowly pull the front wheel forward to remove it. There are two wheel spacers on either side of the wheel, and they will probably fall out when you remove the wheel. Remember that they are different shapes and must be installed the same way they came out, so take a look first to see how they fit. Move the wheel out of the way, but don’t lay it down on the disc rotors.
4. Remove the Front Fender(s)
Next, you’ll need to remove the front fenders and the lower fork brace. I have the two-part fenders on my 1994 K75 Standard. To do this, first pry off the small hinged cover on the back of the fork brace. Be careful, as this cover is pretty flimsy! Under that cover you’ll see an Allen bolt – I think it’s a 5 mm. Remove that bolt and washers. Next, remove the reflector assemblies from the side of the front forks. Refer to Clymer Chapter 13, starting on page 496.
Note: I found this to be the trickiest part of the entire job: there are several washers involved here that make this a rather complex assembly that holds the reflector and the front half of the front fender. There are two tabs that come down from the fender that slide over the bolt and there are various sizes of washers and a collar that hold everything together.
Make sure you understand how they all fit together before you take them out! I didn’t, and it took me some time to figure out how everything went back together. I’m still not 100% sure I did it right, but it seems to be working. Clymer’s warns that if you don’t get it right, you may risk breaking the tabs on the fenders, which means you’ll have to buy a new fender AND get it painted! Also, when you get to a point where the bolts are loose, hang on to the front fender, or it will drop off and probably land upside down and get scratched.
Where to Buy BMW Fork Gaiters
Check Reviews & Prices on AmazonSee More: Motorcycle Accessories, Motorcycle Tire, Motorcycle Helmets
5. Remove the Lower Fork Brace
You do have to remove the lower fork brace. Initially, I thought perhaps I could get away without doing this. To remove the lower fork brace, remove the four (yes, there are four!) 6 mm bolts under the fork brace. You should now have two naked forks staring at you, ready for removal!
6. Remove the Front Forks
Pry off the top trim cap on the forks – they are up on top of the “triple tree” under the handlebars. Loosen (it’s not necessary to remove) the upper and lower fork clamp bolts; they are the Allen bolts in back of the forks, one on the upper fork bridge (6 mm on my bike) and one on the lower fork bridge (8 mm) in back of each fork. Refer to Clymer page 377. Slowly slide each fork down and out. You may have to twist the forks slightly back and forth as you remove them. They should come out fairly easily – if not, first make sure that they fork clamp Allen bolts are, in fact, loose. If you are still having problems, you may need to spray some penetrating fluid around the forks inside of the upper and lower fork bridge.
7. Clean the Forks
Now that the forks are out, you should make sure they are as clean as possible. I sprayed WD-40 on a clean towel and wiped them down. I also cleaned out the holes in the upper and lower fork bridge holes where the fork goes. I then left a very light coating of WD-40 on the part of the exposed fork tubes that will be covered by the gaiters. I suppose that if you haven’t done a fork oil change in a while, this might be the time to do it; perhaps it is easier when the forks are completely removed from the bike.
8. Install the Gaiters
Slide the gaiters over the forks. Make sure you have the large diameter end down, as this must slide over the fork seal assembly. It’s not necessary to do anything other than slide the gaiters over the forks at this point; you have to reassemble everything before you can cinch down the gaiters. Note that there are four drain holes in the bottom of each gaiter. You may want to locate these so that they don’t point directly forward – best to have them on the sides, I figure, to prevent dirt or rain from getting in. Remember that once you get the bottom part of the gaiters on, and you install the fork brace, you probably will not be able to move them again, as it is too tight of a fit to do this once the fork brace is on, so get them lined up as closely as possible.
9. Reassemble the Forks
The half-way point! It’s downhill from here…. I sprayed a bit of WD-40 in the holes in the upper and lower fork bridge where the forks are installed to prevent future corrosion. I suppose I could have put a very light coating of “Never Seize” instead. Slide the forks back up into the fork bridge. This is a good time also to clean up everything on the front end; the forks; under the fenders; the lower fork brace, etc.
I decided to move the forks up above the triple tree by 5 mm, just to see if it would speed up the steering a bit. This did work, as I will relate at the end.
If you are going to reinstall the forks to factory specs, simply slide them up into the upper and lower fork bridge until the top of the fork tube is flush with the top of the triple tree. You may need to lay a small straightedge on top of the triple tree to tell when you are there. Be careful, as it may appear that the forks are flush with the top of the triple tree when they really aren’t. Check the measurement you made at the beginning to determine if the forks are in the same location as before.
Now you should snug up the forks just enough to hold them in place, and pull the lower part of the fork gaiter down over the top of the fork seal assembly. You want to do this now, because it is a very tight fit once you get the fork brace on. I pulled the gaiter down far enough so that the bottom of the first pleat was even with the very top of the fork, right before it meets the fork seal itself. You need to make sure that there is enough rubber over the lower section of the fork so that when you install the cable tie it will have something to grab on to and hold the lower part of the gaiter on securely.
It gets a bit tricky when you’re trying to juggle the forks and the fork brace – you may have to mess with a combination of holding the forks up and fiddling with the lower fork brace to get the brace installed in the proper position as you reinstall the forks. You have to slide one fork down lower than the other to get the brace in, then move the fork up until everything is lined up.
You need to have the ability to rotate each fork as you slide it up into the fork bridge, but at the same time, you need to make sure the lower fork brace is in its proper location. You sort of have to go back and forth until you get the right combination of moves where both forks and the lower fork brace are all lined up! It’s kind of tough to do by yourself – I eventually had to call my wife out to the garage to give me a hand.
Also, you should make sure nothing is binding at this point. You don’t want to force the fork or the assembly with the fork brace; make sure everything has a bit of play or is not binding. This may take some doing.
Once you get things lined up, tighten the Allen bolts in the upper and lower fork bridge just enough to keep the forks from sliding down. I had to do quite a bit of measuring and tweaking to get everything lined up and correct, as I moved my forks up 5 mm above the triple tree. Then, tighten the four bolts under the fork brace. Make sure you torque these; Clymer’s calls for 14-16 ft. lbs.
Where to Buy BMW Fork Gaiters
Check Reviews & Prices on AmazonSee More: Motorcycle Accessories, Motorcycle Tire, Motorcycle Helmets
10. Reassemble Front End
Now it’s a matter of reassembling everything pretty much in the reverse order from the way you ripped it apart. Reassemble the front fender(s), ensuring that you install the washers correctly on the reflector assembly. Reinstall the front wheel, then the brake calipers. Make sure you double check everything to ensure you torqued everything to specs; don’t forget the fork clamping bolts on the upper and lower fork bridge!
11. Finish Installing Gaiters
Make sure the lower part of the gaiter is secure around the upper part of the lower fork tube, and that it covers the fork seal with enough room to slide in the cable tie. It is a very tight fit between the gaiter and the fork brace; I used a pair of pliers to slide the cable tie back and forth until I was able to get it far enough down to tighten. Don’t cinch the cable tie tight yet, just let it hang there until you make sure everything is located properly. I stretched the gaiter up to the top of the fork, right underneath the lower fork bridge, just to make sure everything looked right, before I cinched down the gaiter.
Once everything looks good, you can cinch down the lower cable tie. Make sure you adjust the cable tie so that the little female part is at the back of the fork; this gives a cleaner look to the front fork.
Stretch the gaiter up to the top of the fork tube under the lower fork bridge. This may take some persuading with a piece of wood – don’t use a screwdriver, as it may cut the fork gaiter and ruin your work! Push the gaiter up as far as it will go and make sure it’s even. You should be able to get it up far enough that you see no chrome or fork tube. Once it’s in place, wrap it with a cable tie and again, make sure it’s located such that the female part of the cable tie is in back of the fork.
I used a pair of pliers to pull on the cable tie to make sure it was really tight. I then snipped off the extra part of the cable tie that stuck out. Everything looks great!
You may want to put some black RTV sealant around or under the upper part of the gaiter where it meets the lower fork bridge. I didn’t do this, but Iwonder if it would have helped hold the gaiter up. I’m assuming that the cable tie is tight enough to hold it for a long time.
A Note on Raising the Forks
I have heard that raising the forks in the triple trees can help to quicken the steering by slightly decreasing the trail. I wanted to try this; since installing Dunlop K491’s, the steering seemed a bit slow – the bike almost seemed to “understeer”, or plow, a bit in the corners. When reinstalling the forks, I only raised them 5 mm, which wouldn’t seem to make that much difference. In fact, some people say that it really doesn’t make much of a difference on some bikes to raise the forks.
But I definitely noticed an immediate difference. As soon as I pulled the bike out of the driveway, it seemed to steer much quicker. It may be that the 5 mm was just enough to overcome the slightly slower steering of the Dunlop’s. The bike now feels like it turns in as quick as it did with the original Metzeler’s, but without the feeling that the Metzeler’s gave me that the bike was “falling in” to corners. I always felt like I had to give the bike mid-corner corrections with the Metzeler ME33/55 combination.
UPDATE: I recently installed the lower K75 “C” handlebars on this bike, which has made a huge difference in the way the bike “feels”. I then tried again to raise the forks in the clamps, this time by 1″. Combined with the newly improved front end feel, raising the forks has just about eliminated the top-heavy, “tippy” feel the K75 has at low speeds. See more on the page that describes the handlebar conversion…(more)
Where to Buy BMW Fork Gaiters
Check Reviews & Prices on AmazonSee More: Motorcycle Accessories, Motorcycle Tire, Motorcycle Helmets
The End
Again, make sure everything is torqued to specifications! Clymer’s calls for the following on the K75, but check your bike to make sure you know the exact torque specifications:
- Front axle 8 mm Allen bolt 21-27
- Front axle 6 mm clamp bolts 9-13
- Front caliper 8 mm mounting bolts 21-25
- Fork bridge clamping bolts
- Upper 6 mm 14-16
- Lower 8 mm 29-33
- Fork brace bolts 6 mm 14-16
Remember, this document is to be used as a guide only! Please make sure you read the BMW technical manuals and the Clymer’s or Hayne’s guides before doing any work on your bike. The front end, forks and front brakes are critical components to your bike and your safety. Make sure you check and double check that everything is installed correctly and torqued to proper specifications.
Note: For informational use only. All material and photographs are Copyright © webWorld International, LLC – 2000-2011. All rights reserved. See the webBikeWorld® Site Info page. NOTE: Product specifications, features and details may change or differ from our descriptions. Always check before purchasing. Read the Terms and Conditions!