
A simple and effective leveraging of technology to mitigate many of the performance issues users cope with from modern lean-burn fuel-injected engines.
A true plug-and-play device, the Booster Plug does not have or need an interface or dynamic controls. Read the installation sheet, plug it in and go riding.
Like so many other cautious adopters, I am now a convert — the Booster Plug works. I can’t wait to try one on my HP2 Sport!
UPDATE (November 6, 2010): Booster Plug Mk II now available, see below.
Many modern motorcycles are to a great extent controlled by multi-bit processors of varying sophistication.
With complex engine management systems that include multiple control processors and digital- or single-wire networks to tie everything together, most new two-wheelers are anything but simple.
There is no doubt that fuel injected systems provide efficiencies and economies that cannot be ignored.
Additionally, manufacturers are acutely aware of the ever-changing environmental and regulatory roadways that in large part resulted in the wide scale adoption of fuel injection, among other technologies, in the first place.
But while these efficiencies and economies are most valuable when it comes time to get an engine certified for use, at the other end of the spectrum, where the user resides, these efficiencies and economies may not be as readily discerned or nor always appreciated.
While fuel injection is now a very mature motorcycle technology, it never ceases to amaze, confuse and frustrate so many of us, right? And while experts in the field might (do) argue the point, many fuel injection systems do not provide optimum performance across all applicable bases.
For those who have adopted fuel injection willingly or otherwise, but are less than totally satisfied, there are after-market solutions — some of which have actually become standards of sort in allowing owners to more fully exploit all the technology and performance of modern motorcycles.
Admittedly, some of the after-market solutions can be as or more complex as the systems used on the motorcycle, but they do allow the owner to monitor and adjust critical management and performance processes dynamically.
While this raises other issues, a knowledgeable user can now undertake performance adjustments (hopefully of the non-destructive kind) for far less effort and far less expense.
So while the more complex after-market systems receive much of the attention, there are a number of simple solutions that address the most basic and glaring issues regarding fuel injection and engine management systems. And one of these is the Booster Plug.
Small But Mighty
First off, let me say that the product website does an outstanding job of identifying the issues, explaining the engineering and technology and detailing solutions, including the one used by the Booster Plug. Browsing through all the information is extremely informative and an education unto itself.
Accordingly, I have tried to capture the essence of what the Booster Plug is and how it works so as to provide a basic understanding of this product.
Modern engines rely on a multitude of inputs from multiple sensors, along with pre-set instructions, to provide the information needed to manage the engine and thus provide sustained performance, fuel efficiencies and, meet emission control standards. One of the most important sensors is the Air Intake Temperature or AIT sensor.
While there are many ways to try and trick the system into working better under a wide range of conditions, most solutions are still lacking when it comes to providing precise and consistent control under varying air temperature conditions. This is something experienced first hand over a riding season that typically involves temperatures of -10 C to 40 C (14 F to 104 F) or more.
Through the use of known data, research and a methodical engineering approach, the inventor of the Booster Plug came up with a resistor-based component that fits in-line with existing Air Intake Temperature Sensor configurations.
The Booster Plug utilizes and processes readings from the original Air Intake Temperature sensor and its external sensor that provides ambient air temperature data along with its internal resistor data and it is this output that is sent to the Fuel Injection Control Unit.
Simply put, the Booster Plug makes the Fuel Injection Engine Control Unit think that the ambient air temperature is 20 degrees Celsius (plus/minus one degree) lower than it actually is and accordingly the Engine Control unit makes the mixture richer by a specific amount.
This specific amount is six (6) percent), which should result in faster and more stable (smoother) throttle response, improved acceleration and a reduction of low speed response issues typical of lean burn engines including back-firing or pressure build-ups in exhaust systems, particularly aftermarket items.
The Booster Plug claims to be the only resister tuning device to offer real temperature compensation and it does so across an effective operating temperature range of minus 23 to plus 37 degrees Celsius (-23 C to +37 C) or minus 9.4 F to plus 98.6 F.
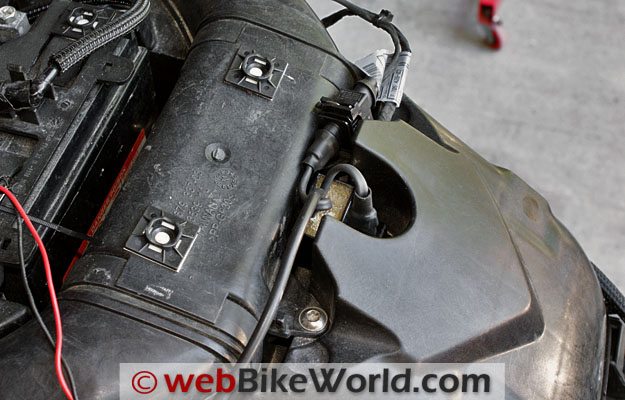
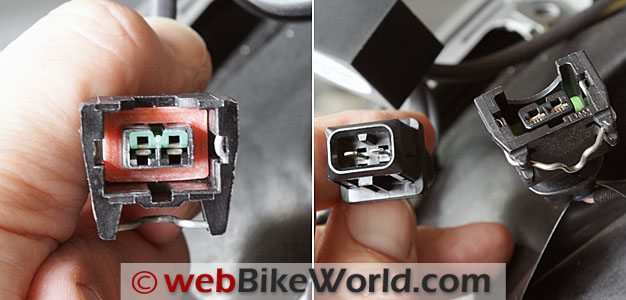
Locate the AIT sensor connection at rear of airbox (L) and disconnect the air intake sensor lead (R).Booster Plug Build and Quality
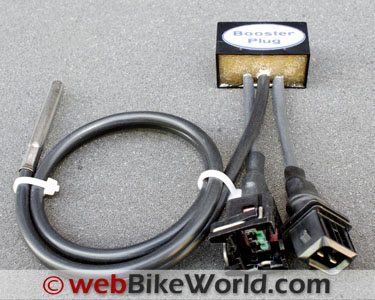
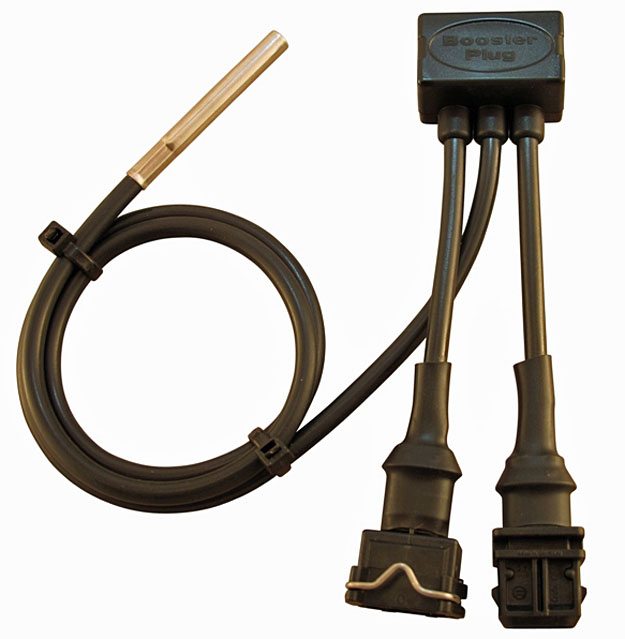
Like other well designed devices, the Booster Plug is a marvel of simplicity and it is truly “plug and play”. Quality and attention to detail is obvious, apparent from the first look at the TYCO modular connectors that are virtually identical to the connectors used by BMW. These quality components provide resistance to vibration, heat and moisture.
The small thermo-plastic epoxy-sealed housing has three leads emanating from it. The two connector leads provide the keyed male and female connections to insert the Booster Plug between the stock Fuel Injection Engine Control Unit and Air Intake Temperature sensor leads: the connectors cannot be installed the wrong way.
The third lead terminates in the external negative temperature coefficient (NTC) sensor or thermistor. As this component emulates the stock Air Intake Sensor (itself an NTC sensor), it needs to be installed in a spot that enjoys fresh air rather than the stuff found in or near the heated confines of the engine compartment.
Connect the female Booster Plug lead to the air intake sensor on airbox.(L). Then connect the male Booster Plug lead to the OE air intake lead connector (R).Installing the Booster Plug on the BMW F800GS
The BMW F800GS engine is a near-perfect candidate for the Booster Plug, being very much a lean-burn engine and exhibiting all the (undesirable) engine performance characteristics that most of us wish would go away or be mitigated. On some days, given temperature and humidity levels, it can be plain cranky.
A T25 Torx T-handle or socket removes the top faux tank panel secured with four M5 x 25 mm speed screws on the top and two M5 x 15 mm (or M5 x 10 mm) speed screws at the front left and right sides beside the steering head (see photo).
Lift the panel up slightly and disconnect the original equipment BMW accessory plug by pushing in on the bottom of the socket release tang. I have a Powerlet 15A outlet kit installed to the right of the ignition switch so that gets disconnected as well.
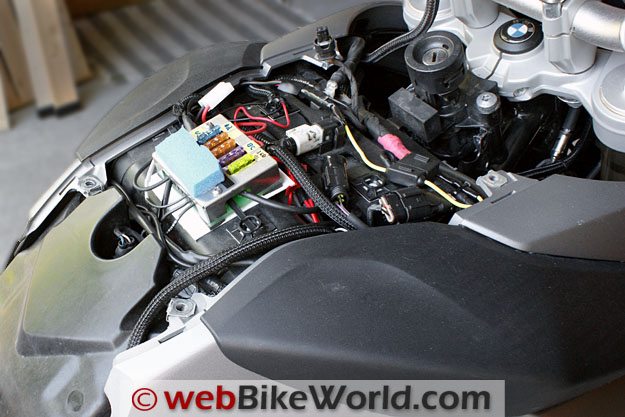
On my 8GS test mule, most of the available real estate between and around the battery compartment and airbox is (neatly) crammed with accessory wiring. Everything is hooked up to the Centech AP170-A component that resides on the airbox cover (held in place by a thin strip of cushion foam mounted on the underside of the faux tank panel and a long zip-tie).
Air Intake Sensors on the BMW F800 models are readily accessible either at the front or back of the airbox; on the 800 it sits in a recess behind the air filter housing. The BMW Engine Control Unit lead is disconnected from the inset socket by pushing the thin-wire retaining spring release (a narrow finger or screw-driver blade works).
The Booster Plug female connector is now inserted into the socket on the air box and the male Booster Plug connector goes to the Engine Control Unit lead — it is that simple.
To help preserve real estate, I turned the Booster Plug upside down and carefully slipped it between the back of the airbox and the inset connector. The three lead wires can be oriented to reduce their profile.
Next up is the external NTC (negative temperature coefficient) sensor. At 65 cm or 25.6 in. long, there is enough lead for it to be mounted in an open area on the motorcycle. Additional length can be added if needed; just make sure the added wire is the same or compatible and that all connections are absolute (soldering is still the way to go although Posi-Lock connectors are my usual alternative).
For optimum efficiency and effectiveness, the NTC sensor needs to be in fresh air and not buried next to the engine or under pieces that absorb heat from the engine. The provided instructions are very clear in this regard, as is all the reference material posted on the website.
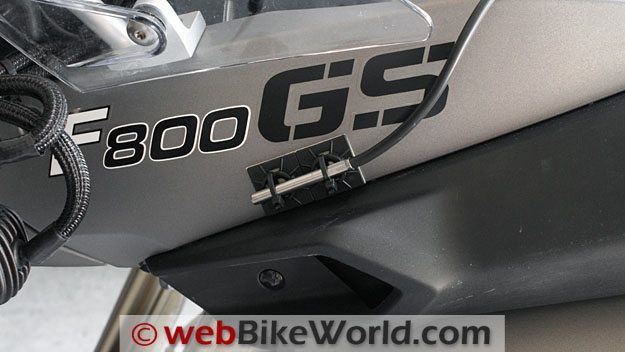
Choosing to mount it on the left air intake snorkel, I ran the lead forward under the faux tank panel and looped it up over the edge of the left side panel, positioning the sensor tip just above the front of the intake snorkel.
Two adhesive cable mounts and small zip-ties secure the sensor firmly to the side of the panel. In this position it sits directly in the air stream and ahead of the Famsa tank pannier (review)harness.
Mount the Booster Plug external temperature sensor where it will measure ambient air temperature. Shown here mounted outside the fairing, but it can be mounted anywhere it will sense ambient temperature.So Does It Work?
Having lived with lean-burn engines for years, a level of tolerance is the norm and like most other riders, the mind, body and right wrist adjust to the quirks so typical of some fuel injected engines.
Besides, living with lean-burn issues is far less painful when the ride is the multi-faceted F800GS — my favourite motorcycle.
So, does it work? Definitely. Life aboard the 800 is much better with the Booster Plug. The first block ridden with it installed revealed positive changes; throttle action is now smoother, bumpy transitions are pretty much gone and the machine still creeps off at idle when the clutch is let out.
Throttle response, i.e., performance — at least by the seat of my pants — is improved and the unwanted back firing and pressure pulses, while not totally eliminated, are pretty much gone at any RPM or temperature.
The Booster Plug was installed two months ago and since then I have accumulated over 2000 kilometres or 1242 miles without any adverse effects.
Since being put on the road the fall of 2008, my F800GS has averaged 53.44 miles per Imperial gallon (5.28 litres/100 km), which converts to 44.49 miles per US gallon.
With the Booster Plug the average has increased slightly to 57.10 miles per Imperial gallon (4.95 litres/100 km), which converts to 47.54 miles per US gallon), all on my usual 93 or 94 octane gasoline and some 91 octane fill-ups..
This slight change could be attributed to many things, but I am confident that the Booster Plug is working well with the engine, including the closed loop fuel injection system used on the Beemer.
After mounting the external sensor lead, the Booster Plug module can be hidden in a recessed area.Conclusion
I am just one rider, with just one Booster Plug, installed on one motorcycle. But like so many other cautious adopters, I am now a convert — the Booster Plug works.
The process involved in bringing the Booster Plug to fruition was not likely an easy one and there seem to be lots of skeptics, as there are for virtually any product of this type. But from my perspective this small, simple and relatively inexpensive device does exactly what it is claimed to do.
The Booster Plug is currently available for most current and non-current Beemers. BMW has consistently used the same Air Intake Sensor and maintained the Air/Fuel ratio at the same level for most of their models so one Booster Plug model works.
And last, but not least, the Triumph 1050 is also on the list. If the product continues to be validated by users, it is possible that the compatibility list will be expanded.
Will I be ordering more for the other Beemers in the fleet — done!
Note From Jens Lyck, Booster Plug Inventor
I’ve been working on motorcycle fuel injection systems for several years. After purchasing my new BMW F800S, I was certainly nor happy with the fuel injection fueling; it had a snatchy throttle at low speed).
So I started thinking about a simple solution to the problem, and after a lot of development and testing I came up with the BoosterPlug, a true Plug and Play device that will solve the less than perfect fuelling on most newer BMWs.
I know it’s a high claim, but it’s actually backed up by +500 happy customers!
The idea itself is actually rather simple: if you can trick the computer to think the ambient temperature is lower than the actual temperature reading, it will enrichen the mixture a little which will improve acceleration and throttle response.
And it gets even better: All modern bike have an oxygen sensor in the exhaust to provide a feedback that will adjust mixture back to factory determined level. This actually works to your advantage as there’s a certain delay in this feedback.
This means that as long as you maintain a steady speed (steady throttle, steady RPM), the feedback from the O2 sensor will make the computer adjust the mixture back to the original lean level (good for mileage). This is called “Closed Loop” operation.
As soon as you move to a different cell on the injection map by changing the throttle position or the RPMs, the oxygen sensor feed back cant keep up, and the bike will rely on the basic fuel map and input from temperature/air pressure sensors (like the first generation of fuel injection computers did). Now you will have the slightly richer mixture that is improving the drivability a lot. This is “Open Loop” operation
So you will get the best of two worlds: Improved throttle response where you need it, while maintaining a good mileage – quite brilliant actually!
All you have to do is to change the signal from the Air Intake Temperature Sensor by adding some extra resistance, and the technique is not unknown, but no one has ever been really successful with this method before.
-
You have to know what you are doing, and there are several problems you must solve before you get a usable result.
-
You need to know about the “Open Loop” – “Closed Loop” operation and understand in detail how it works.
-
You need to know how much to enrich the original mixture to obtain a perfect result.
-
You need to know that the behaviour of the original Air Intake Temperature sensor is not linear and that it’s very difficult to tweak so you will obtain a constant enrichment in all ambient temperature conditions.
There are plenty of plug-and-play devices out there that will promise wonderful results by changing the temperature input, but few of them have a clue to what they are doing, and none of them have been able to provide a stable output in all ambient temperatures.
My device has been creating quite a lot of attention in the forums, and my customers are leaving 100% positive feedback.
Usual shipping time for the BoosterPlug is 4-7 days within Europe, and 6-12 days to USA, Canada, and Australia. Shipping to other parts of the world can take up to 3 weeks. But it all depends on the performance of the postal service in the receiver end – I always ship the next day after payment is received.
Warranty is like forever — I haven’t had a single failure yet, but if it should happen, I will replace the unit with a new one. People are trusting me and paying for the device to get a solution, and I want to deliver as promised.
The only additional info is that demand for the BoosterPlug seems to increase constantly and there may sometimes be a waiting list to get one. But I’m very keen on not accepting payment if I can’t ship immediately, so I’m having my website keeping track of my inventory, so customers can’t order and pay for the BoosterPlug if I’m out of stock.”
Booster Plug Mark II
Update from Jens (November 6, 2010): “As mentioned earlier, I was really annoyed about the (very few) quality issues I had with the unhardening resin in the BoosterPlug. (Editor’s Note: See the comments and photo from “S.H.” below).
So I invested in tools to cast the module as a one piece thermoplastic moulding, the same material that is used in Casio G-Shock watches, and I’m quite proud to introduce the BoosterPlug Mk2, that is improved in a few ways:
Technically, it’s the same as the famous Mk1 module – Plug and Play tuning simply doesn’t get any better than this 🙂
The module is now a one piece thermoplastic diecast moulding. Impossible to break, unless you do something really stupid…
The module is even smaller than the Mk1, and measures 20 x 20 x 32 mm. Easy to fit anywhere you want.
The cables to the connectors are slightly longer to make installation even easier.”
See Also: Fat Duc O2 Sensor for Ducatis.
Booster Plug MkII Photo
▪ Motorcycle Product Reviews
▪ Maintenance and Repair Articles
Owner Comments and Feedback
See details on submitting comments.
From “Y.P.” (April 2014): “Delivery of the booster plug was lightning fast, as the company sent it to me within 24 or 48 hours in the summer of 2013. Installation is relatively simple on my BMW 2011 F800R.
True to the above review, the throttle action is smoother and there are no bumpy transition in the speed. The throttle response is different in a more smoother reaction.
Having the air fuel mix changed by the unit reminds me a bit about having the choke lever out (on cold weather or cold engine) for a richer mix when I had a small carbureted motorcycle. In any case, out of curiosity and to note the difference, I disconnected the unit yesterday. The throttle without the booster plug is much more nervous and responsive and has a more of an immediate acceleration.
I did not find any bumpy transitions in accelerating and or changing gears. Some riders would or may find the stock throttle too nervous or jerky. But, it takes a finer touch to modulate and control the acceleration that is definitely more nervous and responsive without the booster plug. But the motor sound more substantial with the booster plug and the bike respond more easily and smoothly.
So its a matter of taste; for now, I am without the booster plug and the bike is a more nervous animal. Would be interesting if the booster plug had an intermediate setting, as a compromise between a very nervous response and an almost too smooth of a response. All in all, its well worth installing for what it does and its reasonable cost and to find out how it works on your bike.
I forgot to mention, that for my 2011 BMW F800R, The gearbox is totally different using Mobil synthetic oil 15W50 versus the regular non synthetic oil. With the 15W50 the gearbox and motor works wonderfully; with the regular oil, the motor is simply terrible by comparison: it’s simply not the same bike. I also use super gasoline and a premium air filter. I presume the booster plug would make more of a difference with the regular motor oil…”
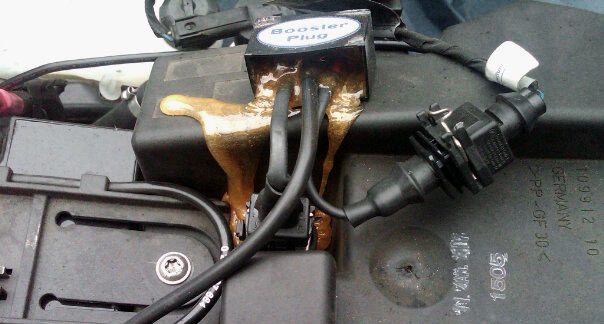
From “S.H.” (09/10): “I have been using Jens product for months now and it has completely transformed my F800S into the machine I want. No more stalling issues, better/smooth power, etc.
However, I wanted to attach the photo (below) on what I discovered today while performing routine maintenance on my motorcycle. In your article it noted Jen saying he guarantee’s the product forever and has yet to have customer defect out of the 500+ units he’s sold, I suppose I am that lucky person!
I sent him an email over with the photo above and immediately received a partial refund of $50 via PayPal.
Apparently it could have simply been a bad unit from the rest as a result of too low of an ambient temperature when being dried to harden the epoxy. This was the only real explanation Jens could get from the resin manufacturer and either way is sending over a new unit for me free of cost.
The unit I have now is still fully operational, with just a margin of wires being slightly exposed to the elements under the front tank panel of the F800S.
Overall, still very pleased with Jens product and customer service. In my opinion, this is the only product which truly fixes many of the F800 engine series initial production quirks. This product has completely eliminated all stalling issues in all types of conditions, smoothens out power and makes the machine much more fun and user friendly.
As many other users have reported, gas mileage was slightly effected but not by much.”
Note From Jens
(September 25, 2010) “I can confirm that the BoosterPlug warranty is “For Ever” and that I want to provide the best possible customer service.
Also, I would like to point out that this is not a general problem with the BoosterPlug, and it’s still a mystery how crystal hard epoxy can suddenly become soft ?
The explanation from the manufacturer of the epoxy resin was that (when casting the potting mixture), the ambient temperature (might have been) too hot (not too cold), and this caused only the surface to harden up. Chemical reactions with the liquid resin could then “unharden” the surface layer again and the resin would flow out.
Right or wrong ? I’m no chemistry expert, so I don’t really know, but I did cast a few modules on a very hot day, so I’m making sure that all epoxy work will be made in moderate temperatures.
Anyway, the partly unhardening epoxy does not seem to glue itself well to the parts it’s getting in touch with, but can be peeled off easily. So there’s no harm done to the bike.
Bottom line is that I’m extremely annoyed to face a quality problem like this. I’ve been selling the BoosterPlug since last fall, and all units have been flawless. Rest assured that I will do my very best to provide a top quality product in the future too, and that my after sales service will be second to none.”
From “M.H.” (09/10): “Was intrigued enough by the article to contact the manufacturer of BoosterPlug. I have an ’06 K1200GT with all the software and airbox upgrades designed to address the issue. It has helped some. Jens Lyck @ BoosterPlug responded almost immediately and I ordered based on his responses.
My question to H.B.C. is concerning his installation. Why does he “disconnect the original equipment BMW accessory plug”? Am I missing something or does this unit require power? Does not mention that on the BoosterPlug site.
Looks like on the GT, you just need to locate the airbox (right side panel needs to come off?). Unplug the BMW Engine Control Unit lead at the airbox. Hook up the BoosterPlug and run the new sensor to a clean air spot on the bike and you’re done.”
HBC’s Reply: A. This step is only needed to remove the dummy (faux) tank panel to provide full access to the back of the air box, where the BMW Air Intake Sensor connection is made.
Once installation of the Booster Plug is completed, as detailed, any other leads disconnected, such as the BMW accessory power lead (which connects to the accessory port located to the left of the ignition switch), will need to be reconnected, before reinstalling the tank panel.
As identified in the submission, the Booster plug is connected between the original Air Intake Sensor lead and plug and does not require power. A final paragraph under the Installation Section about reinstalling everything disconnected or removed was not included…but should have been just to close the loop.
I hope this clears up any confusion. For what its worth the small installation sheet provided for the Booster Plug is succinct but complete for most purposes.”
From “L.C.” (09/10): “I have a question regarding the Booster Plug. Does it reduce/eliminate the off-throttle lag when blipping the throttle during downshifts? I have a 2005 R1200ST. Due to the lean fuel mixture when off-throttle, I cannot blip the throttle during downshifts. If I do, the engine bogs due to fuel starvation. If this product solves the “blipping” issue I would purchase it for that reason alone.
HBC’s Reply: As I mentioned in the article, throttle transitions, including blipping the throttle, are smoother on my F800GS, although I must point out that given the slick transmission characteristics of the F800GS, I don’t do as much “synchronization” (via blipping) when downshifting as I have had or typically have to do with the Boxer motors like your ST.
So while I cannot provide a conclusive answer for your machine, I suspect, given typical engine characteristics, that the Booster Plug would/could help. If you do invest, please let us know how it works out.”
Follow-up from L.C. (9/10): “I made the investment. I installed the Booster Plug on my R1200ST a few days ago. The device definitely helps reduce bogging when blipping the throttle during downshifts. My subjective judgment is that it reduces throttle lag by 80-90%.
Prior to installing the device I could not blip the throttle at all from the off-throttle condition — if I did so I would lose revs rather than gain revs. With the Booster Plug installed I can now blip the throttle. A small lag persists, but it’s workable. I don’t have the crispness or immediate response of a carbureted bike, but it’s good enough. I can’t downshift as aggressively/precisely as I have with past bikes, but if I downshift with moderate spirit it is very satisfying. To me, it’s well worth the $150 to be able to “blip” again. Thank you for the review!”
From “S.A.” (8/10): “I recently installed a Booster Plug on my 2008 BMW R1200RT. If you’re old enough to remember how effortlessly the pre-EPA BMWs pulled from low rpm, then you understand just how performance has suffered in the newer bikes.
I’ve heard the excuses about how the hexheads “love to rev”. Baloney, they have to rev to avoid shaking like a wet dog. The Booster Plug simply delivers enough fuel to make the engine run properly at combinations of low rpm and high power demand. Its a revelation. Gas mileage has not noticeably changed.
I was somewhat skeptical about the expected performance enhancement, but I’ve been totally pleased. I’d never again own a BMW twin without installing a Booster Plug.”