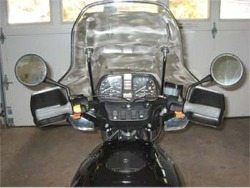
I probably should have spent the money in the beginning to buy the K1200RS I really wanted — it seems like I’ve spent enough on this K75 to buy two K12’s by now! I haven’t been pleased with the riding position of the K75 standard; the pegs seem like they’re too far forward, and the stock bars made me sit too upright.
It’s not a bad seating position really — for touring, that is. But I wanted something a little more sporty, and the classic “sit up and beg” riding position on the K also gives a rather remote feeling for what the front end is doing.
A local BMWBMW club member, Steve S., made the conversion on his identical K75 from the high bars to the K75C bars, and raved about it. So I decided to give it a try. Let’s get to the bottom line first — I really like the change and it confirms everything Steve said; it gives you a completely different feel for what the front end is doing, and removes most of that low-speed “tippy” feeling the K75 has. You really feel like you can lean into the turns much more securely than with the standard, “high” bars, and it brings a lot of fun into riding the K75.
It does take a while to get used to though. All that’s needed to steer the K75 with the original bars is a light touch — there’s plenty of leverage on that big tiller! The lower bars were a bit scary at first — it takes a real push to get the bike turned. But that reduction in leverage is, to me, what now gives the bike more feel than it had before.
There’s only one tiny disadvantage: it does put just a tiny bit more weight on your palms, so you may need an arm stretch once and a while. But I really don’t think it’s bad at all, and for me, the pros far outweigh the cons. Plus, the standard bars were uncomfortable on my wrists anyway, but in a different location.
If I keep the bike, I’m planning on getting a set of rearsets from Omar’s. They look like quality pieces, and I think they would complement the forward-leaning riding position. With the standard footpegs that are still on the bike, my feet still feel like they’re too far out in front of me; but this is mitigated somewhat by riding with my feet on the passenger pegs on longer trips. Steve mentioned that BMW also listed a set of rearsets for the K75, but we’re not sure if they’re still available.
Installing the bars really isn’t that difficult, just kind of a pain. It was made much more complicated on my K because I had to also transfer over the heated grips. If it wasn’t for that, it would be a pretty easy job. I also did it without taking apart any cables or the handgrip assemblies on either side of the bike; this may or may not work for you, probably depending upon the layout on your bike.
You’ll need some replacement black cable ties to snug everything down when the job is completed. The only tools you should need are:
-
4, 5 and 6mm Allen wrench
-
Flat and Phillips bladed screwdriver
-
Assorted wire cutting/splicing tools if you transfer the heated grips.
-
If you are installing heated grips and the new bars don’t have the hole drilled on the bottom, you’ll need a selection of dril bits, starting at about 3/64″ and going up to 5/16″, along with a drill and a small round file to deburr the hole.
Hopefully the photos will help — I think there’s a couple of tricks that can save some time. Let’s begin…
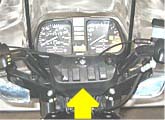 First thing is to remove the “dash pad” that covers the 4 bolts that hold on the handlebars. There are two 5mm Allen bolts underneath that come out pretty easily.
You don’t have to remove any of the wires that attach to any switches you have on the dash — except if you have heated grips, you’ll have to unplug them from behind. My heated grip switch is the farthest one on the right, so I reached behind and unplugged it after I removed the pad.
Next, snip any cable ties that hold the clutch, throttle and brake cable and anything else that is attached to your bars. The wires that are left holding the dash pad on should be long enough that you can move the pad out of the way to get to the 4 bolts that hold the handlebars on.
If you have heated grips, you’ll probably have to move or remove your fuel tank to get to the connector under the tank that attaches the heated grip wires to the wiring harness. I’ve been able to do any maintenance necessary without ever having to completely remove the tank, but…someday I’m sure I’ll have to completely pull it.
 Pull out the two clips under the tank at the rear; carefully remove the radiator shroud, and the tank should lift up (the radiator shroud is held to the bike by a pin that fits into a rubber grommet on each side under the front of the tank).
I lifted the fuel tank up and slid it over to the left, which gave me enough clearance to work underneath.
While I was at it, I removed the seat to give me more room to work. Once you have the fuel tank moved, unplug the wires for the heated grips.
They fit into a 4-way connector under the tank, and you should be able to unplug the four wires that lead down from under the existing handlebars and lead to the connector. As we shall see, I ended up clipping my wires anyway, so if you have to cut them at this point, it should be alright.
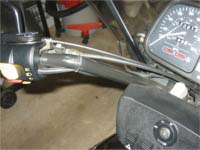
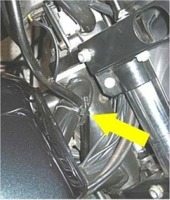 Snip the cable ties that hold the front brake line to the frame tube (see yellow arrow in the photo on the left).
This should give enough play in the brake hose so that you can remove the grip assemblies from the stock bars without having to disassemble anything or remove any cables.
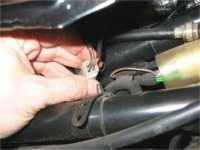
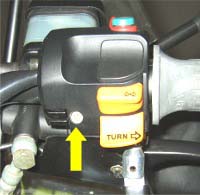
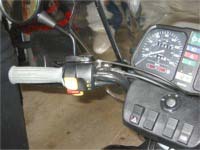
Next, you’ll have to loosen the grip assemblies on each side. First remove the covers above the directional switches; do this by removing the #2 Phillips head screw (indicated by the yellow arrow in the photo of the right-hand switch).
Then loosen the 4mm Allen screws that hold each grip onto the handlebar. After you do this, the grip assemblies should be loose and ready to remove.
If you have heated grips, you’ll have to first remove the two Phillips head sheet metal screws on the left hand grip. They are under the rubber part of the grip itself — peel back the edge of the grip nearest the directional assembly and you’ll see the two screws.
 They serve to attach the grip to the handlebar. You should then be able to remove both grips along with the heated grip wires. Pull slowly and make sure the wires don’t break!
Now it’s time to take out the old handlebar. Remove the four 6mm Allen screws holding the handlebar to the clamps. You may need a helper for this part, although I managed to do it by myself.
You’ll have to hang on to everything to make sure nothing scratches the tank; I put a towel over the front part of the tank just in case. Also, the right side assembly includes the brake master cylinder; so you may want to have a bungee cord or some rope or tape or a partner to hold this upright so that it doesn’t leak any fluid after it’s removed.
After you remove the last bolt that holds the handlebars to the clamp, everything will come loose; make sure you’re holding on! You should then be able to slide the bars as far as you can to the left and work the right grip assembly off the right side of the bar.
There was just barely enough clearance/room on my bike to do this — there’s no way it was going to work until I removed the cable ties holding the brake line to the frame tube. Once I did that, it gave me just enough room to pull the right handgrip assembly off the bar.
Once you’ve done that, the left side is easy — move the bar over to the right and slide the left hand grip assembly off. You should now have the old handlebar in your greasy hands, and the right and left hand grip assemblies should be free and dangling!
 You may need to drill a hole in the new bars for the heated grips. Even if you don’t have heated grips now, you may want to drill the hole in case you add them later. I’ve found that if the hole is there, you can feed the wires down through without removing the bar.
But if you don’t have the hole, and you later decide to add heated grips, it’s a much bigger job because you’ll have to completely remove the bar to drill the hole. Bottom line: the hole isn’t that hard to drill, so do it now!
I placed the bars in a vise, using some old foam rubber to pad the jaws to help grip the bars and to protect the paint. The hole needs to be somewhere near the center between the bend, and in a position that will be underneath the bar when the bar is installed. It doesn’t have to be exactly in the middle; as long as there’s enough room to feed the wires down underneath the bars.
Whenever you’re drilling a hole in metal, it’s usually a good idea to start with a small pilot hole and work your way up. I started with a a 3/64″ drill and slowly worked my way up to the 5/16″ hole that is about the minimum size you’ll need to squeeze the wires through. You may also want to use some oil to lubricate and cool the drill bit as you drill. When you’re done, use a round file to completely deburr the hole, both inside and out.
All you have to do now is reverse the installation procedure with the new bars. Locate the new bars in the clamp on the bike, but only partially tighten one bolt to just hold the bars for now (unless you’re reinstalling the heated grips; see next paragraph). Slide the control assemblies on to the new bars. The trickiest part is reinstalling the heated grips.
I’ve done this a couple of times and here’s the trick: you’ll need an old piece of 18-20 gauge wire. First feed that wire up through the bottom hole and out one side of the handlebars. You may want to do this prior to clamping the bars. Then wrap that piece of wire on to the wire from the heated grips and fasten it with some electrical tape.
You can then pull the spare piece of wire down from the end of the handlebar down through the hole, and the heated grip wire should come along with it. Pull gently or the wires will come apart. In other words, you feed wire up from the bottom hole, and pull the heated grip wires back through. Don’t try to feed the heated grip wires down from the end of the bars to the hole in the middle — you’ll be at it forever!
I had to cut the wires leading to the BMW 4-way connector under the tank. I went to Radio Shack to look for a replacement connector, but found that Radio Shack is not like it used to be. They barely have any electrical items any more and the clerk didn’t even know what I was talking about. I ended up using small sized wire twist cap connectors, like the ones you might find behind a switch plate in your house. I filled them with some dielectric grease and simply twisted the wires together, then wrapped them tightly with electrical tape.
This will probably be looked upon by some as a crude method, but it works and I can always do it differently next time I find one of the 4-way connectors. The problem with the 4-way connectors is that you can only use them once. (NOTE: Since this article was written, I found Posi-Lock wire connectors for splicing wires; these things are the greatest, and actually make doing electrical jobs fun! I’ll never use twist caps or solder again! Check out the wBW review of Posi-Lock connectors)
All that’s left is to tighten everything up. But before you do, sit on the bike and rotate the new handlebars up and down to find a good riding position. Just remember that there are some adjustments that you can make, either now or later, by rotating the bars to find the best position for you. When you find the position that’s best for you, make sure you torque the handlebar clamping bolts to the correct torque as specified for your bike.
Both Steve and I found that the new bars gave the front brake line too sharp of a bend where it attaches to the bottom of the master cylinder. The solution is to slightly loosen the banjo bolt and rearrange the brake line to straighten the line as much as possible. Don’t forget to use some cable ties to secure the brake line back on the frame tube.
One more thing: I also rearranged the clutch and fast idle cable on the left side, and the throttle cable on the right side. I pulled the cables up behind the dash pad a bit to take out some of the slack that results from the lower bar.
You may want to consider replacing the cables with the “C” length. I left the stock cables in place, and there’s just a bit more cable visible sticking up behind the dash pad, but it’s not bad at all. I did not use cable ties to secure the clutch and fast idle cable to the left side of the new bar, but I did use a small cable tie to secure the two cables together without attaching them to the handlebar tube, and this seems to work fine.
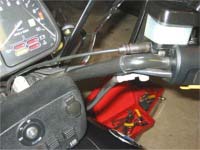
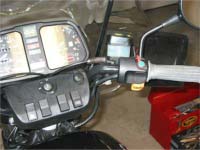
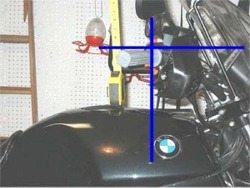
The photos below illustrate the differences between the high and low bars:
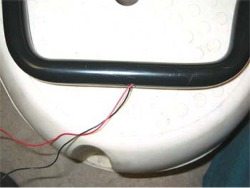
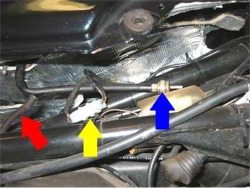 The yellow arrow (left) points to the 4-way BMW stock connector. I had to cut the wires coming in and out of this connector; it can’t be reused once the wires are connected. I ended up using electrical twist connectors which seem to work fine.
The blue arrow points to a vent line that comes out of the fuel tank. The white plastic item is a one-way valve. On this bike, this line was attached to the crankcase at the front of the engine.
It appears to have been plugged at the crankcase at the factory, so this line sits under the tank. I didn’t want to take the chance of fuel leaking on to the hot engine under the gas tank (do you blame me!), so I re-routed this line to point towards the back of the tank, and added a 1/4″ ID line from the valve that now hangs down off the swingarm along with the overflow lines for the fuel tank and the radiator overflow container.
The red arrow points to the fuel tank overflow line; it was too short and kept coming off, so I replaced it also.
NOTE: Make sure you replace both of these lines and check everything else under your fuel tank before you replace the tank and button everything up!

UPDATE: I’ve been very pleased with the front end feel resulting from the lower handlebars. I decided to again see what effect raising the fork tubes (effectively lowering the front of the bike) by 1″ would have. I’m happy to report that it’s made another nice difference in the way the K75 handles. It’s definitely taken out the top-heaviness at slow speeds that is characteristic of the K75 standard.
I raised the forks in their clamps by exactly 1″. It’s very easy to do on this bike — simply loosen the four Allen bolts, sit on the bike and give a big push down on the handlebars. The forks will push up through the top of the clamps. This has really made the bike much more responsive, especially at lower speeds.
I had previously tried this with the higher bars, but didn’t like the feel. The lower bars seem to give a better feel for the front end, and raising the fork tubes has been another step forward in the K75’s handling.
One last thing: here’s an article by Ted Verrill about going the other way — installing “C” bars on a K75S.
Note: For informational use only. All material and photographs are Copyright © webWorld International, LLC – 2000-2011. All rights reserved. See the webBikeWorld® Site Info page. NOTE: Product specifications, features and details may change or differ from our descriptions. Always check before purchasing. Read the Terms and Conditions!