They say there are two types of riders: those who have gone down and those who will go down. Figure on an accidental drop or two, or someone backing into your motorcycle. As your eyes survey the damaged plastics, your mind calculates replacement costs while your blood pressure skyrockets.
Cracked and broken fairings are expensive to replace. The solution? Repair it yourself with a Plastex Plastic Repair Kit.
Background
Okay, here goes…I have to suck up my ego and tell the story about why I needed to buy a Plastex Plastic Repair Kit.
It was Labor Day and I’d been looking forward to a ride with my Dad through the twisties up one of the local mountain passes. We had taken a wrong turn and we were in the mountains, in an area I was unfamiliar with. To get back on track, I had to do a tight, right-hand turn. Thick trees and brush blocked my view of what was on the other side of the turn.
As I went around the corner, several things hit me at once: the road turned to gravel, became an incline, and was bordered by a ditch. My attention was suddenly divided and my head wasn’t completely in the game in the first place. Not good. Luckily I was going slowly, and I decided the best approach was to stop, back up a little bit, line the bike up and then go.
I stopped — or tried to — I still don’t know what I did wrong, but suddenly I was face down in the gravel with my foot pinned under my bike. I was shocked because I had been putting my feet down to stop, then was on the ground. I’m still not sure what happened: was it the gravel…Too much front brake? Were my bars still slightly turned from going around the corner? Or all of the above?
I felt pain radiate through my foot, thought it was broken, and rolled over to look at my bike. I don’t know if I was more upset at my error, my hurt foot, or my broken turn signal and cracked fairing (Insert scream here!).
Thankfully, I always ride with full gear and had on my TCX Women’s Sunray Boots (review). The weight of the bike sprained my foot, but it would have been much worse if I’d been wearing sneakers. There I was: shaken, cold, with a throbbing foot, and facing at least a ninety-minute ride home.
Lesson learned: don’t push yourself. If your head isn’t in the ride, don’t ride! If you’re cold, you aren’t focused; you can’t react as quickly. The accident was completely my fault; I was foolish, distracted, and didn’t turn around all the times I wanted to. I’m very lucky it wasn’t worse.
So in typical “Smalls” fashion, that’s my long background story to lead into the review!
Removing the fairing.The Product
Many owners think that the plastics on a motorcycle are actually fiberglass, but they’re not. At least none are to my knowledge.
The inside of my Ninja 500 fairings say “plastic”. I’ve read many stories of those who repaired their fairings with a fiberglass kit, only to report that the repair cracked again as soon as the plastic started to flex. Plastex Plastic Repair Kits are unique because the powder and the liquid in the kit actually becomes plastic when combined. And here’s the beauty of it: there is no mixing ratio to follow, so you can’t mess it up!
Tim, the owner and product designer of the company, informed me that Plastex makes a very strong bond. He said if a repaired area is damaged again, it is more likely to crack next to where the Plastex repair was made than on the original crack — the repair is that strong.
By the way, Plastex is a family-run business and the customer service was a testament to that — talking with Tim was like getting help from a friend and he gave me several tips when I placed my order.
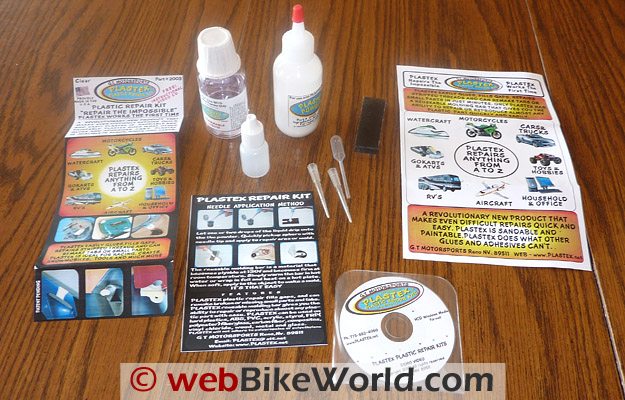
Each Plastex Plastic Repair Kit comes with powder, liquid, applicator needles, and other containers necessary for its use and application, along with an instructional DVD. A molding bar is also included for molding small replacement parts.
Powder and liquid refills, molds, and repair cloths are also available individually. Several different kits are available; the kit shown in the photos is the Standard Clear Plastex Kit.
As long as the lids are kept tightly on the liquid to prevent evaporation, and it’s not stored in direct sunlight or high heat, Plastex has no shelf life and is good indefinitely. Plastex can be sanded and painted, by the way, and is available in many kit sizes and colors.
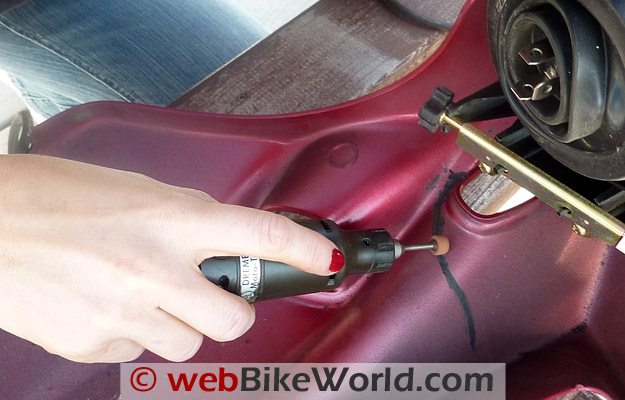
Grinding the crack on the inside of the fairing.Prepping the Plastics
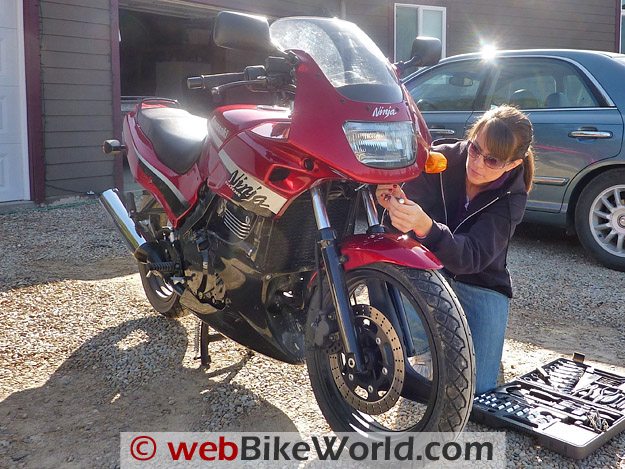
To overstate the obvious, remove the pieces that need to be repaired. This was interesting on my Ninja 500 since the upper fairing is one large piece from side to side, so I had to first remove the mirrors and disconnect the turn signals and headlight. This required a couple of basic tools, like a Phillips screwdriver and a 10 mm socket wrench/ratchet.
Enlist the help of a friend to hold the fairing so as you take off the last screws it doesn’t hit the ground and cause more damage. When I first started prepping the plastic, I left the headlight in the fairing, but the weight of the light made it difficult to work with the fairing so I removed the light, too.
Per the instructions in the Plastex kit, the back of the crack to be repaired should be filed down to a “V”. This allows the Plastex to form a strong bond all the way through the material being repaired rather than just forming a bond on the surface of the crack.
I used a Dremel tool to file the back of the fairing. I tried a couple different Dremel tips and angles to find what worked best, and ended up switching to a flat disk to get more control over the width of the cut I was making.
Filing the inside of the fairing was a little challenging because the Ninja 500’s top fairing is one large, U-shaped piece and was awkward to work with. Plus, one of the cracks was on an inside corner which made it difficult to get a good angle with the Dremel.
The bottom edge, where a piece of the fairing had broken off completely, was much easier to file down. Also, make sure the back of the area being repaired is clean — remove any dirt and paint down to the bare plastic.
Since my fairing was cracked where the turn signal is inserted, Tim suggested I reinforce the area with fiberglass cloth. If a fiberglass cloth strip is being applied for reinforcement, it’s vital to also clean and sand off the paint where the strip will be placed; I used sandpaper for this part.
Once the back of the fairing is prepped, use clear packing tape and tape the front of the pieces together, being careful to line up the cracks so no gaps show. The tape not only holds the pieces in place, but also prevents any Plastex from running through the crack onto the front of the fairing.
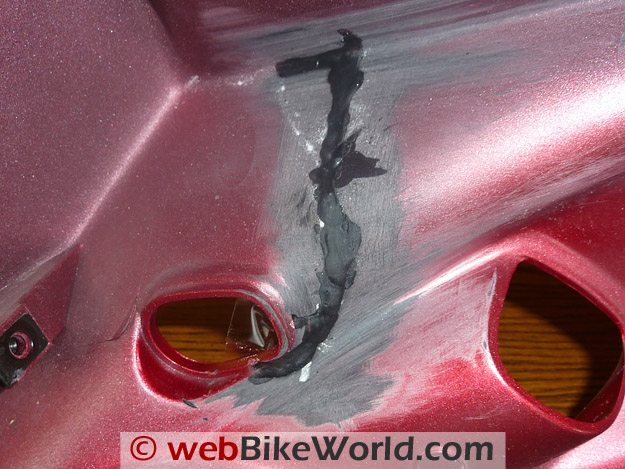
Inside of the fairing with the Plastex applied.Plastex Application
Apply the product in a well-ventilated room because the chemicals in the Plastex repair kit have a very strong odor. Even though it was chilly outside, we ended up opening a window to vent the room.
I watched the instructional video to get a feel for how to apply the product. There are two different ways to apply it: The powder can be squeezed into the crack, and then liquid applied over it (I thought this was the easier method).
Plastex can also be applied by placing a drop or two of liquid into the container of powder, then picking up the resultant “bead” with the tip of the applicator needle and placing the bead in the crack while adding more liquid, then repeating.
If fiberglass cloth is to be placed over a repaired crack, cut the cloth to size and place it on a piece of packing tape (sticky side up so the cloth sticks to the tape). Cover the cloth with Plastex Plastic Repair Kit powder, and then squeeze drops of the liquid onto the cloth until the powder and cloth are saturated.
Pick up the tape and cloth and invert over the repaired crack, applying pressure on the tape to smooth any bumps and bubbles out of the cloth, then remove the tape.
Let any repairs sit at least an hour before removing the tape off the front, doing touch-up painting, or reinstalling.
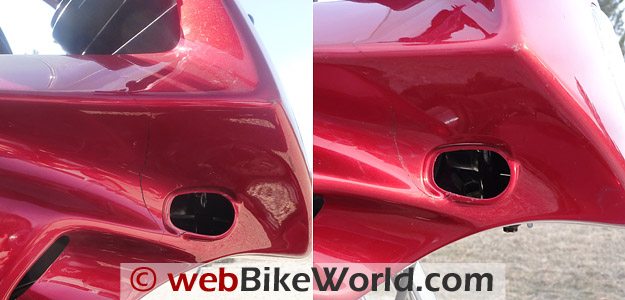
Before (L) and after (R). The crack still shows, but the fairing is solid again, which is what counts.
Results
The repair on the piece that had broken completely off the Ninja looks really good — a smooth crack in the paint on the surface is all that is visible. A little sanding and touch up paint would hide it completely.
Once the Plastex was completely dry, I used a drill to cut through the hardened cloth that covered the hole where I needed to reattach the reflector.
The area around the turn signal was a little trickier to repair with a nice smooth edge because of the location of the crack and all the tight curves around the opening. But this was my error because I think I didn’t tape it well enough; this turn signal opening was difficult to work around.
But based on the overall results, and especially with how good the repair looks where the piece had broken completely off, this is a product I would recommend.
Plastex Plastic Repair Kits are easy to use; the repair dries quickly and is very sturdy. I tried to flex the piece back and forth to see how strong the bond was, and it was definitely solid (Side note: your fingernails don’t have to be painted to match your motorcycle when doing repairs!).
From start to finish, it took me less than an afternoon to have the repair done and the fairing back on my bike. And it cost me less than $40 US including shipping!
Conclusion
Plastex Plastic Repair Kits can fix cracked or broken plastics for a fraction of the cost of replacing them. It’s easy to use, cures quickly, and looks a heckuva lot better than duct tape or zip ties.
Plastex is available in black, white, clear, and a variety of other colors.
wBW Reviews Home | wBW Technical, Repair and Maintenance Articles
|
wBW Product Review: Plastex Plastic Repair Kit |
|
| Available From: G.T. Motorsports |
List Price: $13.95 – $244.95 (for a master shop kit) |
| Colors: Various colors and kits. | Made In: U.S.A. |
| Review Date: May 2010 | |
Note: For informational use only. All material and photographs are Copyright © webWorld International, LLC – 2000-2013. All rights reserved. See the webBikeWorld® Site Info page. NOTE: Product specifications, features and details may change or differ from our descriptions. Always check before purchasing. Read the Terms and Conditions!
Owner Comments and Feedback
See details on submitting comments.
From “W” (5/10): “First off, I enjoyed the article. Well done, and it mirrors my experience with using Plastex as well.
One minor nitpick: The different colors that come with the basic kit (white, clear and black) are not just different colors. The instructions state that the black is specifically formulated (with graphite?) to be used in areas of higher temperature.
In my experience, the black plastic is much more brittle than the white and should be generally avoided unless the temperature resistance is needed (inside a fairing next to the engine).
For bigger jobs, I invested in an actual plastic welder. It’s a bit harder to use, but the results are quite worth it, in my opinion.”