3M’s Scotchcal paint protection film is described in the two wBW articles listed in the right column.
Scotchcal is a clear adhesive-backed urethane covering that is applied over clean and smooth surfaces to protect the paint or finish from scratches, nicks and dings.
It helps protect motorcycle paint and finishes from scratches, rubs, chafing, road grit and stone damage.
Scotchcal is relatively easy to install, especially on flat surfaces or surfaces with smooth, wide radii.
Scotchcal is available in several thicknesses.
8 mil (0.008″) paint protection film is generally used to protect painted surfaces, and the 40 mil (0.040″) thick headlight protection film is used to protect headlights from stone damage.
The manufacturer claims that 40 mil (0.040″) thick Scotchcal film will help protect headlights from stone or rock damage.
By the way, you can buy it here through the webBikeWorld.com Amazon store.
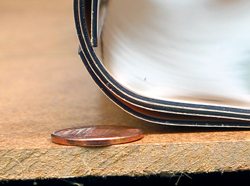
The photo on the left shows a roll of Scotchcal (right), compared to the thickness of a U.S. one-cent piece.
X-Pel, a Scotchcal bulk retailer, offers a 5-year, $1,000.00 “light protection guarantee” against any damage if their Scotchcal is installed.
I’m not sure how about the details of the guarantee, so make sure to read the fine print carefully.
Headlight protection film can easily be installed on round headlights; curved or faired headlights are also relatively easy to cover by making a pattern to use as a guide.
Scotchcal is hard to distinguish once it’s on the headlight, which is a nice feature. I’ve seen other motorcycle headlight protectors made from what I assume are sheets of plastic or clear, hard vinyl.
These are usually attached to the headlight via some Velcro “buttons” that must first be glued on to the headlight cover.
In my opinion, the buttons make these covers unsightly and somewhat crude. These type of covers can also be expensive, while a 12″x12″ piece of Scotchcal can be purchased for under $20.00, including shipping.
Headlights should be protected against stone or road damage for safety reasons and also because they can be very expensive to replace.
Taking the few minutes needed to install a piece of Scotchcal headlight protection film can provide peace of mind and it is a worthwhile investment.
Installing the Scotchcal
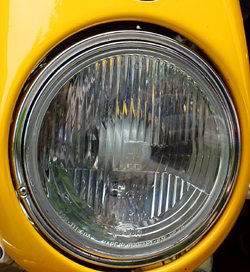
We installed some Scotchcal headlight protection film on the 6.5″ round headlight of this Triumph Thunderbird Sport.
Installing the film on a round headlight is very easy, and the task should be well within the mechanical ability of nearly every motorcycle owner.
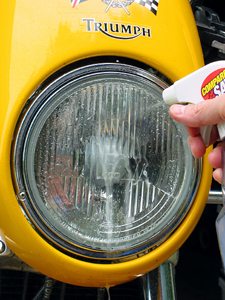
The first step in any Scotchcal installation is to thoroughly clean the surface.
I always have a couple of bottles of Glass Plus around the garage, and I’ve found it to be indispensable for use on motorcycles. It doesn’t contain ammonia, and I’ve found it to be safe to use for just about any cleaning task.
I first cleaned the headlight with Glass Plus and then dried it off with a clean paper towel. Next, use some rubbing alcohol on a clean paper towel to clean the headlight, removing any leftover wax or grease.
Make sure the headlight is thoroughly clean.
I’ve learned by installing lots of Scotchcal paint protection film that a super-precise cut with perfect edges isn’t really that critical for success.
Maybe I’m not the perfectionist I once was, but it’s hard for the average home mechanic to get perfect cut lines.
And it doesn’t really seem to matter that much because the product is so hard to notice after it’s been applied and has dried for about 24 hours.
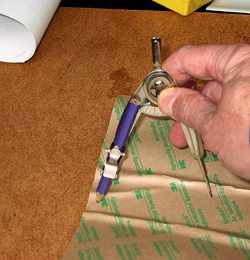
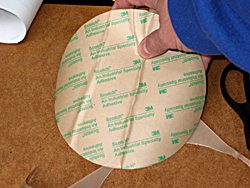
I measured the Triumph’s headlight at 6.5″ across, so I used a cheap protractor and set it to 3.25″. I scribed a circle on the backing of the Scotchcal, and used a pair of sharp scissors to carefully cut out the required piece of film.
If a 6.5″ diameter plate or round, hard circle was available, I probably would have tried to use it as a guide for an X-Acto knife, but a good pair of scissors and a freehand cut works fine.
Scotchcal is shiny on one side and has an adhesive on the back, and the adhesive is covered with backing paper. The backing paper must be peeled off to expose the adhesive.
X-Pel suggests that the 40 mil Scotchcal can be installed either dry or wet.
I’ve always used the wet method to install Scotchcal, so I figured I’d go with my experience to install the thicker 40 mil headlight protection film.
But next time I think I’ll try to install it dry, because it seemed to take a relatively long time to squeegee out the water and for the adhesive to set.
To install it wet, use a mixture of water, rubbing alcohol and a couple of drops of dishwashing liquid. X-Pel includes a recipe for the mixture in the instructions that are sent with every Scotchcal purchase.
I usually spray the surface and then spray both sides of the film after the backing is peeled off.
The idea behind a wet installation is that the film can be laid on to the surface and slid around, much like installing a decal on a model car or plane.
But for this application, it’s easy to center the round piece of film over the round headlight, and it isn’t really necessary to move it back and forth to find the center, so a dry installation may be easier.
The Squeegee
After laying on the film, use the squeegee provided by X-Pel, or a credit card or similar device to squeeze out all the water, working from the middle out to the edges.
Eventually, the water will get squeezed out and the adhesive will start to do it’s job.
X-Pel suggests turning on the headlight for a while prior to the installation to help soften up the film. I started the bike and turned on the headlight during the installation, and it got pretty warm, but I’m not sure this really helped speed up the process.
Keep using the squeegee to squeeze out the water, and eventually the edges should start to set up. Use fingers or a cloth to hold down any edges that don’t seem to want to take a set.
I haven’t tried installing the film dry, but I imagine that the same steps must be followed.
It might be more critical to make sure that the film is precisely lined up the first time, but this method would probably mean that the edges will stick much faster than using the spray.
As you can see from the photos below, the headlight protection film virtually disappears from sight after it’s dry.
The last photo shows the edge of the film, which can be seen just above the edge of the headlight.
Conclusion
Installing paint protection film or headlight protection film is an easy task that has the potential of protecting your bike for many years.
It’s better to do this when the bike is new, or before the paint or headlight receive damage, rather than regret it later on.
Protecting the paint and headlight could also help maintain the bike’s resale value.
Publication Date: June 2004
3M Scotchcal Headlight Protection Film:
Buy It Here at the webBikeWorld.com Amazon store.