Ah, the joys of owning a brand new motorcycle, free of scratches, nicks, and chips!
You can feel the approval of other riders and the envy from those who have yet to be enlightened.
You worked hard to afford it and you want to keep the paint clean and sparkling.
Or perhaps you’re one of those riders that live for chrome and find therapeutic value in polishing the shiny stuff.
Only the best products for cleaning and waxing are purchased and lovingly applied.
The bike is kept covered to protect it from the ravages of the sun and parked out of harm’s way.
But no matter how hard you slave at maintaining that pristine quality of your pride and joy, the bugs continue to hurtle themselves into your path and oil and tar bits appear from nowhere.
What is it about motorcycles that bugs and birds find so attractive?
Where do the bugs come from when it’s 28 degrees outside? And why do other vehicles insist in throwing those small stones at you?
Then comes the day, while caressing the paint and cleaning off those disgusting insect remains and road grime, you discover not one, but several nicks in the paint or headlight.
Maybe even a scratch. OH NO, you cry out. This can’t be happening!
Does this sound familiar?
Then you’ve probably experienced the same sinking feeling that I had recently with my brand-new 2006 Yamaha FJR1300A.
Now, I have to admit I’m not a fanatic about keeping my bikes spotless.
They do get washed (far more often than my cars) and they even get a coat of wax from time to time. But the articles I’ve read about motorcycle detailing are lost on me. I’d much rather ride ‘em than wash ‘em.
Besides, it might rain while I’m riding and doesn’t that constitute a “wash”?
With over 6,000 miles on the “brand new” FJR, it has somehow managed to pick up a few “injuries”. “How in the world did they get there?” I wondered.
Paint Protection
After close scrutiny and superior deductive reasoning I came to realize that while some of the chips are from the road (nicks in the paint on the nose piece below the windscreen and the right head light lens), several of them were my fault!
Like that scratch at the rear of the fuel tank, which probably came from the zipper pull on my heated jacket liner; the mark across the top of the tank, made by the cord for my heated gear; and a lone scuff mark on the right side case top from my right boot.
The paint seems to be pretty fragile on the FJR compared to my ’99 BMW K1200LT, which has over 137,000 miles, not all of which were on paved roads. Mile for mile, the BMW has fewer nicks and scratches than the FJR.
So I figured I’d better do something soon to protect the FJR’s beautiful metallic blue finish from further damage.
I remembered seeing the webBikeWorld review describing a clear protective film that can be applied directly onto the paint.
I ended up at Pacific Auto Trim, which makes the Tankslapper brand of clear motorcycle paint protection, available in pre-cut kits designed specifically to fit a large selection of bikes.
Pacific Auto Trim specializes in clear protective films for a wide selection of motorcycles, with the notable exception of Harley-Davidson. Their products range from simple tank and headlight protection to “Total Protection Kits”.
Tankslapper Paint Protection
The Tankslapper Total Protection Kit consists of two different types of clear film products.
One of the clear film types used in the kit is 3M Scotchcal (review).
That’s what is used in the SheerMask paint protection kit.
(Editor’s Note: Scotchcal is also available in bulk and can be cut to fit; see this webBikeWorld article that describes how to cut and fit clear Scotchcal paint protection on a Ducati track bike).
The other film provided in the kit is their own “Tankslapper” film.
They also have graphics and details available along with some saddlebag reflective tape kits (check out my review on my home made reflective tape kit).
I chose to purchase a Total Protection Kit for my FJR, hoping to minimize further damage to its finish.
3M Scotchcal Notes
Pacific Auto Trim is an authorized 3M distributor and they recommend using the stronger 3M product on the frontal and lower areas of the motorcycle, which are most prone to stone, sand and bug damage.
The Scotchcal film manufactured by 3M is “constructed of thermoplastic urethane with a clear coat layer which contains UV protectants to counter ultraviolet rays that can cause yellowing”.
What this means for motorcyclists is no worries about the stuff turning yellow and trashing the looks of the bike.
As it turns out, the 3M film is a bit more difficult to install on harsh contours. But since it has an adhesive to aid it in bonding to the surface, it is far more durable and won’t move or pull back along the edges.
A downside of the 3M Scotchcal product is that you’d best have it placed where it you want it once it starts to bond.
That’s because it’s a “once on and once off” film.
It can be removed, but it requires some heat in the form or hot water or a hair dryer and a finger nail under the edge to get it started.
The less exposed sections of paint protection film in the kit use the Tankslapper brand film.
This film is very similar to the Paintgard clear vinyl motorcycle paint protection film we reviewedsome time ago.
Tankslapper Film Details
The Tankslapper film is a very flexible 0.8 mil thick polished poly vinyl which they claim “works 10 times better than most of the products we have tried”.
Unlike the 3M Scotchcal film, the Tankslapper film can be easily removed and installed over and over again since it adheres by a combination of static cling and a vacuum formed between itself and the surface applied.
Tankslapper claims their film can be left on when washing the bike and it can be waxed.
They recommend using a product like Plexal should its surface start to dull. Note that the kits can be purchased with all 3M film if desired, although this costs extra.
The thought did cross my mind about where in the heck to put the film if it needed to be removed temporarily.
You sure don’t want to lay the stuff down where it can pick up any contamination and I can’t see aligning it back onto the paper it came on, much less saving the 20 something pieces of paper backing that came with the film sections in the first place.
Installation
Tankslapper recommends storing it on a clean dense surface like glass or Plexiglas.
I’m not sure my wife would be real keen on the idea of my storing the pieces on our sliding glass door so I’d better find someplace else.
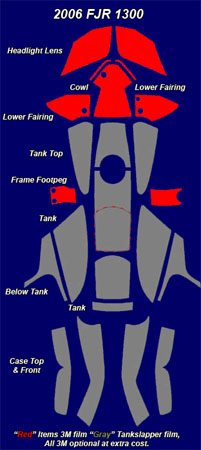
As you can see, there were pieces of all shapes and sizes inside the much anticipated package. What piece went where?
A quick visit to their website yielded the FJR 1300 layout which made sense once it was printed and compared to the pieces received.
Installation instructions are included in the package along with a plastic squeegee and some liquid soap to be mixed with water when applying the 3M Scotchcal.
It’s recommended that the Tankslapper film is applied with a mix of 30% isopropyl alcohol with 70% water applied with a spray bottle. For more information on this process, see the webBikeWorld article on installing the SheerMask Scotchcal paint protection film kit.
All of the pieces were accurately cut to size.
Included in the FJR “Total Protection Kit” were six pieces for the tank, two for the panels below the tank, two for each side case, one for either side at the foot pegs and one for each headlight.
Also, two for the lower fairing and three for the cowling behind the front wheel.
There is also a smaller piece for the rear of the fuel tank that can be used if desired and a small piece for the trim panel where the tank and seat meet.
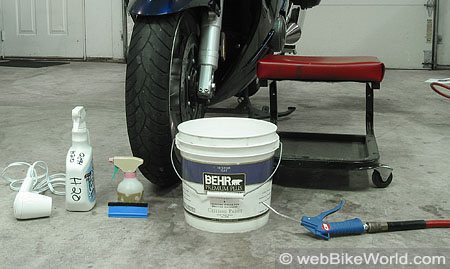
Surface Preparation
As with any project of this type, surface preparation is paramount. Pacific Auto Trim recommends washing and waxing the paint prior to applying the film.
so the FJR got a much needed thorough cleaning and waxing (I had been waiting for the package to arrive along with some warmer weather), making sure all surface contamination was removed.
No sense in preserving bug splatter by sealing it in plastic!
They also recommend flowing water over the surface prior to installation to ensure all particles are removed. If not, they will be clearly visible after the film has dried.
With an unusually warm (60 degrees F) winter weekend present from Mother Nature, I figured I’d better get this job done. Included in the kit was a piece of the 3M film for “practice” to hone my skills before tackling the real stuff for keeps.
Instead of following the directions and playing with the practice piece first, I opted to start with the headlight pieces.
Little did I know that these would probably turn out to be the more difficult ones to apply.
Do yourself a favor and practice with the scrap piece first!
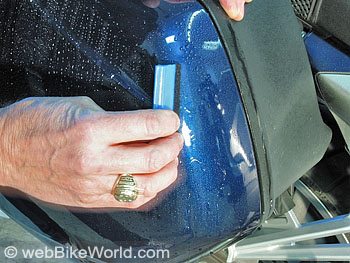
If I had to sum up the process in one word it would have to be patience. Don’t start this project unless you’ve got plenty of time to devote to it, unless you’re only going to do one or two pieces at a time.
It was not an overly difficult task, it just demanded patience to keeping working the film with the supplied squeegee.
Heat?
Strategic application of heat at multiple contours to help persuade the film into conforming to the surface contours was a must.
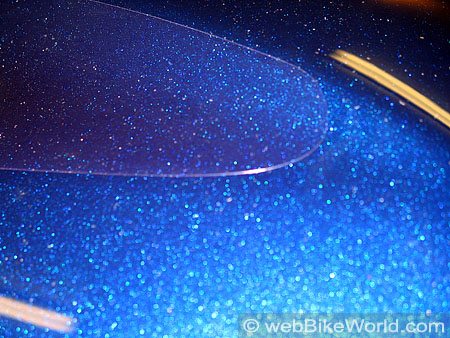
Between the reflections off the paint and the fact that the film is nearly invisible to the camera, getting any pictures of the application was darn near impossible.
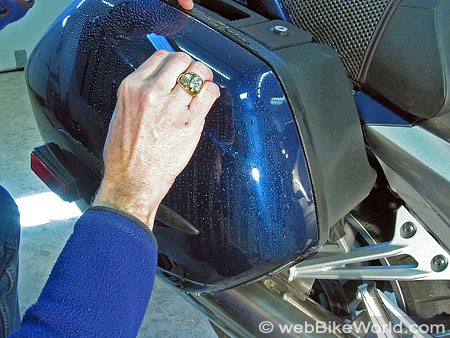
Places where there were multiple contours, like the rear of the fuel tank, the headlights and the side cases were the most difficult.
Generous use of the water lubricant mix throughout the process is another key to success.
I used a little compressed air, just prior to application, in hopes of cleaning the immediate surface of any stray particles. It’s also necessary to have a warm environment to work in as the films are far more compliant when warm.
Let It Dry Before Use
As per their instructions, I let the bike sit for at least a day upon completion, which was easy to do since the weather here in the Mid-Atlantic area is unpredictable in January.
I’ve logged over 600 miles since installation and all of the pieces are still in place despite some trips “above legal speed limits”.
The weather (temps in the teens to 30’s) has not allowed me to wash the bike (and it doesn’t look like it’s going to soon either) so I can’t vouch for the retention capabilities of the film during cleaning.
I bet sitting in the sun on a nice warm day would help its retention though (It would do a lot for me too).
My only disappointment with the Tankslapper Total Protection Kit? With all of those pieces provided, why there are none for the fairing nose above the headlights?
With several nicks already in the paint, this is another frontal area that requires protection, perhaps with the 3M film.
Also, there’s still a large area where the Yamaha emblem is located that runs the length of the fuel tank on each side that’s exposed and could benefit with film protection.
Conclusion
Whether self inflicted or not, injuries to the bike’s finish do appear if the bike is actually ridden and not left in the garage.
Application of the Tankslapper films available from Pacific Auto Trim could do much to minimize damage to exposed surfaces on your bike, many which can be easily removed if needed.
With the films properly installed they all but disappear except for a barely noticeable edge.
The films are durable, not overly difficult to install and should you sell the bike you can simply peel off the film revealing a scratch free finish. This is a low cost preventive measure that’s sure to pay off in dividends later on “down the road”.
Master Listing of All wBW Motorcycle Product Reviews
| wBW Review: Tankslapper Paint Protection Kit | |
|---|---|
| Manufacturer: Pacific Auto Trim | List Price (2007): $15.95 and up |
| Colors: Clear | Made In: U.S.A. |
| Review Date: March 2007 | |
Owner Comments and Feedback
See details on submitting comments.
From Motor Cycle Tank Armor: “…In the article a point was made that “with the notable exception of Harley Davidson Tanks” a product was available etc…
I thought you may be interested in seeing the product I have available specifically for Harley’s. It’s for the same purpose but is delivered in a very different and possibly more substantial ways.
We use a clear molded panel that is quickly and easily fitted to the tanks of the bike (approximately 2 minutes to apply) and we’re getting fantastic results against stone chips and road debris.”