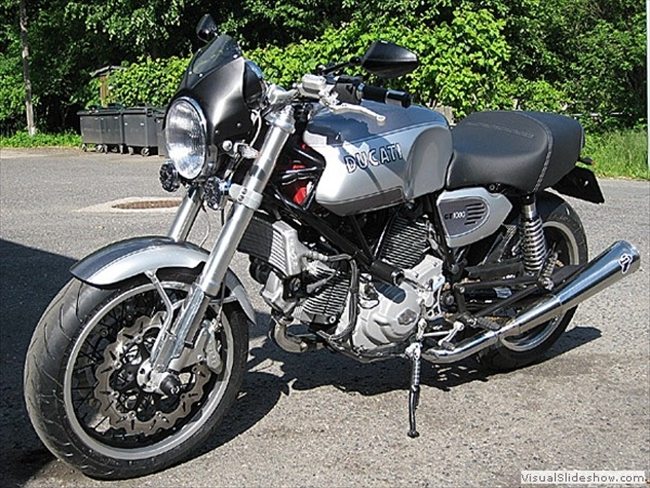
Ducati GT1000 Blog
Welcome to my GT1000 blog! The most recent entries are entered in order from latest to oldest on this page (below). As the page fills up, I move the older articles to Blog Page 2 and hopefully there will be many more!
Still in process: I still need to install the Scotchcal paint protection kit on the fuel tank (see Dec. 30 entry below). I have a new batch of LEDs for the brake light and turn signal bulb replacements (see below) and hope to get to that soon also. Meanwhile, check the blog entries below.
If you have any tips on parts or accessories for the GT or any of the SportClassics, please feel free to drop me a line at editor@webbikeworld.com
GT1000 Rear Suspension Options
January 1, 2014 – From “M”: “I can recommend the high quality suspension from Wilbers Germany, it works smooth and looks great. I have it on a 900SS bevel Ducati and on a GT1000.”
Time to Replace That Filter!
January 29, 2013 – From “D.H.”: “This may be too late on this but I just had this problem on my 2006 Sport Classic. It was quite an effort to diagnose it and I wish I had found your posting on this first.
My symptoms were that the bike would crank but never turn over. When I finally pulled the fuel pump out I noticed that the short section of hose between the filter and the pump had disconnected (the section between (7) in the parts diagram.
I replaced the filter, tightened the new clamps securely and the bike fired right up.”
GT1000 Owner Mods
From “B.W.” (February, 2012): “You asked for comments about modifications, upgrades, and accessories, so here goes.
In late 2009 I bought a new 2008 Sportclassic at a very good price. It has turned out to be one of the most satisfying motorcycles I have ever owned in 47 years of continuous riding, with a near-perfect (for me) combination of performance, handling, comfort, and looks.
Since then I have done a number of minor comfort and appearance upgrades, and these have just added to the pleasure of riding and owning the bike.
First, about my riding habits and needs, since they have a lot to do with the modifications I’ve chosen: I live in a semi-rural island near Seattle. I commute year-round by motorcycle, with a round trip of 33 miles.
I ride in all weather conditions except when there is likely to be frost or ice on the roads, which only happens a few days each winter, or if it’s pouring down rain in the morning when I’m deciding how I’ll get to work, which happens maybe three or four times a month.
(The more typical pattern is for it to be cloudy but not rainy in the morning so I take the bike, then it starts pouring down rain about the time I leave work).
Because traffic is light-to-nonexistent for most of my route, my biggest consistent hazard is the large population of retarded kamikaze deer that live on my island and that lurk in the roadside shrubbery until a vehicle gets close before springing out — often in family groups.
For urban riders who are not familiar with the brainless suicidal behavior of deer, think of bicycle messengers. 90-plus percent of my riding is commuting.
Second, my riding history has had a lot to do with what I look for in a motorcycle, so here’s the full line-up (including some bikes that taught me things to avoid):
Brand-new 1963 Honda 50 Cub (I could get a license for the street at age 13 for this bike and it proved impossible to kill, otherwise it didn’t have a lot going for it);
1963 Triumph 200 Tiger Cub (the less said the better, although it did build cardiopulmonary capacity); 1969 Norton 650SS (awesome handling as long as no critical parts had shaken apart or fallen off);
1976 BMW R90/6 (went like stink and handled reasonably well, although it did prove that while the mythical BMW reliability is a myth, the myth of expensive BMW parts is very, very true);
and 1993 Honda VFR750F (superb handling, performance, reliability, all-around goodness, and comfort – enveloped in acres of plastic).
Now for the modifications:
Emissions Canister: One of the first was to remove the gruesome evaporative emissions canister and associated plumbing, per the instructions on your site, resulting in a tremendous visual improvement.
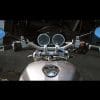
Horns: Next, I replaced the stock horns, which make a pathetic useless bleat like a dying lamb, with a two-horn system from Fiamm. These are not air horns, but are inconspicuous black plastic electric horns like you might retrofit to a car.
I run them off the battery through a relay triggered by the horn button so they get plenty of power. I tucked them along the left-hand side of the bike, attached to the oil cooler mount.
Now when I hit the horn button there is an actual honk that causes cagers to look around to find the car that’s about to hit them, distracting them from their intended (?) course of running over me. You can hardly see the horns but you sure can hear them.
Mirrors: I replaced the gawky stock stalk-mounted mirrors with a pair of black “Napoleon” bar-end mirrors (review), with stick-on bullseye mirrors in the corners. They look better, are less conspicuous, and give better rearward vision.
Windscreen: I installed a Plexifairing II from National Cycle. This does a great job of blocking wind and rain, making my winter commute significantly more comfortable except in deluges (see above), but it does not fit very well around the turn signal brackets so I may replace it someday.
I did not go with the Ducati windscreen or some of the others I’ve seen on Sportclassic blogs because I was looking more for working weather protection than good looks.
Clutch Slave Cylinder: I installed an Oberon slave clutch cylinder, which works and looks better than the stock unit.
Wheel Hugger: I also installed a rear wheel hugger from Geoffrey Rossi (review), which significantly reduced the volume of dirt and other grody material getting sprayed up onto the rear underparts of the bike, and my legs.
Dress-up Parts: I put on a billet oil filler cap (review) and replacement crankshaft end cover, just because I could. Most of these mods so far have been discussed on various blogs including yours, but I have done a few more that have been very worthwhile.
Luggage: First, because of the commuting duty I needed a solid luggage system.
The Ducati saddlebags did not appeal to me due to their small size, high price, overdone pseudo-retro styling, leather (what were they thinking?) appliqué, and reportedly flimsy mounting system.
I quickly discovered that aftermarket goodies specific to the Sportclassic can be hard to find. (I was surprised that Givi doesn’t make anything for the Sportclassic. You would think the Italians would stick together better).
I did find a good system from Hepco & Becker, so now I have a very sturdy and functional set of side cases, luggage rack, and top case.
Because I’m not trying to give anybody the false impression that I’ve just gotten back from a solo crossing of the Gobi Desert via the Urals and the Himalayas I went with the black plastic “Junior” series.
The H&B bags are not beautiful, and they stick out a lot, but they’re lockable, weather-tight, and highly functional.
Lights: I installed a pair of Trail Tech 12-watt HID floodlights on the front forks to to help me spot those kamikaze deer lurking in the roadside shrubbery during dawn and dusk, when they tend to be most active. Fortunately their eyes are reflective so they can be seen if you can throw enough light to the sides.
I went with HIDs to get the most light for the lowest current draw since I don’t want to excessively stress the electrical system.
(I actually wanted something that would set the deer on fire or make them explode, but had to settle for being able to see them due to concerns about high current draw, too much weight on the front end, and complaints from the neighbors over inadvertently destroyed pets, children, decorative plantings, or other property).
The lights are powered straight from the battery through a relay that I wired to the high-beam circuit on the headlight, through an independent switch.
This way I can have three options: high-beams with deer lights, high-beams without deer lights, and low-beams with no deer lights.
Tank Bag: I bought the official Ducati Sportclassic tank bra and tank bag to provide a home for my radar detector, cell phone, and StarCom1 intercom master unit, plus handy clutter like a tire gauge and maps. It fits and works well for this purpose, but is borderline too fussy for my taste so I may get rid of it and move everything to the H&B top case.
Brake Bleeding: Finally, because I despise bleeding hydraulic lines and do not have a reliable shop assistant, I installed SpeedBleeders at the brake calipers and clutch slave cylinder.
These totally rock. I won’t say that they make bleeding my hydraulics into a fun activity, but they come close.
Muffler?: About the only fix-up goodie left on my list is a pair of the Staintune reverse-cone mufflers. I’ve seen (and heard) a pair mounted on another Sportclassic, and they really work for me.
I’ve always thought the Norton Commando was one of the best-looking bikes ever built, and to my eyes a Sportclassic with Staintunes pushes many of the same buttons.
All these mods have taken a wonderful all-around bike and made it into a very functional and comfortable commuter with the soul (and legs) of a sport-tourer.”
Fork Spring Change for Better Handling?
June 26, 2011 – GT1000 Owner “R.P.” from the UK writes: “Hi There GT1000 fans. I have written to you regarding the front end on the GT1000 on a couple of occasions.
My bike is a 2006 model. I’ve always thought the forks behaved less than perfectly especially when I got a move on.
Well, my friend has a 2009 model. His handles really well. So we looked at the forks. At a standstill just bouncing the front end of both bikes it was obvious mine had more travel and moved up and down more easily.
We compared the length of the exposed bottom fork and the 2006 bike had something like one and a half inches less length.
My mate is a mechanic and the conclusion is that the later bikes were fitted with longer fork springs which reduces the amount of movement. That’s why the later bikes handle better.
The older bike is mostly fine but if you push it and it is a Ducati it is less planted than it should be on our British roundabouts or fast bends.
I’ll leave the bike alone for the summer but come the winter it will be fitted either with the later factory springs or some Race Tech alternatives.
So there’s your answer folks. The tank slappers that some people have experienced on early GT1000 bikes are down to the early machines having shorter, possibly softer springs than is ideal.”
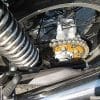
New Fuel Tank Mounts From Ducati
May 19, 2011 – Photos of the new fuel tank mounts and rubber bumpers from Ducati to help solve the fuel tank spreading problem.
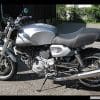
Fitting a Monster Fairing to a GT1000
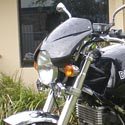
April 27, 2011 – Instructions for fitting this great-looking Ducati Monster fairing to your GT1000!
From Ronnie VDB: “I saw a monster fairing fitted to a GT1000 at the Corbin seats web site and it looks great. Tried the same with items sourced in Australia.
Thought I might pass on these notes in case someone else out there thought of doing the same.”
Here are Ronnie’s photos and instructions on Fitting a Monster Fairing to a Ducati GT1000.
GT1000 Handling Tips
April 17, 2011 – From “R.P.”: Handling Tips for the GT1000
“Just improved the handling of my black (was grey) GT. Always thought the front was too hard and the steering at speed felt remote. Fitted a set of “M ” shaped lower bars from a Brit dealer called Norman Hyde.
Makes the bike look more athletic but crucially it handles better. That bit of extra weight on the front means you can now ride like a rocker. Far cheaper than changing springs in the forks etc. and it’s a cosmetic plus. Try it guys it really works. Now I have a sporty GT!”
GT1000 Suspension Tips
September 4, 2010 – From “B.F.”: Suspension Tips for the GT1000
“I have always thought the GT suspension was harsh ( so does my wife) but after 18,000 miles I finally did something about it.
I (installed) Race Tech springs ($109) according to their chart. It is a much more responsive spring. I rode the bike for a week then changed the fork oil to 7.5 weight. That did the trick for the front.
My son has a Sport Classic 1000 so I stole his rear shocks for a day. That made a huge difference in the back and they are fully and easily adjustable. I watched EBay for some to show up and got a pair with 1,300 miles on them for $400.
Now when my wife and I go out for a long freeway ride or even around town it feels plush. A few clicks here and there, a twist of the spring tensioner and it feels great on the canyon hair pins or carrying 40 lbs. of camping gear. With the gold canisters, it looks real good to.
After 2 sets of the classic tires I tried a modern design and found that made a huge difference in cornering.”
From “R.P.” (06/2011): “I have sent in comments before. Particularly with regard to the official factory screen which I am still trying to sell. Earlier I mentioned that the bike was starting to run unevenly. This was sorted by my local dealer here in Cardiff. The throttle bodies had gone out of synch. It runs great now.
My only complaint with this bike is the suspension. I think I previously suggested that the forks were too stiff. Well I got that totally wrong. They are too soft. That is why the bike feels less planted than it should.
My friend has a BMW Boxer Cup. I know these bikes have a different set up especially at the front end but the GT1000 had double the suspension travel of the German bike. I need stronger springs really.
I thought of thicker oil but apparently this does not give less travel just slower travel. That might make enough difference though. So I’ll try the 20w stuff and report back.”
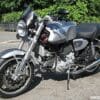
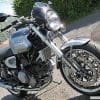
Jan’s Custom GT1000!
July 10, 2010 – Here’s a list of GT1000 mods by Jan, with photos below!
List of Modifications to the 2009 GT1000:
- Front Fork. S4R 50/54 mm with Race Tech Springs and Valves according to weight.
- Hagon Rear Shocks, Springs according to weight
- Oberon Clutch Slave
- Rear “Hugger” in Carbon
- Rizoma Rear Brake Fluid Reservoir
- 14 tooth Front Sprocket + 42 tooth Rear Sprocket (SuperSproxy)
- X-ring Chain
- Frame-Slider / Wheel Sliders
- 4 pads Brembo Calipers
- Alpina Wheels + Metzler M3 Tyres.
- Rizoma Handlebar
- Termignoli Exhaust
- ISR Brake Cylinder / Clutch Cylinder
- Brake lines by ISR. NB Double Banjo Bolt / Brake switch
- Galfer Brake Discs
- Camshaft Cover by Rizoma
- Handlebar Grips by Rizoma + Plugs, also Rizoma
- EVR Slipper Clutch
- Oil Cooler by NCR
- Rizoma Mirrors
- Rectifer/regulator FH012AA Shindengen (alternator in, two thick cables directly back to battery)
- Front Sprocket Cover Rizoma
- K&N Oil Filter
- Stainless bolts
- Steering Damper kit
- Airbox exchange with K&N air filters / Power Commander

GT1000 Seat Comparison!
June 25, 2010 – Ducati Stock Seat vs. Ducati Comfort Seat vs. KonTour vs. Corbin
Nice comparison of the different GT1000 seat options available, submitted by a webBikeWorld reader and GT1000 owner. This will probably be the last entry in the blog, unless another GT1000 owner has more to contribute, because I just sold my red GT1000 and I’m looking for the next bike to take its place in the garage!
GT1000 Chrome Fenders?
February 14, 2010 – Can Anyone Help Solve This Problem?
From “J.M.”: “I have a 2007 GT1000 and recently purchased the chrome fenders. The front chrome fender went on in seconds with no issues, but the rear fender installation is not going well.
The pictures in the instructions are unreadable, and its hard to understand what they are referring to without them. All the holes seem to be off and none of the parts are fitting back on. Any help you or your readers may have is greatly appreciated..”
Editor’s Note: If any GT1000 owners can help, please let me know.
GT1000 Comfort Bars and Handlebar Risers
June 23, 2010 – GT1000 Comfort Bars Not So Comfortable?
From “B.J.”: Just a comment on the comfort handle bar kit. I purchased them from Frasers and had them fit them. The kit cost $308.06 and the fitting charge was $275.00.
All I can say is don’t be in too much of a hurry to get them. They took the sporty feel away from the bike and in my opinion left the bike looking a bit silly. They did help a bit with comfort but I got used to the original bars.
I have the original bars back on with the extended throttle cable and front brake lines still fitted. I will get around to changing the cable and brake line back to standard and hopefully sell the comfort bar kit!”
November 28, 2009 – More GT1000 Handlebars
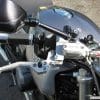
From “J.M.”: “While searching for a solution that would raise the handlebars a bit without the very clunky look of the Gen-Mar spacers, I tried using a set of old spacers I had for a Triumph Bonneville made by SpacerJim.
They worked with a little tweaking for the larger Ducati bolts.
After contacting him about it, he made custom spacers in a polished finish for the Ducati SportClassic that fit perfectly, and raise the handlebars just 1″ or 1.25” (and thus don’t require new cables), but put the bars in a much more relaxed position, at least for me.
As a bonus, they’re very inexpensive ($30)!
I thought your readers might benefit from the tip, since the ‘stack of zinc washers’ approach is effective but very ugly. I’ve attached a picture of the risers installed on my ’07 GT1000:
September 21, 2009 – This information on sport handlebars for the GT1000 arrived from “P.J.”:
“Just a few lines of warning regarding the comfort bars for the Ducati GT1000. I purchased a genuine bar kit from a Ducati dealer in Lincoln just before Easter 2009. I fitted the bars over the Easter period, only to find that the pre-drilled hole for the clutch lever assembly was drilled incorrectly.
If the dowel was fitted into the hole and the assembly, the clutch lever assembly including the reservoir was (tilted) approximately 30 degrees forward.
I contacted Ducati via email and the dealer via telephone regarding this problem. I received acknowledgement from Ducati UK regarding my complaint and was informed on the 14th May via email that all stock at the factory had been checked and found to be correct.
The dealer in Lincoln has since that date had three sets of bars in for me, all exactly the same as the incorrect set I received in the kit, the dealer will not get any more in as they state that Ducati will not refund the cost after items sent out.
Since that date I have contacted both the dealer and Ducati UK and the last communication I received from Ducati UK was on the 14th August stating that emails had been sent but the factory was on holiday.
I have been offered a refund (for) this item but I feel that this is just an easy way for the problem to be resolved by Ducati UK.
During one of my visits to the dealer it was suggested by one of the technicians that I just drill another hole in the bars, (but) this was dismissed by a more senior technician.
This makes me wonder, that if no one can find a good set of comfort bars, have dealers who has fitted these bars been just drilling another hole to make the clutch lever assembly fit correctly, thus possibly weakening the bars?
The latest info I got from the dealer, about two weeks ago was that they had got a bike in with comfort bars fitted and they were going to photograph the bars, alongside a set of incorrect bars and send this info to the factory.”
Editor’s Note: If any GT1000 owners have a set of comfort bars installed and can comment on this issue, please let me know.
Ducati SportClassic Oil Cooler Radiator Guard

May 27, 2009 – Another cool must-have accessory from Paul Smith and CustomDucati: the Ducati SportClassic Oil Cooler Radiator Guard!
GT1000 and SportClassic Hugger

April 4, 2009 – Easy-to-install hugger for the GT1000 and dual-shock SportClassics
GT1000 and SportClassic Fork Guards

November 4, 2008 – Aluminum fork guards for SportClassics!
Fat Duc O2 Oxygen Sensor Manipulator

October 11, 2008 – The Fat Duc O2 Manipulator really works — it’s transformed the GT1000!
GT1000 Center Stand?
UPDATE: October 18, 2008 – Fitting the GT1000 Center Stand; information and assembly!
GT1000 Battery Access
August 17, 2008 – I hope you caught our recent motorcycle horn comparison; as you’ll see in that article, we used the GT1000 as the “mule”. But before we started playing with the horns, I installed a relay, running directly off the battery.
I purchased a couple of ready-made Eastern Beaver dual horn relay kits (review), but it took quite a bit of modification to get everything to work, so in the end, it might have been easier to simply use one of the relays that came with the horns.
My GT1000 came with an accessory two-in SAE Battery Tender connector already attached to the battery.
You may recall this was an early blog entry (see Blog Page 2) and I thought it was put there by Ducati, but apparently it was done by the dealer during prep.
It’s a good idea to install an SAE harness harness if you don’t have it, because it can be used for many other accessories also.
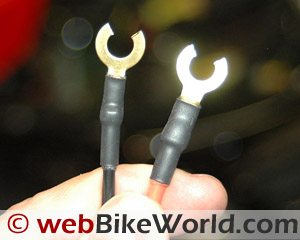
For the horn installation, I added a second harness to the battery, which I can now use to attach any other accessories to the bike.
I soldered a couple of round connectors to the ends of the wire (photo left), but then clipped part of the tips so I could slip them under the battery terminal screws without having to remove the screws themselves.
Accessing the battery on the GT1000 is a bit tricky, and you have to be careful to make sure you don’t short anything out by mistake. I removed the seat and both side covers; they are held by an Allen screw in the back, I think it’s a 4 mm. Apparently, the battery box will also slide out the back, but I didn’t try this.
The battery is held inside a plastic case to keep it protected from the crud flying off the rear wheel. I use a pair of needle-nose pliers to grab the rubber band on each side and pull it up and over and off the hook on the battery case. This allows the battery cover to be easily removed.
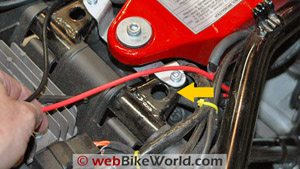
Now you have to be careful — you may think you can slip a screwdriver down into the hole on the frame right above the battery terminal Phillips head screws (orange arrow, photo left).
But, as I found out, it’s way to easy to short the positive terminal to the frame as you’re trying to squeeze the screwdriver down through the hole.
I’m a slow learner, so I even tried it with an insulated screwdriver (the shaft is covered in plastic), but the screw is oriented in a way that I couldn’t loosen it anyway without stripping the Phillips head.
The best bet is to go from behind with a 10 mm wrench and loosen the screws.
Be careful not to short out the positive terminal to the frame! Notice the red and black wires in the photo — they’re already attached to the battery and I routed them up on either side.
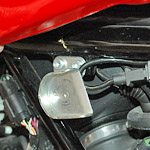
If you’re ever under the seat you may want to install a harness like this anyway and put a Posi-Lock (review) terminal connector over the ends, this way you’ll have a ready-made harness for things like electric clothing or a battery charger.
Note that in the photo all you see is the wires. Remember that you’ll probably need a fuse somewhere along the hot lead; I used the fuse block from the Eastern Beaver harness.
Most electrical accessories like clothing or the Battery Tender will come with their own fuse block. I think the best bet is to use a Posi-Twist connector (review) to attach any electrical accessory to your el Cheapo harness.
GT1000 Fuel Tank Spreading Problem Fix
 July 31, 2008 – Some GT1000 owners are reporting problems with the fuel tank. Apparently, the polycarbonate fuel tank starts to spread and the brackets that hold it at the front become ineffective.
Here’s the Ducati fuel tank spreading fix.
GT1000 Exhaust Modification
 May 18, 2008 – Don from Ducatis Unlimited Connection says “Thought I’d share a modification to the stock GT1000’s exhaust ‘cans’ that has become quite popular among members of Ducati.ms’s SportClassic forum members.
The basic modification involved drilling two 5/16 inch holes in the rear of each exhaust canister that go through both the outer shell and the rear wall of the rearmost internal compartment.
The holes are then smoothed out with a fine file or Dremel tool, and a flat black heat resistant paint is then applied to the indented portion on the canister.
My original purpose for making the modification was solely to improve the sound of the original exhaust system.
It was not expected to enhance performance.
But to my surprise, along with the expected better sound, the modification also brought about a greater and more significant improvement: It largely eliminates the unpleasant low rpm vibration that has annoyed many GT1000 owners.
A thread provides details of how the modification is made and provides numerous evaluations of its effects by forum members who have made (and in some cases further modified) the modification.
The thread also contains my somewhat speculative explanation for the improvement the mod makes in the bike’s low rpm feel.”
Carrozzeria Wheels Review

May 14, 2008 – Yeah! Check out my Carrozzeria Wheels review — these gold-anodized, forged aluminum beauties are now gracing my GT1000!
GT1000 Fuel Tank Problem?
May 8, 2008 – Reader “J.D.” told us about a potential fuel tank issue with the GT1000. He said “I don’t know if you’re hip to this, but the SportClassic polycarbonate fuel tanks, especially the GT1000 tanks, have been prone to “spreading” and hence not connecting with their front mounting pegs.
The result is that the front mounts for the tank don’t work and the front of the tank is loose.
This puts undue stress on the single bolt that holds the back of the tank. This is a warranty fix. Ducati knows about it and is replacing a lot of tanks, mine included.
Check your tank. If you can grasp it at the lower front and pull it out of the “pegs”, then you should get a replacement tank.
I asked my service guy if the new tanks were any better and he said that they would probably warp in the same way since they are made by the same manufacturer and of the same material.
So…? Pro Italia said that they were going to make longer “pegs” or whatever one calls them so that the tanks would be more secure to the frame as a fix. But, right now, I’m getting a new tank at Ducati’s expense.”
UPDATE: See my article on fixing this problem.
If anyone has more information on this or the longer “pegs”, please let me know and I’ll post it here. Email me at editor@webbikeworld.com
Spring!
April 14, 2008 – Spring has finally arrived! Couple of things: I installed some clear vinyl paint protection on the GT1000 and Burn and I took a video, here’s the article.
Also, I ordered a set of Carrozzeria alloy wheels to replace the spokes — these will be gold anodized for some ultra bling! Will report on them as soon as they arrive.
Winter Check-in
March 10, 2008 – Can’t believe it’s been 3 months since my last posting! It has been a colder than normal January and February, with very few decent riding days — unusual here in the Mid-Atlantic.
The few days that were good enough to go riding found me on the Multistrada instead of the GT1000. After the GT stood there for several weeks, I finally drained and replaced the oil, this time with Mobil 1 15W40 V-Twin, which came highly recommended by the local Ducati crowd.
I didn’t do much else – I put some Sta-Bil in the fuel and topped off the tank (I always keep a couple of 5-gallon containers full with gas and Sta-Bil in the winter so I can keep the tanks topped off) and there it sits.
Can’t wait for the weather to warm up a bit — looks like this coming weekend should be good.
In the meantime, I received a couple of emails. This one is from “P.B.” in the UK on his recent purchase of a GT1000:
“I came across your site when surfing the net looking for information on the GT1000 and was impressed by the useful hints and links on the site. For what it’s worth, here are my thoughts on the GT1000 and a bit of background on my previous Ducati.
I have been riding for just on 50 years, mainly on Velocettes — the 350 and 500cc singles — until about 10 years ago.
Then I decided to try something modern before I got too old. Looking for something interesting, and small and light enough for my 5’10” and 130 lbs. I settled on a 600SS, one of the last built in 1998.
Except for an uncertain reserve fuel warning light that I discovered the hard way the bike was totally reliable.
I changed the oil and filter every spring, usually about 2000-3000 mile intervals, using a cheap brand fully synthetic oil.
I never had a problem in 22000 miles; it used no oil between changes, I checked the valve clearances at 16,000 miles – they were all still as the factory set them – and replaced the cam belts.
These can be tensioned by twisting 45 degrees with the fingers; if this can be done easily the tension is insufficient, it should only just be possible.
The most important thing to ensure long life, though, is to gently warm the engine at not more than 50% rpm for about 5 miles and I always do this on any bike or car before pushing on.
I managed some touring to France and last year managed 550 miles in one day. It is necessary to work up to this mileage, don’t try it the first time out for a month!
The seat is a bit of a plank but the wind pressure nicely counters the weight on the wrists caused by the low bars at speeds above 60 mph.
60+ (Imperial) mpg was normal and the performance allowed an indicated 90 mph cruise on motorways with plenty in hand and the handling was excellent although, surprisingly, the steering was slower than a good Velocette.
The bike was fairly easy to clean with a good finish.
Eventually, though, I decided to update again and find something more suited to an elderly gentleman! Hence the GT1000.
The first thing I did was take out the slack on the throttle cables and I will find a way of damping the very light movement to steady the input at small throttle openings; the system needs some friction. Do you remember the throttle friction adjustment on the old bikes? That’s what is needed.
I had the Ducati windshield fitted before delivery and was disappointed with the turbulence it generated onto my helmet. I have removed it and will modify the supports to allow it to be set a couple of inches higher.
The finish is not as good as the 600SS and I am unimpressed by the powder-coated(?) finish of the rear subframe while the rest of the frame is stove enameled.
The engine finish is better, though, and looks as though there might be less corrosion on things like engine bolts. I find the seat and riding position are very comfortable and fit me well which was one of my most important criteria.
The markings on the speedometer are a pain – black and white and very simple is the best.
The engine characteristics are similar to the 600SS with a minimum engine speed below which it shakes and vibrates; on the GT1000 this is at a lower rpm and much less of a problem so making for an easier ride.
I have not started to take the revs much above about 4500 yet but there does seem to be some vibration coming in at that engine speed although below it the engine is very smooth.
This is in contrast to the smaller bike which was as smooth as silk from 3000 rpm all the way to the red line at 9000 rpm.
However, there is so much power on the GT even between 3000 and 4500 rpm that, with six gears to choose from, there is little reason to go much outside this band.
Many adverse comments have been made about the gearing and I can only suggest that, while agreeing that 5 gears would have been quite enough with this engine, it is treated as a four or five gear bike, only bothering with sixth gear on a motorway.
The clutch and gearbox are excellent, very much better than the 600SS which wasn’t too bad anyway.
I have noticed an occasional shake of the bars when cornering on a bad surface and will be interested to know whether Hagon or Öhlins shocks are worth buying to cure this. The 600SS handled beautifully with standard (Sachs) suspension so this is something I’d like to get right.
So far, then, I have no reason to suppose that I won’t enjoy many miles on the GT although there are one or two niggles to be sorted, but there are on any new bike. It’s largely a matter of changing ones riding style to suit the new machine.
Thanks again for a great blog.”
J.D. (see below) responded: “In response to “P.B.”s post about the head shake that he experiences on uneven road surfaces: Yes, it’s true – as they say, “They do that.” I think it has more to do with the tire fitment on the GT than the suspension.
The GT has more rake than the S models, but the Michelin Classic tire has the center grooves front and rear that catch every rain groove in southern California, and, I’m sure, every patch in the tarmac in Britain.
Disconcerting, to say the least, and downright puckering at times. I can’t wait to switch those tires to the Pirellis that are on the Paul Smart and the 1000s. I think that that will cure the wigglies. Any info on anyone switching tires?”
More on the GT1000 Battery and Side Panels
“J.D.” writes: “After owning a 1987 Paso 750, and a 1992 851 Strada, let me say, ” I fear no Ducati”. I put 50,000 miles on my Paso, and 25,000 miles on my 851 and still counting. A few weeks ago, I had an electrical glitch with my 851, and while at the shop (Pro Italia), I had the opportunity to test ride the GT, and the Multistrada.
The Multistrada 1100 is totally bitchen, with its Öhlins stuff and all, but I bought the 2007 GT 1000, in grey, and have been digging it ever since. This site is great, and thanks for all the information.
My taillight burned out on my second ride and rather than thumb through the useless owner’s manual looking for taillight fix-it, I found the info here.
One correction on your “removal of the side panels” section. however. The screw that holds the side panels on is not a “Torx” head screw, but a simple metric Allen head screw. 5 mm, I believe. I may be wrong on the size.
Also, you don’t have to remove the tank to access the battery. Just unscrew the mounting bolts and rotate the entire case back towards the rear wheel. The cables give just enough to allow you to remove the top cover and get to the terminals.
Great site and let’s see how many other GT 1000 owners we can get to contribute.
ECU Recall?
December 2, 2007 – Read my follow up article on the GT 1000’s ECU replacement, throttle body balance and lean running condition.
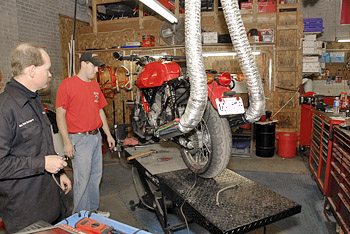
November 16, 2007 – Wow! Where did summer go?? I’ve been meaning to bring the GT1000 toDuc Pond Motosports in Winchester, Virginia for a throttle body synchronization check; I wanted to write up the story for a webBikeWorld article.
After a couple of false starts, I finally got over there this morning and, believe it or not, it was spitting snowflakes just as we were unloading the bike from the Rocket folding trailer.
Donnie Unger has a fantastic Ducati shop that’s growing all the time — and, by the way, he now sells MV Agusta and I think I’m falling in love with the red Brutale on his shop floor…
I’ve noticed since the bike was new that 1) it pops and backfires on the overrun; and 2) it stalls when I come to a quick stop, especially when the engine temperature is under 180 degrees F.
I thought the popping sounded cool and was part of the Ducati mystique, and although the stalling was annoying, I didn’t want to take the bike in during primo riding weather.
So Donnie put it on the lift and discovered that it’s running way lean — 0.0 to 0.1 CO2, when it should be a minimum of 0.7. The CO2 emissions are an indicator of lean/rich burn.
But since Ducati uses a closed-loop ECU on the GT1000, there was nothing he could do about it, even with some fiddling of the throttle bodies (which, by the way, were perfectly synchronized!).
So he called Ducati, only to find out that there was a recall on that ECU? I have not heard of this, have not read about it on any of the Ducati forums and I’m surprised I didn’t get a letter from Ducati. Anyway, I left the bike there and Donnie will replace the ECU.
While he’s at it, he’s going to do the official fuel tank recall. I checked the fuel lines in the tank myself and wrote this up in the blog, but I should have used the recall kit to secure the fuel lines to the fuel pump and I didn’t, so Donnie will.
I’ve also asked him to replace the front 15-tooth sprocket with a 14-tooth version to lower the ridiculously high (numerically low) final drive ratio, which requires about 80MPH to get the bike into 6th gear — a common Ducati problem, apparently.
I’ll report back on all of this when the job is done…
Pazzo Adjustable Levers
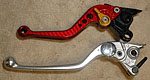 October 27, 2007 – Installing Pazzo Levers – Yes, the GT1000 comes with adjustable levers, but take one look at the beautifully made Pazzo levers and the OE levers look like yesterday’s pasta.
The Pazzo’s aren’t difficult to install, but there is a catch…here’s how.
Broken Saddlebag Mounts
October 21, 2007 – by “M.B.”: Here are a couple of photos of my right-side saddlebag bracket.
One shows the broken weld, and the other shows the very poor weld quality at the joint near the edge of the seat.
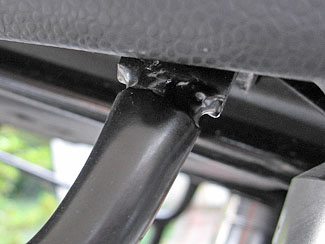
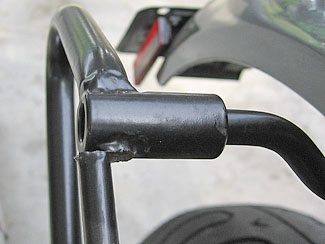
I couldn’t get the camera to focus any closer than these, but the broken one looks like there wasn’t good weld penetration.
There’s a thin ring of weld where the diameter of the small tube was, but most of the center of the area where the small tube was has no evidence of ever having been melted.
New Rear Tire and Oil Change
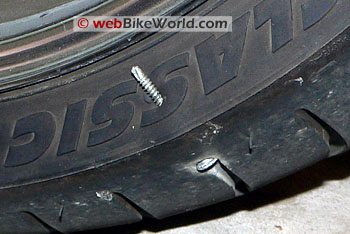
October 6, 2007 – Here’s a real good reason to inspect your tires before every ride.
I usually check the air in the tires, which I do before every ride, and found this sheetrock nail pinned through the sidewall!
Believe it or not, the tire had the correct 32 psi pressure, so apparently the nail did not puncture the tube.
I brought the bike down to the local dealer (RAM Cycles in Gaithersburg, MD) and had a new tire and tube installed.
Normally, I’d order tire from one of the online retailers (see the wBW Motorcycle Tire page) and do it myself; after all, we have a pro motorcycle tire changer handy, but this time I just didn’t have the time or energy.
It took 2 days for the dealer to get the new tire, but then they decided that it would probably be a good idea to replace the tube also, which took another couple of days to arrive.
The total bill was a painful $240.44, which includes $178.88 for a replacement Michelin Pilot Classic original equipment tire; $2.00 for a tire disposal fee; $22.06 for a Metzeler 160/70-17 to 190/50-17 tube and $37.50 for labor.
The labor charge was actually $63.75 but I got a good customer discount of $26.25.
While it was there, I had them flush and refill the clutch fluid. If you recall, I did this myself not too long ago when I also flushed and refilled the front and rear brake fluid on the GT1000 (seeBleeding the Brakes and Clutch).
But like other GT1000 owners, I found that the clutch fluid turned dark again really quick.
Apparently, some of the fluid stays in the system and is very hard to flush. The RAM Cycles techs recommended holding my finger over the hole at the bottom of the reservoir while the Actron brake fluid pump keeps sucking, to get all the old fluid out.
That cost me another $45.26. Then I also had them change the oil and filter (see our article on changing the oil and filter on a GT1000) and fill it with Motul 15W50 Synthetic. This cost a whopping $93.79 (the Motul oil is $12.71 per quart)!
The Motul synthetic motorcycle oil is pretty interesting stuff. It is an unusual green color — it looks just like antifreeze.
But I used Motul oil in the first oil and filter change on the Multistrada 620 (see blog), which does not have an oil cooler, and I noticed both easier shifting and that the bike runs much cooler — by about 15 degrees, I estimate, under the same types of conditions.
I may be dreaming such a dramatic difference, but I know that in 80-85 degree temperatures before using the Motul, the Multistrada was running 200 to 235 degrees, and now it seems to stay around a steady 185; in fact, I it barely cracks 200.
I had the temperature gauge on that bike up near 300 once, coming up a long, steep grade, and I thought that was too hot.
Anyway, lots of money, but at least the work is done and I can get back to riding!
GT1000 Notes
September 9, 2007 – Here’s a note from “M.C.”: “First of all, thank you so much for all the excellent information on the blog. Truly excellent stuff!
I got a two tone GT 1000 a month ago, coming out of a 2001 748. I love Ducatis, but the 748 was getting to be more of a chore than a joy to ride. Bad ergos, aging back and knees, you know the rest.
The GT is fun to ride, gives all the desmo feel and the retro styling is a standout.
A few points of interest/information: – a small Leatherman tool – the one with the locking pliers – fits in the storage compartment and is a must-have for tightening down the mirrors
– the shock adjustment tool (see blog entry below) you mention is available on Amazon. Just search for item number and it pops right up. I use 2 clicks for regular riding and three for two-up.
Hope that all helps!”
GT1000 Upgrades
August 19, 2007 – Here’s a note sent by “S.B.”: “Just a note about my most recent changes to my GT1000… I’ve installed the FBF high compression pistons and a lightweight flywheel from Nichols Mfg. No baseline hp readings but just my seat of the pants impression is a noticeable improvement in torque and much smoother throttle response.
I’ve had the Termignoni silencer ECU kit since the bike was new, as well as the Ducati saddlebags and rear luggage rack. I’ve got several Ducatis so I’ve don’t have as many miles on this one as I could.
I’ve had it a bit over a year now and it’s showing about 5700 miles on the clock.
BTW, the valves were checked at 5400 miles when the pistons were installed and not a single shim needed to be changed. I ‘ve done a track day at Mid-Ohio, logged a 730 mile day with relative comfort, and overall I’m really happy with this bike.
Forget that it’s a Sport Classic, it’s just a damn fine all around motorcycle.”
GT1000 Rear Shock2 Preload Adjustment Spanner
August 2, 2007 – Here’s a good tip sent by “B.R.”: “I just ran into a slight problem with my GT, and thought I’d pass along a cheap and easy fix. As Ducati was kind enough to not include a preload adjustment spanner with our toolkits, I figured it was time for a solution.
As the rear suspension on the bikes comes in its softest position, the bike may not handle properly with a tour load or a passenger. The old kits had a spanner for this, the new ones don’t.
I’m not a big fan of the hammer and screwdriver method of adjusting the preload so off to a local bike dealer I went.
All they had was a preload wrench for a monoshock which was way too large. Ebay was no better. Finally I found myself at Drag Specialties website. They had a very nice looking adjustable spanner on their site.
Although they don’t sell to individuals, they sell to a ton of retail bike dealers, my local Harley dealer being one of them. They had one in stock and it fit perfectly. Preload was adjusted in like 45 seconds with ease.
The best part was the price of 13.00 USD which I considered a real bargain. Remember, turn clockwise to tighten, but be conservative and try it one click at a time. Hopefully, this will help other GT owners that were frustrated with the lack of a factory wrench included with our bikes.”
Editor’s Note: The Drag Specialties “Shock Spanner Wrench” is their part number DS-192282, with a list price of $13.95.
Updated Pit Bull Rear Stand Instructions
July 27, 2007 – Yikes! Who knew? I bought one of the very first Pit Bull SportClassic rear stands, which has been working perfectly, but I’ve been using it wrong all this time! See the updated article.
Windshield and Saddlebag Installation Instructions
July 13, 2007 – See the table at the top of the page; I uploaded .pdf versions of the official Ducati installation instructions for the GT1000 windshield and saddlebags that you can download and print, just in case you lost yours (like I did).
These are scans of the paper documents, so they’re a bit dodgy, but eminently usable.
Here are some Ducati Windshield Installation Tips from “D.J.” (10/10): “GT 1000 Windscreen comes with zero mounting instructions. At least mine did. I found it difficult to view a flying blueprint of the screen installed.
Preventive measures should be taken when removing the handlebars.
- Pad the fuel tank to prevent scrapes or dings.
- Do not over-stress the cables and wiring as I did and wreck the clutch switch, its pretty cheesey. Be prepared to snip a few ties for extra length.
- Lay out hardware to view this must go here and this must go there. Remember the larger bent pieces install to the top of the screen, and the bottom of it attach to the triple clamps and will raise you bars that distance. Longer screws in Kit.
- Dry run fit and relax; so what if your clutch reservoir leaked with the bars laying hard upside down on the tank…
- Tighten up all things that need tightening up with moderation and do not Lock-Tite anything yet. Handlebar mounting stock base will be needed to fit bars and will give a pain if tweaked tight not inline and secure.
Happy Happy and secure all fasteners, and head out. Don’t forget to tighten up the handlebar base mount that you had to realign, cool.”
Luggage Rack Installation
July 12, 2007 – A note from “T.K.”: “Thought I’d say that I installed the luggage rack last night and over all I’m pleased mostly because it’s a pretty beefy unit with good chrome plating.
BUT: the holes don’t line up real well, the new bolts are too short for the front of the rack (and) the washers are too thick.
SO: I used 6x20mm bolts up front with thinner washers: 1.03 mm vs. 2.11mm this let more of the bolt reach the end of the nut.
Since it takes more than two hands I used needle nose vise grips with shrink tape on the teeth to hold the rack in place while starting the bolts. I also used about a two in long bolt to pull the rack up snug than put in the other bolts.”
Here’s more on the GT1000 luggage rack, received on July 23, 2007 from “B.R.”: “Ducati offers one for about $175 very simple install, less than 5 min. Follows curve of rear seat so looks good, but limits carrying something large.
Chrome is so-so, I have rust in a few spots and have not even gotten the bike very wet. Will stabilize a fairly good size duffel on the rear of the seat. Looks good. I note they now offer a rack bag that fits this rack.
Makes a great handle for pushing the bike around.”
More From “E.D.” (4/10): “Saw you were looking for a luggage rack for a GT1000. I have a Sport 1000 and I got a Ventura system… the bag and rack work great together, but the rack works just as well by itself… hope that helps.
BTW, any idea of a heat shield for a Sport 1000? Got a lot of heat on my thigh from the left side of the engine…”
Clutch Fluid Problem
July 11, 2007 – I recently changed the clutch and brake fluid (see April 28 entry below) and just noticed that the clutch fluid is the color of tar. The clutch feels like it only engages at almost the end of the lever travel, so something is up.
I made an appointment to bring the bike in to fix that and also a stalling problem – it stalls if I shut the throttle too quickly when stopping. I’ll report back after the repairs… I may also have them install a 14-tooth front sprocket while it’s in the shop.
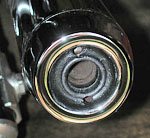
GT1000 Rear Brake Reservoir
June 27, 2007 – GT1000 owners may have noticed that the brake fluid in the rear brake reservoir seems to quickly get dirty. Apparently, the seal on the rear reservoir is the culprit.
Here’s a tip from “T.K.”: Some of the GT owners are replacing the reservoir with a better sealing unit from the Buell S-2. P/N# HO206.8AQ @ $ 9.55. “It mounts pretty much the same as the unit on the GT and has the same look. I have ordered one and will let you know how it works out.”
GT1000 Saddlebag Installation
June 10, 2007 – : I finally got them installed! The Ducati instructions make it seem easy, but I ran into a few problems and apparently I’m not the only one. Here’s the full story with photos.
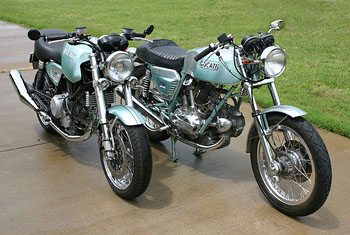
Texas Joe’s Matching Ducatis
June 7, 2007 – : Be sure to read Joe’s great article on his matching 750GT and GT1000! Here’s a taste:
P.S. I finally installed the Ducati bags on my GT1000! However, I ran into some problems with the bag mounts… I have many photos ready to go, so all I have to do is write it up, hopefully this weekend.
But here’s a tip: based on my experience, if you can get somebody to install these for you for, say, 100 bucks or less, do it!
I’m not sure if I’m the only one who ran into problems, but if GT1000 owners are going through what I had to go through to get them installed, it’s worth paying a shop to do it instead! Here’s the full story with photos
GT1000 Shop Manual
May 31, 2007 – In case you didn’t catch it on the Fuel Line Recall Fix page, here’s a source for what’s claimed to be the official Ducati GT1000 shop manual. I haven’t checked this out but if anyone has, please let me know.
wBW visitor “P.E.” sent us a note regarding a GT1000 shop manual “I searched the official Ducati site and did not find it. But luckily I found it at the site of a very ambitious Ducati seller in Germany.
It contains 150MB of data, a shop manual and a spare part catalogue. The content is presented in several languages: Italiano, English, Deutsch, Francais, Espanol, Portuguese, USA, Japan. But the charge is enormous: 51,20 €.”)
Also, here’s a note from “M.D.”: “I wanted to tell you that this web site has shop manuals for 2,50 Euros. That’s around $3.35 in US dollars. I just bought one and in about 10 minutes I had a link to download it. It’s pretty big, otherwise I’d just email it to you.
Staintune Mufflers
May 29, 2007 – I’ve been really slacking off lately in the GT1000 department because I have way too many other projects going on!
I hope to finally get to the saddlebags this week, but there’s probably not much more I can add other than some good photos (I hope) of the installation procedure. Many other GT owners have already posted good information on how to install the Ducati saddlebags.
In the meantime, here’s a note from “G.C.E” on his Staintune reverse-cone mufflers for the GT1000:
“I have been looking for a new set of mufflers for my Ducati GT 1000 for about four months. The stock ones were disappointing even after I punched a few holes in the bafflers. The intake was louder than the exhaust. I looked at the Termi’s but the price and being the only mufflers I could find for my bike made me hesitate.
I found the Staintunes on the ‘net and being $400 cheaper and sweeter-looking made me take the plunge. I’ve always had a weakness for reverse cone megaphones.
Although they were made in Australia they were available through my local bike shop (no worries mate) and they even gave me a discount. All stainless and the finish was excellent. I was still worried that they might not have the sound I wanted.
Installing them took about an hour (half of that looking for the right Allen wrench). Fit was great and the sound made me feel young again for about five minutes but what the hell.
Just idling was a pleasure to hear. Not raspy or irritating, very mellow.
There are no restrictions in these muffles and they are set up to work with the original chip. A 5.3 hp gain at the rear wheel they claim and I felt it right away.
It makes the bike less balky and smoothes things out. I don’t think many people will be disappointed with these mufflers.”
GT1000 Handlebar Risers
May 9, 2007 – CJ from Switzerland writes: “I have a 2007 GT1000 that I bought a few weeks ago. Great bike but I also wanted a more upright seating position so I ordered handlebar risers from GenMar Manufacturing in Arrey, New Mexico for delivered price of US $82.00.
Today I went to install them and noted that the front brake line is too short to permit installation. When I go to the dealer for a 1,000 km check up I will find out how much a longer brake line costs but this is more work than I expected so just wanted to let your readers know.
Editor’s Note: CJ also told us that the GT1000 handlebar risers are not currently listed on the GenMar website but they do have them in stock; they are 40mm risers with a finish that matches the bike’s stock finish.
Bleeding the Brakes and Hydraulic Clutch
April 28, 2007 – The GT1000’s brake fluid looked like coffee, so it was time for a flush ‘n’ fill. We wrote about motorcycle brake bleeding a long time ago, so we broke out the old Actron vacuum pump and had a go to see if the same technique would work on the Ducati.
Read how in this webBikeWorld technical article. This is not a difficult job if you have the right tools and it can save you a lot of $$, both for the service call and to prevent having to purchase a new master cylinder if it gets corroded. And believe me, it doesn’t take much to end up with a corroded master cylinder!
Other WebBikeWorld Motorcycle Brands Posts