GT100 Fuel Filter Fix
The Ducati GT1000 was recalled for a loose fuel line hose clamp. Here’s how to do it yourself.
Like many other GT1000 owners, I received the official recall notice from Ducati last week.
But also like many other Ducati owners, the closest “local” dealer is 30-odd miles away. I’m lucky actually; 30 miles is nothing compared to the distance that some Ducati owners have to travel.
The warm weather is finally arriving and I didn’t want to park the bike for the few weeks it would take to get a service appointment, so I decided to do it myself and report back.
My sweat = your equity!
The bottom line? First, this is not a very difficult job and second, I’m happy to report that the fuel lines on my bike are nice and tight and I do not foresee any problems.
Let me say right up front that I had no idea how to tackle this job, and I still don’t have a GT1000 shop manual (anyone know when it will be published?), so there may be an easier way to tackle this project.
But I’m bold when it comes to the unknown and I relish the challenge, so I just ripped into it, improvising along the way.
My wife thinks I’m nuts, but this is what I call fun! Like when I brought home a BMW K75 and immediately proceeded to disassemble the entire bike on the garage floor before I even took it for a ride…
By the way, you’ll need to use this same procedure to replace the GT1000 fuel filter, which is located on the fuel pump assembly inside the tank, so consider this a two-for-one!
But first, a warning: This is an extremely dangerous project because it involves the fuel tank, gasoline, spilled gasoline and gasoline vapors.
Proceed at your own risk and note that although the following procedure worked for me, it may not work for you and, in fact, it is dangerous and risky! Use extreme caution.
The official Ducati fuel line recall notice states, in part:
“On certain motorcycles, the fasteners from the fuel line to the fuel filler were not tightened properly. The fuel pump hose inside the fuel tank may separate from the fuel filter. This condition will stop the engine from running.”
I don’t know what they mean by the “fuel line to the fuel filler”; I think it is a mis-spelling, and it should read “from the fuel line to the fuel filter”.
The cure is that “dealers will replace the fuel pump to fuel filter hose and fasteners to prevent the engine from stopping.” OK, so that’s all I had to go on. Something inside the tank needed a fix.
GT1000 Fuel Line Hose Clamp Fix
First thing I did was to open up the fuel filler on top of the tank to see if I could look inside to gather further intelligence.
I even dreamed that maybe I could simply reach my hand in there and see if the lines were loose. Fat chance!
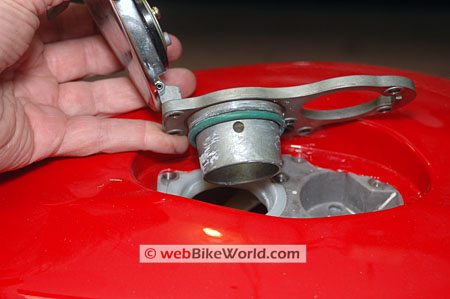
There are six 3mm round-head Allen screws that hold the fuel filler assembly and I removed these and pulled off the fuel filler cap.
Nothing much to see under there (see photo below), so this was a dead end, but I figured I’d post a photo anyway, seeing as how much of the GT1000’s inner workings are still a mystery because there’s no shop manual.
One thing I noted was the bunged-up blue/green O-ring seen in the photo below; it had some pieces hanging off it and I trimmed these off before they came loose and dropped down into the tank.
By the way, note that the screws that hold the fuel filler assembly to the tank do not take much torque and they bottom out, so if you remove the fuel filler cap assembly, be gentle. Here’s the photo:
OK, so the tank had to come off. I briefly covered this before on my first GT1000 blog page, but to recap, the only thing that holds the tank on the bike is a single 5mm bolt under the seat.
When you’re removing this, be careful not to lose the metal washer, the metal spacer and the two rubber grommets.
The washer got stuck to the bottom of my magnetic parts pan and I spent about an hour looking for it when I went to re-assemble everything last night!
If the washer is missing when the bolt, spacer and grommets are re-installed, the tank can’t be tightened to the frame and the front of the tank will remain loose.
Note also that there are two rubber bumpers under the front of the tank on each side that hold the tank in place, so make sure these stay in place and that the tank sits correctly in the guides when you’re reinstalling it.
I puzzled for quite a while on how to best remove the tank without spilling a ton of fuel.
I used a Griot’s Garage hand pump (review coming one of these days) to pump out most of the fuel, but a cup or so of fuel will remain down in the lower section of the tank that continues down under the front of the seat.
The fuel in this section acts as a kind of buffer to feed the fuel pump to help prevent starvation.
It’s almost impossible to get the fuel out of this lower section without spilling some, as I discovered, so the bike should be parked outdoors for this project so you don’t spill any fuel in the garage, which is both dangerous and odiferous.
Actually, I first thought I might be able to remove the fuel filter assembly without removing the tank. I tried lifting the tank up and putting a board underneath to hold it up as far as possible off the frame.
I then started to remove the fuel pump screws on the bottom of the tank, but the fuel started pouring out, so this is not a solution.
This means that the tank would have to be completely removed.
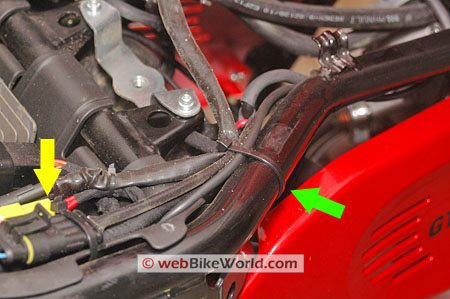
I clipped the cable tie that holds the fuel pump wire harness to the right side of the frame and then unplugged the harness from the connector.
Here’s a photo: the green arrow points to the cable tie that must be removed and the yellow arrow points to the fuel pump wire harness connector that is also easily removed.
Sorry about the out-of-focus on the connector but you get the idea.
The cable tie must be clipped and the connector disconnected to completely remove the tank from the bike.
The overflow line and a breather hose are located up in the middle of the tank, under the fuel filler, and these must be removed. The overflow is a simple friction fit on the nipple; slowly and gently pull it off, rocking a bit back and forth.
Remember that this fuel tank is non-metallic, so all the metal parts like the nipples and female screw inserts are fragile and they need gentle care so they don’t dislodge from the tank.
The breather is attached to a nipple with a clamp, so you’ll need a pair of pliers to squeeze the spring to release the pressure. Slide the clamp down on the hose and slowly and gently remove the hose from the nipple.
Once the breather and overflow are removed, the only other lines that must be removed are the fuel lines that are located underneath the rear of the tank, attached to the fuel pump.
But before you do this, you’ll need to have your friend pick up the tank and hold it off to one side, tilting it as far as possible.
If as much fuel as possible was pumped out, nothing should drip from the fuel filler cap, but this entire job should really be done outdoors, just in case.
I piled up a wad of paper towels over a folded newspaper and placed it under the rear of the tank to absorb any spills and then I disconnected the fuel lines.
These can be removed by pinching the round plastic loop that holds them on to the large nipples coming out the bottom of the fuel pump. They’re pretty easy to remove, I discovered — almost too easy, which is puzzling.
They make a quiet “snap” when they’re replaced, but it sure seems like they should fit tighter than they do.
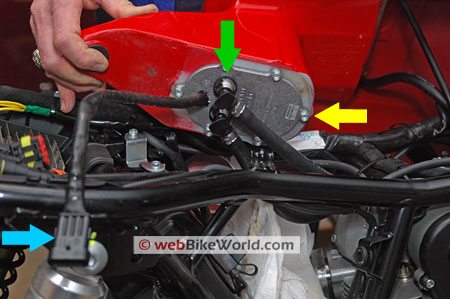
This photo shows the bottom of the tank, flipped over to the left-hand side of the bike. The photo was taken from the right-hand side. The green arrow points to the nipples that hold the two fuel lines.
The yellow arrow points to the bottom of the fuel pump assembly and one of the six Allen screws that attach it to the tank. The blue arrow points to the fuel pump wire harness connector, again out of focus!
Note the breather and overflow hoses in the upper right-hand corner of the photo, still attached to the underside of the tank.
The fuel in the lower part of the tank will come pouring out but it wasn’t as bad as I thought. If the tank is tilted over far enough and most of the fuel is drained, there should only be about half a cup or so.
Once the fuel lines are removed, the tank is completely loose from the bike. We placed the tank in a big old plastic pan and stood it upright with the rear of the tank pointing up and the front down.
This forces all the fuel up to the front of the tank so it won’t pour out the bottom when the fuel pump is removed.
After that, it’s a simple matter of removing the six round-head Allen screws that hold the fuel pump assembly into the bottom of the tank.
Slowly and carefully pull out the fuel pump — it has a couple of plastic filter screens located at the bottom, so be careful.
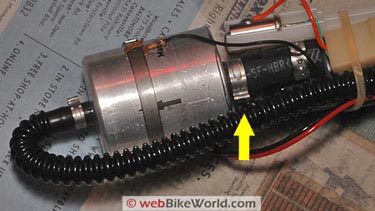
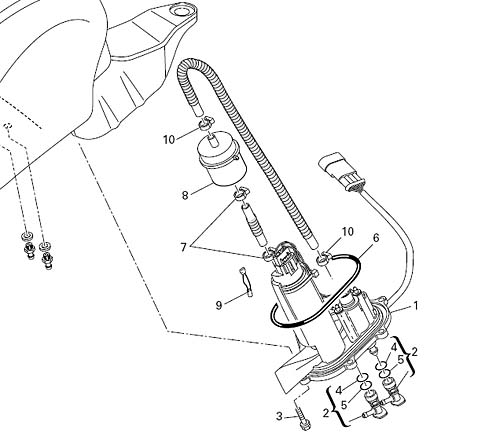
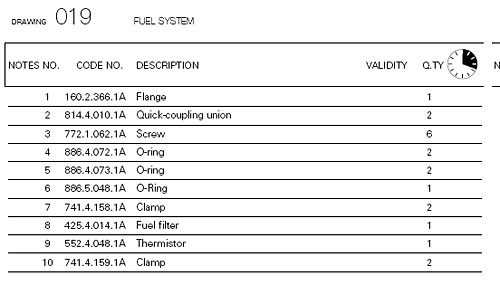
I laid the fuel pump assembly on a piece of newspaper to inspect it. For reference, see the black and white line drawing illustration at the bottom of this page, showing the fuel pump and the parts.
Note that there are four hose clamps on the pump, illustrated in this photo by the yellow arrows:

Here’s a close-up of the fuel filter and the hose clamps that I believe are what is referred to in the recall notice:
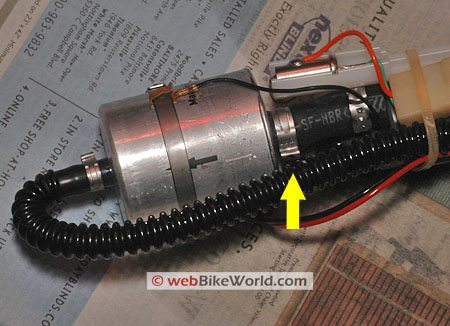
The hose clamps seemed nice and tight on this fuel pump, but I did take a pair of end-cutter pliers and gently crimped the clamp just to the right of the fuel filter (yellow arrow in the photo above).
That was the only clamp that seemed even remotely loose. The others seem fine and I do not anticipate any problems with them coming loose.
ADDENDUM: If the hoses were loose (i.e., if I could have easily pulled the hoses out from the clamps), I would have replaced the factory clamps with stainless steel hose clamps, probably the threaded type that tighten with a screwdriver.
The factory clamps seen in these photos can be tightened with either the hose clamp pliers that are designed for this type or with a pair of end cutters that are small enough to fit.
UPDATE: wBW visitor “G.R.” sent this note: “Just read the article on the GT blog about doing the fuel line recall fix.
My dealership re-crimped the hose clamps when they prepped my bike because they knew about the problem, but it was before DNA had started sending out the recall kits.
The problem is that the original clamps themselves just aren’t robust enough, and even though mine had been checked/tightened, the hose fell off last weekend after 2400 miles and left me stranded.
I was finishing a 780+ mile trip through the mountains and the failure happened just as I got back into town at the first stoplight. Some serious luck there!
So I would strongly recommend that if anyone is going to go through the trouble of attempting this fix themselves, they should absolutely replace the clamps even if they seem snug, and never re-crimp or tighten an old one.
Unless of course, you fancy a ride in a big shiny tow truck…”
Once you’re satisfied everything is OK, carefully insert the fuel pump assembly, but be careful to make sure the plastic filter screens aren’t pinched or damaged as you re-insert the assembly.
Also, note that without a shop manual, I don’t know the torque values for the fuel pump assembly screws, but I discovered as I started removing them that they do not need much torque at all.
I used our ±1% accuracy Precision Instruments 0-300 in. lbs. torque wrench to tighten one and discovered that it only used 24 inch-pounds of torque (2 ft. lbs.). So be very careful, as 2 ft. lbs. is just barely hand tight.
Other than that, it’s easy to re-assemble everything and you’re back in business. The hardest part of this job by far is draining the fuel without spilling it; after that, it’s a piece of cake!
Have a comment or tip regarding the fuel line recall fix or changing the fuel filter on a Ducati GT1000 or other SportClassic? Send it to me at editor@webbikeworld.com
If you have comments, more info or tips, please send it to me at editor@webbikeworld.com
Publication Date: March 2007
Master Listing of All wBW Motorcycle Product Reviews
Owner Comments and Feedback
See details on submitting comments.
From “J.M.” (August 2015): “Thanks for posting this! My ’07 Sport 1000 has encountered this annoying issue twice; once while it was within pushing distance from home, and the other, well…much further.
The first time it happened, I had it fixed by my dealer under warranty (this was before the recall was published). I just finished fixing it for the second time myself.
I noticed that the dealer was nice enough to replace the stock hose clamp with a screw-type one, but he didn’t tighten it down much. At least it was an easy fix.”
Editor’s Note: Apparently the fuel line clamp problem hasn’t been fixed on new GT1000’s. We received the following email on June 1, 2007:
From “M.A.” (May 2012): “I just repaired the fuel pump to fuel filter clamp problem. I was left stranded on a country road on a fine sunny day. I got the bike home and began to troubleshoot. Everything pointed to a fuel delivery problem.
After a few blog searches I found your article and bingo. My Duck is a 2006 Sport 1000. I removed the tank and pulled the fuel pump from underneath and the filter was just dangling by one of the hoses.
The faulty clamps are #7 in the diagram in your article. I replaced them with screw type clamps and all is well now.”
From “M.D.”: “I really found your web site useful. Especially since my 2 week old Sport Classic 1000 stopped running on the highway yesterday and left me stranded.
I finally got home and learned about the recall from your web site. Today I removed the pump and it was in two pieces. The filter had completely slipped off of the hose.
The clamps were not tight at all. I did replace them both with (stainless steel) hose clamps. The bike started right up again and is fine. I just wish the dealer would have told me about the recall.”
Other WebBikeWorld Articles Posts