
Mounting a motorcycle headlight modulator is an easy procedure that may help increase the visibility of your motorcycle to oncoming traffic.
Motorcycle headlight modulators rapidly flash the motorcycle’s headlight at 240 (plus or minus 40) cycles per minute.
This is designed to attract the attention of oncoming drivers.
Headlight modulators for motorcycles are completely legal in all 50 states 1.
NOTE: Motorcycle headlight modulators are now legal in Canada.
Motorcycle headlight modulators are designed to increase the visibility of the motorcycle in the most critical area, the left front, to help grab the attention of oncoming traffic.
The Hurt study 2 found that “the failure of motorists to detect and recognize motorcycles in traffic is the predominating cause of motorcycle accidents”.
The study also found that:
- Intersections are the most likely place for accidents;
- That the view of the motorcycle in the accident is limited;
- That conspicuity of the motorcycle is a critical factor, and accident involvement is significantly reduced by the use of motorcycle headlamps (on in daylight) and the wearing of high visibility yellow, orange or bright red jackets; that conspicuity of the motorcycle is most critical for the frontal surfaces of the motorcycle and rider
Headlight modulators are designed to help address these critical factors.
NOTE: See note below for an alternate installation procedure if your motorcycle has a plastic chromed headlight bucket.
Types of Modulators
Headlight modulators are made by several manufacturers. Some modulate the low beam, some modulate the high beam. Some models let you choose which beam to modulate.
The federal law cited above has other specifications and limitations on how they work.
For example, all modulators must have an automatic system that stops the modulation at night, but still allows the headlight to function normally.
Fortunately, you don’t have to worry about how it works, as the modern miracle of microelectronics comes through again and makes it happen!
After careful study (see the abbreviated listing of web sites of modulator manufacturers below), I chose the Kisan P-115W-S modulator for my 1994 K75 standard.
The reason I chose this model is that the standard K75 leaves very little room within the headlight cowling behind the H4 headlight to mount any other type of modulator.
Most, if not all, modulators plug in to the motorcycle’s headlight in place of the 3-prong plug.
Some modulators need room for a small circuit board assembly somewhere near the headlight, and some are large units made for bikes with a lot of room behind the headlight.
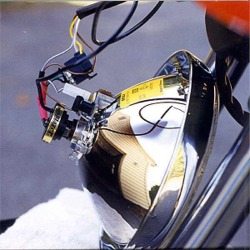
The Kisan P-115W-S is an extremely small unit, measuring only 40 mm wide and 15 mm thick.
It plugs directly into the headlight, and it has a separate 3-prong plug attached to a wire cable about 2 inches long that comes off the side of the unit to insert the original headlight wiring from the bike itself.
This gives enough room inside the headlight cowling for everything necessary. I had no problem at all in fitting the P-115W-S to the standard K75.
Tools Needed
#2 Phillips head screwdriver; Hammer, preferably a ball peen machinist’s hammer.
¼” diameter round metal file and emery cloth, approximately 100 grit.
A couple of drops of oil, 30 weight or motor oil will do.
Electric or battery powered hand drill with drill bits: 1/8″, 1/4″, 5/16″, and 25/64″ (or 10 mm).
A center punch. Two six inch or twelve inch scales (rulers). Safety glasses or goggles. Optional: black silicone sealant.
Note the small size of the Kisan P115W-S modulator (arrow), and the separate 3-prong plug (attached to red shrink wrap).
Another reason why I chose the Kisan is that it modulates the high beam.
The high beam has a wider pattern than the low beam, and the high beam throws more light to the left than the low beam.
This maximizes the effect of the modulated headlight to oncoming traffic, which in the U.S. is on the left side of the motorcycle.
In order to be polite, you can switch to low beam when you’re stopped in back of a car at a stoplight, so that the flashing high beam isn’t too annoying to other drivers.
Installing the Modulator
The headlight on the K75 is held on, believe it or not, by one Phillips head screw on the bottom of the chrome bezel that surrounds the headlight.
Loosen the screw until the bezel is loose. The screw will not come all the way out, but be careful that the headlight itself doesn’t come tumbling out of the cowling.
After the screw is loose, you should be able to gently remove the headlight from the cowling.
Carefully pull off the 3-prong plug from the back of the headlight. You may have to rock it back and forth a bit, or even pry it out using a flat-bladed screwdriver, but be careful not to bend or break one of the studs.
They are meant to be tight in order to ensure contact without vibrating off.
There’s another little light bulb (the parking light) and a ground terminal (brown wire) on the headlight.
Gently pull the small light bulb out, and carefully pull the brown ground spade connector off the terminal also and set the complete headlight assembly aside.
You may want to cover the headlight with something so that no dirt gets into the hole where the parking lamp was.
Wrap the cable and plugs that come from the bike inside the headlight shell in a towel or plastic bag to protect them during the next step.
Day and Night Modulation Control
Now comes the scary part. In order to comply with regulations to prevent modulating at night, every modulator must have a device that prevents it from modulating when it gets dark, while still allowing the headlight to operate normally.
The Kisan modulator assembly has a light sensor attached to about an 18″ long wire.
This sensor must be mounted through the headlight cowling and pointing up.
To do this, you must drill a 10mm (or 25/64″) hole in the top of the cowling!
Don’t worry, it’s easier than you think! You need to get over the mental block of drilling into your precious baby, but I justified it by thinking if I messed up, I would simply plug the hole with a black rubber flush mount plug, and no one would notice.
Drilling holes in thin walled sheet metal is a bit tricky, as the drill has a tendency to grab the metal and stall.
As an ex-machinist, I know there is a way to sharpen a drill to help prevent this from happening, but it’s really not necessary for what you need to do.
To help things along, you’ll drill a series of pilot holes leading up to the big kahuna, the 25/64 incher.
Do not try to drill a large hole in sheet metal without first drilling a series of pilot holes!! Use a very small drill and work your way up. Be patient!
The hole for the sensor should be dead center on top (12 o’clock position when standing in front of the bike looking at the headlight) of the headlight cowling.
The sensor must be located in a way that will prevent oncoming headlights at night from allowing it to activate the modulator, so the best way to mount it is pointing straight up at the sky on top of the headlight cowling.
You’ll need to locate the hole fore-and-aft along the centerline of the bike, and side-to-side (or port-to-starboard!) in the middle of the top of the headlight cowling.
To locate the position for the hole, I measured back 35 mm from the front edge of the headlight cowling, which locates the hole about in the middle of the space from the front of the headlight to the beginning of the instrument module.
Finding the exact center side-to-side is a bit trickier.
You can eyeball it and get pretty close, or I found that you can locate the center by using your two scales.
Use one scale to measure up from the Allen headed screw on one side of the cowling (they are located at the 3 o’clock and 9 o’clock positions) and then over to find the center.
Repeat this from the other side until you find the spot where the distance is the same.
This should be the center. It turned out that on my bike the center was located 115 mm from each screw.
Now you’re ready to start drilling.
First, put on your safety glasses or goggles. You must wear eye protection to do this.
To start the hole, you must use a center punch to create an indentation to help locate the drill bit, otherwise you will not be able to get the drill to start without wandering.
Don’t use too much force, as the headlight cowling is just thin aluminum and you may put a bigger dent than you bargained for.
Don’t ask me why I know this! If this does happen, you can gently tap the headlight cowling from inside to straighten it out a bit.
You can’t simply drill a 25/64″ hole first thing.
You must drill a pilot hole first to guide the bigger diameter drill. I drilled a series of holes using progressively bigger diameter drills.
Start with the 1/8″ bit.
After you have that hole drilled, put a drop or two of oil around the hole to help lubricate the next.
Drill the ¼” hole, then the 5/16″, then the drill the final hole using the 25/64″. This one may want to grab the edges of the hole, so be careful.
If it gets jammed, simply reverse the drill and let it back itself out.
You may find that if you start the drill before touching the metal it may go smoother.
After drilling, the hole will have a burr. You must remove the burr using the round file and the emery cloth.
Now the hard part is over.
Here’s where my experiences in installing the modulator hopefully can help you prevent the mistake I made.
The instructions that come with the Kisan modulator are not very clear on how to actually mount the sensor in the hole.
I even called Kisan to ask about this, and they were very helpful, but I realized later that I still didn’t understand the procedure.
The Kisan modulator comes with a small black grommet to mount the sensor in the hole.
The grommet slides around the cable that holds the sensor, then fits up tight against the sensor head itself and pops into the drilled hole.
The grommet is designed to keep the sensor tight and waterproof.
Here’s how to do it right: first pull the sensor itself up through the hole.
THEN put the grommet around the sensor cable (it has a vertical slit to allow you to do this).
Locate the grommet up around the threaded part of the sensor, and then push the sensor and the grommet unit down into the hole.
This may seem obvious, but it wasn’t to me, and the directions weren’t clear to me either.
Anyway, it should snap in and it will be a pretty tight fit.
I had to file my hole a bit to get it to fit, and I over did it, so the fit was a tiny bit loose.
I put a dab of black silicone sealant around the inside of the hole to make sure it stays waterproof. You may want to do this anyway, just as extra insurance against leakage.
Now we’re getting close. Plug the Kisan modulator into the back of the headlight.
Caution: only push the modulator on until it stops, don’t try to force it any more after that!
Replace the small light bulb and the ground terminal. Attach the original headlight 3-prong connector that comes from the bike into the 3-prong receptacle on the little extension cord that comes out of the side of the modulator.
Replace the headlight assembly and attach it by tightening the screw in the bottom of the bezel. It’s easy to over tighten this, so be careful or you’ll strip the threads.
Congratulations, you’re all done! Start the bike and turn on the high beam, and after about a second the headlight will start to modulate. Life is good!
Also to Note…
One thing to remember, you need to be in enough light so that the sensor doesn’t prevent the headlight from modulating.
If you flick on the high beams and the headlight doesn’t modulate, you may not have enough light in your garage or wherever you’re working.
The sensor seems pretty sensitive, so even though I had an overhead bulb on in my garage at night while I was working, it didn’t come on until I turned on another light.
Try waving your hand above the sensor to see how it turns the modulator on and off.
UPDATE: wBW Visitor “D.H” installed a Kisan headlight modulator on a Honda VTX 1300C.
This bike has a plastic chromed headlight bucket, which makes for a tricky installation of the ambient light detector. If you have this type of headlight, you may need to use this procedure. D.H. writes:
“Hi Rick…
I just now successfully installed a Kisan P115W in a 2004 Honda VTX-1300 C, and….. I suspect, that this new twist may be more common than to just this one bike.
Since the change over from thin steel and chrome parts to plastic & chrome, the install scenario changes somewhat.
None of the supplied mounting information, and the split bushing will help. The headlight assembly on the Honda is made of thick plastic, and chromed.
The thickness is just short of 1/4 inch at the nominal top location on the headlight body. The supplied “split bushing” will not lock in place, as it was made for thin wall metal.
So, with a very slight modification to the non-optical end of the Day Light sensor cable, the whole unit will fit very nicely in a 5/16″ (no larger) diamete hole.
I recommend placing a piece of tape, or adhesive strip similar to a Band-Aid on the area that you plan to drill the hole. This is to keep the chrome film from tearing, while the drilling occurs.
Of course, care must be also used when removing the tape, so as not to pull off the chrome film in the process.
Tape in place, now drill the hole per your own recommendations….. starting smaller, and working up (no oil needed)….. but NO LARGER than 5/16″ diameter.
Carefully deburr, and remove tape slowly. Clean hole and surrounding area of debris, both top, and inside the headlight housing.
Now for the modification: (this part needs to be modified, as the plug end, in it’s present configuration, will not fit through a 5/16″ diameter hole.)
The Sensor Plug, at the other end of the Optical (sun sensor) cable has a “small depress tab”, which allows the plug to be locked in place into the Polarized Sensor socket of the PathBlazer (this is the unit that has the “T” plate that can become very hot, per comments by manufacturer).
Just above, and to the left, and right of that “small depress tab”, are two small plastic molded stops, which would prevent the “small depress tab” from being lifted up too far.
In the actual operation of this assembly, there is no reason why you would ever want to ‘LIFT” that “small depress tab”, so these are, for all practical purposes, not required. Using your thumbnail, pull each of the two plastic stops off/they break off quite easily.
Now the rest is quite easy. Just slide the entire cable into the hole, starting from the top outside of the headlight housing, plug end first.
Stretch some Mylar tape, or similar material on top of the sensor (to hold it in place), and pot, with a silicone glue, or similar material, the area around the protruding brass colored collar from the inside of the housing.
I would recommend letting this assembly dry completely, before progressing to the final install process, per the instructions included with the product.
The beauty of this assembly is…. that it’s completely waterproof, and quite stable, as the housing has a fair amount of thickness.
This note was prompted by the mere thought of other folks drilling the suggested diameter hole into their beloved bikes….. only to find out, too late, that the supplied parts won’t work. Ugh!! ”
Thanks for the tip, D.H.!
References
1. “Motorcycle Accident Cause Factors and Identification of Countermeasures“, Volume I: Technical Report, Hurt, H.H., Ouellet, J.V. and Thom, D.R., Traffic Safety Center, University of Southern California, Los Angeles.
2. U.S. Department of Transportation, National Highway Traffic Safety Administration. Federal Motor Vehicle Safety Standards 49 CFR Part 571, Docket No. 97-87; Notice 1. Executive Order 12866 (Federal Register: February 21, 1996, Volume 61, No. 35).
Here is a one-page copy you can take with you on your bike in case you get stopped by an uninformed LEO.
Publication Date: 2004 (?)
Some Sources for Headlight Modulators
More wBW Motorcycle Headlight Modulator Reviews
Owner Comments and Feedback
See details on submitting comments.
From “B.L.” (May 2015): “I’ve been using a headlight modulator on my motorcycles since 2006 (currently 2015, so nine years at this point).
I’ve had numerous experiences, each year, where cars started to pull out in front of me, on the bike, then they suddenly stop, and look at me with an inquisitive look on their face.
This has happened numerous times, on three very different motorcycles (1979 Honda CB750, 1983 Kawasaki 440LTD, and a 1993 Kawasaki Voyager XII touring bike).
With regards to the placebo effect, I would say that any rider who is conscientious enough to install a headlight modulator, is already a cautious rider, who aggressively looks around for danger at every moment he/she is riding.
I agree that using the high beam for the modulator is annoying to other drivers, which is why I always use the low beam.
The justification for using the high beam, is that the high beam is aimed higher, and thus it is more likely to attract the attention of oncoming drivers — I feel it is more in their eyes, and that it poses a danger to all around as it could affect their vision of the scene.
The modulating headlight is highly visible, even on the low beam, in my personal experience.
I would suggest you go back to your own article, and re-read the part about the Hurt Study’s comments on conspicuity. This is more than enough justification, in my mind, to use a modulator.
Combine that with my personal experiences of the past nine years, and I am convinced of its positive impact on my personal safety.
Of course this is purely my opinion, based solely on anecdotal experience. For me, that is more than enough.
In the interest of full disclosure, I also wear a florescent yellow, armored riding jacket, and full gear; I also equip every bike with a brake modulator, in addition to the headlight modulator.
I am safety conscious, and I do everything I can to improve my chances of surviving riding motorcycle.
By the way, my bride and I are tour riders; we almost never go for a ride of less than two hours each ride.
We take a lot of weekend day trips, lasting 8+ hours, and we take at least one 7-10 day trip, each year, so we are not casual riders.
All anecdotal, but it is enough for us. YMMV.”
From “J.A.” (March 2015): “I have no financial interest in modulators. I have real world experience.
I had years of riding with ordinary headlights. Oncoming cars failing to see me was a common affair and a daily occurrence when I was in Washington, DC.
The motorcycle couriers there all had modulators installed on their yellow BMW’s. A courier supervisor told me that after they installed the modulators the oncoming “failure to see” incidents and accidents decreased to “virtually nothing.”
I installed the mod on my Suzuki 750. In several years after that, I never had a “failure to see” incident. I did about 15,000+ miles in Washington, DC and later Los Angeles.
At night I did not use the modulator except as an occasional “visual horn.”
The real world experience of countless couriers and my own experience convince me that the device is a life saver. It is well proven and an incredible effective investment in safety. I hope that you will encourage their use.”
Editor’s Reply: Since the time this article was published (around 2001) I have mixed feelings about modulators.
I no longer use them and certainly never use a high beam during the daytime, which I think both annoys oncoming traffic and makes the motorcycle’s turn signals less visible to oncoming traffic.
I’m not convinced that the rider on a modulator-equipped bike isn’t having some sort of placebo effect, where they unconsciously ride more carefully and/or are more aware of looking out for other vehicles.
Also, there’s no way to know whether the “failure to see” incidents would have been the same or more or less with or without a modulator. I wish there were more objective studies done on this.