A motorcycle’s front brake provides the vast majority of stopping force. In the past, motorcyclists avoided using using the front brake, fearing that they would be thrown over the handlebars.
This is now laughable, considering the awful brakes and conservative geometries that were available until recently. In fact, many motorcycles didn’t even have front brakes back then.
It’s interesting to note that some motorcyclists are still afraid to use the front brake. I’m sure this doesn’t include any webBikeWorld visitors, who are known for their motorcycle savvy. But it is a good idea to practice emergency stops, using all the braking force your bike can muster.
Modern motorcycles have incredibly powerful braking systems, and they seem to be getting better all the time. Radially mounted front calipers have recently become de rigueur on sport bikes; just a few years ago, these could only be found on exotic racing bikes.
Combined with sticky radial tires, motorcycle braking distances are getting shorter and more controllable, and in some instances they are approaching the short stopping distances of the best sports cars (120′ or less from 60-0 mph).
Motorcycle brake technology has evolved so rapidly that even bikes just a few years old can benefit from a brake upgrade. And any motorcycle built before 1990 could certainly benefit from a front brake upgrade, especially if the bike only has a single front disk brake.
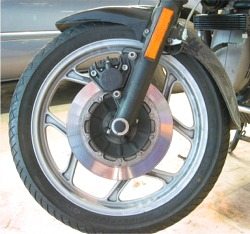
Our test mule for this project, a 1986 BMW R65, is typical of motorcycles from the 1980’s, with a drum rear and single disk front brake. The rear drum brake on this bike is, for all practical purposes, useless, with very limited braking power. Also, the brake shoe presses against the alloy hub of the rear wheel to stop the bike. If (when) the hub becomes worn, it’s not possible to fit a new liner and the entire wheel must be replaced.
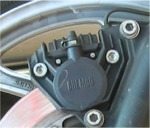
The R65’s front brake system consists of the typical solid front disk rotor and a caliper manufactured by Brembo. This caliper is found on many European and Japanese motorcycles of the 1980’s. It has a single pad and piston on each side of the disk, and it weighs 1164 grams (2 lbs., 9 oz.). It is a lackluster performer, with very long stopping distances, especially noticeable when hauling the bike down from speed.
The weak braking performance is unfortunate, because the bike is a sterling handler, and the (relatively) grippy Bridgestone BT45 tires (110/80-18 front, 120/90-18 rear) definitely have the potential of offering more stopping power than the original front brake can provide.
Unfortunately, there aren’t many choices when it comes to a front brake upgrade on many motorcycles of this vintage. BMW has always listed a second front disk assembly as an option for the R65 and R80, and the forks on both of these motorcycles are pre-drilled for easy installation.
But the downside is that a second disk would add considerable weight to the front end, which could potentially change the bike’s great handling capabilities. Installing a second disk rotor and caliper is also an expensive proposition, at roughly $230.00 for the rotor and another several hundred for the front caliper. Add in the new front brake line, a brake line balancer to feed the dual disks and a new master cylinder and the total bill would be around $1,000.00. Although it’s hard to put a price on improved braking ability, this was a bit much.
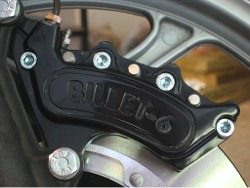
Another option is the Harrison Billet “Mini-6” caliper. Harrison has been making calipers in England since 1989 that are used on race bikes, street bikes and even show bikes. The calipers are all manufactured on site using Harrison’s CNC machining equipment, and the designs have been refined through years of testing and feedback from customers.
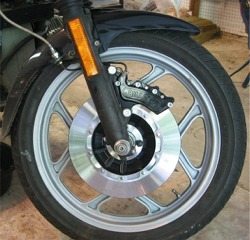
On looks alone, the Mini-6 has the Brembo beat by a mile. This trick-looking unit is machined from 6082-T6 aluminum, and at only 891 grams (1 lb., 15-3/8 oz.), it’s about 30% lighter than the stock Brembo (1164 grams, 2 lbs., 9 oz.). The light weight gives the bike noticeably quicker steering. But the best part is the stopping power that the Mini-6 provides, which will be described later. The Mini-6 is so called because it uses six small brake pads, each backed by its own piston, to provide lots of swept area for increased braking performance.
Although Harrison does not list a fitment for the 1986-87 R65 (or R80), they do have a listing for the R80GS of the same vintage. Since the R65 and R80 front forks are identical to the R80GS, it only seemed logical that the Mini-6 would fit.
These forks, by the way, are the more modern style which were also used on the early BMW “K” bikes of that era. Although Harrison was unsure about the fitment on the R65, we ordered a caliper with the disconcerting agreement that it couldn’t be returned if it didn’t fit.
When the caliper arrived, we opened the package to find a beautifully black anodized work of art. We simply had to find a way to get this
beauty fitted to the bike, anticipating the reaction we’d get from the crowd down at the local hangout (not to mention the increased stopping power!). The only problem? We ordered a left-hand caliper, figuring on simply replacing the bike’s stock caliper, but the unit that was sent was for a right-hand fitment.
Since the bike was set up to accept the optional second disk brake kit from BMW, we looked things over and decided that it would be relatively easy to swap the front brake rotor over to the other side. Harrison apologized for the mix-up and sent us a spare set of brake pads for our trouble, so no harm done.
Swapping the rotor is a relatively simple matter of unbolting it from the left and bolting it to the right side of the wheel. Although the rotor was in pretty good shape, we decided we may as well replace it with a brand new unit, which added another $230.00 to the cost.
The bike had a stainless steel brake line fitted at some point in its life. This is recommended to get the most out of a high-performance (or any) brake, and that may be another expense to consider. Mounting the Harrison caliper involved a few tricks and required some inventiveness on our part. Although the project was spread out over several days, it’s actually a simple job that can be finished in a couple of hours once you know the secrets.
The first problem that we ran into was that our caliper did not arrive with installation instructions. There were 6 washers attached to the caliper with a cable tie and a sticker covering one of the threaded holes that read “M10x1.0” and that was it.
We understood that to mean that two M10x1.0 bolts would be required to mount
the caliper to the bike, and we’d have to make our best guess as to how long the bolts should be. It’s a mystery why Harrison doesn’t include a couple of these bolts with a $665.00 caliper.
Locating these bolts in the U.S. was probably the hardest part of the entire job; they were not available locally, and small quantities of metric hardware is very hard to find online. We finally obtained a variety of M10x1.0 bolts in different lengths at the Bolt Depot, which has a decent selection of metric fasteners.
Once we found the correct bolts, we ran into two other issues. The mounting holes on the caliper are threaded to accept the M10x1.0 bolts. Since the caliper is made from aluminum, and the bolts are inserted through the fork’s mounting tabs, we were concerned that it would be too difficult to tighten the bolt without stripping the very fine threads.

Since no torque specifications were provided, we were on our own as far as securing the caliper to the bike. So we decided that it would be best to use a bolt long enough to attach a nut on the backside, to ensure that the caliper didn’t come loose and to provide a more secure mounting arrangement.
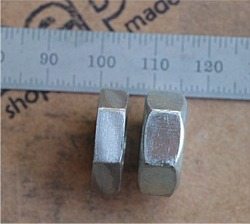
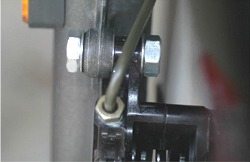
This created a problem, because we discovered that adding a nut in back of the caliper would interfere with the clearance on the new rotor (see Photo 1). The replacement rotor that we purchased is riveted to its carrier, and the rivets are raised just enough to interfere with the nut and prevent the wheel from turning.
We solved this problem by tightening two nuts against each other on the end of a bolt and grinding one of the nuts to make it thinner (see Photo 2). The original nut was approximately 0.25″ thick (6.35 mm) and we ground it down to 0.21″ (5.3 mm). This made it thin enough to allowed enough clearance over the rivet heads.
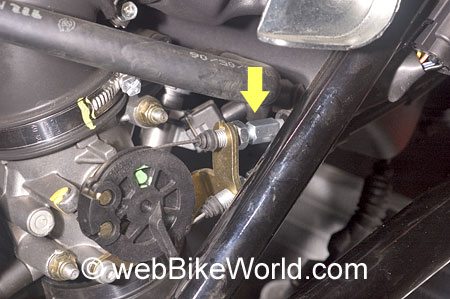
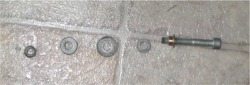
Once we got that figured out, we guessed that the 6 washers that were supplied with the caliper were supposed to be distributed between the two mounting bolts. We assumed that one washer should go under the bolt head, one on the caliper’s outside mounting hole between it and the forks, and one under the nut.
What we didn’t realize was that two of the washers are slightly thinner than the other four (see Photo 3), and that the location of the washers is critical to ensure that the caliper is located so that it is centered over the brake rotor. Again, a simple set of instructions would have saved us a great deal of time and frustration.
Once we figured this out (see Photo 4), we mounted up the caliper, switched over the brake line from the left to right side, and then bled the brake, which is very easy to do using the Actron vacuum pump (see the wBW review). We left the bike overnight with the front brake lever in the compressed position, tied up with a piece of Velcro fastener, to purge any bubbles that may have accumulated in the brake line or the caliper.
The next day we looked over our work and realized that the front wheel was dragging on one side. This is when we discovered that the washers were a different thickness. After some trial and error, we realized that the thinnest washers should be mounted in the middle; i.e., between the fork and the outside of the caliper. This provides the correct clearance so that the brake pads are centered over the brake disk. It seems logical now, but the without instructions, and with similar-looking washers, it wasn’t obvious at the time.
We took it easy for the first couple of rides, getting the feel of the new brakes. Our first impression was that the pad compound was very hard, because there was little initial bite. After several hundred miles, the pads seem to give a slightly better feel.
However, the front brake really doesn’t have a noticeably different feel than the original equipment unit, which is a bit disappointing. It is much more powerful than the original, and it can lock the front wheel at any speed. A daring rider can actually bring the rear wheel off the ground in a “stoppie”, which is quite a feat on a bike with the relaxed geometry of the R65. But it would be nice to have more initial bite and less effort at the lever. Possibly a new master cylinder would resolve this problem, but it’s too expensive to try without confirmation that it would make a difference.
The Bridgestones are up to the task, and once warmed up, they provide about as much grip as one is likely to get from a bias ply tire of 1980-90’s design. The biggest test is in coming down the steep hill to the street where the webBikeWorld offices are located. This is where the original Brembo brake really failed us – coming downhill at speed, the bike simply felt like there was no way it was going to stop, no matter how hard the lever was squeezed. The Harrison caliper easily has enough power to stop the bike and overcome the additional force of gravity in this situation.
Conclusion
The Harrison Mini-6 is a beautiful looking unit and provides strong braking power. Whether it’s worth $600-700 to get the benefit is up to the individual. On one hand, we’re disappointed that it doesn’t provide better feel and lower effort; on the other hand, the ability to stop the bike from higher speeds has definitely been improved.
Note: For informational use only. All material and photographs are Copyright © webWorld International, LLC – 2000-2011. All rights reserved. See the webBikeWorld® Site Info page. NOTE: Product specifications, features and details may change or differ from our descriptions. Always check before purchasing. Read the Terms and Conditions!
| Product Review: Harrison Billet Motorcycle Brake Caliper | |
| Available From: Harrison Billet Colors: Black anodized, clear or polished. Made in: England |
Suggested Retail Price: Approx. $665.00 (£306 + 2.6% credit card transaction fee + £53 shipping; see the xe.com currency converter) |
| Product Comments: CNC-machined, appears to be very good quality. Very nice black anodized finish. Approx. 30% lighter than stock Brembo caliper. Provides same initial bite and overall feel, but has more stopping power at the limit. Fitments available for BMW, Ducati, Japanese, Harley and custom. | |
| More: wBW Motorcycle Braking Tips | BMW R65 Page | Fitting Wider Motorcycle Tires | |