

The Neutrino fits almost anywhere, depending mainly on access requirements.
In reality, this should be minimal once everything is connected.
The module is completely sealed and only the connection strip might need basic protection from the elements.
That will depend on its mounting location; silicone grease or a small protective cover of some sort addresses this requirement.
I reused a strip of play-putty from a Dispatch 1 installation…
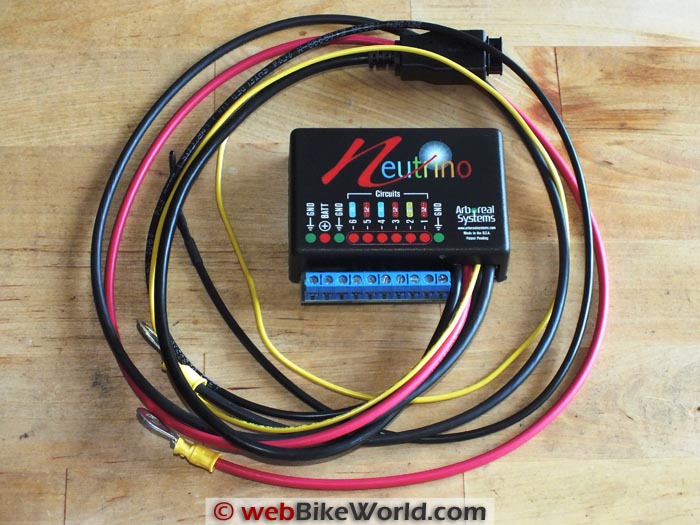
Four integrated leads are used for power, the external sensor and a 12V+ DC trigger.
Positive and negative leads are 10AWG with round terminal connectors and measure 71 cm (28 inch) each.
The yellow power sense (trigger) wire measures 61 cm (24 inches) long, while the black sensor lead is 68.5 cm 27 inches) in length. Last but not least is the USB/BT lead at 37 cm (14.5 inches) long.
The Neutrino prior to installation.Sample Installation: 2014 BMW R 1200 GSW
Two easily accessed locations are available on this bike.
One is on top of the electronics under the front seat section and the second in the vicinity of the TPMS module mounted to the rear fender (now readily accessed thanks to the large cut-out in the deck component) provided options.
For the initial installation, the underseat location was utilized with a small rectangle of plastic sheet used as a floor and insulator from the electronics directly below.
The main power leads are encased in a common length of Flexo F6 wrap and routed between the major OE harnesses then down along the edge of the shock and back up to the battery housing area.
The sensor and USB leads route out the left side, with the long sensor lead running back along the rear section of the trellis frame guided with two small black adhesive cable tie mounts.
The USB lead turns slightly upwards so it can be secured with 3M Dual-Lock to a flat spot on the deck component below the left corner of the front seat section.
Outside of one new lead run forward, the existing Dispatch 1 wire sets were retained although the 90-degree co-axial connectors were cut off to facilitate the direct wire connections. A few spare Dispatch 1 power leads are still stored on the shelf as needed anyway.
Sample Installation: 2014 BMW F 800 GS Adventure
Unlike the Dispatch 1 black box that ended up mounted in the back frame section on the original F 800 GS and then externally sheltered from the elements inside a small weatherproof camera bag, on the new GS Adventure model, the Neutrino is mountable almost anywhere.
And that even includes the real-estate-limited F650/700/800 series Beemers.
But for expediency and easy access, I mounted it to the proven spot on top of the air box cover.
It was oriented forward to facilitate installation of the main leads (encased in F6 wrap) and the accessory leads (colour coded and labeled) as they make their entrance from the sides with the space between the battery and air box acting as the “organized wiring” area.
Again, all existing six leads I still had available from the Dispatch 1 were used.
Although a couple of hours on a warm late summer afternoon was time well spent cleaning up the wiring runs for a bit less clutter overall.
When air filter servicing is required, the Neutrino module lifts off its hook-and-loop base and when moved forward slightly to lift the wiring bundles out of the “canyon”; the air box cover screws are accessible.
Once I install a small lightweight lower-profile Shorai battery (a winter project), the module will fit in a small housing on top.
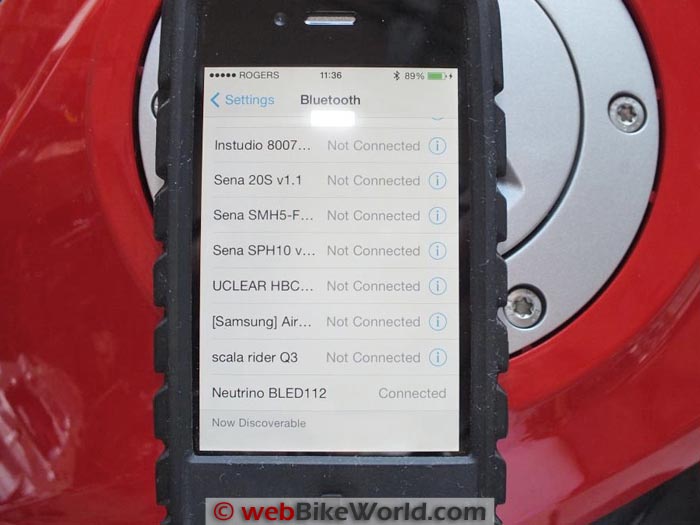
First iPhone Bluetooth interaction with the Neutrino.Functions and Performance
With the smartphone connected to the Neutrino module using a direct USB connection or the wireless Bluetooth connection, initial set-up of the Neutrino can be accomplished using the installed app.
Turn on the ignition and once the phone beeps, confirming the connection for data and power (if the wired USB connection is used) and the Neutrino can be launched.
The wireless process is similar to any other pairing, although the use of Bluetooth LE (Low Energy) makes the whole process faster and seamless.
It should take less than five seconds (you might actually see the one-time detection of the module displayed on the Bluetooth device listing before it disappears) before the connection is made.
Like the Dispatch 1, multiple Neutrino modules can be installed on different platforms and managed by one controller (smartphone with app), although only one system at a time.
In having two modules installed on two different motorcycles, once the ignition is off on one motorcycle the app (left running) immediately connects to the second once its ignition is on.
And in speaking of the controller or smartphone, don’t forget that if dynamic or ongoing management of the system is to be done, then the smartphone needs to be accessible.
And of course, gloves that are or can be fitted with a touch sensitive ability…even for one finger.
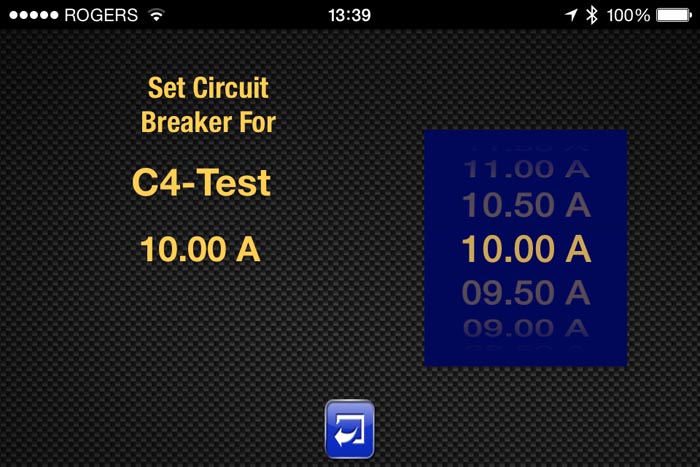
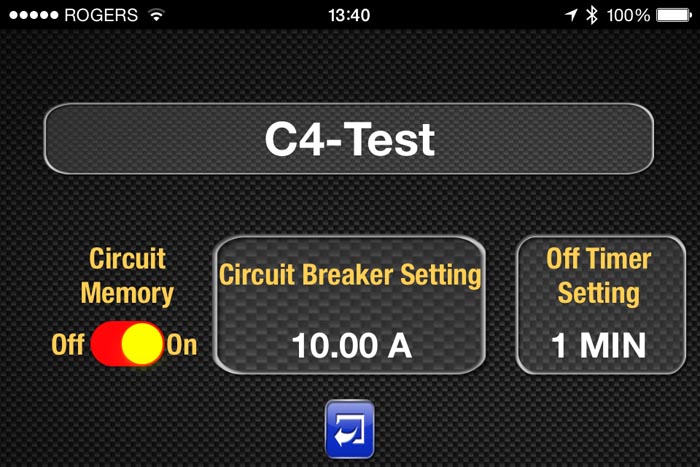
Circuit breaker settings for the “C4-Test” circuit named above. Changing circuit memory.Neutrino Cockpit Main Operational Screen
Regardless of a wired or wireless connection, once initiated, the lower screen indicator should go from a red “Not Connected” to a yellow “Connecting” following by a green “Connected” (Note: this sequencing is key).
Once connected, Neutrino module data along with smartphone sensor data appears on the screens…the Neutrino world is now at your fingertips!
On the opening or main operational screen the thin uppermost bar will have the usual smartphone status info.
The next bar down is Neutrino information and left to right it shows or will show Voltage, Heading, Altitude, Temperature, along with a Units icon for accessing another setup screen.
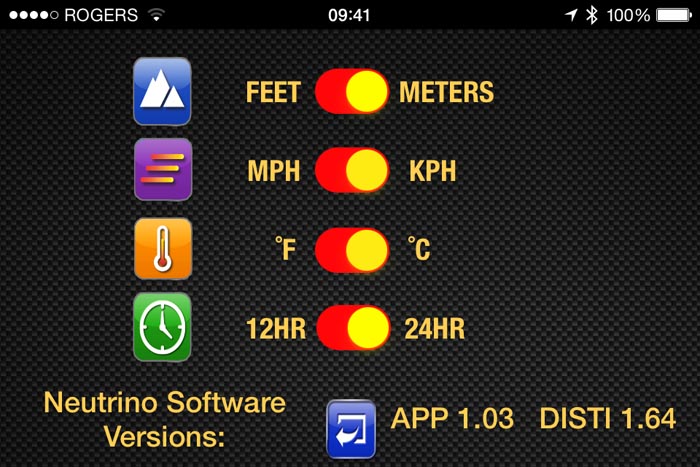
Tapping on this Units icon brings up the Units of Measure screen with Distance (feet/metres), Speed (MPH/KPH), Temperature (F/C) and Time (12/24 H) slide options — set them all to one standard or play mix-and-match — the choice is yours.
Touch the blue “Return” icon to go back to the main screen.
Circuit Configuration and Management
Knowing that the user will read the Neutrino Installation Guide and the Owner’s Manual (also available online), a few minutes of visual orientation and finger exercises checking out the screens, logic-based adjustment boxes, scroll wheels and slide controls brings it all together quickly.
The layout is intuitive and full of shortcuts — lots of them, all obvious and all effective.
But in starting at the start or main screen tap any of the six circuit boxes to bring up the respective circuit adjustment screen; another tap on the gear icon on the lower right brings up the circuit configuration screen.
Naming the circuit (at the circuit configuration screen, tap the default circuit name display), the keyboard appears on the lower part of the screen, type in the desired name (up to 16 characters), tap “Done” and move to the next setting.
Note that the app can be launched and setting changes made at any time.
But changes will only be saved to the module when the App-Device-Module link is active as indicated by the green “Connected” status display on the bottom of the main screen.
Using the Neutrino
When the motorcycle’s ignition is turned on, the Neutrino will make sure that power and trigger wire levels are good and only then activate the circuits as programmed.
With the motorcycle running, the C1 and C3 USB outlets are activated, as are the Denali DM1 LED (review) which are installed on my bike.
These lights serve as always-on DRLs and night-time augmentation with their circuit (C5) programmed for “PWM” (Pulse Width Modulation) mode.
And the output slider is set to ~30%, enough to form a highly visible lighting triangle in front while low enough to use at night in built-up areas without issue.
As warm days become cold days, the 20A heated gear circuit gets more use.
In PWM mode, a direct connection to my Powerlet RapidFIRe jacket liner (review) is made with output managed directly via the circuit’s slider control on the Neutrino app screen.
Alternatively, if my phone is tucked away in a pocket or not taken for some reason, it is a simple matter before departing to change the circuit to “Switched” with memory “On”.
This is so that power is available once the motorcycle is running, with the handlebar-mounted Powerlet wireless heat controller providing output modulation to keep things cozy while in the saddle.
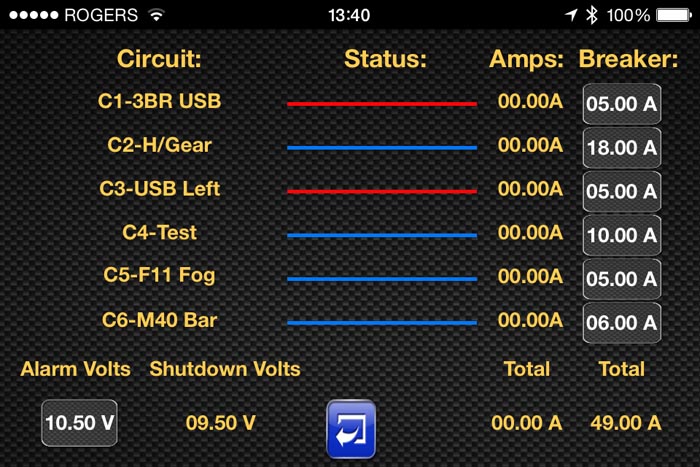
Global Electrical Settings: A global view or snapshot, preferably on one screen is good; this is where the previously identified Master Electrical Page comes in.
Tapping the “Voltage Indicator” display in the upper left corner brings up a grid view of the system with circuit status, current amperage draw by circuit and total amperage draw data shown.
System Voltage Alarm settings can be adjusted here as well; tap the “Alarm Volts” button on the lower left and a scroll wheel comes up, providing the means to set a voltage threshold and if this threshold is detected, the system will let you know.
Activating this option also initiates the Automatic Shutdown Voltage that is set one volt lower than the alarm setting.
Accordingly, any of the circuits designated as “voltage dependent” will be shut down under this feature. Lots of safeguards, but a bit of forethought is needed.
System Diagnostics: Six small LEDs on the “porch” base of the circuit board (one for each circuit) light up if active: amber for normal operations and red for a short circuit.
With the app and in activating a circuit, the thin horizontal bar changes from blue to red.
If there is a short circuit, the Voltage Indicator will turn red, along with the corresponding LED on the module. In this instance the circuit will immediately shut down and stay down until the short or fault is rectified.
Finally, if a circuit is overloaded — say a peak 6A load when the circuit breaker is set for 3A — a flashing Red indicator will show…setting the circuit breaker level higher fixes this.
Neutrino Cockpit main operational smartphone app display screen. Display for setting the units measurements. Neutrino Cockpit smartphone app composite electrical status screen also shows amps and voltage.Next: Part 3 Conclusion
Owner Comments and Feedback
See details on submitting comments.
NOTE: See Part 3 for the Owner Comments and Conclusion.