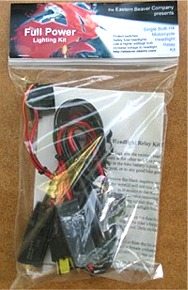
Ready-made wiring harness and relay kit makes it easy to add relays to a motorcycle headlight.
Adding a relay can improve headlight output, reduce load on switches and allow higher wattage bulbs to be used with reduced fear of overloads.
Eastern Beaver also has relay kits for dual H4 bulbs and universal relay kits for driving lights, horns and other electrical accessories.
Motorcycles are notorious for having weak electrical systems and switchgear that hasn’t really kept up with the demand for high output headlight bulbs, heated vests and gloves and other accessories.
The bottom line for motorcycle owners is to be careful about electrical overloads.
A fried wiring harness can be incredibly costly to repair.
Note that relays aren’t a cure for old or overstressed motorcycle wiring.
Their job is to supply all possible voltage to the headlight bulb (or other accessories) and to take the load off the original equipment switchgear.
Owners who have installed headlight relays frequently report brighter light, even from standard H4 50/60 Watt bulbs.
If you’re planning on installing a high output bulb, like a 90/100 Watt or higher, relays are a necessity, along with other potential issues. For example, incandescent bulbs get very hot; a 100 Watt halogen bulb can burn through plastic in no time at all.
Your motorcycle’s headlight shell may not be able to dissipate the extra heat, so be careful. Eastern Beaver has adiscussion about potential issues when using higher Watt bulbs, and it’s worth a read prior to buying that 100/130 Retina Blaster.
Eastern Beaver Headlight Relays
Relays can help increase the life of a stock motorcycle headlight bulb and switchgear. An electrical relay is basically a remotely controlled switch that’s turned on and off by the normal headlight switch.
When a relay is wired into the motorcycle’s headlight wiring harness, the motorcycle’s handlebar switch sends an electrical impulse to the relay, and the relay clicks on and sends power to the headlight directly from the battery.
This means that the handlebar switch only has to do a small amount of work by sending a signal to the relay, and the hefty relay switch routes the juice directly from the battery to its customer – in this case, the headlight (For a much better and more detailed explanation, see All About Relays by “Mike”).
A few motorcycles are supplied with factory installed relays for the headlights, and less frequently for the horn or other electrical devices. Relays are useful for switching any electrical accessory that needs lots of power – accessory driving lights, for example.
Motorcyclists have reported much louder horns after installing a relay in the circuit that feeds power to the horn, and if you’d like to take advantage of something like the extremely loud Fiamm Freeway Blasters, a relay is essential.
The bad news? Well, installing a set of relays and a wiring harness from scratch is more complicated than changing a fuse, which makes it beyond my electrical capability.
Power, ground and other wires must be correctly installed for the devices to work properly. I’ve been meaning to install headlight relays on my motorcycle for some time, and I’ve read various articles describing the procedure, but I’ll admit that I just haven’t been able to figure it all out.
So the Eastern Beaver headlight relay wiring harness is made for people like me. It’s a ready-made wiring harness assembly that has everything necessary for connecting a pair relays to an H4 motorcycle headlight. A dual H4 bulb kit is also available for $5.00 more.
Headlight Relay Installation
The harness includes two high-quality Matsushita automotive grade 20-amp plug-in relays, each protected by a heavy plastic water resistant cover.
It’s pre-wired with H4 male and female headlight plugs and 14 gauge power and ground leads that have eyelets correctly sized for most motorcycle battery terminals.
The power lead also has a built-in quick disconnect, which makes it easy to feed through the motorcycle’s headlight shell (see below), and it includes a a 20-amp inline fuse in a water resistant housing. The bulk of the harness is sheathed in a heavy shrink wrap, so the product is ready to use, and it comes with easy-to-follow instructions.
I was able to install the harness in less than 20 minutes with no problems. I had to remove the fuel tank, because I wanted to secure the harness to the bike’s backbone frame. But it may be possible to install the harness without having to remove the tank if your bike has a different style frame.
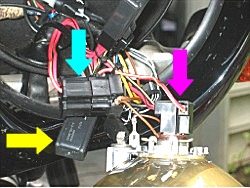
The harness must be connected to motorcycle’s headlight, which means removing the headlight surround if it’s a naked bike, or digging into the fairing on a sportbike.
The hardest part of the installation is feeding the power and ground leads back out of the headlight shell.
Some bikes have very little room in back of the headlight reflector, but there’s usually a rubber grommet that feeds the headlight wiring out the back of the headlight shell and helps prevent moisture intrusion.
The addition of the quick disconnect is a great idea. It allows the inline fuse holder to be temporarily disconnected so that the 14 gauge power and ground leads can be easily slipped through the grommet without having to also having to squeeze the bigger fuse holder through it also.
I found that a quick spray of silicone can help lube the grommet and make it easier to pull the wiring without damaging anything.
Connecting the harness into the headlight’s wiring is easy – simply remove the H4 headlight connector from the back of the bulb, plug it into the female connector on the harness, and then plug the male connector from the harness back into the bulb.
That’s all there is to it. There’s no messing with the relays at all, because they’re pre-wired, mounted and ready to do their duty.
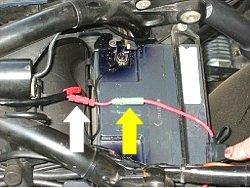
After running the wiring back along the bike’s frame, re-connect the power lead with the fuse holder and attach it to the motorcycle’s battery. The ground can be connected either to the negative terminal on the battery or to a good ground, or “earth” connection on the bike.
I used this opportunity to clean up my bike’s battery terminals and give them a coat of Permatex battery post coating, and I added the relay ground wire to my negative battery terminal.
The harness is about one meter long, which was about 30 cm longer than necessary on my bike.
I considered looping the excess and using a cable tie to secure it somewhere under the seat, but I didn’t like the idea of a bunch of loose wire hanging around, so I cut it to length instead and spliced it back together using the fantastic Posi-Lock connectors (see the wBW review of Posi-Lock Connectors).
I used a few cable ties to secure the harness to the bike’s already crowded frame and that was it.
The switchgear worked the first time with no problems; if I listen carefully, I can hear the little “click” noise as the lights are cycled on and off and from low beam to high.
The motorcycle’s headlight seemed to be much brighter and “whiter”. It’s too bad I didn’t take a before/after nighttime photo… Now I can’t wait to get a more powerful bulb!
Conclusion
The Eastern Beaver headlight relay wiring harness is a touch on the expensive side, but it probably saves at least an hour or more of time if you had to manufacture a harness — if you know what you’re doing (and I don’t!).
It uses high-quality components and it’s very easy to install, so it’s definitely worth it. I’m planning on also installing one of their Universal Relay Kits to wire up a couple of Freeway Blasters, and I’ll report on that when the job is completed.
More: Eastern Beaver Horn Relay Kit | wBW Motorcycle Lighting Page | Motorcycle Maintenance and Repair Articles
| wBW Review: Motorcycle Headlight Relay | |
|---|---|
| Manufacturer: Eastern Beaver Co. | List Price: $59.99 USD (single H4); price includes worldwide shipping. |
| Colors: N/A | Made In: Japan |
| Review Date: 2006 (?) | |
Owner Comments and Feedback
See details on submitting comments.
From “R.E.” (March 2013): “Purchased a headlight relay for my ’88 BMW R100RS a couple of years ago but never seemed to have the time to put it on. Like you (the editor) I felt somewhat uncomfortable messing with my bike’s wiring system.
Started a new job in July of 2011 at a location about 140 miles away from home. Ride down on Sunday night and return home on Friday evenings required quite a bit more night riding than I had previously done. That, coupled with the facts that it was over a very remote stretch of highway between Mountain Home, Idaho and Elko, Nevada and through open range (with predominately black cattle on the roadways!) prompted me to get off my butt and get the relay installed.
Jim at Eastern Beaver was very helpful in determining which relay was most appropriate for my bike. High product quality and excellent customer service will always get my return business. I solicited the assistance of my neighbor, who is more adept at not letting the smoke out of wires, to install the relay.
Alas, having done it during the day we did not even think about before/after pictures until after the installation. Installation was very straight-forward with excellent instructions provided on the Eastern Beaver website (not including paper copies of instructions keeps the shipping costs down).
Build quality is exceptional. No installation issues whatsoever. Even felt comfortable to do the work myself with the excellent oversight of my neighbor.
Hard to quantify the light output without a light meter reading. However, I can confirm that the overall quality of the light was significantly brighter than stock, as is the extent (distance) of useable light. Riding south that night was a brand new experience. Cattle were visible well over 300 yards away, compared to the previous estimate of just over 150-175 yards. Road signs were much more readable at distance than previously.
I can comfortably say that this lighting upgrade saved my bacon more than once while doing the commute. All this without changing my stock wattage bulb! I can’t recommend this product more highly. Since the time of installation, I have added two more bikes to my stable and a third in the next couple of weeks (my son’s K75S). I’ll be ordering three more relays sets very soon to improve the lighting on these bikes as well.
Thanks for the excellent review on the relays and everything else you provide. Keep up the great work.”
From “S.R.G.” (March 2012): “Jim at Eastern Beaver is cooler than the other side of your pillow. His craftsmanship is second to none and his materials are the best. He has many configurations to choose from.
I just installed his H4 relay on my 1984 CB 700sc and the results are more than I had imagined. I ordered my harness with a circuit which enables me to switch off my low beam at any time (switch not included), and a power tap for running lights which is wired so that my running lights are on when my high beams are on. (you can order them to be on when low beams are on if you wish).
After installation, the output from my stock 60/55W was obvious, but that did not stop me from plugging in the 75/70W that I had waiting in the wings — now we’re talking night vision!!
I have an 100/80W (as yet uninstalled), but I don’t think I will be needing it. I feel bad enough now when I am behind someone in an auto, headlamp on lo beam, and the distinct aroma of the hair on the back of their neck burning wafts to my nostrils. ;-)”
From “J.”: “I rode a black Suzuki 750 for years in Washington D.C., year round. It was almost a daily occurrence to have near accidents when cars coming the other way turned left in front of me. Then I heard about modulators and installed one. I set it up to go high/low 4x second. I then rode several more years, in Wash, DC., and Los Angeles, California. After getting the modulator, I never had a single incident in several years of an oncoming vehicle failing to see me.
In Wash, DC I heard about the modulators from a courier rider. They all rode yellow BMW’s, and every bike had a modulator. What they told me about their experiences mirrored mine; put one on and failure-to-see incidents of vehicles coming the other way dropped to near-zero.
The courier firms also had enough bikes, riders, and mileage that the safety improvement was statistically documented.
At night I ran with the normal low lights on. But I sometimes used the modulator as a “visual horn” if I was worried that I wasn’t being seen.
A hundred bucks and change for a gadget that keeps you alive and whole? What a steal!”
wBW Visitor “K.S.” writes: “Just a note to let you know I purchased a Dual H4 Headlight Relay Harness from Eastern Beaver Company based on your website. The purchase and delivery was the best, it is a quality product, the installation on my 1978 BMW R100RS went fine, and so far it functions perfect. Your site was very helpful and the supplier was an excellent suggestion. ”