
The new Drift HD170 offers very good quality 1080p HD video and a rugged form factor designed for outdoor use.
It is definitely the easiest to use helmet video camera we’ve tried and the live view comes in very handy.
Soon after the Drift X170 video camera review was published on webBikeWorld, Drift released the HD version we had been wishing for.
Fortunately, very little has changed in the excellent Drift software and hardware, which makes the task of writing this review of the HD 170 version a lot easier!
Just about everything that was written about the X170 is valid for the HD 170, including all of the comments about form and function, so please refer to that review and the included videos for comparison with the HD 170.
There are really only two major differences between the X170 and the HD 170: The HD version uses a 3.7 Volt lithium-ion battery (4 x 21 x 13 mm) with a claimed 1,110 mAh instead of the two AA batteries in the X170.
And the HD 170 takes video in 1080p, 720p or standard definition (WVGA) formats, while the X170 video is a wide format only at 720×480 pixels.
Both cameras use the same soft-touch, semi-ruggedized body, which measures 133 mm long by 50 mm thick by 33 mm wide and weighs 172 grams with the battery, a 4GB SD card and half of the helmet mount adapter attached to the bottom.
Otherwise, everything in the HD version appears to be identical to the original X170, although we no longer have the X170 here for direct comparison.
Oh — and there is one other difference: the price.
The Drift X170 is still for sale at a current list price of $199.99, while the list price of the Drift HD 170 is $329.99, so it’s basically a $130.00 premium for the HD quality of the HD 170 over the X170.
While this price may seem a bit high compared to the average run-of-the-mill digicam, it’s the same as the VholdR Contour HD video camera we reviewed. Also, the Drift HD 170 form factor is specifically designed for outdoor use; i.e., motorcycles, snowmobiles, skiing, etc.
It can certainly take more abuse than non-ruggedized digicams, which basically put their tail between its legs and go whimpering home at the first sign of water or vibration.
Although I’m not sure how it compares to the Panasonic TS-2, for example, a waterproof, dustproof, shockproof HD digital camera with optical image stabilization.
The Panasonic has a form factor more like the GoPro HD than the long and narrow Drift HD 170, and the Drift is nicely suited for mounting on top of a helmet, while the Panasonic is not.
Ease of Use
One of the best features of the Drift video cameras (including the X170 and the HD 170) is their ease of use.
The menu system is very intuitive; one quick push on the rubberized membrane button turns the camera on and another push starts the video recording. It really couldn’t be simpler.
This is a huge difference from the cumbersome and unintuitive menu system on the GoPro HD camera.
The Drift HD 170, like the X170, comes with a simple fold-out sheet with the instructions in 6 languages. But again, the camera is so easy to use that the instruction sheet isn’t really necessary once you’ve browsed through it.
The Drift HD 170 also features the live view in a small color LCD screen on the side of the camera.
The current GoPro does not have a live view, and this is a big difference — and a definite plus for the Drift HD 170.
I discovered a bit of a trick in setting up the Drift HD 170 on the helmet or bike. Make sure the camera is correctly oriented by looking at the LCD screen before starting the video recording.
Look at the camera from the side when it is oriented with the “DRIFT” and “HD170” printed logos towards the top as you’re looking at the camera.
Rotate the lens to align the scene so it is in landscape mode with the top of the scene towards the print and the bottom towards the bottom of the camera.
This may sound logical, but it sometimes isn’t; I found myself recording upside-down more than once after rotating the camera and thinking I had the lens correctly oriented.
This is where the live view really helps, because after you think you have the camera aligned correctly, get on the bike and take a quick 3-4 second video, then pull the camera out of the mount and play back the video on the live view screen to make sure it is oriented the way it should be in the LCD.
When the camera is held with the LCD in landscape mode (lens pointing to the right when you’re looking at the screen) and the Drift logo print at the top and you play back the video and it is correctly oriented, then your planned setup should be fine.
By the way, the Drift HD 170 package also includes the super-handy remote control found in the X170.
This is a basic on/off switch for the camera and all you have to do is wrap the remote control around your wrist with the included hook-and-loop fabric belt and you’re all set.
Very easy and very handy when riding a motorcycle.
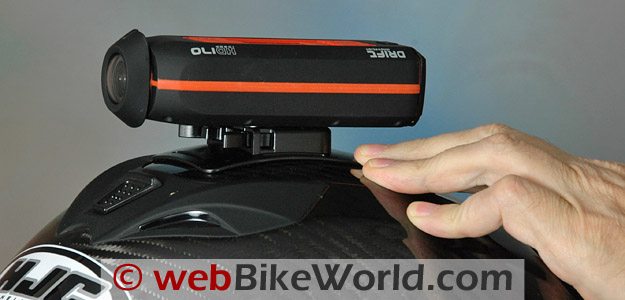
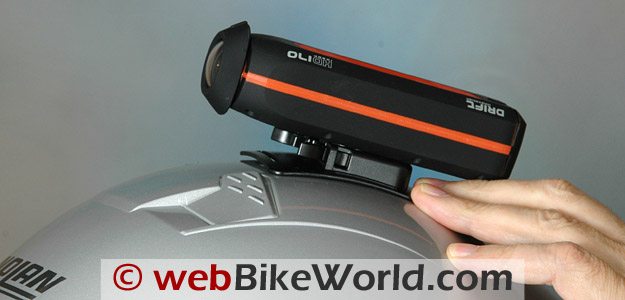
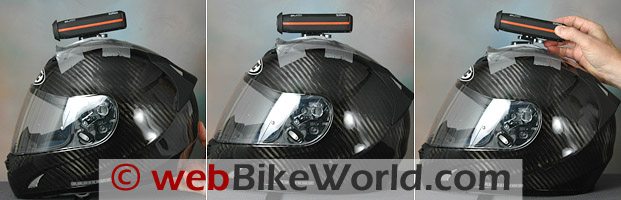
Drift HD170 mounted on HJC AC-12 Carbon helmet (review). Drift HD170 on Nolan N90 (review in process). Note top vents interfere with mounting. Drift HD170 temporary mounts to determine best position (R).Mounting the Drift HD 170
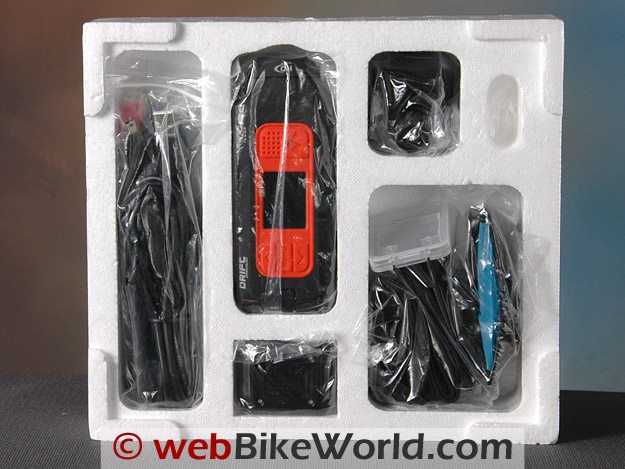
The HD 170 includes the same selection of mounting accessories that are included the X170. Mounting is the weak point for all of the motorcycle helmet video cameras we’ve tried; we just haven’t found the “perfect” helmet mounting system yet.
The camera mounted fine on an HJC AC-12 Carbon, but not on the Nolan N90 or Icon Variant (reviews in process).
There simply is no universal helmet mount that will work on all types of helmets, one of the problems with video cameras.
The HD 170 is much easier to mount on top of a helmet than the GoPro HD, due to the streamlined shape of the Drift. However, the GoPro is easier to mount on the rider’s chest with their accessory harness.
Each format has different issues for mounting, so until we get a high-quality HD video camera in a thimble-sided case, those differences will remain.
The Drift HD 170 has a wide-angle lens (170 degrees in 720p and 127 degrees in 1080p) that rotates through 300 degrees, enough to align the lens at any angle in which the camera body is mounted.
The wide angle takes in so much of the landscape that it can be difficult to determine the correct mounting position for the camera — chances are, you’ll mount it too far forward and pointing too far down.
The basic helmet mount that comes with the camera consists of a male and female clip; one goes on the helmet while the other attaches to the 1/4-20 standard mount threaded hole in the bottom of the camera.
I found that the best way to determine the prime mounting location was by trial-and-error using duct tape (better yet would be gaffer’s tape).
You will need a Phillip’s head screwdriver to loosen and tighten the mount to the camera — don’t try to turn it when it gets tight, or you may strip the plastic teeth that provide the friction to hold the camera to the mount.
The HD 170 had to be mounted much farther back and pointing much higher on top of the helmet than I originally thought, due to the wide angle lens.
But here’s where the live view comes to the rescue again — temporarily mount the camera, get in position on the bike and put on the helmet and take a few second video, then look at the live view to make sure it’s correct.
Once you’ve found the right position, either use more tape to secure the bottom part of the mount to the helmet, or use the hook-and-loop sticky pads that come with the kit.
Nobody I know of wants an ugly patch of semi-permanent hook-and-loop on their helmet though…but duct tape isn’t much better. This is why we can’t say there’s a good mounting system for any video camera yet — at least that we know of.
I also used a suction cup mount with a 1/4-20 screw to mount the Drift HD 170 on the side of the bike. It works well due to the light weight and streamlined shape of the Drift camera.
The video below is in a few parts; the first part was taken with the camera on the helmet, while the second part has the camera mounted on the side of the bike.
Drift HD170 on Suction Cup Mount.Video Quality
The 1080p video from the Drift HD 170 is probably the best quality we’ve seen in any of the motorcycle video cameras we’ve tried.
It’s better than the video from the basic video cameras like the Flip HD or Kodak and possibly the equal of the small digital cameras that incorporate HD video.
It’s certainly not as good as the Canon HV20 or Panasonic HDC-TM700, but for what it is, it’s fine.
The video seems nicely saturated and crisp, with none of the “rolling shutter” effect so apparent in previous motorcycle video cameras we have reviewed, which is a very nice surprise.
The only issue that the Drift HD 170 takes a (relatively) long time to adjust the exposure when going from deep shadows to bright light and back again. In the “neutral” exposure setting, it seems to over expose the video by about 2 stops.
You can see in the video below that when I ride from the shadows into the bright sunlight, just about every light-colored highlight gets blown out for a couple of seconds until the camera adjusts.
This is especially apparent near the beginning of the video, when going from the shady road to the red barn that is featured in all of our video samples.
The Drift HD 170 camera has a ± 1 to 2 stop manual exposure adjustment in the menu system, but playing with the settings seemed to result in videos that were either too dark or too light, so the neutral setting of 0 exposure compensation seemed best for the local terrain.
If you were taking video in snow or twilight, the exposure compensation settings might come in handy.
But for video with a fairly neutral exposure background, like the trees, roads, fields and hills around here, it’s fine, but as soon as it hits really bright light or really dark shadows, it takes a few seconds to compensate.
Other than the exposure, the camera has no manual adjustments or overrides for shutter speed, frame rate or white balance.
Video File Format and Editing
The videos are saved in .mov format, so Windows users may need to download a free copy of the DivX Player to view the videos on your PC.
The files can be easily moved from the SD card by pulling the SD card out of the camera and plugging it into a reader or by attaching a USB cable to the camera.
The camera does not come with an SD card but it will accept SD cards up to 32GB.
The .mov files seem very large; for example, one of our 10 minute videos is 874MB, so figure on roughly a gigabyte every 12 minutes or so.
Buy the largest and fastest SD card you can find. The 4GB card I used became filled during one ride as I took a dozen videos or so; it will hold about an hour of video tops.
We were able to import the .mov files into Adobe Premiere Elements 8.0.1 without problem to edit the video and splice together the 3+ minute selection below.
However, Premiere Elements only saves H.264 1080 video in interlaced mode, so the .mov progressive files are now 1080i, then uploaded to YouTube, where they are compressed.
The actual 1080p video is pretty good — crisp, clear, sharp, albeit with the exposure issues mentioned above and, surprisingly, the post-processed video looks better than the original raw video when played in the DivX Player.
We left the sound exactly as recorded; there is wind noise with the camera mounted on top of the helmet due to the air coming over the helmet, but the sound recorded with the camera mounted via the suction cup is better.
The microphone is covered on the camera and it even has a covered speaker, again a bonus feature compared to the GoPro.
I also recorded the video on some of the same roads used in previous webBikeWorld reviews of motorcycle video cameras so you can compare the differences.
See the previous review of the Drift X170, with comments comparing that camera to the GoPro HD Video Camera Review to learn more about the details and to watch a video of the GoPro HD on the same roads.
Also please read our review of the VholdR Contour HD video camera for a comparison.
Miscellaneous
The Drift HD 170 is claimed water resistant to 1 m, probably enough for any motorcycle rain storms encountered. The large fisheye-type lens is unprotected, so be careful and try not to touch it or scrape it against anything.
Too bad they didn’t include a soft carrying case for the camera…
Buy a high-quality microfiber cloth to clean the lens — you’ll have to clean it often, so take care and don’t use a shirt or T-shirt or paper towel!
The li-ion battery seems to have a very short life; it was half gone after taking about 40 minutes of video.
By the way, the HD 170 also takes still shots but it’s really a video camera only with a still photo capability only if no other camera is available and you really want a still photo.
Here’s a sample photo of the Ducati engine, taken from only about 18″ away so you can see the field of view. The photo has been resized to 625 pixels but is otherwise unretouched.
Conclusion
At this point in time, I’d have to say the Drift HD 170 has the best overall performance and ease of use of any motorcycle video camera we’ve tried to date (although we certainly haven’t tried them all).
It’s so simple and easy to use — and that makes a big difference when you’re main focus is riding the motorcycle.
The video quality, while not broadcast quality by any means, is very good to excellent, and we noticed none of the “rolling shutter” effect. The live view, hidden microphone and speaker and the remote control are a real bonus.
The Drift HD 170 will be released in August, so hurry up and get your name on the waiting list!
More webBikeWorld:
▪ Video Action Camera Reviews
▪ Intercom and Radio Reviews
| wBW Review: Drift HD 170 Video Camera | |
|---|---|
| Manufacturer: Drift Innovation | List Price: $329.99 USD. |
| Color: Black and orange. | Made In: China |
| Review Date: July 2010 | |
Note: Item provided by a retailer, distributor or manufacturer with these Terms and Conditions.
Owner Comments and Feedback
See details on submitting comments.
From “K.D.” (July 2011): “I purchased my Drift HD170 at Amazon in June 2011. Prices are fluctuating a bit, since I was able to get it for $244.78. It’s at that price today, but frequently jumps to $349.99.
I had a GoPro sitting in my cart for months on Amazon, waiting for the price to come down, but decided on the Drift after reading this review and considering the price differential. webBikeWorld hasn’t steered me wrong yet, and I’m still in that camp.
I love it – mostly. The positives far outweigh the negatives, but I do wish I had considered the negatives before forking over the dough, since I probably would have waited for the industry to fix what I think are ridiculously obvious oversights in design.
I’m with “O.R.” (comment below) in my thinking that the manufacturers of action cameras in general are way behind the curve in designing in simple, usability-based features into the firmware and hardware of these cameras. If only Canon, Panasonic or Sony would go after this market – something tells me they’d have a slam-dunk product out by the second generation at the latest.
The resulting videos from the Drift are superb – but you nailed it on the over-exposure note – the default setting was far too over-exposed on my first long test; a ride on a bright, sunny day on Bear Notch Road in the White Mountains of New Hampshire. In and out of the shade caused several instances of seconds-long washouts while the camera adjusted to the changing light.
As an aside: Bear Notch Road is a spectacular ride, one of the nicest 15-minutes you’ll spend riding the White Mountains. It’s closed in the winter, so take advantage when it’s open. Take it from 302 in the North to 112 (the Kancamagus Highway, another vista-filled ride) in the South.
I had no problem at all mounting the camera to my Shark RSi helmet (review) – I mounted it on the right side, since mounting on the top would have blocked the vent.
The remote is a godsend, although I wish it would do more than merely stop and start recording (it won’t power-on/off the camera, and it would be great if the remote itself had an LED that would light when the camera was recording).
Getting the data off the camera is simple enough, either via USB by connecting the camera to your computer, or if you’ve got an SD-card reader in your computer or attached, you can use that by popping the card out of the camera. I’ve found the SD-reader in the computer (a Macbook Pro) is much faster at getting the data off the card.
I move the files locally onto the computer before importing them into iMovie or FinalCut, since that allows me to get the card back into the camera sooner – importing 5-10 GB of video can seemingly take forever, even on a fast machine.
As for the negatives: The mic picks up nothing but wind, so unless I plunk down $19.99 for the external mic, I turn down the mic sensitivity to the lowest setting. Based on the endorsements of two riders who post well-regarded POV videos on YouTube (halfthrottle and 808yewtube, check out their stuff – some of it is fantastic!), I’ll be investing in the mic (and, to protect the camera because the mic requires you open the back of the camera, a silicon end cap for an additional $14.99.
That unprotected lens really makes me wonder if Drift did any thinking at all before they released this “action” camera to market. Did they really think that exposing the lens to the many things that come flying at us during an average ride on the slabs was a good idea? Much less the junk that this camera would be exposed to on the helmet of an enduro rider!
Take a look at your face shield after a few hours on the road – you want all that crap hitting your camera lens?
Ok, now drift has just released to market a “waterproof case”, which looks more like a heavy-duty plastic bag with a screw-on lens cap on one end, and a bag clip on the other, all for the low, low price of $39.99. And, from what it appears, there’s no way to connect the external mic while the camera is in this “case”. If this is true, I’ll be mighty disappointed – since the mic seems to be the only way one can narrate the video in real time.
Would I buy it again? Maybe. But, I am considering a second camera, and perhaps a third, to capture multiple angles of the same ride, and am uncertain whether to go with another Drift, or to give one of the competitors a try, like the Contour GPS. Sure, GoPro and Contour are much more expensive at first, but after you’re done buying the accessories (did I mention that the Drift suction cup mount has to be purchased separately, too?), the price differential becomes less of a motivator, and the feature comparisons are much more apple-to-apple.”
From “O.R.” (05/11): “All its qualities notwithstanding, the HD 170 has what I consider two major flaws in everyday maintenance, which would have been a deal breaker, had I been aware of them before buying.
If you remove the battery, the date and time will be lost, and you’ll have to re-set them every time. I have bought the extra capacity battery, and an AC charger, because I do not plan on carrying my computer along when traveling for USB charging (who does?) But I will have to go through the hassle of setting the date and time every night.
There is no way to set sequencing file numbering. When you empty the SD card, the camera will start over numbering the files at File0001.mov, with the end result that you will have to change the name on the card before copying the files to your computer, if you don’t want to erase previous videos already downloaded (who does?). Sounds petty, but it’s not.
It’s totally infuriating. I mean, photo camera companies have learned how to deal with these two simple problems many years ago. But Drift “Innovation” can’t do it? Give me a break.”
Editor’s Note: I never use the date function on video or still cameras anyway, so that doesn’t bother me. Regarding the file numbering, I create a folder on the computer, give it a folder name, then drag the videos from the SD card to the folder.
Update From “O.R.” (05/11): “Apparently, Drift Innovation will release a new model of the HD 170 with an internal battery to keep the date and time, and the option to chose sequential file numbering. They have also developed a waterproof clear case, which will protect the front lens as a side benefit. So, my complaints were not totally excessive after all. I think that’s good news for future HD 170 buyers.”
From “R.G.” (10/10): “Excellent review. I ride an ’03 Ultra Classic with 103,000 miles. I initially bought the “Race Optics” camera for over twice the price. What a piece of *&^%! I have had nothing but problems and the video is fair at best. I often get “sun blot” spots for no reason. The video will go bright yellow in the middle of recording.
I appreciate the video of both helmet mounted and suction cup mounted. As you probably well know HD riders have an aversion to the safer helmets you metric riders use (our egos get in the way of our own best interest). I did an 11,000 mile, six week coast to coast ride last year.
I bought the Race Optics camera to record some of my “bucket list” trip. Beartooth Hwy, Going-to-The-Sun Road, Devils Tower, Hwy 22/MI, Hwy 12 ID, Hwy 1/PCH etc. Even came face to face with Buffalo while waiting in line for the tourist to take 1,000 pics of the same buffalo.
NONE of the video came out to very good quality. Again, thanks for the review. I am looking forward to using my new Drift HD 170. I just hope the suction mount works on the faring and I can record some excellent riding videos. Living in North Carolina and so close to excellent riding I can have a lot of fun with it.”
From “C.B.” (7/10): “Nice review. Is it possible to power the Drift HD 170 via USB cable during use instead of relying on just batteries?”
Response From Drift: “The short answer is yes. The long answer is…… The customer can use a 12V USB adapter, if there is a 12V socket on the bike.
If this is socket is not present they can hard-wire a mini USB cable to the the battery. They would need to know what they are doing for this option!”